Fuses and relays Hyundai Solaris (RB), 2010 - 2022
Most of the power supply circuits of the electrical equipment of the Korean sedan are protected by fuses. Powerful current consumers are connected via relays. The protective elements are installed in mounting blocks, which are located in the car interior and engine compartment.
The information is relevant for Hyundai Solaris (RB) models 2010, 2011, 2012, 2013, 2014, 2015, 2016, 2022 with gasoline engines 1.4L R416V, 1.6L R416V.
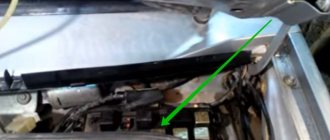
In the engine compartment
Located near the battery.
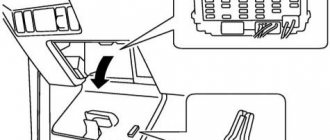
To access the mounting block located in the engine compartment, do the following.
1. Press the latches of the mounting block cover...
2. ...and remove the cover.
| Solaris engine block fuse diagram | ||
| № | Decoding | Current, A |
| 1 | Reserve | — |
| 2 | — | |
| 3 | Gasoline pump | 15 |
| 4 | Sound signal | 10 |
| 5 | Power windows, hazard warning switch, central locking | 50 |
| 6 | Heating system control unit | 40 |
| 7 | Electronic engine control unit | 30 |
| 8 | Ignition switch, engine start and stop button | 40 |
| 9 | 50 | |
| 10 | Air conditioner | 10 |
| 11 | Reserve | — |
| 12 | — | |
| 13 | Supply system | 15 |
| 14 | Camshaft Position Sensor, Oxygen Concentration Sensor | 10 |
| 15 | Electronic engine control unit | 10 |
| 16 | Reserve | — |
| 17 | Instrument cluster, tail lights | 10 |
| 18 | Reserve | — |
| R1 | Reserve | |
| R2 | Horn relay | |
| R3 | Ignition switch relay, engine start and stop buttons | |
| R4 | Air conditioner relay | |
| R5 | Ignition interlock switch relay | |
| R6 | Fan Relay (Low Speed) | |
| R7 | Fan Relay (High Speed) | |
| R8 | diagnostic connector | |
| R9 | ignition switch | |
| R10 | ignition switch, engine start and stop button | |
| R11 | emergency braking warning | |
| R12 | electronic engine control unit | |
| R13 | Fuel pump relay | |
| R14 | Reserve | |
| R15 | Radiator fan relay | |
The main fuse is installed on the side wall of the mounting block.
| Purpose of main fuse fuses | ||
| № | Protected circuit | Current, A |
| 1 | Tail light relay | 50 |
| 2 | Reserve | — |
| 3 | Reserve | — |
| 4 | Generator | 125 |
| 5 | Hydroelectronic ABS module, diagnostic connector | 40 |
| 6 | Hydroelectronic ABS module | 40 |
| 7 | Heated rear window relay | 40 |
| 8 | Fan relay | 40 |
| 9 | Reserve | — |
In the cabin
To access the fuse mounting block located in the passenger compartment, do the following. 1. Pry the recess in the decorative cover of the mounting block with your fingers and, overcoming the resistance of the latches...
2. ...remove the cover from the instrument panel.
General view of the block.
| Diagram of where the fuses are located in the interior block | ||
| № | Description | Current, A |
| 1 | Heated windshield | 15 |
| 2 | Socket for connecting additional equipment | 15 |
| 3 | Solaris cigarette lighter fuse | 15 |
| 4 | Egnition lock | 10 |
| 5 | Front airbag deactivation warning light | 10 |
| 6 | Airbag | 10 |
| 7 | Hazard switch | 10 |
| 8 | Reserve | — |
| 9 | — | |
| 10 |
| 15 |
| 11 | Reserve | — |
| 12 | Rear fog light | 10 |
| 13 | Front fog lights | 10 |
| 14 | Battery saving relay. The function of automatically turning off the side lights after removing the key from the ignition switch (lock). | 10 |
| 15 | Brake lights | 15 |
| 16 | Instrument cluster | 10 |
| 17 | Security control module | 10 |
| 18 | Hydroelectronic module of the anti-lock braking system ABS | 10 |
| 19 | Reversing light switch | 10 |
| 20 | Immobilizer | 10 |
| 21 | Left headlight | 10 |
| 22 | Daytime Running Lights | 10 |
| 23 | Hazard switch | 15 |
| 24 | Electronic key control module | 25 |
| 25 | Reserve | — |
| 26 | Engine start/stop button | 10 |
| 27 | Vehicle speed sensor | 15 |
| 28 | Ignition coils | 15 |
| 29 | Power windows, sunroof | 10 |
| 30 | Windshield wiper, windshield washer pump | 25 |
| 31 | Door lock control unit | 20 |
| 32 | Locking power windows | 25 |
| 33 | Heated front seats | 15 |
| 34 | Reserve | — |
| 35 | Interior lighting, air conditioning | 10 |
| 36 | Audio system | 20 |
| 37 | Rear left lamp, license plate lamps, left headlight | 10 |
| 38 | Right tail light, right headlight | 10 |
| 39 | Starter relay, anti-theft alarm | 10 |
| 40 | Right block headlight | 10 |
| 41 | Power window control unit, left rear power window switch | 25 |
| 42 | Power window control unit, right rear power window switch | 25 |
| 43 | Heated exterior mirrors | 10 |
| 44 | Air conditioner | 10 |
| 45 | Reserve | — |
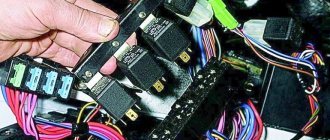
| Relay modules on the back of the block | ||
The cigarette lighter does not work on the Hyundai Solaris: repair
Cigarette lighters in modern cars are needed not only for their intended purpose. The presence of various gadgets, for example, requires additional power sources for recharging. This need can be satisfied by just such a device available on the Hyundai Solaris.
Since one socket is not enough, you have to experiment with splitters, adapters, and sophisticated devices . Which sometimes leads to device failure, just when it is so needed. If someone has not used this attribute at all before, they may encounter it malfunctioning at the most inopportune moment.
Causes of cigarette lighter failure and their solutions
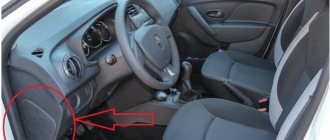
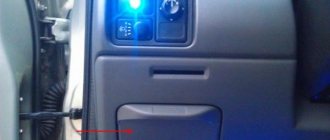
The design of the device is such that it always works in conjunction with a 12V outlet . They are located on one panel, separated by USB and AUX , in front of the gearbox gear shift knob. The non-working state of one indicates a lack of power in the other.
The cigarette lighter is connected to the same circuit as the 12V socket.
If, when connected to the cigarette lighter socket, the gadget does not charge, it means that electric current is not supplied.
The electronic device may only respond when the ignition is turned on, when the key is turned to the ACC mark at a certain level. When the problem does not disappear even if the necessary conditions are met, then you need to start repairing.
Cigarette lighter and 12 Volt socket.
Now it will be easier to determine the reason. If there is no power at the cigarette lighter outlet, it is possible :
- The fuse has burned out (in the car interior);
- Electrical wiring is damaged;
- One of the sockets needs to be replaced with a new one.
Replacing the fuse
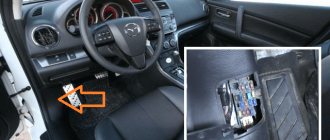
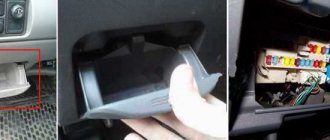
A simple procedure that involves determining the exact location of the failed element. On the left side of the dashboard on the driver's side, just below the headlight adjustment buttons, there is a rectangular plastic plug . Gently pull it towards you and slightly up the lid by the recess for your hand.
Below the headlight control buttons is the interior fuse box.
Pull the lid towards you and slightly up.
There is a fuse box built into the niche, one of which is what we need. According to the location diagram, the burnt out element is located in the bottom row, third from the left. The fuse is blue, with a current strength of 15A .
The fuse that controls the cigarette lighter and socket is located in the bottom row, third from the left.
To dismantle, use special plastic tweezers , which are located along with the spare fuses under the hood, to the left of the battery along with the fuse box.
Replacement must be carried out only with an element of the same power. Otherwise, a spare part with a higher current may cause a short circuit and even a fire in the wiring.
Repairing the first type of fault will usually be enough to restore the functionality of the cigarette lighter.
Video about replacing the fuse with a socket and cigarette lighter in a Hyundai Solaris
Repairing the wiring supplying the cigarette lighter
In order to carry out this procedure, you need to go to a service station or find a suitable electrician. You won't be able to deal with this on your own. The only nuance that you can solve yourself is to check the presence of power at the terminals and open connections available for testing . You will need some equipment:
- tester;
- voltmeter;
- multimeter
Having even a little knowledge in the field of physics or electrical engineering at the school level, you can conduct a superficial diagnosis of the electrical component of the system . If all the wiring turns out to be in perfect order, then the third and only problem needs to be solved.
Replacing the mechanism of a damaged device
It is necessary to purchase a new seat for the plug of our cigarette lighter, which costs about $10. To dismantle a spare part that has become unusable, you must first open the cover of the 12V socket .
The outlet panel can be removed without special tools or much effort.
Using two fingers, the index and middle of either working hand, remove the panel by inserting your fingers into these two holes. The lid will give in easily with a little applied force and move outward . We make a replacement by first removing the terminals from the socket plug, disconnecting the burnt-out part, and installing a new one in its place.
Disconnect the terminals.
We connect the connectors at the end of the wires back and, lightly pressing the socket, fix it in its original position. The renovation is complete.
Layout diagram
The Hyundai Solaris has two fuse blocks. One of them is located directly in the cabin. There are those fuses that can quickly lose their functionality. Accordingly, in the event of a breakdown, you will not need to climb under the hood of the car. To gain access to the block, simply remove the decorative trim using a screwdriver.
The second block is located directly under the hood. It is located on the right side of it. The block is protected by a plastic cover, which can also be removed using a screwdriver. Like any other element, it can become unusable, so it is important to know the location of each of the fuses.
The diagnostic connector is located inside the car. You can find it right in the instrument panel, next to the fuse box. To correctly select and replace fuses, you can rely on special diagrams. The original diagram can always be found on the lid. If it was replaced, you will have to use a schematic representation of the arrangement of elements proposed below.
Replacing fuses yourself
If one of the fuses has done its job and has blown, it is advisable to replace it as quickly as possible. Otherwise, you will not have protection against short circuits, and another vehicle system may fail.
It is strictly forbidden to remove a burnt-out fuse by hand. We recommend that you use tweezers, which are located in the same block. Dismantling of parts is carried out only with the help of it, otherwise there is a risk of damaging the fuses.
The plastic decorative trim is pryed off with a screwdriver so as not to damage it. Do not touch it with your fingers or apply force to ensure that the plastic clips remain fully functional. If the cover is original, it will definitely show a detailed diagram of the fuses.
Use only original jumpers. Don't use items you made yourself. Otherwise, there is a risk of damaging the devices or even causing a fire in the car.
Replacing fuses located in the engine compartment
The replacement operation is carried out in the event of a failure of the fuse or relay located in the engine compartment block. The car owner will need a new part of the appropriate value, gloves and tweezers to remove it.
Work algorithm:
- disconnect the negative terminal from the battery, wait at least 10 minutes;
- release access to the block by squeezing two plastic latches;
- remove the black plastic cover of the unit;
- find the desired element by first determining its location on the diagram, and then finding it on the block. It will be possible to detect a burnt-out one by the melted jumper;
- carefully remove the part with tweezers;
- Insert a new one to replace the burnt one.
As standard, the block is equipped with fuses with short contacts, but if it was not possible to purchase one, it can be replaced with a more popular part with long contacts.
Larger fuses in the motor block may also fail; depending on their rating, they are blue or white. This element can be easily removed with your fingers – you just have to pull the plastic casing. A new one is also installed manually.
Removing and installing the mounting block
If the problem lies in the mounting block, then you need to replace it too:
- Disconnect the connected wire from the negative terminal of the battery.
- We remove the lower trim of the dashboard to gain access to the elements.
- We bend the fixing bracket. Disconnect the wiring harness block from the mounting block. Then we get rid of the top block of the harness.
- To disconnect the side block of the wiring harness, press its lock.
- Using a screwdriver, remove the diagnostic connector from the bracket securing the mounting block.
- We disconnect the relay from the right wall of the mounting block by pressing the fastening latch. We also disconnect the upper and lower blocks from the left wall.
- We unscrew the two nuts securing the mounting block.
- To disconnect the three rear blocks of the wiring harnesses, move the mounting block to the side.
- Remove the mounting block.
This completes the procedure. All that remains is to install the new part and check whether the mechanism works correctly.