18.10.2019
| (No votes) |
Issues discussed in the material:
- What are the main functions of a lambda probe
- What types of lambda probes exist
- Where is the lambda probe located and how many such sensors are there in the car?
- Which manufacturer to choose a universal lambda probe from?
In addition to the well-known parts and mechanisms, the design of the car has many auxiliary elements, the existence of which many car enthusiasts are not aware of. Such spare parts include a residual oxygen sensor - lambda probe. Compliance with the conditions for proper operation and timely diagnosis of the condition of the device will avoid breakdown of the mechanisms associated with it, and will also help save your money.
Read our article about what a lambda probe is, how to identify its malfunction and replace it.
Basic functions of a lambda probe
Rapid technological progress and the accompanying deterioration of the environmental situation have led to the establishment of clear standards regarding the maximum permissible amount of emissions resulting from the operation of vehicles. In order to minimize damage to the environment, cars began to be equipped with catalytic converters (catalysts) - special devices that reduce the amount of harmful substances in the exhaust gases of cars with internal combustion engines.
The catalyst is an important element of the car, but its effective operation is possible only if several conditions are met. Thus, without systematic monitoring of the composition of the fuel-air mixture, the device will quickly fail and lose its operating functions. You can avoid this kind of trouble by using an oxygen sensor, also called a lambda probe.
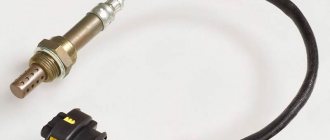
What is a lambda probe? The basis of the name of the sensor corresponds to the name of the Greek letter λ (lambda), which in mechanical engineering denotes the coefficient of excess air in the fuel-air mixture. If the composition of the mixture has optimal proportions, i.e., 14.7 parts of air account for 1 part of fuel, lambda is equal to 1. The range of possible deviations within which the operation of the catalyst will remain effective is in this case minimal: from 0.9 to 1, 1.
Maintaining such accuracy is only possible through the use of power systems with electronic fuel injection and taking into account the presence of a lambda probe (Scheme 1). It turns out that the main function of the device is to inform the computer of an injection vehicle about violations in the ratio of the components of the fuel-air mixture.
Now let's try to figure out where the lambda probe is located. The lambda probe is located in front of the catalyst in the exhaust manifold and is the most important element of the system for determining the residual oxygen content in the exhaust gases. The sensor signal is sent to the electronic control unit of the fuel injection system, which optimizes the mixture composition if the volume of fuel supplied to the cylinders changes.
As a result of the interconnected operation of the listed mechanisms, the amount of fuel is adjusted relative to the amount of air, which allows to maximize the percentage of fuel combustion in the cylinders and ensure efficient operation of the catalyst. It is worth noting that many modern car models are equipped with an additional lambda probe or auxiliary sensors (for example, a temperature sensor that is installed at the outlet of the catalyst). This allows you to control the operation of the catalyst and maintain the correct proportions of the air-fuel composition.
If you do nothing
First of all, the motorist himself will suffer, as fuel consumption will increase, and the exhaust gases will have a toxic smell with strong hues from the pipe. In the case of modern cars with a lot of electronics that know how to check the health of the oxygen sensor, the lock is activated. In such a situation, any movement by car will become impossible. But the worst option is depressurization. The car will not move at all or will have difficulty starting. This can lead to complete engine failure. In the event of depressurization, all gases will enter the air intake channel instead of the exhaust pipe. When engine braking is performed, the probe will detect toxicity and give negative signals. This will completely damage the injection system. The main sign of depressurization is loss of engine power. This can be felt while driving at speed. Also, knocking and popping noises and a smell will be heard from under the hood. Previously, motorists needed to know how to adjust the carburetor. Now nothing has changed - you need to remember how to check the oxygen sensor (VAZ-2112 is no exception).
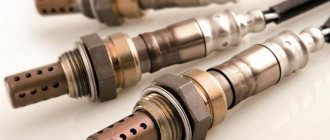
Main types of lambda probes
The following lambda probes may be present in the design of a modern car:
1. Zirconium.
The most popular model, which is made on the basis of zirconium dioxide.
We recommend
“Liquid glass for cars: why is it needed, how much is enough?” More details
The element in question works on the principle of a galvanic cell with a solid electrolyte in the form of a special tip.
The tip, made of ceramic and zirconium, is covered on all sides with protective plates of porous platinum electrodes, which act as current conductors. It is worth noting that the properties of the electrolyte are activated only when zirconium dioxide is heated above +350 °C. It turns out that the lambda probe will give an error if it does not warm up to a certain temperature. The device heats up quickly thanks to the built-in heating structure with a ceramic insulator.
Note! Increasing the temperature to +950 °C can lead to overheating of the sensor and its further damage.
By passing through small gaps in the protective casing, the exhaust gases enter the outer part of the tip. Air, in turn, penetrates into the sensor through a special opening in the device body or a porous sealing cover.
The potential difference is formed due to the movement of oxygen ions through the electrolyte between the outer and inner platinum electrodes.
The voltage on the electrodes is inversely proportional to the volume of oxygen in the exhaust system.
If there is a warning from the sensor, the control unit equalizes the content of the air-fuel mixture components. The voltage coming from the lambda probe changes several times every second, which allows you to optimize the mixture composition regardless of the operating mode of the internal combustion engine.
Depending on the number of wires, zirconium lambda probes are divided into several groups:
- single-wire – equipped with one signal wire, while contact to ground is made through the housing;
- two-wire – have signal and ground wires;
- three- and four-wire - imply the presence of a heating system, as well as control and grounding wires connected to it.
2. Titanium.
Externally similar to zirconium, but in this case the sensitive part of the sensor is made of titanium dioxide. The volume resistance of the device changes taking into account changes in the amount of oxygen in the mixture: from 1 kOhm with a rich mixture to more than 20 kOhm with a lean mixture. At the same time, the conductivity of the titanium element changes, which the lambda probe reports to the control unit. The efficiency of the sensor of this type is achieved only at a temperature of +700 °C, so a heating element is not necessary here.
The titanium lambda probe has a high price and complex design, which negatively affects the popularity of these devices.
3. Broadband.
Unlike the models described above, broadband devices have a design consisting of two chambers: measuring and pumping.
The measuring compartment maintains a gas composition such that lambda is equal to unity. As for the pumping chamber: if the engine runs on a lean mixture, the chamber removes excess oxygen from the diffusion gap into the atmosphere, and if on a rich mixture, it replenishes the diffusion hole with the missing oxygen from the external environment. The direction of the current to move oxygen in different directions changes, and its magnitude is proportional to the volume of colorless gas.
Normal operation of broadband sensors is possible at a temperature of +600 °C, which is achieved due to the operation of the heating element in the sensor.
Wideband oxygen sensors detect lambda levels between 0.7 and 1.6.
A little history
This element can be considered the most popular among all other sensors in the car. Automotive diagnostic specialists often deal with it. There have been oxygen sensors before, this is not a new thing. The first lambda probe was a kind of sensitive element without heaters. The element was heated by the temperature of the exhaust gases. The heating process took some time.
As the years passed, the environmental situation around the world constantly deteriorated. Therefore, it was necessary to take measures to tighten the harmfulness and toxicity. The requirements for cars have become stricter. At this point, the sensor began to develop and evolve. It was equipped with a special heater.
Where is the lambda probe located and how many are there in the car?
In order to determine the exact number of oxygen sensors in your car, you can seek help from a car service center, where, after special diagnostics, you will be given a picture of the bottom of the car with lambda probes marked on it. But if you want to save your money, we will tell you where to look for a lambda probe and how to set the number of sensors yourself.
It is worth noting that lambda probes are installed both under the hood of the car and under the bottom.
First you need to decide on the exact year of manufacture of the car. If your vehicle was manufactured back in the 20th century, then most likely it has only one lambda probe. More modern car models are usually equipped with two or four sensors.
We recommend
“How not to forget which side the gas tank is on: advice from professionals and more” Read more
Another important parameter is engine size:
- if it is less than 2 liters, then the car is equipped with two sensors, which will not be difficult to find (the first lambda probe is located under the hood, and the second under the bottom);
- if more than 2 liters, the car will have four lambda probes (two under the hood and two under the bottom).
You can personally verify the presence and number of engine compartment sensors as follows:
- Open the hood.
- Find the engine (usually it is located right in the middle of the engine compartment under a plastic cover with the name of the car brand).
- Locate the exhaust manifold (these are massive pipes located next to the engine, one part of which is adjacent to the motor, and the other goes deep).
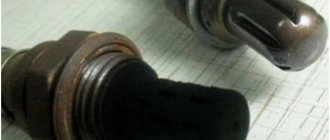
- On the manifold, find a small cylinder-shaped element, the length of which does not exceed 5–7 cm. This is the lambda probe (if there are several of them, then one will be located on the right and the other on the left).
What determines the interest of motorists in the location of the lambda probe? The thing is that the oxygen sensor does not last forever and requires replacement after a certain mileage. The technical documentation of most vehicles indicates that the lambda probe must be replaced with a new one after 80,000 km. As practice shows, an oxygen sensor can function almost twice as long, provided that the car owner adheres to a few simple recommendations.
How to extend the life of a lambda probe and when to change it
Knowing the principle of operation of the lambda probe and its relationship with other elements, it will be quite simple to establish a malfunction of the sensor. The lambda probe definitely requires the car owner's attention in the following cases. If:
- at idle or low gas the engine runs intermittently or stalls;
- During operation of the vehicle, an increased amount of fuel is consumed;
- the dynamic characteristics of the car have sharply deteriorated;
- after the engine stops running, noises similar to crackling are heard, which are accompanied by an unpleasant odor of hydrogen sulfide.
If, after turning off the engine, you hear a crackling sound near the converter, then most likely the lambda probe has failed and it will no longer be possible to resuscitate it. But if you do not lose time before the final breakdown, you can increase the period of operation of the device if the following conditions are met:
- Fuel your car only with high-quality fuel suitable for your model.
- Give preference to proven liquids with additives that have quality certificates.
- Avoid using sealants to secure sensors.
- Maintain sufficient pauses between engine starts.
- Do not disconnect the spark plugs when checking cylinder function.
- Try not to overheat the exhaust system of the car (the maximum permissible temperature for the normal functioning of the lambda probe is +950 °C).
- Do not treat sensor tips with products that contain chemically active elements.
- Make sure that the connection between the sensor and the pipe is tight.
By adhering to the recommendations listed, you can maximize the life of the lambda probe and replace it only as necessary.
It is a mistake to believe that a small lambda probe is an insignificant part that does not require your attention. The oxygen sensor is involved in the operation of the main systems of the car, and each replacement of the lambda probe will reduce your budget by 1,500–2,000 rubles. Careful handling and timely diagnostics will not only extend the life of the sensor, but also save your money.
Bottom line
The importance of an oxygen sensor in a car can hardly be overestimated, because the correct preparation of the working mixture and the main parameters of the car depend on its operation: efficiency, dynamics, throttle response and others.
In addition, a malfunction of this unit can lead to failure of other important engine components and the need for expensive repairs. That is why, at the first sign of a malfunction of the λ-probe, it is necessary to diagnose it, and if a breakdown is detected, replace it.
Signs of a malfunctioning lambda probe
We list several signals indicating the need to replace the lambda probe:
- extremely toxic exhaust gases;
- unstable acceleration dynamics;
- short-term activation of the engine malfunction indicator with a sharp increase in speed;
- unstable idle speed;
- increased fuel consumption;
- crackling sounds in the catalyst area when the engine is turned off;
- constantly burning engine fault lamp;
- receipt of unfounded signals about an over-enriched air-fuel mixture.
Please note that all of the listed signs may indicate a breakdown not only of the lambda probe, but also of other car parts.
The average operating time of a lambda probe is 60,000–130,000 km. Possible causes of sensor failure include:
- installation of devices using silicone sealants not designed for high temperatures;
- use of low quality fuel;
- oil entering the exhaust system due to wear of oil scraper rings or caps;
- overheating of the lambda probe as a result of an incorrectly set ignition or an over-rich air-fuel mixture;
- repeated attempts to start the engine within a short period of time, which lead to the penetration of flammable mixtures into the exhaust system;
- unstable contact, short to ground, broken output wire;
- deformation of the sensor structure.
Video “Review of decoys for oxygen controller”
User Victor Tokar in his video talked about devices for bypassing lambda probes, describing the main features and disadvantages.
Do you have any questions? Specialists and readers of the AUTODVIG website will help you ask a question
Was this article helpful?
Thank you for your opinion!
The article was useful. Please share the information with your friends.
Yes
No (100.00%)
X
Please write what is wrong and leave recommendations on the article
Cancel reply
Rate this article: ( 1 vote(s), average: 4.00 out of 5)
Discuss the article:
How to understand that the lambda probe has failed and replace it: advice from car enthusiasts
1. If the lambda probe is faulty, disturbances in engine operation will be noticeable.
“The main function of the lambda probe is to detect carbon monoxide in the exhaust gases of a particular vehicle. Taking into account the data received from the oxygen sensor, the fuel supply to the cylinders is regulated. When the lambda probe is faulty, problems with the engine are obvious: too much fuel consumption, a specific smell after turning off, etc. Replacing with a resistor is pointless, since the computer perceives the constant resistance of the resistor as a malfunction.”
2. The main sign of a lambda probe failure is an increase in speed.
“When the lambda probe malfunctioned, I discovered several characteristic moments (increased speed, high gasoline consumption, etc.). But the most obvious sign for me was the increase in speed: the car first accelerates, then shuts down, and so on again and again. It feels like you are letting off the gas, and then squeezing it again. After replacing the sensor, all the problems described, including the speed increase, disappeared.”
We recommend
“Replacing a windshield on a KIA: complete information” More details
3. Replacing a lambda probe must be justified.
“I would like to say that the probability of deformation of the wires is much higher than the probability of failure of the sensor itself. At the first suspicion that the lambda probe is broken, you should disconnect the connector, carefully inspect it, and also inspect the wires for their integrity. At the points where they enter the connector, the wires often become pinched and lose their functionality. After this, it is necessary to check the operation of the sensor, namely: measure the voltage in various engine operating modes.”
4. When replacing a lambda probe, one very important nuance must be taken into account.
“The process of replacing the sensor cannot be called complicated, but it does require some preparation. The most important part of the pre-work process is preparing a special 22 key with a slot, which will be needed to remove the sensor.
Without such a device, the lambda probe may not respond. A standard open-end wrench, as a rule, does not allow you to grasp the base of the sensor due to the presence of ebbs on the exhaust manifold near it. If there are no ebbs, using a wrench can damage the edges of the sensor nut, because it sticks strongly to the exhaust manifold and is made of a rather soft metal.
Faced with this problem, I found out that the original key for a Honda car costs more than 70 euros, so I decided to make a device for removing the lambda probe myself.
I'll tell you how. First, I took a 22-size spanner and welded a 30-size nut to it. After that, I made a through slot on one side of the wrench and the nut welded to it. It is needed in order to insert the lambda wires into the key and nut, because the connector at the ends of the oxygen sensor wires does not pass through the 22-socket wrench.
So, the lambda probe connector needs to be threaded through an additional 30 socket wrench, which is already attached to a 30 nut welded to a 22 key. With these two keys you can unscrew even a tightly secured lambda. It turns out simple, economical and effective.”
5. The lambda probe can be replaced with your own hands.
“I was able to replace the lambda probe on my car myself.
The original device was single-wire, and as a replacement I also bought a single-wire lambda probe from Bosh.
I will describe the replacement algorithm:
- We heat up the engine (this will make it easier to unscrew the screws securing the exhaust manifold cover and the sensor itself).
- Disconnect the negative battery.
- Disconnect the lambda connection connector.
- Let's analyze the situation: see if it is possible to unscrew the lambda probe and whether there is a tool suitable for this purpose (read about how to make a device for removing the lambda a little higher).
- Unscrew the sensor. We try to install a replacement, check whether the thread is suitable, and look at the screw-in depth.
- At a distance of 15 cm from the lambda probe body, cut off the wires. The steps described in this paragraph and the next are relevant if you are dealing with a non-original sensor.
- We connect the wire of the new sensor with the wire from the old lambda probe. The standard package for the device usually includes a connecting tube measuring 2-3 cm. We insert the wire of the new sensor into the thermal tube, which is also included in the kit.
We strip the wires (no more than 1 cm) and insert them into the tube on both sides. Then we squeeze the tube with maximum force and check the reliability of the connection. At the end, the heat tube should be inserted into the joint and heated up this area with a lighter (do not forget to rotate the joint during the heating process).
- We screw in the new sensor and connect the connector.
- Install the collector protective cover.
- We connect the negative battery, turn on the engine, and then check its operation.”
Connection nuances
If the device breaks down, you can install a sensor recommended by the manufacturer or a similar zirconium probe. Here are the basic rules:
- The colors of the sensor wires vary, but the color that supplies the signal to the electronic circuit is always dark.
- “Earth” comes in yellow, white, and gray shades.
- To connect a 4-wire probe in place of a 3-wire probe, connect the ground wires of the heater and the negative signal system to the ground of the car. The heater wire is connected through a relay circuit to the positive pole of the battery.
Connecting a new probe would be better done by a specialist from a car service center.
How to check the lambda probe for malfunctions
It is recommended to check the serviceability of the lambda probe every 10,000 km, and this must be done even if no problems are observed in the operation of the sensor.
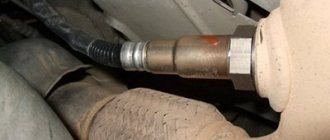
The first stage of diagnosis should be to check the reliability of the connection between the terminal and the sensor and subsequent inspection of the lambda for the presence of external deformations. After these steps, it is necessary to unscrew the lambda probe from the manifold and inspect the protective casing (if necessary, accumulated deposits should be cleaned).
1. Visual inspection of the probe tube.
If during the inspection, traces of white, gray or silver soot are found on the protective tube of the oxygen sensor, the lambda probe must be replaced.
2. How to check the lambda probe with a multimeter (tester).
Using a multimeter allows you to check:
- presence of voltage in the heating circuit;
- "reference" voltage;
- heater condition;
- sensor signal.
Working with a multimeter or voltmeter is carried out according to the algorithm described below:
- Without removing the connector from the sensor, turn on the engine;
- We attach the probes to the heating circuit.
The device readings must correspond to the battery voltage – 12 V.
“Plus” is transmitted to the sensor from the battery through a fuse. If there are no readings, then the problem should be looked for in this circuit.
“Minus” is transmitted to the sensor from the control unit. Accordingly, the lack of readings is due to problems in the lambda probe - ECU circuit.
We recommend
“Liquid glass or ceramics: choosing the best coating” More details
The same devices can measure the reference voltage. Approximate algorithm:
- We start the engine.
- We measure the voltage between the signal wire and ground.
- The device reading should stop at 0.45 V.
To diagnose the heater, set the multimeter to ohmmeter mode. Verification steps:
- Remove the connector.
- We measure the resistance between the heater contacts.
- Different sensors may show different information; normal readings are considered to be numbers in the range of 2–10 ohms.
Note! If there is no resistance, we can talk about possible breaks in the heater circuit.
A voltmeter or multimeter is also used to check the sensor signal. Necessary actions:
- Turn on the ignition.
- Warm up the engine to operating temperature.
- We connect the probes of the device with the signal wire and the ground wire.
- We increase the engine speed to 3,000 per minute.
- We monitor voltage fluctuations (jumps from 0.1 V to 0.9 V are considered normal).
If at any stage of checking the lambda probe, the sensor readings fall outside the specified limits, it must be replaced with a new one.
3. Check with an oscilloscope.
The main advantage of testing with an oscilloscope is the ability to determine the time between monotonous changes in the output voltage. It should not exceed 120 ms.
Step-by-step algorithm:
- We connect the probe of the device with the signal wire.
- Warm up the engine to operating temperature.
- We increase the number of revolutions to 2,600.
- We study the data of the measuring device and establish the functionality of the oxygen sensor.
It is worth noting that it is the oscilloscope that allows you to identify the maximum number of shortcomings associated with the operation of the lambda probe.
You can correctly replace a failed device with a new one by watching the video fragment:
Replacing the sensor
Checking the probe wiring is quite a painstaking job; in most cases, service stations only offer to change the unit if the wiring is broken, but considering that the cost of an original wideband sensor starts at 10,000 rubles. many drivers successfully find a fault in the circuit and eliminate the breakdown.
Reinstalling the probe takes 10–15 minutes with the engine turned off and preferably cooled down. The battery is disconnected, the sensor is loosened with a special key, the part is removed from the output manifold and disconnected from the computer. Installing a new one occurs in the same way; the probe is screwed into the seat by hand and tightened. When replacing, check the condition of the seat and the degree of wear of the o-rings. Replacement is carried out if necessary.
Broadband oxygen lambda probes are quite complex devices that are synchronized with the firmware of the electronic unit of a particular car. If the gas analyzer could be easily converted from an old sensor with your own hands, then in the case of oxygen generators it is dangerous to carry out such work. The exception is extensive experience in programming and sufficient knowledge of setting up this type of equipment.