To operate a vehicle safely, its wheels must rotate without any problems. If any appear, then nuances arise in driving the vehicle that can lead to an accident. Therefore, the condition of the hubs, axle shafts and their bearings must be periodically monitored, and if problems arise, they must be corrected in a timely manner.
- Steering knuckle
Malfunctions - How to increase wheel turnout
- Table: parameters of VAZ 2106 wheel bearings
Video: checking the wheel bearing on the “six”
- Video: replacing the wheel bearing
- Bearing replacement
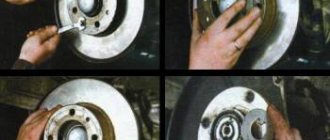
Removing the axle shaft
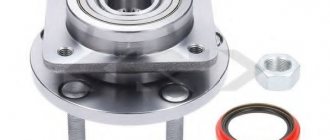
Front hub VAZ 2106
One of the important elements of the VAZ 2106 chassis is the hub. This part allows the wheel to rotate. To do this, a wheel disk is screwed onto the hub, and the rotation itself is carried out thanks to a pair of wheel bearings. The main functions assigned to the hub are:
- connection of the wheel disk with the steering knuckle;
- ensuring a high-quality stopping of the car, since the brake disc is fixed to the hub.
To know how hub malfunctions manifest themselves, as well as how to make repairs, you need to familiarize yourself with the structure of this element. Despite the fact that the part is designed to perform complex functions, it is structurally quite simple. The main parts of the hub are the housing and bearings. The body of the part is cast, made of durable alloy and processed on turning equipment. The hub fails quite rarely. The main malfunction of the product is the wear and tear of the outer bearing races at the installation sites.
The hub secures and rotates the front wheel
What tools will you need?
Description of replacing the timing belt on a Daewoo Nexia car, with a Sons 8-valve engine, with photographs and videos.
Before replacing the rear wheel bearing of a VAZ-2108, you will need the following tool:
- A 30" head and a knob, as well as a piece of pipe. You can even use a spanner wrench, but it must be strongly curved to make it easier to install into the hub hole on the nut.
- Punch or thin chisel. It is advisable to sharpen the chisel in advance. This tool is needed to straighten a jammed edge on a nut.
- It is advisable to have three-legged and two-legged pullers. The first is necessary to dismantle the wheel hub, and the second to remove the inner race of the bearing.
- Pliers for removing and installing retaining rings.
- It is advisable to have a puller on hand to remove and install the bearing into the hub.
- You will also need any type of keys for “12”, “13”, “14”.
- You can't do without a hammer and wooden spacers.
Be sure to buy a good bearing, it is advisable to also buy a nut. It is not recommended to use the old one. You can purchase an assembled VAZ-2108 rear hub, this will greatly facilitate repairs, but will hit your wallet hard.
Caliper
When considering the chassis of the VAZ “six”, you cannot ignore the brake caliper. This unit is mounted on the steering knuckle and holds the brake pads and brake wheel cylinders through appropriate holes, slots and grooves. There is a special hole in the caliper for the brake disc. Structurally, the product is made in the form of a monolithic steel part. When the piston of the working brake cylinder acts on the brake pad, the force is transmitted to the brake disc, which leads to the deceleration and stopping of the car. If the caliper is deformed, which is possible with a strong impact, the brake pads wear unevenly, which significantly reduces their service life.
The “six” caliper is a part without which full braking is impossible
The caliper may receive the following damage:
- appearance of cracks. Since the part is constantly exposed to loads, over time cracks appear on it due to metal fatigue. This indicates the need to replace the caliper, since it is unsuitable for restoration;
- formation of oxides on moving elements. The working cylinders gradually become covered with dirt and an oxide film, and the pistons begin to jam over time, which reduces braking efficiency. In this case, repair or replacement of the cylinders is required.
What bearings to put
Changing the front wheel bearing on a Lada Kalina with your own hands
When a wheel bearing requires replacement, the question immediately arises of which part to install. Many people advise using original components. However, today the quality of parts leaves much to be desired and the issue of choice remains quite relevant.
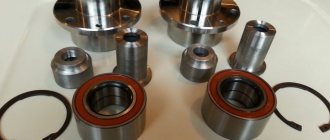
Table: type, installation location, and size of bearings
| Installation location | Bearing type | Size, mm | Quantity |
| Front wheel hub (outer support) | Roller, conical, single row | 19,5*45,3*15,5 | 2 |
| Front wheel hub (inner support) | Roller, conical, single row | 26*57,2*17,5 | 2 |
| Rear axle shaft | Ball, radial, single row | 30*72*19 | 2 |
Manufacturer's choice
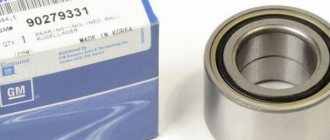
When choosing a manufacturer of a wheel bearing for a VAZ “Seven”, we can recommend SKF, SNR, FAG, NTN, Koyo, INA, NSK. The companies listed have many locations around the world. These products are of high quality and meet the most stringent requirements.
Among the domestic manufacturers that supply bearings for cars of the Togliatti plant, we can highlight:
- CJSC "LADA Image" - manufactures and sells original Lada wheel bearings through secondary markets;
- Saratov plant - produces parts under the SPZ brand;
- Volzhsky Plant - uses the Volzhsky Standard brand;
- Vologda plant - sells products under the VBF brand;
- Samara plant SPZ-9.
Diagnostics, signs of malfunction, causes of failure
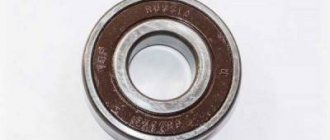
With proper operation, the ball bearing itself can last a really long time - about 100,000 kilometers. However, there are a number of reasons why a part may become unusable much earlier. Among them:
- frequent driving at high speed on bad roads;
- improper installation without lubrication (resulting in overheating and increased wear);
- prolonged exposure to an aggressive environment (water, dirt, other abrasives or liquids that get inside);
It is easy to understand that the ball bearing has failed - a distinct noise or buzz appears in the area of the rear wheels. If you ignore the problem, vibrations will appear on the body, and in critical cases, a grinding noise in the rear, indicating that the assembly has simply fallen apart. It is simply unacceptable to wait any longer - the wheel may simply become blocked while driving, so it is necessary to immediately replace it.
Checking wheel bearings:
Fault definition:
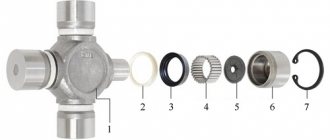
Rear wheel bearing VAZ 2108 - unit design
The main details of the unit can be seen in the photo below:
- guide;
- rear hub;
- sealing element;
- retaining ring;
- wheel bearing;
- thrust ring;
- hub nut;
- moisture-proof element;
- external protective washer;
Before proceeding directly to removing the VAZ 2108 rear wheel bearing and installing a new part, you should stock up on the necessary tools. So, the list of necessary tools includes:
- a set of keys (a 30mm head is required);
- pliers or round nose pliers;
- wooden beam;
- jack;
- hammer;
- chisel;
- mount;
- To facilitate the process, you will also need a special puller and a vice.
Note:
In principle, you can do without the last point, but with such a set the replacement process will be as fast, convenient and effective as possible. In addition, the presence of a special puller will help to change not only the rear, but also the front wheel bearing, including not only on VAZ cars.
Replacing the wheel bearing on a VAZ 2101-VAZ 2107
Welcome! Wheel bearing - why do we need a bearing at all, we think you know, but for those who don’t know, in a nutshell let’s say that in order for any parts to rotate, rotate, etc., there are several types of bearings, namely plain bearings and rolling bearings (This is based on the type of friction), bearings are also classified according to where they will be used, for example, take a sliding bearing, classification “Radial” - it takes a radial load and is designed to work in difficult conditions, its maximum temperature can reach as much as 400 °C, and the speed of relative movement of surfaces can be a maximum of 40 m/s,” there are also bearings classified as “Support”, “Self-aligning” and others.
Note! To replace the hub bearing, you will need to purchase: A repair kit for the hub (There will be bearings and lubricant), as well as stock up on hammers, screwdrivers and all the necessary keys, and of course, choose a free day and get to work!
Where is the wheel bearing located? Having read the name itself, you can already understand that the bearing is connected to the hub, and so it is located in its inner part, usually when replacing this bearing, people remove the brake disc together with the hub, because separating the brake disc is only a waste of time, but changing the bearing on the installed hub will not work at all, so it will need to be removed (without removing the brake disc) and then replaced.
When should you replace a wheel bearing? When will it start to hum, but the whole point is that it is very difficult to determine when you drive a car all the time, because the bearing will start to hum strongly only when it has actually all broken down and become unusable, so checking this way is not an option, for more For an accurate check, you will first need to hang the wheel (First the right front, then the left, it doesn’t matter, both wheels need to be checked) and after that, turn it by hand, it should spin without any jamming and hum (extraneous sound), there should be no (Only the pads can touch the brake disc, but this sound will be completely different, you can distinguish how the bearing hums and how the pads rub), for more details on how to check it, see the video below, it will be said about this hum, and more about how to determine by rocking whether the bearing has become unusable or not yet.
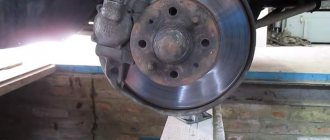
Checking status
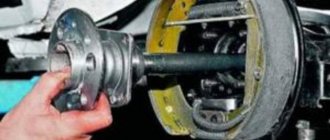
Checking the condition of the front wheel bearing is not that difficult. You just need to jack up the front wheel, where the bearing is supposed to be worn out. If the car is front-wheel drive, you need to set the gearbox to neutral, put chocks under the rear wheels and put the car on the handbrake. Rear-wheel drive cars use both a gearbox (1st gear is installed) and a handbrake.
You need to grab the jacked wheel with your hands at the top and bottom, and check for play with rocking movements. In a bearing in normal condition there should not be any play, not even the slightest.
Additionally, you need to spin the wheel around the axle. The wheel should rotate easily; the presence of any jamming, as well as a slight crunch or noise, will indicate that the front wheel bearing needs to be replaced.
Video: Diagnostics of the VAZ front wheel bearing.
If you have the appropriate equipment, you can make a replacement in a garage, but you must first purchase a new bearing, as well as related spare parts (hub nut, oil seal, retaining rings).
As for the bearings themselves, they differ on different cars. For example, the VAZ-2106 has two tapered roller bearings at the front, but the Chevrolet Aveo has a double-row angular contact ball bearing.
Due to the differences in these elements used, work to replace them is carried out slightly differently. Therefore, let’s look at how to replace the front wheel bearing on the above models.
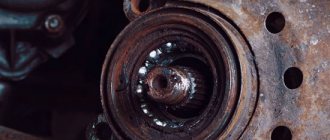
Installation and adjustment of new parts
The insides of the outer bearing are removed, and the old grease is removed from the opened hole. To get to the insides of the second part, you will need to pull out the oil seal by prying it with a mounting spatula or a powerful flat-head screwdriver. It is recommended to wash the inner surface of the hub together with the remaining clips in it with gasoline or diesel fuel. Sequence of further work.
- Place the hub on 2 wooden boards and attach a punch or other metal rod with a pointed end to the holder from the inside. Lightly tapping with a hammer, knock the part out. During the process, the punch needs to be moved so that the clip comes out evenly. Turn the hub over and perform the same operation on the other side.
- Now you need to study the condition of the surface of the hub seats. If traces of turning the clips are visible, you should think about replacing it. It is possible to somewhat extend the “life” of the hub, for this they use the old antiquated method. Small notches should be made on the surface of the seats with a core or chisel. After pressing the clips, they will sit tightly on these bumps and will not turn for some time.
Hub diagram: 1. Outer ring cage with rollers and inner ring 2. Outer bearing outer race 3. Hub 4. Inner bearing outer race 5. Inner bearing cage with rollers and inner ring 6. Oil seal
- Coat the new clips with a thin layer of thick lubricant, then insert one of them into the hole without distortion. Place an old part of the same size on top and, with light blows of a hammer, press the clip flat into the seat. Repeat the operation on the other side of the hub.
- After carefully lubricating the rollers, place the bearing into the pressed race. You need to start from the inside of the hub. Next, install the oil seal in the same way as described in paragraph 3. Thoroughly lubricate and insert the second bearing; coat both parts generously with thick grease. Wipe both working surfaces of the brake disc from grease and place the hub on the axle axle. Tighten the fastening nut and lightly tighten it with a wrench.
Further assembly is carried out in the reverse order; after completion, the front hub of the VAZ 2106 is tightened with a nut with little force. You can check the correct adjustment by pulling the suspended wheel with your hands on its upper and lower parts.
In this case, a slight play should be felt; the bearing should not be tightened “tight”. After tightening, the nut must be hammered with the sharp part of the hammer, placing it on the side of the nut opposite the groove in the trunnion axis. By hitting it with a second hammer, a depression is made that does not allow the nut to rotate on its own.
Rounded fist
An equally important element of the six's chassis is the steering knuckle. Force is transmitted to it from the steering linkage through the lever, resulting in the rotation of the wheels of the front axle. In addition, ball joints (upper and lower) are attached to the assembly through the corresponding eyes. On the reverse side of the steering knuckle there is an axis on which the hub with bearings is placed. The hub element is fixed to the axle with a nut. The left trunnion uses a nut with a right-hand thread, and the right one uses a left-hand thread. This was done in order to prevent the bearings from being tightened while moving and to avoid overheating and jamming.
Malfunctions
The resource of the steering knuckle is practically unlimited, if you do not take into account the quality of roads and neglect of adjusting the wheel bearings. Sometimes a product can travel 200 thousand km. The part is made of cast iron and can withstand heavy loads. However, if it fails, then the owners of Zhiguli cars often change it along with the bearings and hub
It is necessary to pay attention to the steering knuckle when the following symptoms appear:
- the car began to pull to the sides, and the problem is not eliminated by adjusting the wheel alignment;
- It was noticed that the wheels turned out at a smaller angle. The cause may be problems with both the steering knuckle and the ball joint;
- wheel break. This happens due to the breaking of the threaded part of the steering knuckle or the ball joint pin, which happens relatively often on Zhiguli cars;
- unadjustable play. If the wheel bearings were adjusted untimely or incorrectly, then in the places where they are installed, the steering knuckle axis will gradually wear out, which will lead to the appearance of play, which cannot be eliminated by adjustment.
Sometimes it happens that during car repairs a small crack is discovered on the steering knuckle. Some car enthusiasts advise fixing the problem by welding. However, it must be taken into account that safety directly depends on the condition of the steering knuckle. Therefore, such elements should not be repaired, but replaced with known good ones or new ones.
How to increase wheel turnout
Many owners of the VAZ 2106 and other “classics” are interested in the issue of increasing wheel turnout, since the model in question has a rather large turning radius, which is not always convenient. Those who are seriously involved in tuning their car simply install a set of suspension elements (levers, bipod) with changed parameters. However, such sets for the average owner of a VAZ “Six” may not be affordable, because for such pleasure you will have to pay about 6-8 thousand rubles. Therefore, other more affordable options are being considered, and they exist. You can increase the wheel inversion as follows:
- We place the car on the pit and dismantle the bipod installed on the inside of the hub.
- Since the bipods have different lengths, we cut the longer part in half, remove the part, and then weld it back together.
Rear axle repair and gearbox replacement
Depending on the cause of the breakdown, the following repair work may be necessary to restore the transmission’s functionality:
- replacing the VAZ 2106 gearbox oil seal;
- replacement and adjustment of the main pair;
- Troubleshooting differential and shank bearings and replacing them if necessary;
- replacement of VAZ 2106 gearbox.
Repair with replacement of bearings and (or) elements of the main gearbox pair is very difficult in technical terms. It requires special knowledge and tools in the process of adjusting the VAZ 2106 gearbox. As a rule, this unit is adjusted either at the factory or in specialized workshops. By watching a video about repairing a VAZ 2106 gearbox, you can see this for yourself. Meanwhile, in order to prevent damage to this transmission element, it is necessary to monitor whether the shank nut is tightened and whether there is any oil leakage from the seals.
Replacing the VAZ 2106 gearbox oil seal is necessary in case of transmission oil leaking from under it. Simply tightening the nut is not enough. Therefore, before we learn how to adjust the VAZ 2106 gearbox, we will learn how to replace a leaking oil seal. To carry out repair work you will need:
- a set of open-end wrenches and socket heads;
- puller for removing the oil seal;
- Litol-24 lubricant;
- mandrel for installing a new oil seal;
- hex wrench for unscrewing the drain plug;
- hammer;
- container for draining oil;
- transmission oil.
It is best to carry out work on replacing the rear axle gearbox oil seal in the inspection pit.
Replacement is carried out in the following order:
- We unscrew the plug to drain the oil, and, replacing the container, drain it.
- Unscrew the driveshaft from the rear axle gearbox flange.
- Unscrew the flange nut, counting the exact number of turns, and write down the value.
- Remove the flange. It usually comes off easily, but you can easily tap it with a hammer once it's firmly in place.
- If there are shells on the surface of the flange, or wear in the place where the oil seal fits, it must be replaced.
- Using a puller, remove the worn oil seal of the VAZ 2106 rear axle gearbox.
- Lubricate the new oil seal with Litol-24 grease to facilitate its installation.
- Using a mandrel, lightly hammer the oil seal into place.
- We install the flange and tighten the nut exactly the same number of turns that we wrote down.
- We attach the driveshaft to the rear axle.
- Fill the VAZ 2106 gearbox with oil to the level of the filler neck. It is recommended to use gear oil from well-known manufacturers. It would be useful to add a molybdenum additive to it to reduce friction between parts.
After repairs, it is also necessary to check the condition of the breather and, if necessary, clean it. If there is a need to completely replace this unit, then you need to know that the gear ratio of the VAZ 2106 gearbox is 3.9, and the car’s speedometer readings are guaranteed. Read about how to remove a VAZ 2106 gearbox in other articles on our website.