How it works
The car central locking system includes:
- Input sensor: limit switches and microswitches.
- Block – central locking control.
- Actuators.
Input sensors include:
- Door limit switches – are responsible for the location of car doors, transmitting a signal to the power supply.
- Microswitches are responsible for the structural elements of the locking device.
- Two microswitches fix the cam mechanism of the front doors: one is responsible for the “lock” signal, and the other is “unlock”.
- Two more are responsible for the central locking.
- Microswitch for the lever mechanism of the lock drive.
Such a device involves transmitting a signal from microswitches first to the control unit, then to the power circuit, through which the signal goes to the doors (actuators), trunk lid and fuel tank flap. Result: the locks open.
An actuator is an actuator that causes the lock to operate.
The system operates remotely (remote control): There is a special remote control button on the ignition key, the signal is transmitted to the antenna, and from it to the unit. The range of the remote control is 10 meters. You can connect to an alarm system.
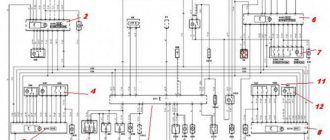
Control block
The block is responsible for the operation of the lock. The control circuit includes digital elements - they transmit a signal to the rest of the system components.
This device of the car central locking system interacts with the alarm system and can also be controlled by a remote control. You can install it yourself, but most modern cars already have central locking with remote control.
The remote control operates from a separate electronic unit, which is connected to the system and controls it.
Central locking functions
The advantage of a central locking device with remote control in a car:
- Save time. Instead of closing each door in turn, you need to close one - the rest are locked automatically.
- Versatility. The device is standard. There is no need to select a model.
A standard car lock kit consists of:
- Electric drive (five-wire).
- Central locking.
- Two-wire electric drives.
- Control controller.
The system is operated by a key or remote control.
- The system works with any type of alarm system.
- The remote control start button is placed on the key fob for convenience.
- If your car has an alarm system and a remote control, there is no point in ordering another one - it’s better to save money.
- In addition to the doors and hatch, you can also connect the trunk of the car. It can also be controlled by remote control.
- An important feature is the recoding of safety capabilities. For example, if the speed is exceeded, the doors are automatically locked. Or set the opening sequence: first the driver's side door, and when pressed again, the rest.
How to care for your central locking
Central locking in a car is a set of systems that provide additional convenience and safety, but it requires additional care. Problems with car locks usually arise in winter: after washing, if the locks are not properly ventilated, moisture freezes in them and grabs the rods.
To prevent this from happening, the car must be kept with the engine running, periodically forcing the locks to work, for about an hour. Or just drive around the city until the car dries out.
More information about the device and connecting the central locking in the video:
Reviews
| № | Positive |
| 1. | Vasily: after two years of active use of the car, there are no complaints about the body or its elements. The doors close easily and the locks are also in good working order. I try to treat equipment with care and carry out diagnostics in a timely manner. |
| 2. | Kirill: at 65,000 km I adjusted the hinge once on the right side. Obviously there was a bad fixation from the factory. There are no more complaints, I am satisfied with the build quality of the domestic car. |
| 3. | Ivan: for the first time, a Russian car turned out great. Of course, there are complaints about the technology, but they are insignificant. Those who are familiar with a screwdriver can easily eliminate defects on their own. |
| 4. | Gennady: I haven’t noticed anything like this in a year and a half of driving. All mechanisms are operating normally, lubricated and secured. |
| 5. | Dmitry: after buying the car, I immediately re-tightened all the moving elements myself, lubricated them additionally, and adjusted the gaps. I haven't had any worries for more than a year. |
| 6. | Alexander: I bought the car two years ago from a dealership, drove more than 80,000 km, no comments. There were minor breakdowns, but I fixed them myself. There were no major breakdowns. |
| 7. | Ignat: in a year and a half of active operation of the machine, I adjusted the hinges twice and lubricated them additionally. In general, there were no serious breakdowns. |
| Negative | |
| 1. | Kirill: I’ve only driven 75,000 km, but I’ve already adjusted the hinges, changed the seals, and ordered soundproofing for the interior. |
| 2. | Gennady: the dashboard is systematically fastened on the paving stones, I can’t do anything. I contacted specialists and repaired it myself, but it didn’t help. |
| 3. | Vladlen: there are more shortcomings in Grant than advantages; the manufacturer is in no hurry to eliminate defects. |
Conclusion The door lock is replaced only if it is damaged, deformed, or defective. The design of the mechanism is not complicated, and the operating principle is intuitive.
Adjusting the front left (right) door lock on the Lada Granta
In the process of systematic use of the door, its frequent opening and closing, the lock and adjacent elements wear out. As a result, the door closes with a distinct knocking sound.
Often knocking occurs after an accident due to changes in body geometry. The functionality of the lock can be restored by partially repairing it, and in case of deformation, by completely replacing it with a new one.
Sequencing
- We inspect the gaps around the entire perimeter of the door. We mark areas with deviations. The factory standard is 2–3 mm, anything higher or lower is a defect.
- Using a screwdriver, unscrew the screws securing the hinge to the body. If necessary, use an impact screwdriver.
- Move the hinge a few millimeters up and down and check the tight fit of the door to the body. If you hear a rumble when closing, lower the hinge; if you hear a dull knock, raise it.
- We carry out a control measurement and tighten the bolts.
By analogy, we adjust the lock on the opposite side.
Review of Manufacturer Prices
| Name/article | Price, rub.) |
| External handle 11180-6205151-00 | From 425 |
| RENAULT/LADA 11180-6205151-00 | From 385 |
| 11180-6205150-00 | From 420 |
| Internal handle 21900-6205181-00 | From 135 |
| 21900-6205180-00 | —/— |
| Bolt M5x10 00001-0038331-21 | From 10 |
| Nut M5 00001-0038318-01 | From 10 |
| Screw M6x10 00001-0032759-01 | —/— |
| Lock washer 00001-0026053-71 | —/— |
*prices are current as of November 28, 2018.
Recommendations for selection
Without a doubt, when choosing, give preference to parts with factory catalog numbers. Purchase consumables exclusively from official representative offices, service stations, and auto stores.
Before purchasing, check the catalog numbers of parts with the actual data specified in the operating instructions. If such a book is not available, seek advice from service center specialists, download recommendations from the Internet.
Connecting the lock to the alarm system
Connection to the alarm depends on the type of car central locking device:
- Controlled by negative impulse.
- Controlled by positive impulse.
- Controlled by a mixed impulse (almost never found).
The type of pulse determines what charge it is connected to the car alarm.
The difficulty lies in finding the necessary wires on which the pulse is determined using a probe. First you need to check the wires coming out of the door. If they are found, the door will open or close.
If the wires are not found, you need to check the central locking unit. You can find it by listening to the relay clicking. If you manage to disassemble the block and find the impulse points, the alarm is attached here.
Another possible location for the wires is at the driver's door of the car.
For the first two types of impulse, the search is the same, you just need to set the desired impulse.
Long gone are the days when drivers could safely leave their cars with the doors open, and car thefts were so rare that they were discussed for months afterwards.
Today it is difficult to imagine transport without a full-fledged security system, an integral part of which is the central lock. Using this device, you can simultaneously block not only the doors, but also the fuel tank, depriving thieves of the opportunity to drain all the gasoline. What is central locking?
What is central locking?
Central locking is one of the additional comfort systems and locks the doors when you press the remote control button. In addition to the doors and tank lid, it also closes other vehicle locking devices - the top hatch and luggage compartment.
Blocking can be done through centralized or decentralized control. In the first case, the machine is equipped with a single unit that automatically closes all the locks; in the second case, a separate electronic unit is mounted on each door.
How the central lock works
The central locking system operates both with the vehicle ignition on and off.
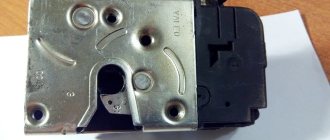
When you lock the entrance doors with a key and turn the key in the lock, a microswitch is activated, which is responsible for blocking. The signal from the switch is sent to the door control unit and then to the central control unit. The central unit generates control signals to all door control units and electric motors of the rear door and fuel tank lid actuators. The activation of all actuators ensures that the car doors are locked. A signal from a microswitch in the central locking device prevents the electric actuator from being activated again. Unlocking all doors is done in the same way.
Remote door locking is carried out by pressing the corresponding button on the ignition key. In this case, the signal arrives at the receiving antenna of the central control unit. After processing it, the control unit transmits signals to the door control units and actuators of the rear door and fuel tank lid. The activation of all actuators ensures that the car doors are locked. When remotely blocked, the car alarm is activated. Door locking can also be accompanied by automatic raising of the car windows.
In the event of a traffic accident, locked doors open automatically. The signal from the passive safety system control unit is transmitted to the central control unit, which in turn activates the actuators and opens the doors.
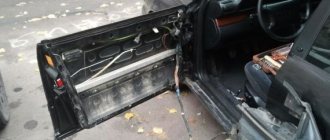
Removing the rear door trim
Open the hood and remove the negative terminal from the battery. When equipping a car with manual window lifters, release the handle lock. We pry it off with a flat screwdriver and push it out to our side.
Read more: Grant radiator grille mesh
The latch is released from the clutch grooves and the window lifter handle is removed. Unscrew the door lock button and pry off the trim on the door handle with a spatula. This opens up access to two screws, which we unscrew with a cross-head screwdriver. Using the same screwdriver, unscrew the screw located at the bottom of the door and remove the trim
After removing the door trim, we have access to the rest of the car. This is necessary to replace components or the door completely.
First, we can remove the interior door handles. It's easy to do. Use a Phillips screwdriver to remove several mounting screws. The handle foot is released from the grooves and the clamp is removed. All is ready.
» data-medium-file=»https://i2.wp.com/avtoivan.ru/wp-content/uploads/2018/09/bez-obshivki-1.jpg?fit=300%2C169″ data-large- file=”https://i2.wp.com/avtoivan.ru/wp-content/uploads/2018/09/bez-obshivki-1.jpg?fit=960%2C540″ data-lazy-src=”https: //i2.wp.com/avtoivan.ru/wp-content/uploads/2018/09/bez-obshivki-1.jpg?fit=960%2C540″ data-lazy-srcset=”https://i2.wp .com/avtoivan.ru/wp-content/uploads/2018/09/bez-obshivki-1.jpg?w=960 960w, https://i2.wp.com/avtoivan.ru/wp-content/uploads/ 2018/09/bez-obshivki-1.jpg?resize=300%2C169 300w, https://i2.wp.com/avtoivan.ru/wp-content/uploads/2018/09/bez-obshivki-1.jpg ?resize=768%2C432 768w" data-lazy-sizes="(max-width: 960px) 100vw, 960px" />
Secondly, we can do glass replacement. To do this, you will need to loosen several screws and remove the decorative trim panel. Afterwards, remove the seal. Unscrew the fastening bolt and remove the guide from the door panel. All that remains is to remove the seal from the front of the door. Otherwise, everything is ready to replace the glass.
The next thing we can do is replace the window regulators. There are times when we have mechanical window regulators and we need to replace them with electric ones. To perform this procedure correctly, you need to fix the glass. Remove the foam gasket and unscrew several nuts securing the window regulator, then unscrew the guide nuts and the upper mounting nut. Next, we can replace the window lift mechanism. Collection occurs in reverse order.
And the last thing we can change is the outside door handle. You need to unscrew the bolt securing the handle and move it forward. That's it, the removal process has been completed.
The parts of the front and rear of the car change almost identically.
Also, removing the door trim material is done not only to replace components, but also for tuning for other purposes.
- Improve sound insulation. Doors will close softer and quieter, and the acoustics in the car will become more pleasant. To do this, you need to use a special material after removing the trim and the internal structure of the door. When reassembling, it is necessary to accurately restore all technical holes.
- Door reupholstery. Made to replace and update cladding material. The material is attached from the center of the door and pulled to the edges using an industrial hair dryer. The front doors are harder to tighten because... they have more holes and bends.
- Airbrushing inside the car interior. These are images, most often of lightning, which are applied to the upholstery or panels of the car. Water-based paints are used for airbrushing. After applying the drawing, it takes time for it to dry completely.
Installation instructions
Installation of the device is carried out as follows:
- First, the plastic door trim is removed and a location for installing the unit is selected. When choosing a location, it is necessary to take into account the location of the window lifter elements. According to many experts, it is better to install the system in the lower left corner of the door.
- The next step is to install the lock activators, each of which is mounted separately on each door. It is necessary to drill the corresponding holes in the structure in advance and secure them with self-tapping screws. After this, the activator must be connected to the rod. Next, the activators need to install clamps on the manual control elements of the central locking.
- The wiring is being laid - All wires must be securely fixed; plastic clamps can be used for this. They should not be placed at the bottom of the door, since moisture usually collects in this place, so it is better to choose a place between the door and the body, installing a rubber tube here in advance. Thanks to it, the wiring can be protected from damage.
- The next step will be to dismantle the control panel. Having done this, the old wiring from the window regulators can be removed and a new one can be laid, which is subsequently connected to the drive.
- After this, the activator drives are connected. When all these steps are completed, the wiring must be pushed under the control panel on one side, and into the glove box on the other side. A pass-through pipe is mounted into the rack; a screwdriver may be required to install it.
- Now a fuse is connected to the connector and this circuit is connected to the central locking power supply, the entire structure is installed under the center console. The cable from the central locking system must be connected to the on-board network, plus to the fuse, minus to the body. Assembly is carried out in reverse order.
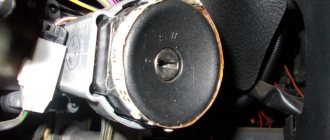
The door does not open in cold weather
Most often this happens after washing a car or driving in the rain, when dampness gives way to negative temperatures. Usually the larva freezes completely in the lock. Sometimes the lubricant in the drive or rod also hardens. Knowledgeable car owners advise warming up the constipation (for example, with a hairdryer) and then lubricating it with WD-40. Moreover, the procedure must be repeated after each significant wetness of the car.
In addition, it will also help:
- turning on autostart with constant heating of the interior;
- disassembling the door and adjusting the lock components;
- use any silicone-based lubricant.
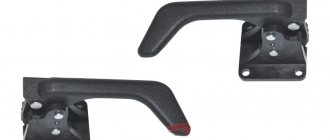
Sequence of actions when replacing the front door handle on a Lada Grant
- We place the car within the perimeter of the repair area and provide priority safety measures.
- Open the front driver's door and raise the window to the top position.
- Unscrew the three screws that secure the upholstery at the bottom.
- We carry out dismantling on the right side by analogy.
- We unscrew the little soldier - the door lock lever.
- Use a screwdriver to pry off the plastic plug.
- Additionally, we unscrew the screw that secures the upholstery in the middle part of the door card.
- We unscrew the screws in the armrest niche.
- Unscrew the handle fastening (two self-tapping screws).
- We insert a flat-head screwdriver between the metal body and the plastic upholstery.
- Squeeze out the plastic.
- We remove the card from the seat.
- Disconnect the block with wires from the locking lever.
- By analogy, we disconnect the contacts from the electric window drive.
- We remove the upholstery.
- Use a screwdriver to pry up the power window control unit and remove the switches.
# 15 Locks & limiters - new model (liftback / Kalina 2)
Accordingly, the handle is now different, I took a Chevrolet from the Niva, purely because of the eye, it doesn’t fit in the seats**.)) Therefore, I had to knock out this fastener and rearrange it on the Grant handle, there were no Kalina 2 and Grant liftbacks in stock =(
Tightness :DD Oddly enough, they were found at the same analysis.)
__ I also purchased limiters from the liftback:
Actually, that’s the problem with them, these white plastic caps wear off and the spring starts to work inappropriately:DD _
Articles: left rear lock 21900-6205013-30 right rear lock 21900-6205012-30 rod 21900-6105248-10 Rear handles: 21920-6205150-20 - right 21920-6205151-20 left Limiters: Front: No. 2 1920-6106082-00 Rear: No. 21920-6206082-00 __
Source
HOW TO INSTALL CENTRAL LOCKING WITH YOUR OWN HANDS
If you have long decided to upgrade your car by making closing and opening doors a fully automatic process, you will benefit from instructions on how to install central locking yourself.
PREPARATION
It all starts with preparation. To install the device, you will need at least four meters of two-core copper wire. Of course, you won’t be able to do without a tool chest either. In it you should have:
Only having this entire set will you be able to efficiently install the entire structure. Also, during the preparation process, do not forget to check that all the necessary components are included in the purchased kit.
INSTALLATION
Installation of the structure begins with removing the trim from each door. But before that you need to disconnect all the terminals from the batteries. This will allow you to install the system without risk of electric shock. The following steps follow:
- Remove the panels.
- Select a location for installation. The best place is considered to be the lower left corner. Otherwise, there is a risk that the glass will interfere with the operation of the locks.
- Install activators for the central locking.
- Connect the rods and activators and secure the clamps. It is very important to check the wiring when connecting each device.
- Pull the wires. Use plastic clamps to secure them.
- Remove the dashboard. The same needs to be done with the old wires responsible for the operation of the power windows. Route new cables and connect them.
- Connect the drives and insulate them.
- Push the wires into the dashboard and glove compartment.
- Install the through pipe.
- Attach a fuse to the connector. This element must be connected to a common power supply. The resulting structure is mounted under the torpedo.
- Connect the central locking system to the car. The minus goes to the body, and the plus is connected to the fuse.
After this, the installation of the central lock can be considered complete, as you can see, there is nothing complicated about it. It is not surprising that most drivers decide to do it themselves.
IMPORTANT NUANCES
When installing a central lock with your own hands, there are certain nuances that will help you do the job at the highest level. Here are the main ones:
- It is best to use a corrugated tube for pulling wires.
- Do not run wires along the bottom of the doors. This may cause a short circuit.
- To achieve better accuracy, the rod can be bent.
Just three recommendations will allow you to avoid common mistakes when installing a central lock with your own hands.