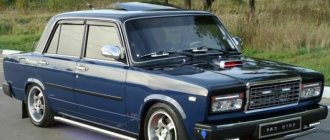
The signal does not work on the VAZ 2115
When I did the camber I noticed that the signal was gone.
Initially, I was guilty of the wiring and the black box. Having crawled around under the hood enough, it dawned on me. When you pressed the signal, there was no characteristic click of the relay, that is, nothing reached the black box. I had to remove the steering wheel and see worn out contacts near the central part of the steering column switches.
To replace this whole thing you need to: 1. Remove the steering shaft casing 2. Remove the trim on the steering wheel (fret label), there are two bolts under it. Unscrew and pull off cover 3. Next you need to remove the steering wheel. To make it easier to unscrew the nut, block the steering wheel and unscrew the nut. The main thing is not to forget to put the marks (to correctly put the steering wheel in place). 4. Take out the turn signal switch knob. We do not remove the right switch yet (it rested on the ignition switch). 5. Unscrew the bolt that holds the central part on the steering shaft and pull the central part towards you, remove the right switch.
Well, it’s natural to perform the assembly in the reverse order)) Good luck to everyone on the roads
How to install Volgov signals?
- Open the hood.
- Remove the black decorative trim (by unscrewing 4 screws) between the bumper and the TV.
- Having gained access to the standard horn, remove it by unscrewing the screw with a key set to “13”.
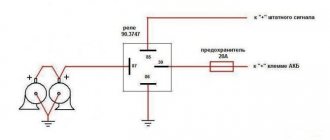
- We cut off the plug of the old wiring, find the positive wire, connect it to the plug of the new horn and short it to ground. If there is no signal, and it appears only after pressing the button, then this connection method is correct. If you decide to install a relay, I have attached a connection diagram that makes everything clear.
- After removing the old beep, two plates remain free, so we will install a new signal on them.
- We connect it to the common positive wire, carefully isolate everything, including the mass of the cut plug.
Important! The “snails” need to be installed with the mouthpiece down so that water does not flow into them, and if it gets in, it immediately drains off
What to do if the sound signal on the VAZ 2106 does not work
A non-functioning horn on a car is a very dangerous malfunction. The most unpleasant thing is that they find out about this breakdown just when the signal is needed most - in a dangerous situation on the road. What could cause the signal to fail?
Such a malfunction as a non-functioning sound signal on VAZ 2106 and VAZ 2114 cars is very easy to diagnose and repair in the process, just study the connection diagram and follow the instructions that you will receive after reading the article to the end.
Signal diagram
Before you start talking about finding and fixing this malfunction, you should first talk about the electrical circuit of the signal (after all, without knowing it, it will be difficult to carry out repair work).
Sound signal device VAZ 2114
It is immediately worth noting that the electrical circuit of the sound signal is quite simple and includes:
- switch mounted on the steering column;
- fuse;
- electrical relay;
- sound signal device;
- connecting wires.
You can study the circuit diagram of the device in more detail using the following drawing:
Step-by-step instructions for replacing and repairing the sound signal of a VAZ 2106
- You can adjust the signal without dismantling it. This is done as follows:
- The sound elements are adjusted one by one. This turns off the power from the element that is not currently being regulated.
- The second GE is regulated in the same way, having first turned off the first one.+
- When replacing a faulty electrical element, the power wires are disconnected from it and the nut securing it to the bracket is unscrewed.
- The new sound signal is installed in the reverse order.
Probable Causes
Based on the nature of the signal malfunction in the VAZ-2110, it can be divided into two groups.
In the first case, the horn does not operate at all, no matter how the driver presses the button located in the center of the steering wheel.
The second option is that the sound is intermittent, that is, the signal begins to work unstable.
Among the most obvious and easily remediable causes, the main one is a blown fuse. A break in the fuse link de-energizes the entire electrical circuit, and, accordingly, the horn does not function at all. To check, just turn on the heater fan. It is connected to the same protective device.
Also, the horn itself often breaks on the 2110 model. This version is accepted as the main one if installing a working fuse does not lead to a positive result. Here you will have to tinker longer:
- the signal is removed (it is located behind the radiator grille);
- connect directly to a battery or other 12-volt power source (the white wire is “plus” and the black wire is “minus”);
- If the device itself is faulty, then it will not produce a characteristic sound.
When everything is in order with the node, then you should suspect a break that occurred somewhere in the circuit.
The next possibility is abrasion of the clamping contacts installed directly in the steering column. This is more likely the older the “ten” is. By the way, it is not difficult to extend their service life - it is enough to regularly treat the contacts with graphite-based lubricant.
Also, sometimes the problem lies in the oxidized terminals of the pads. Inspect the one located in the steering column, and the second one in the engine compartment. At the same time, make sure that all wiring is securely fastened.
The slip ring is less often to blame for the sound signal not working. It is located directly in the steering wheel. This element of the 2110th model also wears out over time and ceases to perform its intended function.
The horn button does not work, what should I do?
If, when diagnosing the electrical circuit breaker, the fuse and the circuit breaker relay, no faults are identified, then you need to check the signal activation button on the steering wheel. Since the steering wheel itself is constantly rotating, and the need to sound a signal can arise at any time, there is a moving contact between the steering wheel and the steering column. Using this contact, you can close the circuit even when turning the steering wheel. In addition, the button itself has two more contacts that allow the driver to give a signal with both the left and right hand. Any of these contacts (most often movable) can fail. In this case, you need to clean it and make sure the button is working. This is done as follows.+
- We install the car wheels straight. The steering wheel should also not deviate to the side.
- Use a screwdriver to pry off the Lada emblem from the steering wheel button.
- Using a 24mm socket, unscrew the steering wheel nut located under the emblem.
- Holding and slightly rocking the steering wheel with both hands, remove it from the shaft. In this case, if the steering wheel is not removed, you can hit the shaft through the spacer.
- Using a Phillips screwdriver, unscrew the four bolts on the back of the steering wheel and remove the horn button
- Remove the button from the steering wheel and disconnect the wire from the contact on the steering wheel. Use a needle file or sandpaper to clean the moving contact located near the shaft on the steering column. Slightly bend the contact upward (towards the steering wheel)
- On the previously removed signal button, clean both contacts.
- We remove and clean the wires and contacts removed from the button
- After cleaning the contacts, we assemble the button. At the same time, we make sure that all contacts are in contact with each other.
To prevent the signal from triggering spontaneously, we check whether the springs of the signal button have weakened. If necessary, stretch the springs or replace them with new ones.
We install the steering wheel on the shaft in the position it was before disassembly.
Removing the steering wheel
If “step 2” is not successful, you need to remove the steering wheel. The two copper strips should “close” when pressed - everything is clear here. The test is carried out with an ohmmeter, and if necessary, the switch is replaced.
Steering wheel after dismantling
When the steering wheel is removed, you can clean the contact tracks. The wire contacts in the column must also be clean.
Dismantling from start to finish
First you need to unscrew the two screws under the trim. Having removed the plastic, you can see the contact plate - perhaps that was the problem.
First step in dismantling
Try cleaning the contacts and performing “step 2” again. If there is no result, take a 24mm wrench and unscrew one nut (not all the way).
The steering wheel needs to be knocked off its splines
The steering wheel is pushed towards itself. And then the nut can be unscrewed completely.
When installing, follow one rule. The protrusion on the bracket should fit into the slot made in the plastic ring (see photo).
Steering wheel installation (first step)
Why the cigarette lighter and radio do not work on the VAZ-2114
Some components that belong to the electrical system are interconnected, so drivers often have complaints that the cigarette lighter and radio in the VAZ-2114 car do not work at the same time ✔. Often the cause of a malfunction is the connection of devices whose power exceeds the permitted value.
Auto-assistance
Road safety is paramount, because a malfunction of the sound signal can cause a traffic accident due to the driver’s inability to warn another road user who, for some reason, does not see your vehicle approaching.
The electrical circuit of the sound signal on a VAZ-2114 passenger car includes: a sound signal switch located in the upper part of the steering column; fuse and relay K8 of the sound signal located in the mounting block; a sound signal located behind the grille covering the radiator; wires connecting these devices into an electrical circuit.
If there is no sound signal after it is turned on, to find the problem you will have to open the hood and remove the mounting block cover to check the integrity of the fuse. If it burns out, then you will have to replace it and start looking for the cause of the fuse failure. If the fuse is intact, then the next step is to check the functionality of the sound signal itself. To do this, you will need a pair of wires designed to supply voltage to the horn terminals directly from the battery terminals.
If the sound signal does not work, then check the reliability of the fastening of its ground wire and remove the signal from the car. A possible malfunction may be blocking of the membrane due to oxidation of the contacts, as a result of the formation of a condensate signal in the housing. It is possible to restore its functionality, but this will require flaring the top cover and cleaning the contacts. If you are too lazy to do this, you will have to replace it.
If the sound signal works, then you will have to check the functionality of the relay by replacing it with a known good one. Well, if this doesn’t help, then you’ll have to check the status of the sound signal button. A possible malfunction could be a slight sliding down of the housing under the steering switches, as a result of which the brass pins of the horn switch do not reach the slip ring.
When the horn starts to turn on spontaneously when the driver turns the steering wheel, the cause of this malfunction may be warping of the slip ring. A hoarse sound of the signal is also possible, which can be eliminated using the adjusting screw located on the housing of the sound signal.
Basic fuse faults
Fuses in cars play an essential role, protecting electrical appliances from power surges and short circuits. They take on the impact of such factors and maintain the working condition of the electrical appliance, while burning out themselves. But if this happens regularly, you need to check the fuse box and determine the cause of the breakdown.
Bad contacts
One of the most common reasons for a situation where a fuse does not work is related to the contact group. With frequent voltage surges in most VAZ cars, contacts burn out and plastic melts, which can interrupt the contact of parts. A similar condition is also observed when the contacts have oxidized and become coated.
Broken wiring
When operating a car, malfunctions such as broken wires often occur. To determine for yourself where the accident occurred, you will need a special device (multimeter, tester) with which to check the working condition of the contacts. To find an open circuit, the device is set to ohmmeter mode, and the leads are connected to the circuit being tested. In the place where the wiring is broken, there is high resistance.
Are you a car driver?! Then you can take this simple test and find out. Go to test »
Short circuit
A short circuit occurs when the contacts in the block are strongly oxidized and crossed due to frequent use of the cigarette lighter socket. This condition is indicated by a fuse blowing shortly after replacing it. To determine the short circuit zone, you need:
- Inspect the entire area for damage.
- Disconnect the section being tested from the main wiring.
- Use a multimeter to set the dialing mode.
If there is a short circuit in the area being tested, the device beeps.
Bulb burnout
The contacts of the light bulb are in a common electrical circuit, so when it burns out, the cigarette lighter and radio on the VAZ also stop working. The reason for their burnout may be high voltage, breaks or short circuits in the wiring, water or poor fastening.
Examination
It is a mistake to assume that damage to high-voltage wires does not in any way affect the condition of the module itself. Many people think of simply replacing high-voltage elements, but in reality they will still have to change the module.
This is explained by the fact that damaged or defective wires direct the wrong current, the configuration of which does not correspond to the necessary parameters. As a result, the spark hits inaccurately or ineffectively, causing the module to burn out and become unusable.
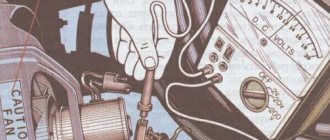
In general, the best option for checking the ignition module on a VAZ 2114 is to use an oscilloscope. But, firstly, not every driver has it, and secondly, few people can use them. Therefore, we will carry out the check using improvised means:
- 12-volt light bulb;
- Tester (available for little money at any auto parts store).
Let's start with preliminary manipulations with the accompanying elements of the ignition module.
- Check the wiring harness. It is disconnected and the voltage indicator is checked.
- To do this, fix the tester on contact A, and connect the other terminal to engine ground.
- In normal condition, the voltage reading will be 12V.
- If there is no voltage, most likely the fuse has blown.
- If everything is fine, transfer the terminals of your tester to contacts A and B, start the car. In this case, the starter should turn and the 12-volt light should blink.
- In the absence of these phenomena, we can talk about the presence of a break in circuit A of the contacts.
Next we go to the ignition module itself.
There are several ways to check the condition of your unit. Therefore, let's look at each of them.
- Set the tester to ohmmeter mode. Use it to measure the resistance on the high-voltage lines going to cylinders 1 and 4, and then, by analogy, to the wiring of cylinders 2 and 3. In normal condition, the device will give you readings from 5.2 to 5.5 ohms.
- Give the device a gentle tug. Thus, you will shake the wiring block and the module. Moreover, this must be done in the operating mode of the power unit. If the device works without obstruction when loosened, everything is fine, you are lucky. If not, you will again have to study the condition of the wiring.
Third way
The third method is considered the simplest, since it involves replacing your device with a similar one that works exactly. But to do this, you have to find a full-fledged twin. We are talking about an ignition module from a car similar to yours in terms of year of manufacture and power unit used. It’s just that 1.5-liter engines have modules, and 1.6-liter engines have coils.
But to replace a module with a module, you will have to first dismantle yours. This is done as follows:
- Remove the negative terminal from the battery, which will allow you to turn off the power to the car;
- Disconnect four high voltages from the ignition module;
- Disconnect the wire block. To do this, you need to release the special clamp that holds the block on the module;
- Next, unscrew the three nuts. With their help, the module is held on the bracket;
- There are three long pins on the bracket, from which the module can simply be pulled off.
Having dismantled your module, you can put another unit in its place, thereby verifying the functionality of that one and the malfunction of yours.
Repair
Finding the reason why the cigarette lighter and radio failed on a VAZ-2114 is not so difficult. Often the problem is hidden in the contact group or in the fuse box.
To eliminate breakdowns associated with poor contacts, you should start by checking all the contact blocks of the wires that go from the fuse box to the cigarette lighter and radio. Insufficient contact and its oxidation lead to breakdown of elements.
Broken wiring cannot be repaired, it can only be replaced with a new one. Some motorists try to solve the problem using the old and proven method, connecting the damaged area with insulating tape. However, experts do not recommend repairing the wiring in such a way that new faults in the form of a short circuit do not appear in the future.
You can solve the short circuit problem by replacing the socket with a better one.
The use of cheap products leads to breakdowns after a short period of time.
Methods for troubleshooting
If the horn circuit is broken and the horn stops working, then there are several options for solving the problem:
- First you need to diagnose the safety device. If this part is burnt out, then you just need to replace it with a new one; the device is located in the mounting block. The replacement process will not take much time; any car enthusiast can cope with this task. If replacing the fuse gave results, but after some time the horn stopped working again, then most likely the reason lies in voltage surges in the on-board network. Overload contributes to accelerated burnout of the fuse element, so you will have to look for the source of the load and solve the problem. To do this, use a multimeter or seek help from an electrician.
- If the horn itself malfunctions, the device must be replaced. If diagnostics by direct connection to the battery do not produce results, then most likely the reason lies in the device itself, which needs to be changed.
- Short circuit. To diagnose, you will need a multimeter and a little experience. Using a tester, you can find a short circuit, but if you have never encountered such a problem before, it is better to seek help from specialists.
- If the clamping contacts or slip ring are worn out, then the failed elements must be replaced. It is not a fact that you will be able to buy new contacts or a ring, so most likely you will have to change the horn assembly.
- Another reason why the horn does not work is oxidation of the internal contacts. Over time, as mentioned above, dirt and deposits accumulate on them, which leads to the obstruction of sound. You can try to disassemble the steering wheel of the car, then clean the internal contacts and assemble the steering wheel (the author of the video is the channel Alexander Amochkin Kolomna AAK).
If you are faced with the problem of a non-working horn, then you will probably be wondering how to replace it:
First of all, you need to remove the steering wheel. To do this, remove the trim and unscrew the bolts that secure the steering wheel. After the steering wheel is removed, you can clean the contact tracks, perhaps this will help solve the problem
Make sure that the wire contacts in the column are as clean as possible. Unscrew the two screws located under the plastic cover. After dismantling the cover, you will be able to see the contact plate; there is a possibility that the problem lies there.
Clean the contacts and check the signal functionality. If the horn does not work, then using a 24mm wrench you will need to unscrew the nut, but you do not need to unscrew it all the way. Next, the steering wheel itself must be pulled towards you; this will require some effort. You can try to move the wheel by tapping it from different sides. When you feel that the steering wheel has given way, the nut is unscrewed completely. After dismantling the steering wheel, we proceed to removing the horn. There is a module located under the radiator grille; it must be removed; to do this, unscrew the nut to 13 and disconnect the connector. Install a new one, replace the steering wheel and check the operation of the horn.
Reasons why the PP stopped working
In fact, there are not so many of them and the most common are:
- The easiest one is poor contact between the panel and the electronic control unit. The problem is solved by replacing the plug or simply cleaning the contacts.
- A breakdown in the instrument panel itself or malfunctions. To solve the problem, all connectors are reconnected, taking into account the correct connection diagram.
- Malfunctions of the tachometer, speedometer, fuel level controller. In this case, the cause is mechanical or electrical. To troubleshoot problems, replace regulators or check the operation of fuses.
- The illumination of the VAZ-1215 software stopped working. In this situation, it is necessary to find out the cause of the problem.
It is unlikely that a simultaneous failure will occur in the operation of the sensors on which the operation of the PP directly depends. If we take into account that they do not work directly with devices, but through an ECU (electronic control unit), then, accordingly, malfunctions will lead to the PP stopping working. In addition, it is worth noting that the engine will also stop working.
There are situations when all devices on the panel stop working simultaneously. In this case, the car driver must check the condition of fuse F16, which has a power of 16 A.
To check, you must turn on the hazard signal or turn signal.
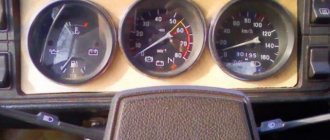
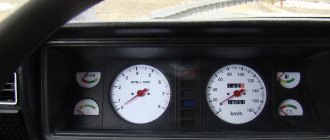
If they don't work, it means the fuse has blown. Therefore, we can conclude that a short circuit has occurred. To fix the problem, check the electrical circuit. However, it also happens that the fuse is intact and in working condition, but the instrument panel on a VAZ-2115 car stops working. Here the reason is much more difficult to find out. The solution to the problem is to remove the instrument panel and check whether voltage is flowing from this fuse to the terminals of the white and red blocks. The white block supplies power to the speedometer, tachometer, and temperature gauge. And the red one is the fuel gauge.
If, as a result of checking, the terminals show a voltage of +12 V, then this indicates that the PCB does not work as a result of poor contact of the wire that goes to the ground of the car. If the +12 V voltage is not reflected at the terminals, then it is necessary to disassemble the mounting block and look for the cause of the problem.
Features of the VAZ-2112 electrical circuit
The owners of cars of the “tenth” family are to some extent lucky: but there is only a switch. The proof is given below.
Standard wiring diagram
The first step is to check fuse F7. In the mounting block it is in the top row (seventh from the left).
Voltage “+12” is applied to one of the fuse terminals. Check it out!
If the fuse is good, potential “+12” should be at one of the horn terminals. Let's take a look under the hood...
Audio module connector
Disconnect the connector and check both terminals with a tester. We connect the second probe of the voltmeter to the negative of the battery.
The standard reason why the signal does not work on the VAZ-2112 is this: the “positive” voltage is connected, but the contact with the “ground” is broken. Most often the problem lies in the switch.
What to do if the VAZ-2115 instrument panel does not work
As mentioned above, it is necessary to establish the cause of the instrument panel malfunction. If they are significant and cannot be repaired, then in this case it is necessary to install a new PCB. For a better outcome when installing the panel, you need to know and follow the following instructions:
- Replacement of the instrument panel is carried out strictly in accordance with the pinout.
- First you need to disconnect the cable going to the cigarette lighter.
- Dismantle the control panel. It is necessary to unscrew 2 screws located along the edges, top and bottom of the instrument panel.
- The next step will be to dismantle the lining. The difficulty is that it is held in place by clamps, so you need to swing it a little.
- After this, all wires going to the instrument panel are disconnected (light alarm connector, clock, speedometer, fuel level sensor).
- The very last step is to dismantle the control panel. All the bolts that secure it are unscrewed. At this stage, you should perform actions very carefully, as you can really damage the wiring.
After all the above steps, the process of dismantling the control panel can be called complete. If there is a need to change the light bulbs, you need to remove the sockets and install new ones. When dismantling the cartridges, they are turned counterclockwise. This should be done with extreme caution to avoid damage. Collection must be done in the opposite direction.
By following all the rules for installing the instrument panel, you can independently solve all the problems associated with its operation. If this fails, you will have to seek help from a car service to correct problems with the PP.
Tapping into wires
Next to the driver's door, there are two wire harnesses running right along the floor. One of them has a cable coming from the parking brake and two wires to the turn signals. The second harness contains the door switch cable. This is where you need to start connecting. To do this, remove the sill trim along with the side panel. They are attached using self-tapping screws that must be unscrewed. Having done this, you can see the wiring harness shown in the photo:
This harness goes to the dashboard. We are interested in the door switch cable. If a 1N5401 diode is inserted into the wire break, the current should flow towards the limit switches. And the second diode 1N4001 is connected as shown in the figure.
The following figure shows the second harness:
At the same time, taps are made from the blue cables and the cords are pulled to the place where the alarm will be installed. And the handbrake wire is cut, and a 1N4001 diode is soldered into the cut with the cathode towards the switch.