Poor weight on a car leads to poor performance of instruments or a stalled engine. The reason is the loss of contact at the junction of the wire with the car body. This happens due to the end of the bulk wire ending in a copper plate. This cannot be allowed. At the junction of copper and steel, an oxidation process begins, accompanied by deterioration or complete elimination of contact. If moisture gets into the joint or the bolt connecting the terminal to the metal rusts, this can also cause the connection to be interrupted. When there is no contact, this affects the operation of the car.
Symptoms of bad weight on a car
Manifests itself with the following symptoms:
- When you turn the key in the ignition switch, the starter does not turn on, but the relay clicks are heard.
- One lamp on the car began to burn brighter than the other.
- When the turn signal is turned on, another light flashes. The windshield wipers or windshield washers can be activated at the same time.
- There is wheezing in the radio at peak power.
These symptoms make it clear that the contact of the mass has worsened. If it is only broken, then the resistance at the junction increases, accompanied by a deterioration in the operation of devices and units.
Where is the engine ground attached? Why is the engine unstable?
In almost 100% of modern cars, the body is used as a single source of electrical energy. The car body is like a universal wire with a negative charge for all consumers of electricity. That is why the body is called the painfully familiar term “mass”. Why “painfully familiar”? Yes, because if somewhere the contact with the mass is either poorly secured or oxidized, the inexplicable begins. Let’s take the first example we come across: the sore subject of the first and second Samaras is the blinking of yellow and red headlights, etc. I have already analyzed this situation in the article: why the headlights do not light up, where I made a “mass”, as the main reason for unstable operation. But the headlights are a small thing compared to the performance of the engine and the electronic engine control system (ECS). In this article we will look at the weak “mass” points on the VAZ 2114 2113 2115 with 1.5l, 1.6l engines.
Battery weight
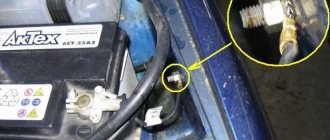
The “minus” on the battery has two branches: a thick wire and a thin one. A thick wire runs from the battery negative to the engine housing. If this contact is not secured properly, then the battery is not fully charged, the starter does not develop full power, and the ECM stalls (since it takes weight from the engine).
On the negative mount of the battery with the engine, you need to check the tightness of the two nuts between which the contact to the engine is attached: first of all, loosen the outer nut and tighten the inner one, and then tighten the outer one.
The second wire from the battery is much thinner and is attached to the body next to the battery itself. This wire is the source for all energy consumers in the car. Here you also need to check the tightening torque of the nut both to the body and to the battery terminal.
ECM weight
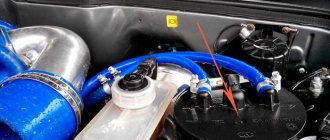
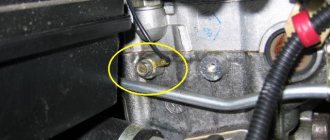
For SAMAR with a 1.5 liter engine, the mass for the ECM is taken from the engine housing, from the fastening of the plugs. The plugs are located on the right side of the block head.
For SAMAR with a 1.6 liter engine, but also 1.5 liter engines, which have a new generation ECM (Bosch 7.9.7, January 7.2), the weight of the ECM is taken from a welded stud. The pin is attached to the metal frame of the instrument panel to the floor tunnel (under the ashtray). In practice, it happens that this pin is painted at the factory and is loosely tightened. Therefore, over time it may become loose and at the moment the fan is turned on, there will be a drop in the voltage of the following sensors (which will lead to jumps in speed): DTOZH, TPS, MAF.
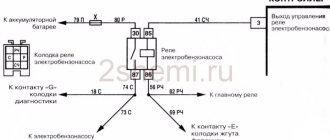
Connections of the torpedo harness, mounting relay and fuse block diagrams, rear harness
Weight of torpedo (instrument panel)
At this point in the bundle there are connections of the torpedo harness, circuit diagrams of the mounting relay and fuses, and the rear harness. This connection is located under the steering shaft mount. If this connection is unreliable, then deviations in the instrument panel readings are possible when energy consumers (headlights, turn signals, etc.) are turned on.
Heater motor weight
This ground connection is located under the instrument panel on the left side of the heater housing.
In conclusion, it is worth noting that absolutely all factory-made studs are not treated in any way other than paint, so over time, corrosion, oxidation appears, and voltage drops begin.
Bad ground on starter: symptoms
Lack of contact directly affects the performance of the brushes. Expressed in relay clicks. The starter will not turn on - the unit does not turn completely. There is no need to rush to disassemble. Check for mass. If the wire connecting the starter to the negative terminal of the battery is broken, it needs to be replaced. Then the starter will work as before.
Weight in the VAZ 2114: location, possible problems and their solution
The vehicle's electrical network is connected to a common “minus”, or mass, which is the entire body. That is, the body as a mass on the VAZ 2114 represents a single source of negative charge. And the source of negative charge is the connection between the case and the negative terminal of the battery.
If the wires connected from the electrical network to ground oxidize (come off), problems arise with the electronics, engine or control system. In case of typical “mass” faults, for example, “blinking” of the rear lights instead of turning on the turn signal or poor cranking of the starter, first check the condition of the wires connected to ground and contact points.
Where is the mass of the ecu for the VAZ 2114
The first ground pin from the ECU on cars with a 1.5 engine is located under the instruments on the power steering shaft mount. The second terminal is located under the instrument panel, next to the heater motor, on the left side of the heater housing.
On cars with a 1.6 engine, the first terminal (mass of the VAZ 2114 ECU) is located inside the dashboard, on the left, above the relay/fuse block, under the sound insulation.
The second terminal is located above the left screen of the center console of the instrument panel on a welded stud (fastened with an M6 nut).
All studs have no corrosion protection other than factory paint. When the paint comes off, the stud rusts. Pay attention to the condition of the stud and treat it with protective lubricant.
Where is the ECM mass located?
The ECM ground is located on the plug mounts on the right side of the 1.5 engine head. On the 1.6 engine, the mass on the VAZ 2114 engine is placed on a welded pin connecting the metal frame of the central panel and the floor tunnel.
Where is the battery mass located?
The battery mass consists of two wires of different thicknesses. A thick wire extends from the battery negative to the engine housing. A thin wire is attached to the housing next to the battery.
Problems with bulk wires
How do problems with ground contacts manifest themselves?
Engine
If the ground wire from the ECM is oxidized or disconnected, this manifests itself in a spontaneous change in operating modes or the car suddenly stalls. Poor contact from the torpedo causes unstable engine operation at idle.
If the contact is broken, the battery charge deteriorates, the starter speed decreases during startup, problems arise in the ECM, because the second ground wire from the battery goes there. To correct the violation, first check the tension of the nuts securing the thick wire to the engine.
To do this, the outer nut is loosened, the inner nut is checked and, if necessary, tightened. The outer nut is then screwed back on. The thin wire is the main conductor of the negative charge. In case of malfunctions, check its condition and the tightness of the nut on the housing, as well as the bolt on the battery terminal.
Battery self-discharge
A leak is both the cause and consequence of battery self-discharge - the process can be like:
- Provoked self-discharge. Caused by current loss due to a short circuit, incorrect connection of equipment or its malfunction.
- Operational. It is caused by an external short circuit of the battery terminals through layers of contaminants on the case (dust, dirt, technical fluids).
- Electrolytic. It is caused by an internal short circuit of the battery terminals through the products of chemical reactions that have settled to the bottom (“sludge” - particles of oxidized lead).
- Natural. Degradation of battery plates and electrolyte during prolonged inactivity or during operation.
Problems with bulk wires
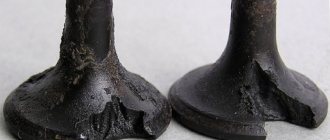
The studs for fastening the common wires are often painted along with the body, and therefore the contact on them is not always reliable. In addition, they are fastened at the factory through a nut - first the nut is screwed onto the stud, then the minus is installed, and only then the wires are attracted to ground with another nut. The bottom nut is often poorly tightened, which is why electrical problems arise.
Often, mass-produced studs rust and the integrity of the contact is compromised.
To establish good contact with the common wire, you need to unscrew the top nut, remove the wiring from the stud, tighten the bottom nut all the way and put everything in place. It is a good idea to place a castle washer between the bottom nut and the body on the stud. The washer will have reliable contact with the body, and electrical problems will not arise due to poor mass.
How to check current leakage in a car
Checking the total current leakage along the 12 V line of the car is very simple: you need to turn on the multimeter in ammeter mode in the gap between the battery and the rest of the car's network. In this case, the engine must be turned off and no manipulations with the ignition must be performed. Huge starting currents of the starter will definitely lead to damage to the multimeter and burns.
It is important! Before starting to work with a multimeter, it is recommended that you read the training article on working with the device.
Let's look at the process in more detail:
- Turn off the ignition and all additional consumers.
- We get to the battery and, using a suitable wrench, unscrew its negative terminal.
- Set the multimeter to DC ammeter mode. We set the maximum measurement limit. On most typical meters this is either 10 or 20 A. We connect the probes to the appropriately marked sockets. Please note that in ammeter mode the resistance of the “tester” is zero, so if you touch the two battery terminals with the probes out of habit, you will get a short circuit.
To measure leakage current, you must turn the multimeter into DC measurement mode
It is important! Do not use a jack marked “FUSED”. This multimeter input is protected by a fuse, usually 200 or 500 mA. The leakage current is unknown to us in advance and can be much greater, which will lead to failure of the fuse. The inscription “UNFUSED” indicates that there is no fuse in this line.
- Now we connect the probes into the gap: black to the minus on the battery, red to ground. For some older meters, polarity may be important, but on a digital meter it doesn't matter.
It is safest to carry out measurements by disconnecting the negative terminal, but it is also acceptable to use the “plus”
- We look at the instrument readings. In the picture above we can see a result of 70 mA, which is quite normal. But here it’s worth thinking about, 230 mA is a lot.
If all electronic equipment is truly turned off, then a current value of 230 mA indicates serious problems
An important subtlety: after closing the on-board circuit with a multimeter, in the first couple of minutes the leakage current can be quite large. This is explained by the fact that de-energized devices have just received power and have not yet entered energy saving mode. Hold the probes firmly on the contacts and wait up to five minutes (you can use alligator clip probes to ensure a reliable connection for such a long time). Most likely, the current will gradually drop. If high values remain, there is definitely a problem with the electrical equipment.
How much do cars weigh (table)
- Car weight table
- Interesting video about weight
Nowadays, few people are interested in such a characteristic of a car as its weight, and if they are interested, then in the last place. It is much more important for the average person to know his appetite, speed, cost and other indicators. Although, by and large, the weight of the car actually affects all its other indicators.
For example, the heavier the car, the more powerful the engine must be installed in it so that it can reach the required speed and accelerate to 100 km in a matter of seconds. The same can be said about fuel consumption - the heavier the vehicle, the more gasoline or diesel fuel it will need to move.
A car's directional stability and handling are also directly related to its weight. The peak of popularity of large, heavy cars abroad occurred in the 50-60s of the last century. Then the auto industry produced truly gigantic cars. For example, the Cadillac Eldorado modification 8.2 weighed almost 3 tons. Agree that for such a weight, an appropriate makeweight is needed.
But as time passed, it became clear that in order to further develop and improve the most important characteristics of the car, it was necessary to resort to reducing its overall weight.
And if we compare the middle of the last century and today, cars have lost half, or even more, of their own weight. Plastic, carbon fiber reinforced plastic, light metals - all these innovations have made it possible to make the weight of a passenger car significantly lower.
Of course, for lovers of everything big and heavy, cars are produced that look like steamships that drink buckets of gasoline, but this is rather an exception to the rule.
Car weights, table
We present to your attention a table that shows the weight of the car by brand.
Make Model Curb vehicle weight (kg)
| Oka | 1111 | 635 |
| 1113 | 645 | |
| VAZ | 2101 | 955 |
| 2102 | 1010 | |
| 2103 | 965 | |
| 2104, 2110 | 1020 | |
| 2105 | 1060 | |
| 2106 | 1045 | |
| 2107 | 1049 | |
| 2108 | 945 | |
| 2109 | 915 | |
| 2111 | 1055 | |
| 2112 | 1040 | |
| 2113 | 975 | |
| 2114 | 985 | |
| 2115 | 1000 | |
| 2116 | 1276 | |
| 2117, 18, 19,20 | 1080 | |
| Niva | 2121 | 1150 |
| Gazelle | 3302 | 1850 |
| 33023 | 2050 | |
| 33027, 330202 | 2100 | |
| 330273 | 2300 | |
| 2705 | 2000 | |
| 2057 | 2220 | |
| 330232 | 2170 | |
| Sable | 2752 | 1880 |
| 2217, 22171 | 2130 | |
| Chevrolet | Cruz | 1285-1315 |
| Niva | 1410 | |
| GAZ (Volga) | 24, 2401 | 1420 |
| 2402, 2403,2404 | 1550 | |
| 2407 | 1560 | |
| GAZ (truck) | 53 | 3250 |
| 66 | 3440 | |
| 69 (8 seats) | 1525 | |
| 69A (5 seats) | 1535 | |
| ZIL | 130 | 4300 |
| 131 | 6790 | |
| 157KD | 5050 | |
| 433360 | 4475 | |
| 431410 | 4175 | |
| 431510 | 4550 | |
| MAZ | 5551 | 7470 |
| 53366 | 8200 | |
| Ural | 375 | 7700-8000 |
| 377 | 6830-7275 | |
| 4320 | 9750 | |
| 5557 | 9980 | |
| Muscovite | 412 | 1045 |
| 2140 | 1080 | |
| 2141 | 1055 | |
| 2335, 407, 408 | 990 | |
| UAZ | 3962, 452 (loaf) | 1825 |
| 469 | 1650 | |
| Patriot | 2070 | |
| Hunter | 1815 | |
| Nissan | x trail (x-trail) | 1410-1690 |
| Qashqai | 1297-1568 | |
| Juke | 1162 | |
| Ford | Focus | 965-1007 |
| Focus 2 | 1345 | |
| Focus 3 | 1461-1484 | |
| Kuga | 1608-1655 | |
| Escort | 890-965 | |
| Renault | Logan | 957-1165 |
| Duster | 1340-1450 | |
| Sandero | 941 | |
| Opel | Mocha | 1329-1484 |
| Astra | 950-1105 | |
| Mazda | 3 | 1245-1306 |
| cx-5 | 2035 | |
| 6 | 1245-1565 | |
| Volkswagen | Tuareg | 2165-2577 |
| Polo | 1173 | |
| Passat | 1260-1747 | |
| Toyota | Camry | 1312-1610 |
| Corolla | 1215-1435 | |
| Celica | 1000-1468 | |
| Land Cruiser | 1896-2715 | |
| Skoda | Octavia | 1210-1430 |
| Fabia | 1015-1220 | |
| Yeti | 1505-1520 | |
| Kia | Sportage | 1418-1670 |
| Ceed | 1163-1385 | |
| Picanto | 829-984 |
What is this device and how does it work?
Its name says it all - switch. The simplest models will cost 2-3 hundred rubles. The ground switch is installed in the gap between ground and the negative current terminal of the battery. If other current consumers are directly connected to the battery, then the switch breaks their ground as well. Typically, such a device is implemented directly on the negative current terminal of the battery. They differ only in the way the line break is implemented.
There are more advanced remote battery disconnect switches. These are electromagnetic switches that can be installed in the engine compartment and controlled from the passenger compartment. The button or switch is installed somewhere in a hidden place. Cost from one to several thousand rubles.
And one moment. Why is the wire broken from the negative current terminal of the battery, and not the positive one? Just to avoid accidentally shorting something to a “broken plus”. Return to content