How long the heater motor lasts depends on the intensity of its use and conditions. If you actively load the climate systems and do not change the cabin filter, the problem may appear after 20-30 thousand kilometers . The most common malfunction of the stove motor is squeaking and squealing. To prevent this from happening, you need regular maintenance of the stove, its motor, and the entire climate system as a whole.
With gentle operation and periodic maintenance, repair of the stove fan may only be required after 100-200 thousand kilometers or more. The main signs by which such a need can be determined are noisy operation (crackling, whistling, howling, etc.) or vibration. If there are no signs of operation at all or the intensity of the air pressure flow from the air ducts has decreased when the climate control equipment is turned on, you will most likely have to disassemble the stove, check it and carry out more complex repairs.
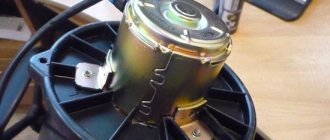
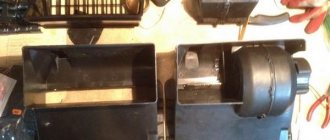
Most cars are equipped with centrifugal fans (barrel-shaped) with a commutator motor, so checking the heater motor and restoring it in many cases is similar. Axial fans (propellers) are used only on old cars, like Zhiguli and Moskvich, and brushless motors are rare even among expensive foreign cars. Therefore, this article is devoted specifically to the collector motor of a stove with a centrifugal fan.
Stove fan
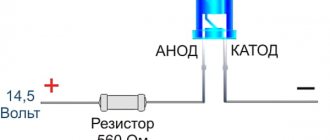
Structurally, the fan consists of a DC electric motor with a commutator-brush assembly and an impeller mounted on the electric rotor. motor. The electric motor is powered from the vehicle’s on-board network. There are several modes of fan operation, the difference between which comes down only to the rotor rotation speed, and this is realized by inserting a resistor into the power supply circuit of the electric motor.
The fan operating mode is set using a handle located in the heater control unit on the center console. Initially, on the VAZ-2110, this handle was part of the design of the SAUO controller, but functioned separately from the controller itself. Later, the ACS added an automatic fan control function (position “A” on the handle), using which the controller regulates the rotation speed of the electric motor in order to maintain the set temperature.
The electric motor used in the design of the VAZ-2110 fan is simple, but it has “weak points” - the commutator-brush assembly and bearings. Wear of these elements causes incorrect operation and complete inoperability of the fan. Short circuits and winding breaks in the stove drive are rare, but don’t forget about these breakdowns either.
Symptoms of failure. Heater components that affect fan operation
Signs of a malfunctioning stove fan are quite obvious and impossible not to notice. Common symptoms of failure:
- Increased noise, grinding noise during operation.
- Significant reduction in air injection efficiency.
- The fan does not turn on.
- Spontaneous change in the rotation speed of the electric motor.
- It can be determined by ear that the electric motor is operating under heavy load.
In some cases, such consequences result from malfunctions in the power supply and fan control circuits, so you should check them first. This applies to:
- fuse (blowout is the cause of complete failure of the electric motor);
- resistor (if it is faulty, some speed modes of the electric motor stop working);
- controller (the knob for switching fan modes is part of its design, so malfunctions of the automatic control system affect the functioning of the electric motor);
- wiring terminals of the power and control circuits (oxidation, damage to wires is one of the reasons for a malfunctioning electric fan).
If diagnostics of these elements shows that they are in good working order, it is necessary to dismantle and repair the fan itself. But it can be diagnosed first.
Fan check
A check is done by directly powering the electric motor from the battery (we lay wires from the battery terminals and connect them to the power terminals of the motor) - operation under load, difficulty in gaining rotation speed, squeals and squeaks indicate wear of the drive components and the need to replace them. But if, even with direct voltage supply, the electric motor does not start, it is most likely that it has burned out or the windings have broken. Such faults are difficult to fix and it is easier to replace the entire unit.
Design features of the stove of the old and new models
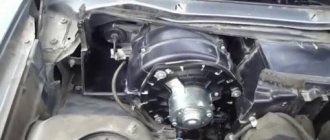
The design of the electric motor of the stove on the VAZ-2110 is identical, but the fans and their location are different. On models of the first years of production, the electric fan is installed in the stove housing in front of the radiator and it is located horizontally (old-style stoves). Afterwards, the design was revised - the fan was already placed in the cabin filter housing and installed vertically (new model heaters).
Despite the design features, dismantling the fan is a simple operation and does not require complete disassembly of the stove.
On a VAZ-2110 with an old-style heater, to remove the electric fan you need to:
- Dismantle the frill.
- Remove the front wall of the niche in which the heater is located.
- Remove the back cover of the fan housing by first unscrewing the screws and removing the clamps.
- Disconnect the wiring from the fan and remove it.
As for models with a new type of stove, the technology for removing the electric stove fan on such cars is different:
- dismantle the “jabot” and the front wall;
- remove the air filter;
- unscrew the fastening of the filter housing to the stove body and separate them;
- disconnect the wiring;
- remove the filter housing together with the fan;
- dismantle the electric fan.
After removing the electric motor with the impeller, we disassemble it, perform troubleshooting, replace worn elements and put it back together.
DIY stove motor repair
Once the nature of the breakdown and its specific culprit have been determined, we begin disassembling the stove motor and repairing it. You can contact specialists at a service station, which is easier, but sometimes expensive. Official dealer services, as a rule, change the entire part, which in a non-warranty case can be very expensive (up to 10 thousand rubles or more for an original electric motor). Small and specialized service stations can undertake the maintenance and repair of the stove motor; the price of work starts from about 1000 rubles.
Repairing the stove motor yourself will cost less. This is not very difficult, but not always possible. Procedures that can be carried out in the garage and restore the performance of the electric motor include:
The process of disassembling and cleaning the components of the stove motor
- cleaning and lubrication of bearings and bushings (lubrication costs);
- cleaning the lamellas on the armature commutator (costs of abrasive and lubricant);
- replacement of bearings (50-300 rubles);
- replacing the impeller (100-500 rubles);
- replacement of brushes (50-300 rubles);
- anchor replacement (up to several thousand rubles)
- replacement of current-limiting resistors (200 rubles on a VAZ and from 1 to 5 on foreign cars).
Repairing the stove fan motor is impractical if damage (breakage, short circuit, burnout) of the stator windings is detected. Damage to the rotor (windings or commutator lamellas) can only be repaired if there is a new rotor assembly, which is not easy to find. Therefore, in such cases, repairing the car’s heater motor does not make sense. A complete replacement will definitely solve all problems without much time, and often even costs less.
Disassembly
In most cases, disassembling the stove motor proceeds in the same way, using a standard set of tools:
- flat and Phillips screwdrivers;
- a set of small wrenches or sockets (usually from 6 to 13);
- pliers or pliers.
The specific set and numbers of keys/heads depend on the design of the climate system motor in your car.
To get to the manifold you need to drill out the rivets, using the example of Volswagen
Flare the bends so that the components are separated, using the example of Volswagen
Disassembling the heater electric motor is carried out according to the following scheme:
- Removing the motor from the housing. It is only necessary for cars on which it is removed along with the snail casing.
- Removing the electric motor impeller from its rotor. The fan impeller is usually secured to the shaft with a bolt or metal retainer. If it fits tightly, you need to remove it by carefully prying it up with two flat screwdrivers, trying not to damage the part.
- Removing the cover from the manifold assembly or separating the halves. If there is a separate cover on the collector side, it must be removed. On motors consisting of halves, they are separated. For fastening, screws for a screwdriver or a small 6-10 wrench are usually used (depending on the motor).
- Removing the brushes. To remove the brushes, simply bend the fixing bar above them.
- Removing the rotor. The rotor is removed from the housing to the side where the impeller is installed. Usually, when removing it from the shaft, the front bearing is also removed, and the rear (if any) or bronze bushing remains in the manifold cover or other part of the electric motor.
Before disassembling the stove fan, find a disassembly diagram (or better yet, a video) specifically for your model. Below are several videos of disassembly of different engines, but although the general principles are the same, the subtleties may differ (especially on Toyotas).
Disassembly and repair of the axial motor of a car heater
Removing and disassembling the heater motor on Priora and VAZ 2110-2112
If the motor itself is disassembled, it is recommended to immediately replace the bearings and clean the contacts from oxides. Often even such simple procedures help restore the proper operation of the motor.
Restoring functionality
Reassembling the stove motor involves visually inspecting the part for wear and malfunctions, identifying defective parts and restoring their operation as a result of repair or replacement. In many cases, all problems are solved by cleaning them from dirt or oxides and lubricating them. However, if parts wear out, without replacing them, it will not be possible to restore the functionality of the electric motor of the interior heater.
If the stove motor does not turn, possible reasons lie in the brushes, commutator lamellas or windings. The first two problems are relatively easy to fix. But if the impeller of the electric motor does not rotate due to the windings, then they need to be rewinded. This is difficult and impractical, so you need to change the armature or electric motor completely.
If the stove motor turns weakly, the problem could be in the brushes or bearings, or in the bushings or windings. Replacing brushes and bearings or bushings is not a difficult task, but if the armature windings are faulty, the motor most likely needs to be replaced.
In some cases, the problem with a weak motor may not be the problem. If the current-limiting speed control resistor is attached to the housing, then the reason why the stove motor turns slowly may be a breakdown of this very resistor. Such a motor can be distinguished by the multi-pin connector chip, the presence of a large resistor somewhere at the back, or by the radiator there.
Motor control board with a resistor on the stove, using Toyota as an example
Location of the current-limiting resistor separately from the stove, using the example of Opel
If the heater motor whistles or crackles, the problem is in the bearings or bushings. In mild cases, the sound is eliminated by cleaning and lubrication, in severe cases (excessive wear, severe play) - by replacing fans or bushings.
In cases where the electric motor is made non-separable, and instead of bearings it uses bushings of rare standard sizes (polymer, bronze or brass) that cannot be found on sale - restoration of the heater fan is realistic only if you have access to a lathe so that you can turn the required bushing out of bronze . There is no such possibility - the motor will have to be replaced with a new one.
Cleaning the stove motor
If the stove motor squeaks, sometimes cleaning and lubricating it is enough to eliminate the sounds and extend its service life. But, in general, cleaning the stove motor will be useful for any intervention during repairs, regardless of the type of malfunction. For cleaning you will need:
Cleaning the impeller using foam for cleaning car interiors
- brush;
- acetone or degreaser;
- thick rags.
When disassembling the heater electric motor, it is necessary to clean its components from deposits of dust, dirt and oxides:
- impeller;
- rotor shaft (armature);
- body and covers.
Cleaning is done carefully with a brush dipped in acetone. You can also use aerosol and contact cleaners, such as spray for carburetors and throttle bodies. Dense deposits that cannot be removed with a brush or a jet from a spray can must be wiped off with a thick cloth that does not leave threads or lint.
Do not overdo it with liquid or aerosol cleaners when cleaning bearings. They have high penetrating power and can get under the seal of a closed bearing. There they dissolve the lubricant, thereby shortening the service life of the part.
Before lubricating the stove motor, check it again for wear after cleaning. Sometimes dirt plays the role of an additional seal and does not allow us to assess the degree of wear, reducing backlash.
Lubrication and Maintenance
Elimination of squeaking and squealing noise from the Volkswagen stove at 1st and 2nd speeds. Stove motor maintenance (cleaning and lubrication)
If the stove motor is humming, but troubleshooting has not revealed much wear and play, it is enough to lubricate it normally to remove the noise. Lubricant must be applied to the bearings and bushings in which the shaft rotates. It is impossible to lubricate the internal parts (armature, lamellas), since the stator and rotor do not form friction during operation, and the commutator lamellas must have tight contact with the brushes! It is the metal-graphite brushes that play the role of lubricant in this friction pair.
How to lubricate the stove motor and what lubricants should not be used
When servicing the fan, the question arises of what to lubricate so that the heater motor does not whistle, and at the same time serves for a long time. In order for the lubricating layer to remain on the rubbing units for a long time, the lubricant must be sufficiently thick and not runny. The most suitable lubricant for stove motors, regardless of its design, is Total Altis SH2, Mobil Polyrex EM, Chevron SRI, Mannol Grease Lc2. The composition of this lubricant is quite thick, withstands temperature changes, lasts a long time and repels moisture well.
Hub motors that use a ring of felt or other dense absorbent material can be lubricated with regular motor or transmission oil. You need to drip it a little into the bushing and saturate the felt seal with it. But it is not advisable to use GL-5 grade gear oil, since the sulfur additives it contains accelerate the wear of parts made of copper alloys.
If the question often arises as to why the heater motor whistles or howls despite periodic maintenance, here are three possible answers:
- Wear . If the electric motor is pretty tired, then lubrication helps only for a short time, and then the howling returns.
- Bushing design . If instead of rolling bearings the motor uses plain bearings (simple bushings made of copper alloy or plastic), then the lubricant is quickly washed out of them and noise occurs.
- Incorrect lubrication . If the stove motor has already been serviced, it is possible that the wrong lubricant was selected, which does not cope with the tasks or has simply already leaked out or dried out.
To keep the stove motor running for a long time, you should not use:
To prevent oil from getting onto the brush assembly, a syringe is used
- Graphite grease . Graphite lubricant is contraindicated for electrical equipment, since graphite conducts current well.
- Dry lubricants . They are not distributed very well, they disappear quickly and therefore fail to cope with the task.
- Solid oil . Solid oil hardens quickly in the cold, and when heated it becomes quite liquid, so it is poorly suited.
- CV joint Lubricants for drives in the stove motor are not suitable, since the operating conditions of the hinges and electric motors are very different.
CIATIM and Litol-24 lubricants are also not suitable in terms of their properties, but they are quite often used by car owners. A repeat situation of noisy operation of the stove after using such motor lubricants is guaranteed.
After servicing the stove motor, lubricating and assembling it, you need to turn it by hand. Firstly, this way you will better distribute the lubricant. Secondly, this will make sure that everything is assembled correctly, installed smoothly, and that the impeller or other parts do not catch anything when rotating.
Restoration of individual parts
Restoring a stove motor makes sense if worn parts can be replaced and its design is dismountable. Breakdowns that can be repaired in a garage include:
- impeller failure;
- worn brushes;
- damaged collector;
- worn bearings or bushings;
- failed resistor.
In the case of a non-separable and maintenance-free design, repairing the heater damper motor is impossible (or possible with great labor costs), so it is better to replace it with a new one.
Replacing the impeller
This is an easy malfunction, since the impeller of the stove motor can be replaced without completely disassembling it. To change a purchased used impeller, it is enough to remove it from the rod, first removing the lock washer (if there is one), basically it just sits tightly on the shaft. But usually the fan does not simply break, so the motor still needs to be examined for play and distortion. After all, the impeller often breaks due to jamming.
Replacing brushes
If the metal-graphite brushes are worn out and have poor contact with the commutator, they can be replaced. To do this, you need to measure the size of the brushes and select similar ones. Sometimes the brushes are soldered to the leads, so replacement may require a soldering iron. But in most cases they are pressed down by springs and to change them you just need to bend the clamps.
Please note: brushes can be either simple graphite (cheaper) or copper-graphite (more expensive). It is not advisable to install the former instead of the latter, since their resistance is often higher, which causes the motor to heat up and accelerate its wear. If there were copper-graphite ones from the factory, then you only need to install these, but on the contrary, you can change them.
Collector repair
Oxidized lamellas on the anchor can be cleaned using soft sandpaper or a rough cloth with an abrasive paste. To speed up the process and uniform stripping, the anchor can be inserted into the chuck of a drill or machine. If the lamellas are severely damaged by oxidation, burnt, or worn out, you can repair the armature by replacing the collector itself.
Repairing the stove motor armature involves disconnecting the old commutator from the windings, pressing it off the shaft, installing and connecting a new commutator. You need to choose a part that has the same size and number of slats. To ensure reliable fixation on the shaft, you can place the new collector on epoxy or glue. In this case, it is important to seat the new part evenly so that the brushes slide normally.
A burnt-out motor lamella, with such a malfunction you need to either change the commutator or the entire electric motor
New and old manifold after repair of the Audi heater motor armature
Replacing bushings or bearings
If the rotor bushings or bearings are severely worn, they are replaced with new ones. The bushing must be selected according to the motor markings or by manual measurements with a caliper (but take into account the wear of the internal hole). Bearings usually have markings according to which new ones should be selected.
If the design uses an open type bearing, it is better to replace it with a closed type analogue. It lasts longer because, due to its tightness, it does not require periodic lubrication.
To replace the heater motor bearing, it must be pressed off the shaft or pressed out of the housing using a puller. You can press out the bearings using a vice or a piece of tube (larger than the outer diameter of the bearing) and a bolt with a washer and nut. The bolt is inserted into the bearing, the tube is put on it, then the washer and nut are put on. When tightening the bolt and nut, the bearing will pop out into the tube.
Replacing heater motor bearings
It is not advisable to knock out bearings with a hammer or use other impact tools, as you can damage entire motor parts!
Resistor repair
Resoldering a burnt resistor to a new one
In most cases, it is more advisable to replace the resistor with a new one, selecting it according to the car model or nominal value. When this is not possible or a temporary solution is needed, then you can try to repair it. As a last resort, you can switch to direct current supply and then the motor will spin constantly only at the highest speeds.
A more difficult task is to assemble a resistor block with your own hands, instead of a burnt one. To do this, you need to find a circuit of the original resistor (on stoves with several speeds it usually consists of steps), select resistances in the radio components that are similar to the original ones, and solder them according to the circuit.
Replacing the heater radiator on VAZ 2110 and 2112. When the resource is exhausted
- Old model (until 2003);
- New model (since 2003).
- Remove the rubber seal from the wind lining;
- The fasteners are unscrewed and the frill is removed;
- Remove the windshield trim. To do this, unscrew the nuts and screws located along its edges;
- The hose is removed from the front window washer. It should be moved to the side, otherwise it will interfere with further work;
- Unscrew the wiper fastenings;
- The cover (wind deflector) is finally removed;
- The metal clips are removed from the stove body. They are examined carefully, if corrosion is visible on them, then they need to be replaced with new ones;
- Remove the filter in the cabin, which is attached to the heating radiator with screws; Turn off the fan. To do this, remove the positive connector and unscrew the nut from the negative terminal (on the body);
- Unscrew the 3 screws securing the stove cover;
- Loosen the hose clamps. We remove the radiator.
- The supply hoses are dismantled. Also remove the steam exhaust hose. It is enough to disconnect it from the stove. They are all attached to clamps;
- Chips are removed from the fan;
- The gear motor is disconnected from the power supply;
- Unscrew 3 screws securing the gear motor;
- We find the places where the radiator is attached to the body and unscrew the screws;
- Unscrew the screws from the filter cover. We extract it;
- Unscrew the screws securing the radiator halves;
- Now you can remove the heater itself. We first pull out the left part, then the right;
- Unclamping the brackets, remove the damper.
Step-by-step replacement process
- Open the hood and disconnect the negative terminal of the battery.
- Behind the engine shield, unscrew the four screws securing the fan casing and remove it. Phillips head screws.
After removing the casing, remove the two screws that hold the fan housing in place.
Using a slotted screwdriver, open the latches and separate the plastic fan housing into two halves.
Disconnect the heater motor power supply terminal (it is located above the gas pedal).
Unscrew the nut by ten and remove the ground terminal of the heater motor (the terminal is located above the gas pedal).
Causes of malfunction
Replacing the heater motor of a VAZ 2110
As a rule, there are many reasons for such a malfunction, these include:
- clogging with slag from the stove radiator;
- stove motor failure.
If the stove motor is not functioning, or some of its speeds are not working properly, then it is first recommended to check the resistor, which in other words can be called the stove rheostat. This element is responsible for the speed of the fan. You can purchase such a part in a specialized store that sells auto parts. As for replacement, this can be done with the help of a specialist or on your own, which is not so difficult even for an inexperienced specialist.
Note! In the case of repairing or replacing the heater radiator, it is recommended to contact a car service center, since it is difficult to remove the radiator yourself. To replace the stove motor, you will need minimal knowledge and detailed instructions.
There are heater malfunctions that can be easily fixed by any car enthusiast. For example, a situation may occur when cold air is blowing through the side deflectors and the windshield heating duct of the heating system, while a hot air flow comes from the lower and central air ducts. Most likely, the reason will be the unsatisfactory operation of the heater damper, which is designed to cut off cold air. In some cases, it prevents the normal passage of cold air. Such faults are most easily identified in the cold season
When bending the damper drive rod, special care must be taken so as not to damage the plastic parts. Please note that in winter the plastic becomes more fragile
Replacing the motor for the stove on a VAZ 2110
Of course, a non-functioning stove causes many problems in winter.
If this is not so important in the summer, then in the winter the windows will fog up. You can figure out what the reason is when disassembling the heating system of the car
Preparing for replacement
If you have at least some skills in working with wrenches and screwdrivers, replacing the stove motor will be a feasible repair for you.
To get to the electric motor of the VAZ 2110 heater, you first need to open the hood and remove the “-” battery terminal.
Now, in fact, we are removing the motor itself, which does not work as we need, or has completely failed:
- The windshield wipers need to be removed. To do this, pry off and remove the rubber caps, take a 10mm wrench, unscrew the nuts, disconnect the brushes;
- We pry up the decorative plugs (a slotted screwdriver is useful here), unscrew the screws that secure the frill, then a couple more nuts on the edges (with a 10mm socket wrench), remove the frill;
- Having removed the rubber seal, unscrew the screws with which the engine compartment shield is attached;
- Now, remove the hose that supplies washer fluid to the injectors;
- The most difficult task is getting to the right side of the engine compartment to remove it. It has two nuts at the bottom (also for a 10mm socket wrench). It would seem easy to unscrew, but it’s just painfully inconvenient. Although there is a positive point here - these nuts do not have to be completely unscrewed - the shield can be pulled out after a few turns;
- Before disconnecting this shield, remove the clamps from the hose going to the vacuum brake booster;
- Unscrew the screws (4 pieces) from the cabin filter cover and remove it;
- The heater motor has already appeared. It is necessary to disconnect the heater motor block, as well as the resistor block;
- Now you can pull out the left side of the stove, and with it the fan motor;
- It became possible to replace the heater fan;
- Reassembly is carried out in the same order, only exactly the opposite.
Be prepared for the fact that for the first time replacing the heater motor on a VAZ 2110 (repair) will take you a couple of hours.
Important points
In order for the stove repair to proceed as quickly as possible, and its results not to disappoint the car owner, you should adhere to the rules below:
- When removing the old motor, be sure to turn it. If this is not done, part of its fastening may break and get stuck in the torpedo, or more precisely, in the mounting bracket. And getting to the stuck fragment will not be so easy.
- When tightening the mounting screws with a Phillips screwdriver, you should not use too much force: they are small, so the threads in their sockets can easily be stripped.
As practice shows, replacing an engine is not particularly difficult even for a novice car enthusiast if he has held a wrench and a screwdriver in his hands at least once in his life. The whole procedure takes 40–50 minutes maximum. The main thing is not to overdo it with tightening the fasteners, and everything will be fine.
- Author: ratico19
Rate this article:
- 5
- 4
- 3
- 2
- 1
(3 votes, average: 4.7 out of 5)
Share with your friends!
Possible causes of malfunction
Before carrying out repairs, you should carefully study the possible causes of a malfunction of the car heater fan:
- Burnt fuse. The real reason is the most banal and simple, but at the same time it is the one that leads to the greatest problems in solving the existing issue. Replacing a fuse turns out to be a very simple procedure that any motorist can successfully handle. Despite simple repairs, it is extremely difficult to detect the short circuit that led to the blown fuse.
- Oxidation of contacts that should be used to establish the operation of a car heater.
- The ignition relay does not allow the heater to turn on and start working successfully.
- An additional resistor can result in only the third speed being operational.
- A faulty car interior heating switch requires replacing the fuse.
- A non-working electric fan motor is another important reason. In this case, it is necessary to replace the heater motor or at least check its contact with the vehicle. In most cases, the cause is hidden in a burnt-out electric motor, poor contact with the machine, or sticking electric motor brushes.
Regardless of the cause of the malfunction, you can successfully adjust your car heater
The most important thing is to understand what exactly is the cause of the breakdown or partial disruption of the functionality of the heating equipment
If diagnostics have confirmed that the cause lies in the heater motor, replacing the heater fan most often becomes a mandatory task. How to carry out such a responsible procedure and how easy does it promise to be?
The radiator fan on the VAZ-2114 is used to forcibly cool the engine and cooling system when natural cooling is insufficient. It turns off especially often if the temperature sensor is broken.
Its failure can lead to unexpected consequences, therefore, it is necessary to determine the cause of the malfunction in a timely manner and eliminate it. If the motorist is unable to do this, then it is worth contacting a car service center.
Throw off the » — » battery cable to replace the fan of the VAZ 2110 stove
2. Disconnect the “+” connector of the heater fan wires
3. Using a ten key, unscrew the nut...
4...and remove the negative wire.
5. Use a screwdriver to unfasten the four brackets...
6. carefully bending the lid,
7. Remove the stove fan and replace it with a new one if it is not possible to repair it.
When installing the electric motor, make sure that it does not touch the housing when rotating.
Let's summarize
As you can see, the process of replacing a fan is simple and will not present any difficulties for a driver who has held a tool in his hands at least once in his life. An independent replacement takes no more than twenty minutes of time, and the price of replacing a VAZ 2114 stove fan at a service station ranges from 200 to 500 rubles.
A warm interior is the key to good and comfortable travel by car. A non-working stove can not only cause discomfort, but also become an argument against further travel by car at all. It’s one thing when you came to the garage, noticed a non-working heater and refused to move further in the car during the breakdown, but if this breakdown caught you on the road, the nearest service center is far away, and it is not possible to drive a car with a non-working interior heater, because the windshield becomes covered with frost and further movement becomes dangerous. Then the only option left is to either transport the car using a tow truck, or try to fix it yourself.
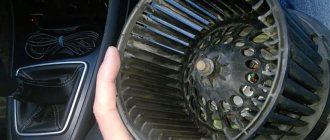
External view of the VAZ 2114 heater fan motor
How to replace the heater fan on a VAZ 2110-VAZ 2112
These instructions for replacing the heater motor are suitable for many cars of the tenth family, but not for all, because dozens were produced in very different configurations and designs over the entire time, some VAZ 2110 even had an engine from Opel installed from the factory, such a car is marked VAZ 21106, therefore, we won’t be able to write about everything (since it will be a very long article), we’ll just take the most common tenth family and use its example to show how to replace a stove motor through descriptions and pictures!
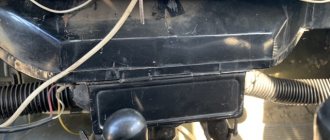
1
First of all, you will need to get to the motor, it is hidden under a trim that is located under the windshield, and inside this trim, the motor is still placed in a casing, so you will have to remove a lot of decorative elements, in more detail how to do this is described in the article entitled: “Replacing the cabin filter on a VAZ 2110” and by the way, the trim that is located under the windshield cannot be removed without removing the brush, and when you lift it, pay attention there will be a tee under it (see the large photo for the location where it is located) , disconnect the hose from it that is connected at the bottom (see small photo) and the trim can then be removed from the car
2. We go further, as soon as all the elements that prevent access to the casing in which the motor is located are removed, find the wires coming from the motor, or to be more precise, one Plus wire and one Minus wire, so the minus (Indicated by a green arrow) is attached to nut (Indicated by a blue arrow), you unscrew it, but the plus (Indicated by a yellow arrow) is connected to the other wire through a wire block and a connector (see small photo), disconnect them from each other.
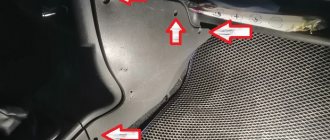
3. Then, using a flat screwdriver, pry out the four latches (They are indicated by arrows) that fasten two casings together, on one of which the stove motor is attached. Be sure to replace any latches that will be broken during their removal with new ones during reassembly. It is recommended to install all the fasteners in their places to prevent the housings from moving between each other.
4. And finally, unscrew all the screws that hold the casings together, there are only about 8 or 10 of these screws (We could be wrong), when they are all unscrewed, the casings can be separated (see small photo), but just remember where the screws go they are twisted because they have different lengths and you cannot wrap the long ones where the short ones should be located and vice versa.
The stove motor can be removed assembled with the casing, or you can immediately take it out separately, it’s up to you how to do it, but having taken out everything assembled, it will be much easier to disconnect the motor (since it will be more convenient), and the motor is separated in the following way, you will only need just remove two wires (minus wire and plus wire) from the hole into which they are threaded in the casing and that’s it!
5. Installation is carried out in the reverse order of removal, after installing the stove, you will have to use the help of an assistant and find out whether you installed the stove correctly in its normal place or with a skew (If it is skewed, then this will need to be removed immediately), in general, closer to topic, ask an assistant or even get into the car yourself and turn on the stove, while assembling it, i.e. tighten the fastening screws (You don’t even have to tighten everything) and install the clamps and, of course, put the minus on the body, and connect the plus to the connector, then turn it on and if everything works fine in all modes, then turn it off and go tighten the last screws, install the covers under windshield and of course install the brushes, the replacement is complete, if after turning on you hear a crackling noise, then this only means one thing, namely that the heater blades are touching the body in which it is located, then turn off the heater and unscrew the screws , remove the clamps and remove the body together with the stove, place the motor there correctly, tighten everything again and try until the noise disappears, just like it disappeared, screw everything back and install all the parts in the reverse order.
Diagnostics
The primary task is to identify the cause of the breakdown and assess your own capabilities in a specific situation.
Let's start with something simple and move on to something more complex:
- We check the fuse (F-7 with a voltage of 30 A), which is responsible not only for the heating system, but also for the operation of: the cigarette lighter, heated mirrors, glove compartment lights, and headlight washers. Therefore, when this fuse blows, all of the above devices refuse to work. If it is working, we move further along the chain.
- Turn on the car's ignition and switch the speed control to positions 1, 2, 3 in order. If the fan does not work in any of these positions, we move on.
- If the electric motor does not show signs of life in the first and second positions of the speed switch, but starts working in the third position (the fan is powered at the first and second speeds through a resistor, and at the third speed the current flows directly to the electric motor), the problem lies in the resistor or in the motor itself. switch
- If the heater motor turns on after the car engine has warmed up, the problem is a faulty ignition relay. Solved by replacing the relay.
- If the heater motor refuses to work in any mode, there remains one malfunction - the heater motor itself.
For the final verdict, let’s apply “+” directly to the motor by removing the positive wire terminal from the motor. If the motor does not come to life, the last thing you can try is to try to clean the place under the ground mount on the electric motor. Often this place oxidizes and the contact weakens.
Work to replace the fan in the cabin
Replacing the heater motor of a VAZ 2110
The subsequent change of the heater motor will be done directly from inside the car:
Under the dashboard you need to find the block that goes to the electric motor. She disconnects. After this, you will need to unfasten the ground wiring of the electric motor. As a rule, it is pressed to the body by the front mounting nut of the heater. The trim and lining of the windshield frame are dismantled, and you cannot do without unscrewing the mounting screws. The right upholstery is removed from the interior heater, and the fastening nuts and screws should also be unscrewed. Heating hoses are disconnected
At this stage of work, extreme caution must be taken, since antifreeze residues may leak from these hoses and the heater radiator. To prevent the smell of coolant in the car interior, you need to lay a material that absorbs moisture well. The wiring is disconnected from the electric motor, from the micro-reducer, and also from the pneumatic valve. After these steps, remove the front housing with the stove casing. These elements are fixed with brackets and screws. It is worth noting that the engine and motor are located on the casing. The latches are removed, and the engine and motor are removed.
Recommendations for replacing the motor
Replacing the heater motor of a VAZ 2110
You can disassemble the electric motor yourself only to evaluate the collector and clean it. If the cause of the breakdown lies in another situation, then it is not advisable for a non-specialist in working with such parts to disassemble it. It is better to buy a new electric motor.
Note! It is also not recommended to dismantle the engine impeller on your own, since when it is installed in its place, the balancing, which plays an important role, will be disrupted. Naturally, the electric motor will function, but not smoothly, which can lead to breakage of the bearings and noise when the stove is turned on.
Since the stove is in a disassembled state, it becomes possible to calmly view the other components of the cabin heater. So:
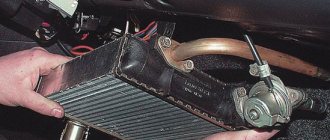
- In order for more heat to come from the radiator, you need to dismantle it and wash it. It is fixed on the rear casing of the heater, which is removed by unscrewing the mounting screws. After this, the radiator can be easily removed and washed under the pressure of water flowing from a hose that is connected to the radiator inlet or outlet tube. The same pressure washes away dirt from the surfaces of the removed radiator.
- To disassemble the air ducts and heater control mechanisms, you will need to remove the instrument panel on which the main air ducts are located.
Note! Usually the panel with the main air ducts is made as one piece, so it must be handled with the utmost care so that it does not have to be replaced later. After this, you need to remove the interior air ducts, which are secured with special screws, and the decorative lining of the floor tunnel
After this, you need to remove the interior air ducts, which are secured with special screws, and the decorative lining of the floor tunnel.
Note! Under this trim there are air ducts for heating the feet, which are attached to the body with screws and latches.
- The air distributor is removed from the dashboard by unscrewing the mounting screws and disconnecting the damper control rod.
- Reassembly must be done in the reverse order of disassembly. If necessary, fix the damper seals with glue. You can also seal the attachment points of the hoses with the radiator with sealant.
- When all the parts are assembled and installed in their places, the functioning of all components is checked and antifreeze or antifreeze is added. It all depends on personal preference.
- At the final stage, they check the tightness of the attachment of the hoses to the radiator and the actual operation of the assembled stove.
For those who perceive information visually, it is recommended to watch a video with a detailed description of the actions and several photos that will help you do everything correctly.
Repair work can be carried out with your own hands, but subject to clear instructions. This will help you save a lot of money, because the price for services of this kind in car services is not cheap.
Cars and everything about them
As often happens, problems with the car heater (the fan inside the cabin heater) come along with the first cold weather. Although she started making strange sounds a year ago, she finally stopped working only now.
The symptoms were as follows : first, the heater motor began to make strange sounds. Sometimes it didn't turn on right away. You could clearly hear the relays clicking, but the engine did not rotate. However, after hitting a bump or some other unevenness, the electric motor began to rotate and warm air entered the cabin.
One fine, almost frosty morning, the heater motor stopped working completely, hinting at the need for repairs . At the same time, it does not react to changing speed and driving on uneven roads.
Winter is approaching, so next we will talk about self-repair of the “stove” fan or, in other words, the cabin heater . And to be precise, about replacing conductive graphite brushes .
Alternatively, if you don’t want to waste time fiddling with brushes, you can simply replace the heater motor assembly . Our instructions will be relevant in this case as well. Just skip unnecessary steps.
Causes of malfunction
There can be many nuances that the heater motor has begun to work poorly. Among them are two main ones that can be helped by a small repair rather than a complete replacement of the fan. The commutator brushes may well wear out. The brushes themselves, in turn, can “gnaw through” the copper lamellas of the collector, which is why it does not want to work, and the heater motor “goes silent.”
Although this happens quite rarely, brass sleeves of plain bearings can squeak or whistle. Repairs are made by regular lubrication, although this usually helps for a short time; sooner or later the electric motor will need to be replaced. So, if you still have to get to the furnace fan, perhaps replacing it completely will be the best solution. In addition, it saves your time.
Adjusting the automatic control system
To check the functionality of the device, you should take a mercury thermometer and place it near the temperature sensor. After this, you need to activate the stove controller and set the fan control knob to position “A”. The automatic control system should be carefully adjusted only if after 15–20 minutes the temperature is more than two degrees below the data from the sensor.
In order for the self-propelled gun to work better, you will have to pull it out and then turn the knob located on the left side of the controller several times. You can increase the temperature by turning the knob clockwise, and decrease it by turning it counterclockwise.
After all the manipulations performed, you will need to check the functionality again and, if necessary, repeat everything from the beginning.
Causes of malfunction
As a rule, there are many reasons for such a malfunction, these include:
- clogging with slags from;
- stove motor failure.
If the stove motor is not functioning, or some of its speeds are not working properly, then it is first recommended to check the resistor, which in other words can be called the stove rheostat. This element is responsible for the speed of the fan. You can purchase such a part in a specialized store that sells auto parts. As for replacement, this can be done with the help of a specialist or on your own, which is not so difficult even for an inexperienced specialist.
There are heater malfunctions that can be easily fixed by any car enthusiast. For example, a situation may occur when cold air blows through the side deflectors and the windshield heating duct of the heating system, while a hot air flow comes from the lower and central air ducts. Most likely, the reason will be unsatisfactory performance, which is designed to cut off cold air. In some cases, it prevents the normal passage of cold air. Such faults are most easily identified during the cold season.
When bending the damper drive rod, special care must be taken so as not to damage the plastic parts. Please note that plastic becomes more brittle in winter.
Of course, a non-functioning stove causes many problems in winter.
If this is not so important in the summer, then in the winter the windows will fog up. You can figure out what the reason is by disassembling the heating system of the car.
Heater motor
7.11.1. Design Features
| GENERAL INFORMATION |
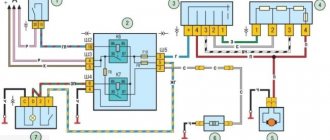
Diagram of the automatic heater control system
| 1 – fan electric motor; 2 – additional resistor; 3 – controller; 4 – mounting block; 5 – ignition switch; 6 – cabin air temperature sensor; | 7 – recirculation switch; 8 – recirculation valve; 9 – micromotor gearbox for heater damper drive; A – to the instrument lighting switch; B – to power supplies |
3
Diagram of the automatic heater control systemAddresses of the output plugs of the heater control system controller
The controller receives information from:
– sensor 6
air temperature in the cabin (a small fan is built into the sensor);
– micromotor gear shaft position sensor 9
heater damper drive, i.e. information about the position of the heater damper.
Based on the information received and the set air temperature, the controller controls the position of the heater damper, sending appropriate signals to the damper drive micromotor.
If the fan operating mode switch handle is in position A, then the controller also controls the fan speed depending on the difference in the air temperature in the cabin and the temperature set point.
A valve is used to quickly warm up the air in the cabin. 8
recirculation with switch
7
. When the valve is turned on, the flow of outside air into the cabin is blocked and only cabin air circulates through the heater.
The vehicle is equipped with a heater fan electric motor of type 45.3730, excited by permanent magnets.
Additional resistor 2
serves to select the fan operating mode. It has two coils with a resistance of 0.23 and 0.82 Ohms. When you turn the heater fan switch knob on the heater control panel, you can turn on either both spirals (1st speed), or a spiral with a resistance of 0.23 Ohm (2nd speed), or turn on the engine directly without a resistor (3rd speed). I speed).
It is recommended to replace a faulty electric motor with a new one. The only possible repair is cleaning the collector.
Addresses of the heater control system controller output plugs
| Plug | Pad address | |
| 13-terminal | 6-terminal | |
| 1 | “Minus” of the micromotor gearbox shaft position sensor | Output "1" additional resistor |
| 2 | “Plus” of the electric motor of the micromotor gearbox | — |
| 3 | “Minus” of the cabin air temperature sensor | Housing ("mass") |
| 4 | “Plus” of the micromotor gear shaft position sensor | Output "3" additional resistor |
| 5 | “Plus” of the cabin air temperature sensor | Output “2” of additional resistor |
| 6 | "Plus" diagnostic output | "Plus" of the power supply |
| 7 | — | |
| 8 | “Minus” of the electric motor of the micromotor gearbox | |
| 9 | "Minus" diagnostic output | |
| 10 | — | |
| 11 | Input “Turn on backlight” | |
| 12 | Diagnostic output “+8 V” “Plus” of the electric motor of the cabin air temperature sensor |
The stove releases cold air
The first thing to do is to determine the cause of the breakdown. This will help you find ways to solve it. But there are quite a lot of them, so let's look at the most popular ones.
One common reason is that only cold air comes out of the unit. This is the first sign that the stove is not working properly. The reason lies in the fact that the interior temperature sensor has broken down - it is responsible for what conditions are in the cabin and whether they correspond to those set by the driver. If it fails, then its readings are incorrect. Thus, the stove receives information that it is hot in the cabin. It will therefore produce cold air to make conditions more comfortable.
It's easy to fix this problem. There are several steps you need to take. First, remove the lampshade by unscrewing it. Then install a new sensor and check it for serviceability.
Also, the reason that cold air comes out of the stove can be a breakdown of the gear motor. To determine it, you must first check the temperature sensor for serviceability. If everything is in order with the latter, then clearly the problem lies in the gearmotor. It is worth noting that this part, like the previous one, cannot be repaired. The only way to solve the problem is to replace it with a new one.
This process is a little more complicated. It consists in carrying out the following actions. First, the wipers are removed. Then you need to unscrew the bolts that are responsible for fastening the frill and remove it so that it does not interfere. Thus, access to the element that has failed will be obtained.
Then you need to remove the gearmotor itself. To do this, its fastening is unscrewed. A Phillips screwdriver will help with this. Next, you should carefully disconnect all the wires. This should be done as carefully as possible so as not to damage anything. This is the only way you can completely dismantle the broken part. Using the same principle, but in reverse, install a new element. At the same time, make sure that the cut of the part clearly fits into the damper.
Preparation
Preparatory activities do not include many complex operations. You will need to do the following:
- Remove the negative terminal from the battery to de-energize the car and protect the car from possible short circuits;
- Drain the coolant from the system. To do this, open the cap of the expansion tank to relieve excess pressure, and then unscrew the drain. The liquid must be drained into a special prepared container.
When draining the cooling liquid, one important rule must be observed - the procedure is carried out only when the engine has cooled down. If in the future you are going to use the same antifreeze or antifreeze, then choose a clean container for draining
If in the future you are going to use the same antifreeze or antifreeze, then choose a clean container for draining.
Design of the VAZ-2110 heater
The SAUO replaced manual control of the heater, but otherwise the stove remained structurally the same. As in earlier models, the interior heating system is a housing with a radiator installed inside, connected to the cooling system of the power unit - a heat source, dampers that redirect the air flow to the desired zones, and a fan driven by an electric motor, which creates the air flow. SAUO is a controller that, depending on the set parameters, monitors the temperature in the cabin and regulates the position of the dampers, maintaining the specified mode.
The efficiency of the VAZ-2110 interior heater would be low without the forced creation of air flow, and this task falls on the stove fan.
When does the heater motor need to be replaced?
There are several signs that will tell a car owner that something is wrong with the heater motor. Here are the most common of them:
- When you try to turn on the stove, you cannot hear the hum of the motor, and this picture is observed at all three speeds.
- The motor supplies air at all speeds, but operates intermittently.
- The operation of the motor is stable, there are no interruptions in the supply of warm air, but instead of a uniform hum, extraneous sounds are heard, a grinding sound, which later develops into a piercing creak.