The decision to install a video recorder in a car allows the driver to constantly record the road situation. The recorder in the car is an electronic “witness”, which allows you to more accurately determine the culprit in the event of an accident, record individual details, possible violations and other events on the road, illegal actions of third parties, etc.
However, not all car owners pay due attention to:
- the issue of proper installation of DVRs;
- choosing the viewing direction;
- reliability of recorder fixation, etc.
- connection method.
For this reason, it is necessary to know how to install the DVR correctly for maximum efficiency and comfortable use. Read more in our article.
Where to install the DVR
According to the technical regulations of the Customs Union “On Vehicle Safety”, it is prohibited to install any objects or coverings in cars that limit the driver’s visibility (exceptions only for rear-view mirrors, wiper blades and heated glass).
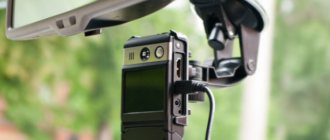
Based on this, it would be best to install the DVR immediately behind the rearview mirror. This will not block the driver’s view, and even the most meticulous traffic police officers will not have any questions.
Outdoor installation
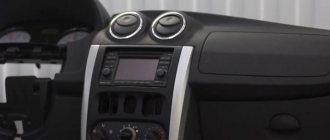
In this case, the device is installed in a place visible to everyone. For example, directly on the windshield or on the dashboard. Pros: easy installation and quick access to the device. But some drivers don’t like the “foreign object” that is constantly sticking out in plain sight. It all depends on the size of the DVR and the aesthetic requirements of the owner.
Best DVRs
Driving a car without a dash cam is an unaffordable luxury these days.
Hidden installation
With this type of installation, they try to hide the device from the eyes of the owner or crooks who can steal it from the inside of the car. There are many options - from inconspicuous mounting on the rearview mirror, to installation behind the decorative grille under the hood (if the recorder works in such conditions, of course). Also, when installing hidden, they try to hide the DVR power cable as much as possible. Plus, the device doesn’t catch anyone’s eye. The downside is that it’s inconvenient to take out the recorder’s memory card (if you hid it somewhere far away) and you need to spend time on installation.
Choosing a DVR mount
In general, all methods of attaching a DVR can be divided into several types. Let's describe each one.
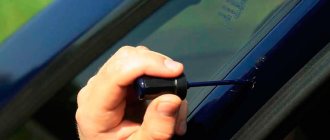
Sucker
Not entirely reliable, since cheap copies become loose and fall off over time. Therefore, it is better to immediately buy a suction cup with a lever that creates pressure. The suction cup must be installed on previously cleaned and degreased glass. In this case, she will hold on tightly.
Frontal mount for DVR. Photo: globallookpress
Double-sided tape
In the box with the device you will definitely find a small piece of double-sided tape. If you clean and degrease the surface, it holds very tightly. In modern recorders, it is not the case itself that is glued, but a special latch-adapter. Therefore, there will be no problems taking the DVR from the car.
Rear view mirror mount
If the DVR is small, then it can be placed directly on the mirror body through the mount. It is important that the mount allows you to adjust the tilt of the recorder, otherwise the device will not be removed correctly. In addition, combined devices are now very common: mirror video recorders.
Mirror DVRs
These devices have a number of advantages over monoblocks
Mounting on a standard suction cup
The complete set of most modern car recorders requires the presence of a suction cup. It allows you to fix the device almost anywhere, but usually it is mounted on the front glass in such a way as not to interfere with good visibility. The installation algorithm is very simple: you need to first degrease the desired area with cotton wool or a cloth soaked in an alcohol-containing solution, and wait until the liquid dries completely. Then you should firmly press the fixation means - sometimes there are several of them - and check the reliability of the fastening by shaking the DVR. Moreover, such checks need to be carried out regularly.
The advantage of this method is its simplicity and minimal labor costs combined with accessibility - almost everything you need is already included in the kit. The downside of this advantage is considered to be the low quality of fastening, since a sudden change in temperature can lead to the device coming off. In addition, installation work cannot be carried out hidden.
How to connect the DVR to power
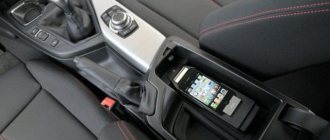
Connection via cigarette lighter
This is the standard type of DVR connection provided by the manufacturer. Before you start driving, you just need to insert the plug into the car's cigarette lighter, and the device will turn on itself. Almost all recorders have a small battery, the reserve of which is enough to safely shut down the device after the mains voltage is lost. The power cord itself can be carefully hidden under the upholstery and brought to the cigarette lighter, for example, through the glove compartment.
Connection to ignition
First you need to understand what voltage the recorder requires to operate. This is usually written on the device itself. If it is 12V, then it can be connected directly to the car’s network, and if it is 5V, then through an inverter. The easiest way to reduce the voltage is through the original cigarette lighter plug with a built-in step-down circuit. It converts 12V to the 5V we need. The main thing is not to confuse the positive and negative wires.
There are two ways to connect the DVR through the car ignition. In the first case, it is connected through the ignition switch, and in the second through the connector of the mounting block. The second method is preferable because you don't have to get close to the castle.
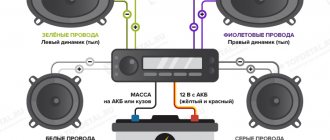
Before connecting wires to the input of the block connector, be sure to find its diagram. Following it, connect the positive and negative wires of the recorder and connector. You can try to fit them in a plastic case, or you can connect to the wires themselves and carefully insulate the connection point. The remaining wiring can be neatly hidden behind the trim.
Now the recorder will start working after the car's ignition switch is turned. It will turn off after the engine has completely stopped.
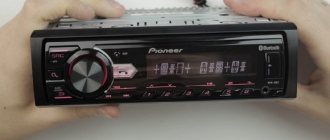
Connection to car radio
Conceptually, this method is no different from the previous one. You need to carefully remove the entire body of the radio (special keys are used for this). Then connect the wires from the recorder to the corresponding wires on the radio connector.
Don't forget about the difference between 5V and 12V if you need to reduce the voltage. Now the recorder will receive power simultaneously with the radio. It will also turn off along with it.
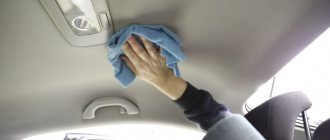
Lighting connection
This connection option is interesting because the lampshade is located next to the place where the DVR is usually installed. You need to carefully remove the ceiling light and get to the wires. As in previous versions, we connect to the 12V network, but through the lighting wiring (if necessary, through an inverter). Now the recorder will turn on after the engine is ignited (at this moment voltage appears in the lighting network). It will turn off automatically after stopping the engine.
Direct connection to battery
Perhaps the most extreme way to connect a car DVR. It allows you to receive 12V power directly from the car battery. To do this, you need to take the wires out of the passenger compartment to the engine compartment and connect them to the corresponding battery terminals. A 15A fuse must be inserted into the open circuit.
In order not to manually turn off the device each time, a power button is built into the circuit. It will be convenient to turn off the power to the device after the end of the trip.
Car batteries
A healthy battery means a healthy car
Fastening the wires
There are two ways to attach the wires that go to the recorder from the power source.
- Hidden installation involves fixing the wires under the dashboard and then under the pillar trim. When using this method, it is important to leave a little free wire near the gadget so that it is convenient to turn the recorder if necessary.
- Open installation involves the use of plastic brackets to secure the wires to the side post and ceiling. Velcro brackets are included in many models. This method is not the most reliable, but easier to implement. As for the questionable reliability, the Velcro will often come off.
How to connect a rear view camera to a DVR
As a rule, recorders that can record what is happening behind the car immediately come with a complete rear view camera. The rear camera is connected with a standard wire, which must be routed through the cabin to the main body of the DVR.
Theoretically, it is possible to connect a separately purchased camera to a “non-native” recorder, but this is too difficult. Therefore, it is better to immediately purchase a device that has two cameras. Everything connects there and works out of the box.
Sticker with double-sided tape
This method has a number of undoubted advantages - the ability to mount anywhere, compactness, high quality of fixation and durability. However, before you properly install the DVR in your car, you need to be aware that under the influence of ultraviolet radiation it is highly likely to fall off. In addition, in order to remove and move the device to another place, you usually have to peel off the tape, and the dismantling process is often difficult. This point is not relevant only when the kit includes special brackets - they allow you to remove the recorder quickly enough. Finally, it is not recommended to secure heavy models of recording devices with double-sided tape - even full compliance with the fixing technology does not guarantee that after a very short period of time the device will be removed from its “home” place.
How to update the DVR software and database
Some recorders, in addition to the video recording function, have built-in maps and databases about roads - speed limits, dangerous areas and the location of traffic cameras. Over time, this data becomes outdated. We will explain how you can update the software and database of the DVR.
- You need to find out what the registrar is called and go to the manufacturer’s website.
- You should find the device model in the catalog - there will be links to update files nearby.
- You need to place them on the recorder's memory card, following the instructions (without this, the device may not see the files).
- When turned on with such a memory card, the update will start automatically.
- After this, the drive can be formatted to standard settings.
If your recorder has Wi-Fi, then the device can be updated via your phone. To do this, you need to download the application from the manufacturer and connect to the device. If the recorder supports updating, the program itself will offer to do this.
Firmware update of the recorder is required in emergency cases. Photo: globallookpress
Lifehacks
How to install a DVR so that it is truly useful is only part of the questions regarding the operation of this device. After all, even when buying it, you can make a mistake with your choice. For example, some drivers purchase devices that do not have autonomy, while it is desirable to have a recorder that can work for at least one and a half or two hours on a battery without connecting to the on-board network.
Mobility also plays an equally important role, since sometimes to record a conversation with traffic police representatives you need to rotate the lens 90°. In addition, you should pay attention to the quality of the bracket - all its main joints should be metal, not plastic. Finally, when the car remains unattended by its owner or passenger for a long time, it is recommended to remove the recorder. In a word, if you approach the installation of a recording device sensibly, then it will fully justify itself and will not be stolen by intruders.
| Tweet |
How to flash a DVR
DVR firmware is required only in emergency cases; in all other cases, a software update is sufficient.
As a rule, any recorders are flashed using a computer. You need to connect the DVR to your PC, and the necessary drivers will be installed automatically.
Manufacturers do not encourage interference with the operation of their devices, so you will have to look for information on how to flash your particular DVR yourself on the Internet.
Remember that by flashing the DVR without going through the official update procedure, you will lose the manufacturer's warranty.
Using a radio
In this particular case, the wires from the camera and the player are connected and the junction points are isolated. If the car radio operates on a voltage of 5V, then the cable is attached directly to the plug. The block or transformer is hidden under the instrument panel. The wires are pulled through the installed chamber.
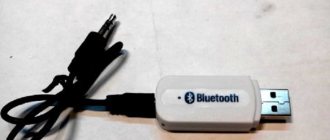
Modern car radios are usually equipped with USB connectors. In this case, the process of connecting the DVR is greatly simplified.
@drive2.ru
Sho-Me G-475 STR
the computer does not see g475str drivers no thanks downloud lights up thanks
Answers 7
Drivers are available on the official website:
It looks like you have a problem with the archiver, download for example 7zip https://www.7-zip.org/download.html
Then go to the folder where you downloaded this archive, right-click -> 7zip -> unpack
The effectiveness of using a device such as a radar detector depends on the quality of the product itself, correct installation and accuracy of settings. To be sure of the quality when purchasing, it is worth checking the functionality of the device and all accompanying documents, including the presence of instructions that tell in detail how to set up the radar detector.
FAQ
Using our adapter you connect to the interior lamp. Consequently, power will be supplied and disconnected to the DVR or other device, just like to the lamp. All cars implement this differently. For some it is related to the ignition, for some it is related to the central locking. In some cars, power is constantly supplied to the lamp. But you can check how it will work on your car. To do this, turn on the courtesy light to the constant lighting position and watch its behavior when you turn on the ignition and close/open the car.