And now you’ve finally bought your first car, you’re stuck in a traffic jam and slowly realize that you’re not the only one and a good half of car enthusiasts still own a “ten.” After a while, you begin to see cars of exactly the same color, with exactly the same rims as yours.
What to do? There is no money for a new car yet, but you have hands that can make a “candy” out of a car. And how to do it? The answer is obvious: tuning. It was this word that firmly entered the domestic lexicon back in the last century, when non-standard parts for production cars began to appear. Tuning implies modification of the engine, interior and exterior from small details to the point of unrecognizability of the brand of your car.
This article will discuss such a process as tuning the interior of a VAZ 2110 car.
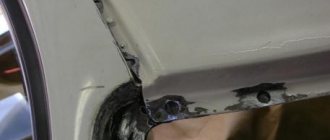
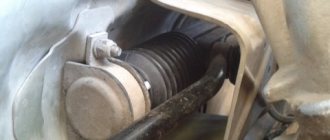
How to remove the rear door trim of a VAZ 2110
Door trim is intended for noise and vibration insulation, as well as for decorative finishing of these doors.
The removal process is the same for both front and rear doors. The only thing you should pay attention to is the window regulators. In the rear doors they are mechanical, and in the front doors, depending on the modification, they can be either electrically or mechanically driven. In addition, the front doors have rear-view mirrors and in some modifications it is necessary to remove the internal mirror drive handle.
Wireless charger
Modern business class cars have many useful options, for example, wireless charging of a mobile device. Many people have phones that are charged from a special unit. You can make a similar base yourself in the car in question. Let's consider all the features of such a modification.
Wireless power supply occurs via the QI channel. This standard can be used to transmit energy over a distance of up to 4 centimeters. The technology involves transferring energy between two induction coils.
A fairly popular option for installing wireless charging is to embed the unit into a tunnel. In this case, the mobile phone will be charged almost constantly, and the phone can be picked up during a call quite quickly.
In order to tune the interior of a VAZ 2110, you will need the following parts:
1. A charging module that transmits current according to the standard in question. 2. A converter that can lower the voltage from 12 V to 5 V. 3. A heat gun that will be used to mount the power supply.
Please note that the charger model is powered from a 5 V network. That is why the connection should be made through a converter. You can create a special niche for the charging module, which will eliminate the possibility of the phone slipping while turning. The mobile phone power base is attached to the base using thermoplastic. In order to monitor charging, you can display the LED in a visible place.
In a similar way, you can create a special unit to power a mobile phone. You can also purchase special holders that are designed for charging a cell phone in a car. However, their use is quite inconvenient.
Let's consider the process of removing the rear door trim of a VAZ 2110
- We take a Phillips screwdriver and unscrew the door locking rod latch and the lining ring on top of the trim.
- We unscrew the three bolts of the plastic pocket-lining at the bottom of the rear door trim of the VAZ 2110, and, slightly pulling it down, remove it from the special holes.
- Before removing the rear door opening handle, use a slotted screwdriver to slightly pry and remove the decorative trim from the handle. We unscrew the two fixing bolts with a Phillips screwdriver and remove the handle, turning it slightly 90 degrees to the right.
- Under the bottom cover, on the back side, there is a small plastic grille, under which there is a standard speaker jack with four mounting points. If it is installed, after removing the cover, unscrew all four screws, remove the speaker from the standard socket and disconnect both wires.
- Using a slotted (flat) screwdriver, slightly pry up the fixing plastic stopper. Remove the window lifter handle and plastic decorative washer.
- Using the same screwdriver, pry it from the bottom corner and remove the rear door trim of the VAZ 2110. At the same time, the removed clips (pistons) should create light clicks.
Before installing the casing in the reverse order, it is necessary to replace all factory pistons with new, more durable ones.
The biggest source of squeaks and rattles on cars of the VAZ 2110 family is the trim
doors. How to deal with these “crickets”, how to get them out of here? Each VAZ 2110 owner finds his own way. Below we will look at one of them.
To remove squeaks and rattles in the door trim of the VAZ 2110, you need to use Modelin anti-squeak.
First, let's eliminate the creaking of the metal casing.
We glue a thin strip of anti-squeak along the perimeter of the inside of the door trim.
To eliminate the squeaks of clips in the metal part of the door, you need to apply anti-creak in the special holes for the clips.
To eliminate the rattling of the clips in the door trim of the VAZ 2110, we apply anti-creaking to the points for attaching the clips and glue rubber washers between the metal and the door trim.
Alternative Europistons can be used. They consist of two parts: the orange one is inserted into the hole in the door, and the white one is inserted into the door trim and snaps into place.
You can try VAZ pistons (6Q0 868 243).
Alternatively, you can tighten the door trim with self-tapping screws. The most important thing is to choose suitable screws. There you will need metal screws, with a short pitch and sizes of 5cm, 4cm, 3.5cm, 3cm. The top parts are the longest, the bottom parts are the shortest, the most important thing is to make sure that the glass does not get scratched.
We close the screws on top with decorative plugs. It is important to select the plugs in advance to match the color of your door trim. If there are none, you can paint them over with a marker or felt-tip pen. You can stick circles of self-adhesive film to match the color of your door trim. It is better not to use mixtures and paint, otherwise you will have to completely clean these screws when removing the door trim of the VAZ 2110. And this is very labor-intensive work.
After all this work with anti-creaking, creaks and rattles on the VAZ door trim 2110
completely disappear. On station wagons and hatchbacks, all this work is carried out on the rear tailgate. To improve the sound insulation effect, noise insulating materials are additionally installed.
Installation of electronic seats
Another way to carry out interior modernization work is to install electrically adjustable seats. You can install the electric mechanism yourself quite quickly, the procedure will not lead to large financial costs. The work can be carried out for all VAZ cars with front-wheel drive.
The modernization work looks like this:
- First you need to select the necessary parts. To change the seats, you will need a power window, a 10A fuse, buttons for adjusting the position of the backrest and a sufficient number of wires to transfer voltage from the source to the installed motor.
- You can tune the interior of a VAZ 2110 yourself: first, we disassemble the window regulator: gearbox, iron disk - these elements are necessary in order to rotate the entire mechanism being created.
- The design should be slightly changed, for which a hole measuring 14 by 10 millimeters is created.
- Next, we install the entire structure on the seat. In this case, the metal part of the mechanism should be directed towards the seat. The metal part is modified by creating a 13 mm hole in it. The metal bolt that is initially present must be removed.
- In order to eliminate the possibility of damage to the mechanism, it is worth protecting it with a special casing. It can be made from plastic.
- The buttons can be placed in any most convenient place. As a rule, the button block is moved to the central dashboard near the seats. The choice of location for the block of buttons should be taken seriously, since if they are poorly positioned, a lot of inconvenience will be created.
The above work requires the skills to connect the energy consumer to its sources. Be sure to include a fuse in the circuit, which will eliminate the possibility of the motor burning out.
How to Remove Shingles: Step-by-Step Guide
Periodic removal and replacement of shingles is essential to extend the life of your roof and protect your home from water damage. But let's be honest. replacing tiles. Not the cheapest home renovation. However, it's worth every penny to avoid the big expense of a full roof repair project, and removing the shingles yourself can make the job more affordable.
Want to know exactly how to remove shingles? It's hard work, but it can be done if you have the right tools, experience, planning and help. We've outlined the shingle removal process in a step-by-step guide that anyone can follow.
READ Replacing the heater radiator on an Audi 80
Tips and Tools
To increase the stability of sheathing installed on rafters spaced 24 inches apart, use H-clamps that fit between the panels where they meet the rafters. Clips also provide the correct expansion gap. If you are not using clips, use a 10d square nail as a 1/8" spacing guide. Use a circular saw to cut away any excess sheathing along the edge of the roof. Once the new sheathing is installed, cover it with tar paper as soon as possible to prevent moisture damage and install the shingles as soon as possible.
% PDF-1.4 % 265 0 object endobj xref 265 55 0000000016 00000 n. 0000002016 00000 n. 0000002216 00000 n. 0000002252 00000 n. 0000002829 00000 n. 0000002914 00000 n. 0000003419 00000 n. 0000003835 00000 n. 0000004373 00000 p. 0000004776 00000 p. 0000005135 00000 p. 0000005730 00000 n. 0000006179 00000 n. 0000006544 00000 n. 0000006656 00000 n. 0000006770 00000 n. 0000007320 00000 n. 0000007490 00000 n. 0000007873 00000 n. 0000008262 00000 n. 0000008740 00000 n. 0000009163 00000 n. 0000009669 00000 n. 0000084033 00000 n. 0000170571 00000 n. 0000250962 00000 n. 0000340054 00000 n. 0000426063 00000 n. 0000503236 00000 n. 0000503632 00000 n. 0000504096 00000 n. 0000504589 00000 n. 0000597660 00000 n. 0000682118 00000 n. 0000686955 00000 n. 0000690035 00000 n. 0000691805 00000 n. 0000694539 00000 n. 0000697086 00000 p. 0000699344 00000 p. 0000699717 00000 n. 0000700138 00000 n. 0000701843 00000 n. 0000702164 00000 n. 0000702534 00000 n. 0000702619 00000 n. 0000702984 00000 n. 0000703253 00000 n. 0000703560 00000 n. 0000730218 00000 n. 0000756961 00000 n. 0000757231 00000 n. 0000774378 00000 n. 0000001838 00000 n. 0000001396 00000 n. trailer ] / Back 1713434 / XRefStm 1838 startxref 0 %% EOF 319 0 object stream hb“b“
Preparing to remove roof shingles
When replacing shingles, you need to remove the old shingles and prepare the roof before installing new shingles. The first step of this process usually costs an average of $1,000 to $3,000 for a contractor to remove the old shingles.
Interior disassembly, preparation for vibration isolation, INTERESTING FIND INSIDE!!! | VAZ 2110
We recommend hiring a professional to handle the installation, but if you want to save on labor costs, you may want to consider removing the shingles yourself. While it's not recommended (or safe) for the inexperienced, most homeowners can expect to save several thousand dollars on roof demo costs by removing the shingles themselves.
How to Replace Roof Sheathing | Home Guides
A roof is only as good as the roofing. Sheathing
roofing consists of sheet materials that form a flat surface that serves as the basis for fastening the tiles. Sheathing. usually plywood or oriented strand board (OSB). made by laminating wood fibers or thin strips of veneer under pressure. Constant moisture can cause the shell to delaminate, making it unsuitable for restoration. If the sheathing has spongy areas or warping, replace it before installing new shingles.
Rafter Prep
Solid wood rafters resist moisture damage better than sheathing
, but if any rafters are damaged, they will need to be replaced before you install new sheathing. If the roof contains trusses, you cannot replace the truss belt without consulting an engineer. Trusses contain smaller structural members designed to support the roof deck as units. In some cases, the rafters or top chords of a truss may be in good shape but slightly warped. Add shims to the top chords or rafters to provide a level base for nailing.
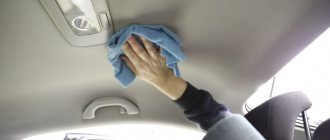
How to remove the ceiling trim of a VAZ 2110
As the car is used, not only various components and assemblies wear out, but also the interior. The plastic fades in the sun and begins to creak on uneven surfaces, the elegant coating peels off the door handles, the seats sag, and their upholstery tears and becomes greasy (in the absence of covers). And if you regularly smoke inside the car, the entire interior smells of tobacco smoke, and disgusting stains appear on the ceiling.
If we talk about a dirty ceiling, it can be saved by dry cleaning or simply replaced with a new one. However, one way or another, it must first be removed. Read below to see how this is done using the VAZ-2110 as an example.
DIY black ceiling FOR 300 RUBLES on a VAZ 2110
Tools and materials
- Wrench 17;
- Flat and Phillips screwdrivers;
- New ceiling panel (article 2110
-5702012-10, about 1500 - 2000 rubles), if replacement is planned.
Technology for removing the ceiling trim of a VAZ 2110
2) First of all, the sun visors are dismantled, for which you will need to unscrew 6 bolts with a screwdriver (3 for each visor).
3) Next comes a series of handrails above the doors for passengers, each of which is screwed with 2 self-tapping screws. Along with them, remove the 2 plugs that stand instead of the driver’s handrail.
4) Remove the lampshade. First, use a flat-head screwdriver to pry up its lens, and then unscrew the 4 mounting bolts using a Phillips screwdriver. Disconnect the block with wires.
5) Next you need to remove
door seals. They are glued, so when dismantling, try to be careful not to tear them, otherwise you will have to buy new ones. It is also advisable to label the seals, which doors they are from, so as not to get confused during assembly.
READ Which clutch is better to put on a VAZ 2110
6) It’s time for plastic linings on the front pillars. Use a flat-head screwdriver to pry them off, being careful not to damage them, and push them away from the stand until the pads come off.
7) Move on to the rear pillars. Armed with a 17mm wrench, unscrew the bolts securing the rear seat belt loops.
 Next, remove the trim on the rear pillars in the same way as in step 6.
9) Now the upholstery is held in place only by plastic clips around the perimeter. Carefully pry them all off using a screwdriver.
10) The most difficult stage begins - pulling out the removed upholstery. If you have a hatchback (“VAZ-2112″) or station wagon (“2111″), this can be done through the trunk. On a sedan, you will have to fold down the front seats (or even remove them), and then, bending the upholstery a little, pull it out either through one of the rear or through the front right door.
So, when the upholstery is removed, there are 3 options. You can try to restore it to its proper appearance by dry cleaning, simply replace it with a new part or cover the ceiling
cars to your liking with other materials. What to choose is up to you.
Tools and materials
- Wrench 17;
- Flat and Phillips screwdrivers;
- New ceiling panel (article 2110
-5702012-10, about 1500 - 2000 rubles), if replacement is planned.
How to remove the headliner on a VAZ 2110, 2111, 2112
As the car is used, not only various components and assemblies wear out, but also the interior. The plastic fades in the sun and begins to creak on uneven surfaces, the elegant coating peels off the door handles, the seats sag, and their upholstery tears and becomes greasy (in the absence of covers). And if you regularly smoke inside the car, the entire interior smells of tobacco smoke, and disgusting stains appear on the ceiling.
If we talk about a dirty ceiling, it can be saved by dry cleaning or simply replaced with a new one. However, one way or another, it must first be removed. Read below to see how this is done using the VAZ-2110 as an example.
Roof trim. HOW to remove it. VAZ 2110, VAZ 2112.
Replacement of VAZ-2110 seats
As a rule, the seats are the first place tuning begins. , to put it mildly, do not create a feeling of comfort. And if you are also a fan of fast driving, then you definitely need sports seats. Seat tuning options:
- The most budget option is to remove and modify the installed seats. You can completely remove the trim, replace the inserts, order a new cover from a sewing workshop and install updated “seats”.
- The second option is to install new seats to replace the old ones. At the moment, there are many non-original replacements for factory seats. An even better option would be to buy seats from some damaged foreign car that is being sold for spare parts - but in this case, you will most likely have to redo the fastenings.
Among other things, you can install electric drives and heated seats, which will certainly increase driving comfort.
Technology for removing the ceiling trim of a VAZ 2110
2) First of all, the sun visors are dismantled, for which you will need to unscrew 6 bolts with a screwdriver (3 for each visor).
3) Next comes a series of handrails above the doors for passengers, each of which is screwed with 2 self-tapping screws. Along with them, remove the 2 plugs that stand instead of the driver’s handrail.
4) Remove the lampshade. First, use a flat-head screwdriver to pry up its lens, and then unscrew the 4 mounting bolts using a Phillips screwdriver. Disconnect the block with wires.
5) Next you need to remove the door seals. They are glued, so when dismantling, try to be careful not to tear them, otherwise you will have to buy new ones. It is also advisable to label the seals, which doors they are from, so as not to get confused during assembly.
6) It’s time for plastic linings on the front pillars. Use a flat-head screwdriver to pry them off, being careful not to damage them, and push them away from the stand until the pads come off.
7) Move on to the rear pillars. Armed with a 17mm wrench, unscrew the bolts securing the rear seat belt loops.
Next, remove the trim on the rear pillars in the same way as in step 6.
9) Now the upholstery is held in place only by plastic clips around the perimeter. Carefully pry them all off using a screwdriver.
10) The most difficult stage begins - pulling out the removed upholstery. If you have a hatchback (“VAZ-2112″) or station wagon (“2111″), this can be done through the trunk. On a sedan, you will have to fold down the front seats (or even remove them), and then, bending the upholstery a little, pull it out either through one of the rear or through the front right door.
So, when the upholstery is removed, there are 3 options. You can try to restore it to its proper appearance by dry cleaning, simply replace it with a new part or cover the ceiling
cars to your liking with other materials. What to choose is up to you.
Installing additional keys
Please note that additional control units may be required when installing additional accessories. It is possible to install keys on the central panel. This can be done quickly and easily.
The procedure for performing the work is as follows:
1. The front panel is disassembled. 2. Excess plastic is cut off. 3. The edges of the frame are processed to a minimum size. 4. To place the keys, you should create a special base made of plastic. 5. In order for the structure to be sufficiently rigid, stiffening ribs should be created. 6. Buttons can be taken from any car. It is worth noting that, if necessary, you can make the buttons backlit as an indication. 7. If necessary, you can repaint the color of the key to match the interior design.
The result of the above changes is a significant increase in the functionality of the car interior. The keys can be responsible for various additional functions. If necessary, you can create a niche for a multimedia system, which will be responsible for many functions in the car: playing music, watching videos, navigation, and so on. You can purchase various multimedia systems, the cost of which varies from several tens to hundreds of dollars. If necessary, you can modify the front panel almost beyond recognition.
In conclusion, we note that before carrying out work you should always create a work plan. It will eliminate the possibility of problems and errors during tuning.
How to remove the ceiling trim on a LADA Granta with your own hands?
Hello. Today we'll talk about how to remove
covering the ceiling on Grant at home quickly and correctly, without breaking or damaging anything. The work is quite simple and does not require special skills or any special equipment. tools.
Why might it be necessary to dismantle the Granta ceiling? There may be several reasons, for example, you decided to soundproof the ceiling or reupholster the ceiling. It also often happens that during operation, stains appear on the ceiling trim, especially on light-colored ones, which spoil the appearance of the interior and make it uncomfortable.
You don’t need anything special for the job; all you need is a standard set of tools, a screwdriver, a pair of keys and a plastic clip extractor, although you can get out without it.
Soundproofing VAZ 2110
When replacing door trim, combine this process with the installation of noise-insulating pads. To do this, you will need to buy a special material, colloquially called “Shumka”, and carefully glue it to the inside of the door. It is best to glue it to the metal part of the doors - this, in addition to sound insulation, will help retain heat in the car.
If you want to make high-quality sound insulation, then you will need to disassemble almost the entire interior of the car. This will make it possible to glue the space under the seats and mats, the places where wires and pipes exit from the passenger compartment, the place where the gearshift lever exits, etc. If you do not use a subwoofer and do not transport large cargo, then you can soundproof the trunk of your Lada. Tuning the interior of a VAZ 2110 at home allows you to make sound insulation so high that passengers will be surprised at the absolute silence while they are in the cabin of your “ten”.
Step-by-step instructions on how to remove the headliner on a LADA Granta
- The first step is to remove the sun visors; to do this, unscrew the three screws with a Phillips screwdriver. We repeat the same for the second visor.
- Next, we remove the handles located in the upper part of the ceiling near the doors, as well as the standard “eyeglass case”. The fixing screws of the handles are hidden under the plugs, carefully remove them and unscrew two screws in each handle. The mount for the “eyeglass case” is located inside it; in order to gain access to the two necessary fastening screws, you should open the cover slightly and unscrew the screws.
- Remove the lamp frame; there are screws underneath it. The frame must be pryed off, and then carefully unclip all the latches in a circle.
- Using a Phillips screwdriver, unscrew the two screws that secure the lampshade and remove it.
- Now you need to remove the “ears” of the seat belts. To do this, use a screwdriver to pry off the decorative plugs, under which the belt fastening bolts are located. Once we have access to the bolts, unscrew them with a socket wrench.
- Now let's move on to the plastic linings of the front pillars. remove
them, you need to lightly pry the cover with your fingers or a plastic spatula. The B-pillar covers are those that do not need to be removed in the middle of the cabin between two doors; just bend them a little.
- Let's move on to the back. We recline the seats at the back, then unscrew one screw shown in the photo below.
- As in previous cases, we pry up the top of the plastic casing and remove it. We do the same thing in relation to the other side.
- Now you need to remove the plastic caps (8 pcs.). To do this, I recommend preparing a special plastic extractor; if you don’t have one on your farm and you don’t want to buy one, you can try to get out of the situation. To do this, we take a piece of dense plastic, in my case an old squeegee, and cut a small groove in it, after which the tool is ready for use.
READ Kia Spectra wipers do not work
How to remove the ceiling trim on a VAZ 2110-2112
- We remove the pistons as carefully as possible so as not to damage the casing and the pistons themselves.
After the ceiling lining has been removed, you can begin to carry out your plans, depending on what scope of work you have outlined for yourself. That's all I wanted to say! As you can see, with the right approach, dismantling the LADA Granta ceiling upholstery turned out to be a trivial, uncomplicated job that any “grant worker” can do. Thank you for your attention, see you again at vaz-remont.ru.
Z.Y. Write in the comments how the removal process went for you and what difficulties you encountered during dismantling.
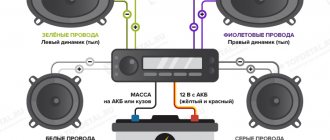
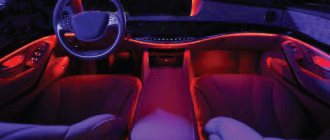
Illuminated seat belts and locks
You should pay attention to the possibility of changing the car interior by installing backlighting for the seat belt, handles and locks. Such changes are not only attractive, but quite useful - you can simply find a belt, handle or lock in the dark. In our case, we use a red backlight.
It is quite attractive at the right time and gives the interior a sporty look. In order to carry out the modernization in question, you should purchase some elements:
- Resistors and drivers.
- Wires, the length of which is 1 meter.
- LEDs in the amount of 4 pieces.
- Thermal gun and insulating material.
These consumables can be purchased at a fairly low price.
The job of creating the backlight consists of doing the following:
1. Tuning the VAZ 2110 interior begins with dismantling work. The seat belt buckle can be disassembled by unscrewing the bolt. Please note that there is no need to dismantle the seats. The structure is disassembled by slightly expanding the body using a knife or thin steel plate or screwdriver. 2. After completing the dismantling work, the LEDs should be attached. Fixation is carried out using special glue. In this case, the cable is also fastened using the method in question. 3. We check that these elements do not interfere with the functioning of the belt. Otherwise, modifications will need to be made. 4. If nothing interferes, then you can reassemble the structure in the reverse order. 5. In order to significantly increase the service life of diodes, you need to use resistors when connecting. 6. Quite a lot of problems are caused by wiring connections. It extends under the seat, then into the tunnel. 7. The diodes are connected depending on the needs.
The above points should be taken into account when considering how to change the interior by installing lighting. Tuning the interior of a VAZ 2110, carried out by installing LEDs, does not take much time.
| Engine | 1.6 l, 8kl (Euro-2) | 1.6 l, 16cl (Euro-2) | 1.6 l, 16cl (Euro-3) |
| Load capacity, kg | 475 | 475 | 475 |
| Luggage compartment volume, dm3 | 450 | 450 | 450 |
| Permissible total weight of a towed trailer with brakes, kg | 1000 | 1000 | 1000 |
| Permissible total weight of a towed trailer without brakes, kg | 500 | 500 | 500 |
Door trim
The appearance of the interior will change for the better if you change the upholstery of the car. In addition, the noise insulation performance of the vehicle will increase. You will have the opportunity to install large equipment for listening to music in the cabin.
To replace car door trim, you must remove the old material. You can do this by following simple steps:
- get rid of the mounting screws that secure the factory trim to the door;
- remove the lock to remove the handle that is used to lower the glass;
- Carefully remove the panel on which the handle that opens the door is attached;
- remove the lock button;
- Carefully pry up the trim with a screwdriver to remove it.
After that you can act as you want. There are ready-made sheathing kits, but you can make it yourself by choosing the optimal type of material. If you plan to install acoustics, then stick on three layers of sound insulators to avoid all sorts of problems in the future.
Seats
Now it’s worth mentioning how to replace the upholstery on the seat and chairs. If you plan to remove the seats to replace them with upholstery, then decide the issue of sound insulation in advance. Remember that the factory error does not cope well with such tasks, so while driving, the car interior will be too noisy and uncomfortable.
- Covers and T-shirts. This option is considered the most budget-friendly. It will allow you to transform your interior for the better without excessive effort. Installation of the elements is easy, so you can do the work yourself. The changes will also affect the driver’s seating comfort level, as it will increase several times.
- New covering
. Not every car enthusiast can redo the interior with his own hands. However, this does not mean that it is not possible to perform the procedure. The idea is that old materials are replaced with new ones. In addition, you can replace the foam inside the cabin. Of course, this is not easy, but you can completely update the interior of the vehicle. - The interior is from another car. Standard chairs have minimal ergonomics. Even if you replace the foam and upholstery, the fit comfort will leave much to be desired. It is better to install a completely new interior, equipped with a sofa and comfortable armchairs. The disadvantage of this option is its high cost, but you can completely transform the appearance of the car's interior. This will pay off if you plan to keep the vehicle for more than five years at a time.
Simple manipulations will help you cope with updating the car interior. Just show your imagination and spend a little time, because this will allow you to solve the problems assigned to you.
Installation of steering wheel from Vesta
Another quite popular way to change a car is to install a non-standard steering wheel, for example, from Vesta. The approximate cost of the design option that was obtained after analysis is 7,500 rubles.
At first glance, the changes in question are quite simple to implement. However, it is not. The fact is that the diameter matches, but the spline pitch does not match. That is why it is practically impossible to do without more thorough revision. Please note that the bushing located on the steering wheel is made of a fairly soft alloy. However, the steering shaft is made using stronger steel. In this case, a simpler solution is to press the steering wheel onto the steering shaft - the softer bushing is deformed, and the steering column can withstand the force exerted.
The work procedure is as follows:
1. To begin with, set the steering wheel to a level position. In this case, you should make sure that most of the splines match. This point will significantly simplify the pressing procedure. 2. After several blows, the softer alloy is applied and the steering wheel is mounted on the steering shaft. 3. The next step is to screw the steering wheel using a nut. The clamp is held with a wrench. 4. After this, you should remove the steering wheel back. In the place of the splines that do not match, there will be notches. They should be partially cut down using a file. 5. After carrying out such work, you should put the steering wheel on the steering shaft again, after which, if necessary, the procedure is repeated.
Work should be carried out until the steering wheel is firmly attached to the shaft. The metal can be removed quite easily, as it is soft. The whole procedure will take a little time.
Dashboard
Do I need to replace the original dashboard with a new element? On this issue, the opinions of car enthusiasts differ. Many say that modification makes sense only if it is planned to install more modern and larger equipment.
Refinement of the dashboard is carried out as follows:
Remember that replacing the dashboard with a part from another car forces you to modify and adjust all the elements. That is why it is better to seek help from specialized companies.
Sources:
https://profnastil35.ru/raznoe/kak-snyat-obshivku-kryshi-na-vaz-2110.html https://avtgid.ru/kak-snyat-obshivku-potolka-na-vaz-2110.html https: //portalvaz.ru/kak-snyat-obshivku-potolka-na-vaz-2110-2111-2112/ https://vaz-remont.ru/kak-snyat-obshivku-potolka-na-lada-granta-svoimi- rukami/ https://vaz-2110.ru/kuzovnoj-remont/obshivka-salona-vaz-2110.html