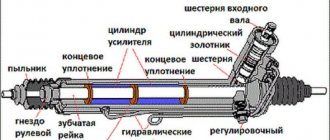
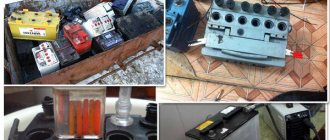
Description of the most common malfunctions of car batteries: signs, causes, elimination rules. Video about the causes of battery failure.
If the car does not start, then most likely the reason for this is insufficient starting current supplied by the battery. And it’s good if you simply forgot to recharge the battery after the car was idle for a long time. In more complex cases, the battery fails and requires repair or replacement. What problems can occur with this device and how to recognize them?
Fast self-discharge
Even a serviceable battery without load can lose energy in an amount of up to 0.5% of its capacity per day. But if the battery loses up to 5 or 10% of its original charge, it’s time to sound the alarm. A sign of rapid self-discharge of the battery is the engine failure to start when the car has been idle for no more than seven days.
However, the reasons for the rapid leakage of energy from the battery may be not only its malfunction, but also problems in the vehicle’s electrical circuit itself. Or the equipment is connected incorrectly, as a result of which it continues to draw amp-hours from the battery even after the engine has been turned off.
Therefore, you should not immediately replace a dead battery with a new one. First, the suspicious battery needs to be charged and removed from the car. If the battery itself begins to quickly lose energy, then self-discharge actually occurs. The main reasons for this problem are:
- low quality electrolyte;
- electrolyte separation, in which the acid, which has a higher density compared to water, falls down the can;
- destruction of plates;
- clogging of the electrolyte with plate particles;
- contamination of battery terminals.
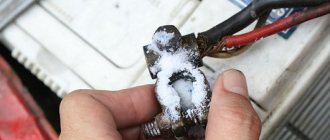
Terminal oxidation
Why do battery terminals oxidize, what are the reasons for this phenomenon? Most often this is caused by loose contact contacts to the battery poles. This can be detected by a white coating on the pole terminals, which can appear when electrolyte comes into contact with the contacts. As a result, the electrical resistance in the battery-starter circuit gradually increases. The latter begins to turn the crankshaft with difficulty due to insufficient current. To solve the problem:
- clean the terminals and terminals with fine sandpaper until a metallic shine appears;
- lubricate the contacts with special lubricant (sold in car dealerships) or technical petroleum jelly;
- tighten the terminals well (but without fanaticism!).
Eliminate energy leaks
The spoiled electrolyte is replaced with a new one. The process goes something like this:
- the battery is fully charged;
- the spent electrolyte is drained from the battery;
- jars are washed with distilled water;
- A new electrolyte is poured into the battery, the density of which must correspond to the full charge of the battery.
What about a maintenance-free battery? Try to make it “serviceable” by drilling holes above the unit’s cans to fill in the electrolyte. It is advisable not to touch the plates or condensation channels. Of course, if the battery is not designed for such repairs, then it would be safer to replace it completely. But then the costs will be higher.
You can try to restore the functionality of a battery with slightly crumbled plates by washing it with distilled water. After this process, new electrolyte is poured into the battery.
A short circuit at the battery terminals can occur as a result of the formation of deposits in this place. Especially if they have also accumulated electrolyte vapors, which in this case is quite to be expected. It is better not to bring the unit to this state, but if contaminants have already formed, then it is worth rinsing the battery crankcase with a weak soda solution and then with water. Moreover, the battery should be washed with a sponge, brush or clean rag, and not bathed.
Hull damage
This problem can be detected by visual inspection of the product: leaking electrolyte will be noticeable immediately. There is another way, which involves using a tester. It needs to be switched to measuring voltage, one probe connected to any terminal of the battery, and the second probe moved along the body. A deviation of the arrow will indicate a faulty car battery. Causes of cracks:
- poor fastening of the battery, as a result of which it is subject to vibration and shaking;
- careless attitude towards the product during its transportation and storage;
- getting into an accident.
If there is mastic on top of the battery (today such batteries are outdated and quite rare) and electrolyte oozes from under it, the cracks can be eliminated by melting. The same applies to modern batteries if there is damage near the terminals (you just have to solder the plastic). But cracks on the side of the battery cannot be eliminated using this method: it will have to be sent for repair, where the case will be replaced. Independent restoration is possible only if there is minor damage and the battery is collapsible. In this case, epoxy resin comes in handy. Procedure:
- completely drain the electrolyte;
- remove the mastic from the top edges to remove the plates in the “set” with the battery electrodes;
- Dry the empty housing thoroughly;
- seal the cracks with epoxy resin using a thick cloth soaked in it;
- dry the repaired box within 24 hours;
- Fill in the electrolyte of the required density.
Electrolyte boiling
Unlike the “traditional” one, boiling of the electrolyte does not occur due to its high temperature. There are usually two reasons for excessive evaporation of the battery fluid:
- improper operation of the relay regulator, as a result of which the battery is recharged and the water in it breaks down into oxygen and hydrogen;
- sulfation of the battery plates, which does not allow them to fully interact with the electrolyte, which leads to the battery not receiving enough energy, as well as electrolysis.
In fact, the battery is not to blame for the malfunctions related to the first case. Here you just need to repair the generator or relay. But sulfation needs to be dealt with.
Write-off process
The battery is handed over to a recycling company
This is done as follows. The condition of the part being written off is checked in accordance with RD-3112199-1089-02 or the instructions in force at the enterprise. A battery write-off act is drawn up. Its sample is in RD-3112199-1089-02 in Appendix No. 3.
The battery is handed over to a recycling company. In accounting, on the basis of the write-off act, the part is written off from off-balance sheet account No. 9 and information about the new spare part is recorded on it.
Sulfation of battery plates
As in the case of self-discharge, the plates of even a healthy battery are gradually coated with lead sulfate. Another thing is that frequent and deep discharges of the battery catalyze this process, and the salts grow in such quantities that they significantly limit the contact area of the electrodes with the electrolyte. In such conditions, it would be naive to expect high performance from the battery. Some signs of battery sulfation:
- significant reduction in battery capacity;
- weak cold start current;
- Battery boils when charging.
On the Internet you can find many recommendations on how to rid battery plates of plaque, but most of these methods can permanently damage the unit. Finding a truly effective and uncomplicated way to desulfate a battery is quite difficult. So it is better to replace a battery with a large amount of salts immediately - anyway, after cleaning it will not work normally.
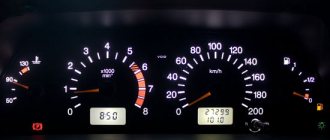
Sluggish and dim
You can guess that the battery is bad when starting the car. If the indicators on the panel or the interior lighting noticeably dim, and the starter barely turns the crankshaft, then the battery is clearly not itself. Of course, oxidized terminals and, say, a simple undercharging of the battery due to a negative energy balance may be to blame, but in any case, this is a reason to find out the reason for such “sluggishness.” And if the terminals are well tightened, and the travel mode allows the battery to be recharged on the road, then it may very well be that the battery is simply time to retire.
Short circuit
When the plates in one of the cans short out, the voltage in the entire battery drops to 10-10.5 V. Thus, the battery receives two volts less from the faulty container.
To identify a short-circuited can, you need to put the battery on charge and, before completing its replenishment with electricity, determine in which container the electrolyte has not boiled. There you should look for the cause of the malfunction. Typically, a short circuit occurs as a result of:
- destruction of plates caused by their wear or violation of battery operating rules;
- deformation of the battery case;
- factory defect.
A short-circuited battery should be carefully examined for swelling or damage to the case. If such problems are found, but they are not so significant, then you can try to repair the battery. In case of serious holes and large dents, the battery must be replaced.
Common Battery Problems
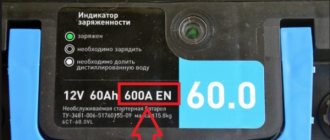
Restoring a car battery is not always possible and depends on the type of fault. The type of battery also plays a role:
- the serviced battery is equipped with plugs installed on top of each bank;
- The maintenance-free power supply is distinguished by a one-piece plastic case - a monoblock without plugs.
If there are screw-on caps, you can check and adjust the density of the electrolyte or drain the liquid for the purpose of repair. A sealed monoblock can be revived in one way - by charging according to a certain algorithm, but a positive result is not guaranteed.
Battery malfunctions are conventionally divided into 2 groups - external and internal. Each variety should be analyzed separately.
Elimination of external defects
During the operation of batteries, car enthusiasts have to deal with two external faults: oxidation of lead terminals and cracks in the case. The latter arise for the following reasons:
- the case burst as a result of mechanical damage (for example, falling of the battery);
- swelling of a discharged battery located in severe frost;
- The plastic has become brittle with age.
Oxidation of the terminals prevents reliable contact of the source with the on-board network and often causes starter failure. The defect can be “treated” by simple cleaning with coarse sandpaper, or in advanced cases with a fine file. In a similar way, the oxide layer is removed from the contacts that are pressed onto the terminals and bolted.
If a crack has formed in the case, it will not be possible to restore a maintenance-free battery - there are no holes for emptying and filling electrolyte. A battery equipped with plugs is repaired as follows:
- Drain the electrolytic liquid from all cans and rinse the inside of the body with distilled water so that when soldering the hot tool does not come into contact with the acid.
- Dry the case from the side of the crack, then carefully solder it along its entire length.
- Cut a plastic patch and weld it over the crack, sealing the seams without gaps.
- Another option is to use a glue gun. The defect needs to be slightly expanded, filled with a polymer compound, and then a patch applied.
When finished, check the battery for leaks by filling it to the top with distilled water. If there are no leaks, fill the battery with electrolyte and try charging. If the plate blocks are not damaged, the battery will “take up” the charge and continue to serve the car.
Internal problems
Most internal faults will definitely render the battery unusable if the problem is discovered too late. In the early stages, resuscitation is quite possible. The list of common problems looks like this:
- sulfation of electrodes - deposition of a thick layer of lead sulfate on the plates, which does not allow the electrolytic liquid to come into normal contact with the active filler;
- shedding of filler from lead gratings;
- short circuit of electrodes and blocks to each other.
Reference. Short circuit of the plates is a consequence of the shedding of a large amount of active filler from the gratings. The defect is critical - the battery cannot be restored.
The reasons for the occurrence of these malfunctions are as follows:
- multiple complete discharge of a lead-acid battery “to zero”;
- operation of a power source with a low charge level due to problems with the generator or electrical part of the vehicle;
- long-term storage in a discharged state.
If the problem is detected at the last stage - deep sulfation, total shedding - it will not be possible to revive the car battery. An irreparable defect is easily diagnosed - the battery does not accept charging at all, the electrolyte constantly boils. In other cases, try to implement the battery restoration methods described below.
Opening the battery plates
Getting rid of unwanted contact between battery plates is technically not difficult. However, such repairs rarely achieve the rated voltage at the battery terminals. And then, if the electrodes did not completely crumble and did not short-circuit everything that was possible in the battery crankcase.
Usually, if the battery plates are short-circuited, it is washed with distilled water. The cleaning method is as follows:
- The battery is half filled with distilled water;
- the battery is shaken to lift sediment from the bottom;
- the battery suddenly turns over, the water is drained;
- washing is repeated several times;
- new electrolyte is poured into the battery;
- The battery is charged in several stages, between which the electrolyte density is measured and adjusted if necessary.
In fact, when pouring distilled water into the battery, you can limit yourself to a faulty container - then it will be easier to shake the unit. If the destruction of the battery plates has not gone too far, then the crumbled particles can be washed out.
However, a battery with deformed plates, even after thorough cleaning, is unlikely to boast high performance. Well, if the battery case is damaged, washing the unit with water will be of little use.
NET.Gadget
Articles
How to check amps with a multimeter? annotation
A multimeter is a device that is used to measure voltage, current, resistance, and test wires. In other words, this device is quite necessary. With all this, as practice shows, it is quite popular not only in the industry, but also in everyday life.
Alas, once a competent installation is carried out and how to proceed with the necessary measurements, it should be taken into account that a multimeter. Not a completely safe device. If used incorrectly, of course, it will not only simply disable it, but also cause severe harm to one’s own health. This is especially true in cases where your company needs to take measurements at high voltage or high current. It won't be difficult to just immediately burn the multimeter and get severe electrical injury.
That’s why, before you can properly install and start using a multimeter, you need to practice on power sources with low current ratings, for example, batteries. It is also not recommended to misuse the instructions for the device.
Types of multimeters
First you need to know that multimeters are digital and analog (pointer, even among electricians they are known as “tseshka”). The latter have been known to electricians for a long time, but it is quite difficult to use them without special knowledge and practice.
- you need to be able to understand the scales of the device, of which there are several on the dial multimeter;
- The device should be kept in a position where the needle on it will not “walk” along the scale.
That's why, if possible, it is better to use a digital multimeter. We will also consider examples with the implementation of a specifically digital device, because it is quite difficult to learn how to work with analog multimeters without the help of others.
There are quite a few varieties of digital multimeters, but the principle of their operation is similar to each other - the difference lies solely in the number of functions of the device. Accordingly, the cost also depends on the functionality of the multimeter, so before you get it, decide why you need it.
The multimeter consists of:
- the device itself;
- 2 probes (dark and reddish);
- power source (9 V Krona battery).
So, what are the features of using this measuring device and how?
Instructions
In order to measure the current in a circuit, you need to connect the device to it one by one. With all this, on the multimeter itself you need to plug a reddish-colored probe into the socket on the device labeled mA, and a dark one into com. A serial connection means that the circuit must be broken and each probe is connected to a different wire, i.e. the device must be connected between 2 power sources. But because you are measuring current strength, and this is simply impossible to do in power supplies, you need to include a certain device in the circuit, for example an ordinary light bulb, placing it in the circuit immediately after the power source.
How can you simply check your charger
multimeter. Watch my other videos from the useful category.
Battery explosion
A short circuit in the battery can not only reduce the voltage at its output, but also lead to a real explosion of the device. The reasons for such an emergency could be:
- severe battery overcharging;
- short circuit when starting the engine using power cables;
- low electrolyte level.
The second scenario is possible when a negative power cable is connected between two cars, or the so-called “lighting”. In such a situation, it is enough to accidentally touch the hood or crankcase with the positive pole for the battery to spark. And oxyhydrogen gas accumulating due to low electrolyte levels in the upper part of old battery cases and oil spills in the engine compartment can cause an explosion that can rip the battery cover off.
In principle, the battery can explode without the participation of a second car. If the electrolyte level in the battery is below the plates, then when you try to start the engine, a spark that jumps in an uncovered area can make a lot of noise.
Maintenance
In most cases, batteries fail due to improper use and maintenance.
It is very important to perform error-free battery maintenance after purchase. The first maintenance is extremely important for the battery. To prevent the battery from constantly breaking down and not having to spend a lot of money to purchase a new device, you can use a few useful tips. Thanks to them, it will be possible to increase the battery life. In addition, this way you can avoid many malfunctions :
- Oil, dirt and debris must be removed from the battery housing at all times. It is necessary to ensure that the battery is always in a clean condition.
- Every day you will need to check the tightness of the battery fasteners under the hood.
- The lids designed to remove excess gases must be cleaned periodically. The procedure will need to be carried out very carefully. At home, they usually use a regular toothpick or sewing needle for cleaning.
- As often as possible, you need to check the wires that come from the battery. They must not be damaged or oxidized. It is also advisable to make sure that they are securely fixed on the device.
- Using a glass tube, you need to constantly check the electrolyte level. If necessary, you will need to add distilled water to the device.
These are the main ways to check the health of the battery. You can also periodically look at the density of the liquid inside the battery. If necessary, make adjustments.
Polarity reversal
You still need to manage to mix up the battery contacts when connecting it to the on-board network. After all, battery terminals, just like tips, have different diameters. But if you really “want”, then you can. The consequences of such a polarity reversal will depend on the settings of the car itself.
Thus, connecting the battery with a reversal of polarity, even with the ignition off, is fraught with failure of devices that are in constant contact with the power source. This could be a stereo system, a clock, an alarm system, etc. Perhaps fuses or other protective elements will prevent serious damage, but who knows?
You can go further and activate the ignition. The on-board computer will be at risk. The battery itself is unlikely to be seriously damaged. Unless it melts a couple of wires in the car's electrical circuit.
But if you connect a reversed battery to the on-board power supply while the engine is running, you can expect a short circuit at the battery contacts. After all, a car’s generator, like a battery, will produce current, but in the opposite direction.
As a result, this method of connecting the battery will, at best, cause a failure of the relay or breakdown of the diode bridge of the generator; at worst, a breakdown of the battery, burnt out wiring, and maybe a fire in the car. Moreover, when connecting the terminals, powerful flashes are possible, so the experimenter also risks his health.
Many electronic devices in modern cars are protected against reverse current flow. But, be that as it may, such a polarity reversal will not bring anything good to the car. Therefore, it is better not to experiment and, if necessary, purchase a battery with the required polarity and connect it normally.
Conclusion
During their service, batteries encounter a variety of faults. Batteries can quickly discharge, sulfate, short out, and finally simply explode. Car enthusiasts can fix some of these problems on their own; sometimes it’s easier to replace the unit. Caring for the device consists mainly of keeping the terminals clean, and for serviced batteries, also monitoring the condition of the electrolyte. Yes, and when connecting the power source to the on-board network, the polarity should still be observed.
Video about the causes of battery failure:
Introduction.
A modern car cannot operate electrically without current.
With the help of an electric current, the working mixture is ignited in carburetor and gas-mixing engines, the engine is started with a starter, the light and sound alarms, control and measuring lighting, instruments and additional equipment are activated. Electric current is the directional movement of charged particles in a conductor, and the force under which an electric current occurs in conductors is called electromotive force (EMF).
electrical current sources
Such devices are called units or units that convert one type of electrical energy into energy.
To obtain electrical energy, electric current sources are installed in the car - a generator and a battery. The generator converts mechanical energy into battery energy, and the electric battery converts chemical energy into electrical energy.
which, Devices convert electrical energy into other types of energy, are called consumers.
Such lamp devices include lighting, starter, electric motors of fan, heating and cabin wiper, water temperature indicator, oil pressure in the engine and other devices.
In this work we will look at the battery, its design, application and technical maintenance.
Cracks in the tank
Cracks in the tank
determined by traces of electrolyte seepage or with a portable voltmeter, one wire of which is connected to any output pin, and the other touches the surface of the tank in places of suspected cracks. The deviation of the voltmeter needle indicates the presence of cracks. The contaminated and electrolyte-filled surface of the battery is wiped with a cloth moistened with a 10% solution of ammonia or bicarbonate of soda. Clogged ventilation holes are cleaned with a wooden stick. The use of copper or iron wire for this purpose is unacceptable. Oxidized pins and clamps are cleaned with a scraper. After tightening the nuts, the clamps and pins are lubricated with technical petroleum jelly or grease.