Suspension elements, like other car parts, tend to wear out. This is usually accompanied by a knocking noise from the front of the car. Beginners are absolutely unable to immediately determine which part is failing the system. But each driver will be able to carry out diagnostics on his own if he knows all the signs of wear on the ball joint. If the breakdown is related to it, then this often leads to various kinds of problems. As for the wear of other parts (bearings, seals), it is not as dangerous as wear or breakage of a ball.
What is the role of support?
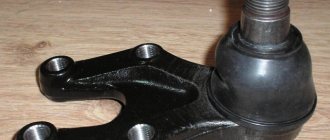
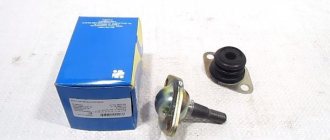
The ball joint is presented in the form of a hinge. At its base there is a ball in the insert, similar to a human joint. It has the ability to move in different directions. The design of the support includes not only the ball with the liner, but also the boot, pin and body. The boot serves to protect the mechanism from various types of contamination. A metal rod is called a pin, which secures the hub to the hinge.
The ball requires careful “care”. Critical wear of the support provokes serious problems for the car and its owner. If a part fails while driving, the support will break and the wheel will turn outward. In the best case scenario, the driver can expect the vehicle to fall onto its wing. At worst, a serious accident.
After separation, the ball hub continues to hold on. But in any case, the wheel becomes uncontrollable. All subsequent events largely depend on how fast the car is moving. The driver must always be on alert to react to a sudden breakdown and avoid an accident.
Device and purpose
Structurally, this product is made in the form of a hinged joint. Its base is a ball made of wear-resistant material. Together with special inserts, it is placed in a metal shell. A natural analogue of the structure is the joints of the upper and lower extremities of humans and animals.
Ball joints serve in a car as a connection between the suspension arms and the hubs of the steered wheels. They ensure a constant relationship between the horizontal position of the axles and the vertical plane of rotation of the wheels at any turning angles or uneven road surfaces. On domestic cars, two devices are used for each wheel (upper, lower), on foreign cars - one. Some models may have more, depending on the design of the front suspension.
The video clearly demonstrates the structure of the mechanism and the process of operation in different conditions:
Symptoms of the malfunction and their description
If the driver is completely unaware of how to determine whether a ball joint is faulty, he needs to better study the symptoms indicating a breakdown.
We list the main ones:
There is a knocking noise while driving. The clanging appears at any speed and can be isolated or repeated periodically. It also occurs if the machine is overloaded.
Creaking noise coming from the front wheels when turning. The sounds come from the rack or hydraulic booster.
If the support is damaged, the steering wheel is at an angle (relative to the road). As a result, the tread wears along the inner edge. Uneven tire wear can be immediately seen upon visual inspection.
When braking, the trajectory of movement changes. This usually appears as a slight curling to the side. This is due to the tilt of the wheel.
While driving, the car wobbles. Most often this appears due to play in the ball. The higher the speed, the stronger the wobble. Many drivers do not notice this symptom because they drive on bad roads.
The wheel alignment characteristics have become different. The wheel on which the support has worn out will suffer the most from this. It is difficult to determine changes by eye, so you should contact a service station for help.
If the driver feels the manifestation of at least one of the listed symptoms, he should diagnose the entire system. If the ball fails, then other parts of the system are “at risk.” They should be checked comprehensively.
Step-by-step replacement process
- Loosen the wheel bolts, jack up and remove the wheel.
- Apply penetrating lubricant to the lower ball pin mounting nut, as well as to the two bolts securing the support to the steering knuckle.
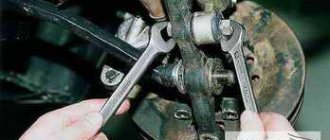
Unscrew the nut securing the ball joint pin using a nineteen wrench.
Install the puller and press the ball pin out of the fist. To remove a pin without a puller, hit the eyelet where it is inserted with a hammer. After two or three hits the finger will pop out.
Using a 17mm wrench, unscrew the two bolts securing the support to the knuckle.
Move the steering knuckle to the side and remove the support.
Clean the landing area and install a new support.
Install and tighten the bolts securing the support to the knuckle. The bolt threads must first be cleaned and coated with copper grease.
Apply copper grease to the threads of the ball pin and tighten the fastening nut.
- Ball joint pin nut – 70 Nm.
- Bolts securing the support to the knuckle – 55 Nm.
The procedure for replacing the ball joint for VAZ 2110, 2111, 2112 is clearly shown in this video:
Causes of failure
The supports experience high loads during operation. They can withstand constant impacts when driving over uneven surfaces. There are several main reasons why these parts fail.
Natural wear and tear. One joint can withstand driving for a distance of 20-150 thousand km, but a high-quality part begins to wear out at about 100 thousand km. In addition to quality, wear is influenced by the presence of lubricant, care of the part and other factors.
Torn boot. This element is considered a kind of “consumable material”. For this reason, you need to constantly monitor its condition. If the boot suddenly breaks, particles of dirt and dust will get inside the support. They form an abrasive between themselves, which will “wear out” the insides.
High loads. When a driver travels on rough roads at high speeds, the suspension suffers greatly from shock. This leads to wear of the ball. The same thing happens when the vehicle is heavily overloaded with excess cargo.
Lubrication. The lubricant dries out or evaporates over time. If the boot is damaged, the lubricant will disappear even faster, thereby causing increased wear on the ball. To avoid this, it is necessary to periodically pour lubricant into the ball.
All of the above reasons do not appear overnight. This is only possible if the part was already defective. This can be avoided if, when purchasing, you purchase a higher quality product rather than a cheaper one.
Checking the ball joint boot
When checking the condition of the ball joint, you must pay attention to its boot. It is made of rubber and its task is to prevent moisture, dust and various debris from the road from entering the joint during operation of the machine. The boot, by and large, is a consumable item and must be periodically replaced. As a result of temperature changes (including in winter), mechanical influences, damage and simply the aging process, first small and then increasingly enlarged cracks may appear on its rubber body, through which dust, sand and other small debris will get inside the ball joint . This mixture will act as an abrasive, gradually breaking down metal surfaces and washing away lubricant.
Therefore, when performing an inspection, you should always pay attention to the condition of the boot, the presence of debris and lubricant in it. If it is damaged, it must be replaced with a new one, since the use of a torn boot leads to a sharp decrease in the overall service life of the ball. And when replacing the boot with a new one, you need to remember to fill it with lubricant (Litolom, ShRB-4 or their analogues).
There is another non-standard method of checking the ball, in particular due to damage to the boot. In particular, the method is suitable for testing on machines in which the ball is positioned vertically with its finger up, that is, if water gets inside, it remains inside like in a vessel, and it enters from above through the oil seal. So, on machines where it is difficult to dismantle and generally get to the support, you can take a regular medical syringe with a needle and pour a little liquid oil into it (2...3 cubes). Next, you need to pierce the boot at the top with a syringe needle and pour the existing oil inside. After this, compare the nature of the old knock and the knock after adding oil. If a difference appears, it means that the ball has failed and it is advisable to replace it. As for the hole from the needle, water will not get inside through it, so the car owner can be calm about this.
Self-diagnosis
The driver can carry out independent diagnostics of the supports if they are suspected of being faulty. There are several ways to do this. They depend on the suspension design. Today, suspension is divided into single-link and multi-link. Foreign cars, as a rule, are equipped with a multi-link type both in the front and rear of the car.
The easiest way to identify problems is with the upper ball joint in a multi-link suspension. To do this, you need to drive the car into the garage, inviting another person to drive. The car owner must begin to swing the upper part of the wheel and at the same time give signals to the person behind the wheel so that he presses the brake. This technique helps determine the presence of wheel bearing play.
If there are faults in the upper hinge, the play will be felt strongly. You can detect play in the lower support using the same method. But drivers try to rock the wheel not just with their hands, but by first lifting it with a jack. This method only works for multi-link suspension. However, there are instructions that allow you to determine the play on any suspension.
The car owner will not need another person. For diagnostics you need an inspection hole and a mount. Having placed the car over the pit, the driver must lift one side with a jack and install a pry bar between the lever and the steering knuckle. If there is play in the bushing, it will be immediately noticeable when the mount is rocked.
How to determine whether a ball joint is faulty
It is believed that the optimal method of checking the ball joint is to visit a car service center where there is a lift and an appropriate stand. There, specialists will be able to identify faults not only with the ball joint, but also with other elements of the vehicle’s suspension.
However, if the task is only to check the ball, then this can be done in garage conditions using just installation. Well, perhaps it would be desirable for the car to be parked on a pit or overpass. A faulty ball joint can be identified by the main symptom - knocking and free movement of the ball pin when a mount force is applied to it.
Quick check
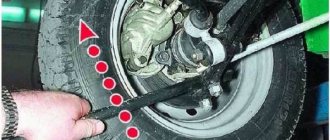
First of all, you need to “listen” to the ball joint. However, for this it is better to take an assistant, preferably one who knows what sound a broken support makes and generally has some understanding of the elements of a car’s suspension. The verification algorithm is simple - one person rocks the car from side to side (in the direction perpendicular to the movement), and the second listens to the sounds coming from the suspension elements, in particular, from the ball joint.
If such rocking does not produce results, it is worth jacking up the car on the side where you want to check the support. Then, holding down the brake pedal (this is done to eliminate possible bearing play), try to swing the wheel in a direction perpendicular to the movement (that is, away from you and towards you). If there is play and/or “unhealthy” clanging sounds, then there are problems with the ball.
The play of the broken ball will be checked using a pry bar. So, the car needs to be jacked up, and the flat end of the mount placed between the lever and the steering axle. Then, while one person slowly turns the steering wheel, the second person presses on the pry bar. If there is play, it will be clearly felt and even visible to the eye. A similar procedure can also be performed without rotating the steering wheel, especially if the ball joint is already significantly worn.
Repair
There are several ways to repair a ball, but most often it is simply replaced with a new one. As for foreign cars, replacing the support and lever is an expensive procedure. That is why repair (restoration) services have become the most in demand.
Restoration will cost the driver less than completely replacing the part. Various technologies are used to restore supports. The simplest of them is conversion into a collapsible one. Here the plastic inserts are changed and the finger is polished.
A more complex technology involves filling the body with liquid polymer. The substance hardens, after which the supports are removed and replaced with non-original elements.
Such savings will sooner or later create an emergency situation on the road. To avoid this, we recommend replacing the ball joints with new ones if they fail. Restoration is allowed only if the driver does not have the opportunity to change elements every second.
What is needed for replacement
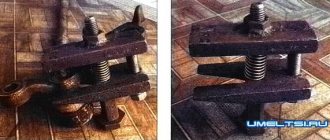
For repairs you will need tools and spare parts. It is worth noting that some manufacturers sell incomplete ball joints. Replacement (the VAZ-2110 does not need it very often) is accompanied by the fact that you have to buy additional elements - a boot, a nut, bolts for attaching to the hub. In most cases, the nut and bolts are not replaced. Installation of new ones will be required only if the threads on the old ones are broken. And you definitely need to have a puller. Without it, you simply cannot remove the old ball joint. This puller makes the whole job much easier. In rare cases, it is possible to knock a pin out of the hub with a hammer. And is it worth doing so? You can easily damage the suspension.
Selection rules
Choosing ball parts on your own is not so easy, especially when there is a wide variety of parts on the product market. Products from the following manufacturers have the highest quality characteristics:
Sidem is a European manufacturer that produces high-quality products. The products have a durable boot without a retaining ring. This design prevents moisture and dust from getting inside. In addition, polyurea-based lubricants are excellent at repelling water.
TRW is an American company that sells its products internationally. Over time, the concern was bought by a German company. The new management has tightened quality control over products. As a result, ball joints began to cover more than 90% of automobile models, incl. for VAZ.
Delphi is an American company that produces high-quality ball joints for middle-class cars. The manufacturer has assumed warranty obligations during the first year of operation. But despite this, drivers report accident-free runs.
Lemforder is a German company that supplies products for most automobile brands. The catalog has a huge assortment of ball joints, which are considered the best for chassis repairs.
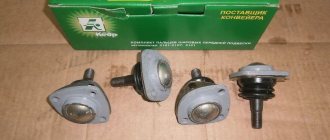
Ball joints are also manufactured by domestic manufacturers. These include the companies BZAK, Belmag, Trek and Kedr.
Mounting methods
Install a new ball joint by threading its pin into the hole in the steering knuckle, install a washer on top, screw on the slotted nut, tighten it, and secure it with a cotter pin. The assembly is secured to the lever with three bolts. Thanks to this design, the wheel occupies a fixed position relative to the vehicle body, and at the same time turns in the desired direction, freely overcoming small obstacles and uneven hard surfaces.
Depending on the suspension device and the make of the car, the ball joint can be attached in a different way. There are options for mounting it into the lever using a press and fixing it with a locking ring. On the Niva, the hinges are turned upside down and are screwed to the lever not from the inside, but from the outside.
Recommendations for extending the service life of supports
Signs of bad ball joints include a variety of “symptoms.” The main reason for their appearance is natural wear and tear. The service life of the part varies from 15 thousand km to 120 thousand km, but experts say that it can be extended.
You can avoid damage if you follow simple rules:
Do not allow high speed when driving over uneven surfaces.
Regularly check the integrity of the boot.
Periodically carry out diagnostics of the mechanism, especially during long-term operation.
Do not allow the lubricant in the joint to evaporate.
The rate of wear also depends on how much the driver loads the car and on what roads he drives. The height of the rubber profile plays an important role. For example, a vehicle with a low profile has a ball lifespan that is half as long as a vehicle with a medium and high profile.
What is the lifespan of the ball joint?
The service life mainly depends on several factors; it can range from 15 to 120 thousand kilometers.
Even a small crack in the boot can dramatically shorten its life. This can cause water, dirt and sand to enter the joint. To prevent damage, it is necessary to observe the condition of the protective rubber cover. It is best to do this on an overpass.
To make it last longer, you should drive more carefully on broken roads, and also promptly replace damaged boots.
Is it possible to drive with a broken ball joint?
Having learned which ball joints are better and their causes of malfunction, the driver involuntarily wonders whether he can now drive the car. All this largely depends on the wear and damage of the unit. It is allowed to move around if there are “early” signs. These include rare knocking, lack of “wobble” on the road, etc.
If the driver still decides to drive with a broken ball joint, he needs to avoid high speeds and bumps on the road. But it is best to think about repairs and replacement of parts. Ignoring the problem will result in a serious accident.
Design features
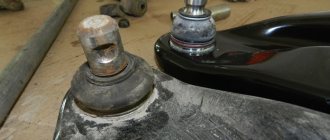
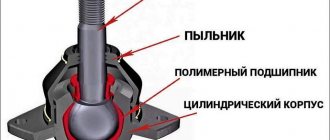
If you disassemble an old, worn ball joint, you can see several elements:
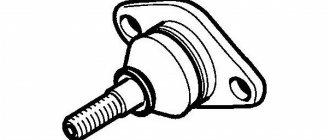
- a rod protruding from the body with a thread and a transverse hole at the end - a finger. It is made of high-strength steel, the thread pitch is very fine;
- The finger is wearing rubber protection - a boot, which has a metal ring at the bottom for a tight fit to the base. It protects the hinge from foreign objects, water, dirt, and road dust;
- the finger is connected to the ball, this is one integral part;
- There are plastic inserts around the ball. They fix its position, eliminate gaps, provide the necessary movement and rotation;
- the ball is inserted into the ball joint housing. There are three holes for attaching to the lever. If the model is serviceable, then an oiler is screwed into it from below to add lubricant.
Price list for basic VAZ suspension repair work
Check with our managers by phone. They will be happy to answer all your questions.
The reasons for contacting the service center may be:
- extraneous sounds when the car is moving, such as knocking or grinding;
- vehicle vibration;
- large body roll when cornering;
- uneven wear of wheel tires.
Diagnostics of your car for suspension health will include checking the shock absorbers
tors, springs and struts, ball joints, CV joints, degree of wear of brake pads.
Diagnostics and repair of the VAZ front suspension, as well as repair of the VAZ rear suspension, is carried out at our car service center using special equipment. The car is located on a special stand, which provides unhindered access to all parts of the car. If during diagnostics malfunctions in the operation of the shock absorbers are discovered, they will be replaced, followed by wheel balancing.
Sources
- https://mylada.net/remont/zamena-sharovyx-opor-na-kaline.html
- https://www.zr.ru/content/articles/118912-kalina_neladnaja_lada/
- https://remontvaz.spb.ru/remont-podveski/
Classic ball design
A standard ball joint design requires the following main components:
- metal case;
- pin with ball head;
- compression spring;
- corrugated rubberized boot.
A sufficient amount of lubricant was packed inside at the factory. High-quality lubricant was enough for a long run. At each maintenance, mechanics must check the safety of the boot and the quality/volume of the lubricant, and if necessary, use a lubricant to repress the required amount. In later models, some metal products were replaced with plastic analogues. Also, there are no springs inside anymore (they got rid of them as unnecessary). The spherical head of the finger is now rolled in a hemisphere of liners. In modern models, the latter are no longer made of plastic, but of more durable and durable nylon. Manufacturers began to produce two types of ball bearings, so there are maintenance-free and maintenance-free bearings. Most new machines have a second type of assembly. There is no possibility of disassembly and there is a built-in oiler for adding lubricant. Sometimes there are intermediate types that relate to non-separable design options, but have an oiler.
Change ball joints on a viburnum with your own hands
Lada Priora Sedan Snezhka Logbook Replacing the support bearing
Hello. Today we’ll talk about how to replace ball and tie rod ends on a Lada Kalina with your own hands. Why ball and tie rod ends fail and how to diagnose their malfunction is written here
Before starting work, you need to prepare: a set of keys, a universal puller, a jack, WD-40 fluid, as well as new spare parts.
How to replace ball joints on a Lada Kalina - step-by-step instructions
1. Before starting work, apply a few drops of WD-40 to threaded connections that you think may have problems. They will be different for everyone, it all depends on the condition of the car, the roads on which it drives, and the attitude of the owner towards this car...
2. Unscrew the ball joints. There are two TORX bolts that are attached to the hub; for this we take an E12 head.
3. Afterwards, we proceed to the stabilizer strut, it must be unscrewed.
4. Bend down the lever with the ball joint.
5. Using a universal puller, press the ball joint out of the lever. If you don’t have a puller, you can use a crowbar, but in this case there is a high probability of damage to the CV joint boot if the crowbar comes off.
6. When the old ball is removed, take the new ball and attach it to the hub and lever.
7. Jack up the lever, using a jack to place it under the ball. This will compress the spring of the shock absorber strut and screw on the stabilizer bar.
Step-by-step instructions - how to replace tie rod ends on a Lada Kalina
- We unscrew the steering wheel in the direction opposite to replacing the steering tip.
- We remove the locking pin and unscrew the nut securing the tip to the stand.
- Now you need to “release” the tip mounting bolt.
- Using a puller, press the tip out of the stand. Some people use a hammer and simply knock out the tip.
- Next we unscrew the tip, this is done clockwise. If the adjusting sleeve starts to rotate, fix it using a wrench.
6
I draw your attention to the number of turns, it must be counted, this will save you from the need to go to a service station and do a wheel alignment
7. Assembly is performed in reverse order. If the car pulls to the side and the “trick” with counting the turns didn’t work, don’t be lazy and do a wheel alignment.
The result of the work done should be the disappearance of play and knocking, which are an integral part of chassis malfunctions.
That's all for me, thank you all for your attention, I hope everything worked out for you!? Until we meet again, take care of yourself and your car! Text belongs to: VAZ Do-it-yourself repair. Text belongs to: VAZ DIY repair
Text belongs to: VAZ DIY repair