Brake hoses in the VAZ 2107 are made of rubber, and they need to be changed periodically. Over time, they become brittle, the rubber wears out, and the brake fluid begins to leave the reservoir. If you don’t monitor its level, one day you may end up in a situation where the brakes simply fail, and it’s good if this happens on a deserted street. To avoid this problem, monitoring the condition of rubber parts and brake fluid levels should be carried out regularly, regardless of service life.
Replacing brake pipes in a VAZ is a process that you can easily do yourself in the garage, using the advice of professionals.
Replacing main brake pipes in a classic VAZ 2107 2106 2105, video
We do-it-yourself replacement of main brake pipes in classic Lada cars, such as VAZ 2107 2106 2105 2104. The work will be performed on the “six” we all know.
The replacement is being carried out due to the fact that during a previous body repair, one of the main brake pipes was incorrectly secured, as a result of which it constantly rubbed against the cardan. There are no visible leaks, but you yourself understand that the brakes are the most important thing in a car, so such parts require priority replacement, especially since it is not so expensive. To work, you will need an inspection hole or a lift, for ease of work, a standard set of keys, and, if desired, self-made plugs from rubber hoses so that the brake fluid does not leak out. Video of replacing main brake pipes in the classic VAZ 2107 2106 2105 2104:
After replacement, do not forget to bleed the brake system; for this you will need an assistant.
How to change front brake hoses on a VAZ 2107
Good afternoon dear friends. The brake system of any car includes brake lines and rubber hoses. The latter have the ability to “crack” during operation, losing their tightness. If there is no tightness in the system, brake fluid leaks out, which means there will be no effective brakes, resulting in an accident or expensive body repairs.
To avoid this, you need to monitor the condition of the brake hoses. If cracks and breaks are observed on their surface, replace them urgently. Today we will learn how to independently change the front brake hoses on a VAZ 2107 , and a specialist will show on video how to do it correctly, reveal all the secrets and nuances of replacing them using the example of a Lada 2106.
A few final words
Briefly some tips:
- Choose quality oil! Beware of fakes.
- Monitor the condition of the engine. If oil is flowing, this is not a sign that it exists; it must be eliminated!
- Change the oil on time. Do not allow the engine to run on oil that has already lost its performance properties. This threatens intensive wear of the engine, including the crank mechanism, the repair of which is not so cheap!
- Don't overlook the condition of the filler plug!
Watch the video on changing the oil to make it more clear what, how and why to do.
Take care of your car and it will serve you for a long time!
Sources
- https://remont-avtovaz.ru/kakoe-maslo-zalivat-v-dvigatel-kpp-i-mosty-na-zimu-v-vaz/
- https://masteravaza.ru/dvigatel/zamena-masla-dvigatel/vaz-2104-zamena-masla-v-dvigatele-251
Required Tools
- Special split wrench “8/10” for unscrewing brake pipes
- Open-end wrench "17"
- Socket wrenches for “14” and “10” or heads for the same bolts
- Pliers or round nose pliers
To replace the front brake hoses on a classic, you will need a narrow metal brush to clean the bolted joints from dirt and a rubber cap to “plug” the metal tube. This cap can be taken from the bleeder fitting of the working brake cylinder. We'll talk about how to use it below. I advise you to buy new copper sealing washers in the amount of 4 pieces.
Auto repair school – DIY car repair
Jun 14, 2022 VAZ 2101, VAZ 2102, VAZ 2105, VAZ 2106, VAZ 2107, Zhiguli, Classics by admin
Let's return to our immortal and beloved Classics! In this article we will look at the process of replacing the front brake hose on VAZ-2101, VAZ-2102, VAZ-2104, VAZ-2105, VAZ-2106, VAZ-2107, Classic cars. I hope that it will be useful to you and after reading it, you will be able (or will have information) on how to replace the front brake hoses yourself. I, in turn, will try to describe the replacement process in as much detail as possible and warn you about possible problems that may arise during operation.
Pay special attention to the list of necessary tools and the quality of purchased spare parts. In general, please...
Let's start, perhaps, with the tool that you will need to replace the front brake hose on a VAZ-2101, VAZ-2102, VAZ-2104, VAZ-2105, VAZ-2106, VAZ-2107, Classic car: 14mm socket wrench, socket wrench for 10, pliers, an open-end wrench for 17, a rubber cap from the bleeder fitting (after disconnecting the tube and hose, it will be necessary to “plug” the brake pipe to prevent brake fluid leakage), special keys for unscrewing the brake fittings for 10 - split or crimped (photo 1).
The presence of at least one special key is necessary. Without it, in 9 out of 10 cases, you will not unscrew the brake pipe fitting!
What you should pay attention to when purchasing spare parts... First, we buy brake hoses from “Balakovo” or “Dimitrovgrad” production. Hoses from these manufacturers, although not cheap, are of high quality and durable
As they say - time-tested.
Included with the front brake hose you should buy two new copper sealing washers
When purchasing washers, you should pay attention to their thickness. According to the standard, the thickness should be 1.5 mm
But unscrupulous sellers may sell washers of thinner thickness (see photos 2 and 3), using which you will not be able to tightly tighten the brake hose bolt.
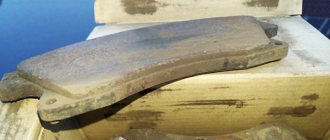
We can also advise you to buy a new brake hose mounting bolt. This is not necessary, but believe me, this cheap detail can save quite a lot of nerves. Since the old bolts are generally very stretched (photo 4) and even with new copper sealing washers, such a bolt will have to be pulled long and hard until there is no brake fluid leakage (and don’t forget that the threads in an aluminum brake cylinder are very easy to break).
We're done with the tools and spare parts. Now let's move on to a step-by-step description of replacing the front brake hose on VAZ-2101, VAZ-2102, VAZ-2104, VAZ-2105, VAZ-2106, VAZ-2107, Classic cars:
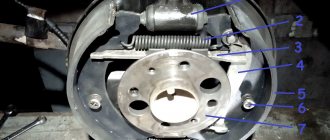
1. Use pliers to pull out the fixing bracket (photo 5)
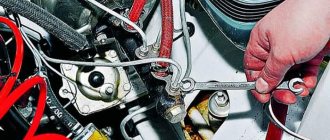
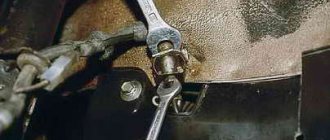
2. Using an open-end wrench size 17 and a special clamp wrench 10, unscrew the brake pipe fitting (photo 6). We disconnect the hose and brake pipe, and put a rubber cap on the end of the pipe.
3. Using a 10 mm spanner, unscrew the fastening bolt securing the brake hose bracket (photo 7), if you have one, of course))).
4. Using a 14 mm socket wrench, unscrew the bolt securing the brake hose to the brake cylinder (photo 8). We remove traces of dirt and sand from the brake cylinder.
We carry out assembly in reverse order. We install the brake hose as shown in photo 9, with the bevel down. We install two sealing copper washers. When tightening the brake hose and tube, tighten the tube fitting and do not twist the hose, thereby preventing the brake hose from twisting.
When using an article or photographs, an active direct hyperlink to the website www.avtorem.info is required!
How to unscrew an old brake hose
1. Carefully clean with a metal brush all the bolted connections that we will unscrew: the fastening of the brake hose clamp to the working cylinder, the bolt connecting it to the cylinder, the joint between the hose and the brake pipe and their fixing plate. These places are located in the wheel area and serve as an excellent storage area for road dirt and rust. This must be done so that there are no problems when dismantling all these parts.
2. Unscrew the cap from the brake fluid reservoir and instead put on a plastic bag and screw the cap onto the clutch reservoir. This is necessary to seal the brake system. Having done this “trick”, you will not lose much “brake fluid” when replacing the front brake hoses on a classic.
3. Using pliers or round nose pliers, remove the fixing bracket from the junction of the tube and hose. It is needed to prevent spontaneous unscrewing of the fitting.
4. Using a special split wrench set to “10”, unscrew the metal tube from the hose fitting, fixing it with the wrench set to “17”.
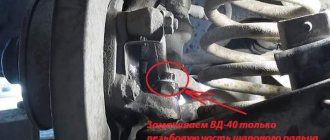
Important! When unscrewing the tube fitting, make sure that it does not rotate with the fitting. There is a chance to break it. To prevent this, you need to “soak” the contact area with WD-40 and develop it by slightly swinging the key in the direction of opening and closing. If this does not help, then remove the opposite end of the front brake hose, fix the fitting, and use a key to “17” to unscrew the hose.
Having removed the hose from the metal tube, close its fitting with the cap mentioned above. This will prevent loss of brake fluid.
5. To unscrew the brake hose from the working cylinder, you need to use a “10” key to unscrew the bolt securing the hose clamp from the wheel hub. Remove the fixing bracket.
6. Using a spanner wrench or a 14mm socket, unscrew the bolt securing the hose from the brake cylinder.
It is recommended to replace the old copper sealing washers with new ones. You will see them when you remove the fastening bolt from the hose fitting and the working cylinder seat. They seal the joint, so there should be two of them - one on top under the bolt head, the second on the bottom, between the cylinder and the fitting.
Removal is complete; reassembly is done in reverse order. After this, it is recommended to bleed the brake system; how to do this was described in detail in the previous article. We check the connection points for leaks and tighten them if necessary.
Video, replacing the front brake hoses of VAZ 2106, VAZ 2107:
Which spare parts are better
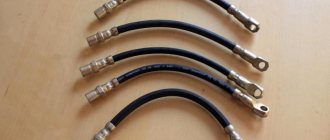
The main problem when choosing brake hoses is the saturation of the market with counterfeit parts of low quality. Such eyeliners do not last long, quickly become covered with cracks or begin to leak near the pressed tips literally a week after installation. How to choose the right rubber pipes:
- Do not buy cheap hoses without packaging, sold individually. Usually the front tubes come in pairs.
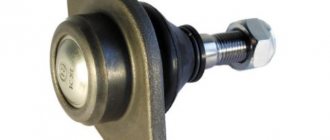
- Carefully examine the metal surfaces of the fastening fittings - there should be no traces of rough machining on them - nicks, grooves from a cutter and similar defects.
- Examine the markings on the rubber tube. As a rule, the manufacturer puts its logo and indicates the product catalog number, which matches the inscription on the packaging. Some hieroglyphs clearly indicate the origin of the spare part - China.
- Try stretching the pipe. If the rubber stretches like a hand expander, refrain from purchasing it. Factory hoses are quite stiff and difficult to stretch.
The inscriptions on the paper insert must correspond to the markings of the nozzles
An additional sign of a quality product is 2 pressing contours instead of one. Counterfeit pipes are not made with such care.
Trusted brands that produce brake pipes of decent quality:
- BRT - Balakovo Rubber Products Plant;
- DAAZ - Dimitrovgrad aggregate;
- KRAFTTECH;
- Fenox.
The embossed logo and inscription on BRT products are molded along with the rubber shell
Copper washers serve to seal the bolted connection; overhead brackets additionally secure the ends of the pipes
Along with a set of front pipes, it is worth buying 4 new O-rings made of copper 1.5 mm thick, since the old ones are probably flattened from strong tightening. It also doesn’t hurt to make sure there are fixing brackets screwed to the calipers - many drivers don’t bother installing them.
Installation nuances
- The fitting of the new hose on the caliper side must be screwed on with a special cut-out downwards. Otherwise, it may rest against the brake pipe of the cylinder and break it.
- If, when dismantling the old front brake hose, the tube fitting was rotated along with the tube, then installation of a new one begins by screwing it to the iron tube. We fix it with a split wrench, and with an open-end wrench we twist the hose and tighten it.
- We tighten all threaded connections carefully so as not to strip the threads. We clearly get into it and try. They should twist without much effort. If you feel that it is difficult to “go”, then separate them and try to get clearly into the thread again.
- You need to tighten everything without any hassle, the threads are small, and the metal is fragile, you can tear it off and then nothing will be able to eliminate the brake fluid leak unless you pull the fittings and bolts.
Replacing brake pipes VAZ
The brake system appeared on the first cars. Its presence has become the key to the safety of the driver and passengers. The first brake system did not have a complex mechanism of action and consisted of several mechanical parts that created the necessary friction on the wheel drive for its subsequent stopping.
The second stage in the development of the braking system was the application of the laws of hydraulics. With this method of braking, the interaction between the brake pedal and the working parts of the brake system is carried out using a special fluid called “brake fluid” (or abbreviated as TF). Brake fluid allows you to stop your vehicle more efficiently. In addition, the use of brake fluid softened the pressure on the brake pedal and made driving more comfortable.
For successful circulation of brake fluid from the brake drive system to the working parts, it is carried out through special pipes. Initially, they were made in the form of hoses, but since they were unreliable, they were replaced by another material.
Design and principle of operation of brake pipes
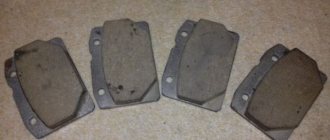
The car is braked by pressing the brake pedal. The pedal lever acts on a vacuum or any other booster, which creates the necessary pressure on the brake fluid. The liquid compresses and goes into a zone where this pressure is minimal. It enters the brake pipes, through which it is directed to the working parts of the brake system. The fluid puts pressure on the brake pads, causing them to compress. When you release pressure on the brake pedal, the pressure in the booster decreases, and the spring drive of the brake pads unclenches them and sends the fluid back to the booster (the area of least pressure).
The passage of liquid is carried out through tubes made of metal. The tubes extend from the vacuum booster and are laid under the car to the working parts of the brake system. The joints of the tubes are made in the form of threaded connections, which makes it possible to achieve maximum reliability when creating high pressure in the system.
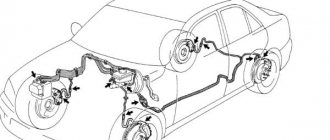
To increase the reliability of the braking system, the pipes are connected diagonally, which allows the brakes to be used if one of the lines fails. So, for example, from the vacuum booster, one tube connects the working part of the brakes of the front left and rear right wheels, and the second tube directs the brake fluid to the front right and rear left wheels. At the junction of all four pipes, a special pressure regulator is installed, which filters out excess pressure from the system so that it does not cause a breakthrough in the lines.
Purpose of flexible pipes
The contours of the VAZ 2107 liquid brakes are made of metal tubes leading from the master cylinder (abbreviated as GTZ) to all wheels. It is impossible to connect these lines directly to the working cylinders, since the wheel brake mechanisms are constantly moving relative to the body - the chassis absorbs unevenness, and the front wheels also turn left and right.
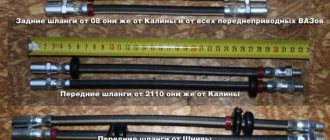
To connect rigid tubes to the calipers, flexible connections are used - brake hoses made of moisture-resistant reinforced rubber. The “seven” has 3 pipes - two on the front wheels, the third supplies fluid to the brake pressure regulator of the rear axle. Short thin hoses between the expansion tank and the gas turbine engine do not count - they do not have high pressure, spare parts rarely become unusable.
Flexible eyeliner consists of 3 elements:
The first end of the hose, connecting to the circuit tube, is always attached with a fixing bracket to a special bracket on the body. On the rear axle the second tip remains free, on the front wheels it is additionally fixed to the calipers with overhead brackets. To prevent liquid from seeping through the threaded connection, 2 copper sealing washers are put on the bolt.
How to repair brake pipes
This process requires the car enthusiast to have extensive locksmith skills and the ability to use special tools. Repairs are carried out in cases where it is not possible to replace the damaged line; it involves saving money on the purchase of a new pipe system and extends the service life of the old one.
To carry out repairs you must:
1. Unscrew the damaged tube from the cylinder or brake caliper.
2. After disconnecting, it is necessary to cut off the damaged area using a pipe cutter.
3. Clamp the tube 50 millimeters from the edge of the cut and chamfer the edge of the tube using a drill.
4. Remove all that remains of the chips and insert a fitting intended for connecting the tube to the brake operating mechanism into the cut area.
5. Insert the end of the tube into the special equipment and flare it. The main line that has undergone repairs must be purged with compressed air. And only after this is it installed with a working mechanism or another pipeline system using an adapter.
As for the length of the tube, this parameter depends on the car model. On some cars, the brake pipes have a reserve that allows you to shorten the pipe and reconnect it to the working mechanism. The metal from which the brake tube is made is flexible, so there should not be any difficulties with its position.
Replacement of front brake tubes
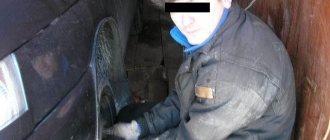
To replace the front brake hoses, it is necessary to place the car in a pit and prevent any movement. Then:
1. Unscrew the line fitting. Hold the hose with a wrench to prevent it from turning.
2. Unscrew the brake pipe from the car body. Typically, they are covered with rust, so it is necessary to treat them with WD-40.
3. Unscrew the other end of the fitting from the brake cylinder or pressure regulator.
4. Install a new brake pipe and reassemble all components in the reverse order.
After repair work or replacement, it is necessary to fill in the brake fluid and bleed the brakes. Bleeding is mandatory and is needed to squeeze out air bubbles from the car’s brake system.
It is worth noting that in some cars, in order to remove the brake pipes, it is necessary to remove other elements, such as the gas tank. The fact is that the design of many models provides for the passage of brake pipes over these elements and their dismantling is possible only when the latter are removed.
As for the engine compartment, usually everything is quite simple and getting to such elements as the brake pipe is not difficult.
This completes the replacement of the brake pipes. As you guessed, this procedure is not at all complicated and does not require special knowledge and skills from the driver. The only thing that is needed when performing repair work is adherence to a clear sequence of actions and increased responsibility. Because the life and health of passengers and the driver depend on the correct operation of the braking system. Good luck on the roads!
VESKO-TRANS.RU
AutoNews / Reviews / Tests
- Home
- Auto garage
- Replacing Piston Rings for VAZ 2107
Replacing Piston Rings for VAZ 2107
Replacing pistons and piston rings VAZ 2107
Replacing piston rings and pistons on a VAZ 2107 is done in cases where the gap between the surface of the ring, piston and the working surface of the cylinder increases, which in turn is accompanied by an increase in oil consumption, a decrease in engine power, and also an increase in fuel consumption. Typically, wear of the pistons is accompanied by wear of the compression rings, and it may also be necessary to bore the cylinder block. Major repairs with block boring must be carried out in a special workshop, because it is unrealistic to carry out such work without special abilities and experience; the most that can be done is to remove and replace the pistons and piston rings.
To replace piston rings and pistons, you need to drive the car into a pit; you will need a standard set of tools. The order of repair work is as follows:
- Drain the engine oil from the engine crankcase by unscrewing the drain plug on the pan. Also remove the pan by unscrewing the bolts securing it with a 10mm socket wrench.
- Remove the cylinder head, having previously removed the air filter, the cylinder head cover and unscrewing the nuts securing the head, remove it from the block.
- We remove the pistons alternately, starting from the first cylinder. We unscrew the nuts securing the connecting rod caps, remove the steel-aluminum liner from the cap and push the piston assembly with the connecting rod upward.
- We remove the piston and connecting rod assembly and secure it in a vice. Using a screwdriver, we remove two compression rings and one oil scraper ring (if the pistons are removed to replace the rings, if the pistons themselves need to be replaced, then there is no need to remove the rings). Using an iron mandrel of suitable diameter, knock out the pin and remove the piston.
Replacing the piston after overheating of a VAZ (classic). Do it yourself!
The video turned out to be very long! Anyone who wants to find out a lot from what is not written in more than one book...
Part 5 Lada Overhaul of VAZ 2107 (1600) Preparation of piston rings for installation
Showed how you can remove and disassemble the engine at home from a VAZ
classic, without winch. I tried...
This completes the disassembly process. Now we need to pick up new pistons. Take the new piston and stick it into the cylinder, the regular piston should slowly lower under its own weight. If the piston fails or does not move, then it does not fit. Also, when selecting, keep in mind that the internal diameter of the cylinder will initially be somewhat smaller, so make the assessment here and there in the middle part of the cylinder.
The next step is to select the rings. Insert the ring into the cylinder and lower it slightly downward, slightly above its middle part. The gap between the ends should be less than 0.2mm or two blades wide.
Next, you need to select a pin for the new piston. Lubricate your finger with engine oil and insert it into the piston. It should be inserted with the usual pressure of a huge finger and should not fall out when positioned vertically. The finger should not fit freely into the connecting rod head; it will have to be seated on the hot side.
Once all the elements have been selected, you can begin assembly. First we assemble the piston and connecting rod with a pin. To press the pin, you will need a special mandrel and a gas burner to heat the connecting rod head. The assembly order looks like this:
- Insert the retaining ring into the piston boss on one side.
- Clamp the connecting rod in a vice, heat its head to 240V°, put on the piston and insert a pin using a mandrel, which will simply fit into the heated head. Push your finger until it rests against the locking ring. Install the second stopper.
At the final stage of assembly, install two compression rings and an oil scraper ring. Lubricate the rings, their grooves and the connecting rod with engine oil. Push the piston into the cylinder from above and secure the connecting rod to the crankshaft. At this point, the repair work on removing and replacing pistons and piston rings of the VAZ 2107 has been completed.
replacing brake pipes on a VAZ 2107 car
Before unscrewing the brake pipe fittings, it is necessary to clean the connections from dirt and apply penetrating lubricant. To unscrew the brake pipe fittings, special wrenches are used that cover the five faces of the fitting and prevent them from being crushed. The operation is illustrated using a brake pipe connecting the brake pressure regulator to the rear brake hose. To perform the work of replacing the brake pipe on a VAZ 2107 car, you will need an assistant, as well as a special 10 mm wrench for brake pipes, a transparent vinyl tube of a suitable diameter, a container for draining brake fluid, fresh brake fluid (see “Operating fluids used on a VAZ car 2107").
Removing the brake pipe from a VAZ 2107 car
1. We prepare the VAZ 2107 car for operations (see “Preparation of the VAZ 2107 car for maintenance and repair”).
2. Using an 8 mm socket wrench, unscrew the screws of the two brackets securing the brake pipe to the underbody of the VAZ 2107 car.
3. Using a special 10 mm wrench, unscrew the connecting fittings securing the brake pipe to the brake pressure regulator (see “Brake pressure regulator of the VAZ 2107 car - check and replacement”) and the tip of the brake hose (see “Rear brake hose of the VAZ 2107 car - replacement” ). 4. Remove the brake pipe.
Installing a tomrose tube on a VAZ 2107 car
1. Install a new brake pipe on a VAZ 2107 car in the reverse order.
2. Fill the brake reservoir with brake fluid and pump the brakes on the VAZ 2107 (see “Hydraulic brakes on the VAZ 2107 - pumping and replacing brake fluid”). 0 0 votes
Article rating
Rear end
There is nothing complicated here, except that the line is longer and it is connected as follows - the longer part of the tube is connected to the GTZ and screwed to the “sorcerer”. Then the “sorcerer” is connected with a short tube to the brake mechanism on the wheel.
Replacement of the rear brake pipe is carried out as follows. If there is an overpass or hole, then you will not need to remove the wheel. First, apply liquid wrench to all threaded connections, then wait a little. After this, use a Phillips screwdriver or other suitable tool to unscrew the screws securing the tubes to the car body. After this, use a suitable wrench to unscrew the two fittings securing the tube to the brake hose and to the regulator. The element is removed and a new one is installed in its place. If the long line to the “sorcerer” is damaged, then the actions are similar, only unscrew the fitting from the GTZ and from the regulator.
After the replacement, you must remember to add brake fluid to the expansion tank to the required level and be sure to bleed the system, since it has taken in air and the braking process will be ineffective. If the front brake pipes on the left were replaced, then there is no need to bleed another line.