How to deal with it
The easiest way to get rid of this problem is to flush the stove radiator. Its essence is to drive a special agent through it that can dissolve and wash away all the scale and dirt. There are two cleaning methods: flushing the heater radiator without removing it from the car and with removal. The first method does not involve dismantling the heater. It is enough to simply disconnect it from the cooling system. In the second case, the heat exchanger is dismantled, and the entire procedure can be successfully carried out even in the bathroom. We will focus on the first option, since flushing the stove radiator without removing it is much easier. And considering that in some cars it is not so easy to get to the heater, it is also faster.
The design and principle of operation of the VAZ 2114/15 stove
The heating system of the VAZ 2114/15 is designed to heat the air entering the passenger compartment. Its design is the same in cars with injection and carburetor engines. The coolant heated by the engine flows from the cooling system into the heater radiator, which is blown by a fan. The flow of warm air created in this way enters the cabin through the air duct system. The intensity and direction of air flow is regulated using deflectors and dampers. The interior heating system of the VAZ 2114/15 can operate in several modes.
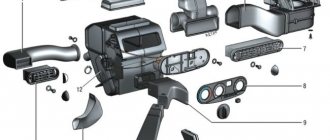
The VAZ 2114/15 stove is designed quite simply: 1 - assembled heater; 2 — protective casing; 3 - seal; 4 — front air duct; 5 — rear air duct; 6 — rear air duct; 7 — right nozzle; 8 — right side air duct; 9 — right side nozzle; 10 — intermediate body; 11 — central nozzle; 12 — draft of the windshield heating flap; 13 — heater control levers; 14 — control handle for the heated windshield damper; 15 — heater control handle; 16 — symbol plate; 17 — control handle for the foot heating damper; 18 — right air duct; 19 — interior heating air duct; 20 — heater control damper rod; 21 — heater valve control rod; 22 — heater valve; 23 - leg heating damper rod
Stove design
The VAZ 2114/15 stove consists of the following elements:
- Fan.
- Windshield defroster.
- A distribution flap that directs air flow to the central and side deflectors, to the lower and upper parts of the cabin.
- Control valve.
- Stove radiator.
- Duct that directs air flow to the legs.
- Internal air duct.
Heater fuse and reasons for its failure
Often the cause of malfunction of most components and systems of a car is a blown fuse. The stove is no exception. Failure of a 30A heating system fuse causes the fan motor to stop and air to stop flowing into the cabin. In this case, find an element marked F7 in the fuse block and replace it. The new fuse should also be rated 30A. If the fan does not work after this, the problem should be looked for elsewhere.
Heater fuse F7 is located in the mounting block under the hood on the driver's side
It is often difficult to determine that it is the fuse that has blown. It can fail due to a short circuit in the electrical wiring, a malfunction of the electric motor, severe clogging of the cabin filter and in a number of other situations. The difficulty lies in the fact that fuse F7 is simultaneously included in the rear window heating electrical circuit and is responsible for the cigarette lighter, glove compartment lighting and headlight washer motor. If it fails, all these components will not work.
Heating system relay location
The cause of a non-functioning stove may be a relay that wears out during operation. It cannot be repaired and is immediately replaced with a new one. The relay is located under the instrument panel in the fuse box.
The heater relay is located under the instrument panel in the fuse box
Stove mode switch
The mode switch or heater regulator is installed on the center console, which will have to be removed when repairing or replacing it. If the switch fails, the fan motor stops working.
The heater control is located on the left side of the center console
How to rinse a stove radiator with vinegar without removing it
How to rinse a car radiator at home
You will need 3 bottles of 70% table vinegar, the capacity of 1 bottle is 180 g. Antifreeze for topping up is 1 liter, or replacing 5 liters. In the case of antifreeze mixed with sealant, it must be changed completely. The cleaning process begins with emptying the cooling system. The coolant is drained into a clean plastic bucket, 2 pipes are removed. The residue is blown out using a compressor. The heater is washed with water and purged with air. To avoid burns on the body from vinegar, wear rubber gloves and a protective mask. All vinegar is poured in for 4 hours. The machine is placed at an angle so that the vinegar fills all the “honeycombs”. They lift it with a car lift or by driving onto a hill or overpass. Bring the car to 5000 rpm for 5 minutes. This is how the air lock is expelled. The system is flushed under pressure. The results are visible at the bottom of the bucket. After washing, blowing with a compressor follows, the removed pipes are put on, new antifreeze is poured into the expansion tank or added to the old one. The engine starts and the coolant level is monitored.
Prepare everything you need
Almost everything you need for cleaning can be found in any garage, or purchased in addition at the nearest auto and household store.
- 150–200 g citric acid;
- bucket for 8–10 l;
- container for draining antifreeze;
- hose about 3 m long;
- clamps;
- wires;
- mesh, gauze or nylon;
- water;
- antifreeze for topping up;
- transfer pump;
- boiler or stove;
- spanners;
- screwdrivers.
Possible risks of using flushes
Each metal resists some aggressive substances and is helpless against others.
The dangers of flushing aluminum radiators with strong acids and alkali, which is part of sewer pipe cleaning products, have already been mentioned; it remains to be added that copper radiators cannot withstand everything.
In particular, even if the copper remains intact, the lead that is part of the solder on which the copper radiator is assembled really does not like some acids. The structure can be greatly weakened.
Copper itself is quite resistant to acid, but the problem is that foreign substances get into the solution. A situation is possible when copper begins to oxidize intensively, but copper oxide is washed off with acid instantly.
This way you can dissolve the entire radiator. Therefore, precise knowledge of which metals stand in the way of washing will allow us to first study the issue by finding out how actively they react with a particular composition. Not forgetting about nuances like solder and material of supply pipes.
Radiator flushing with removal
Having decided what can be used to flush the radiator of a car’s heater, we begin the process itself. Regardless of the method chosen, the first step is to drain all the coolant from the system. After this, we dismantle the radiator along with the tap. We check the operation of the tap and clean the outside of the heater, removing dirt and dust from its lamellas. Before flushing, it is better to disconnect the tap.
Next, we rinse the radiator with a stream of water, directing it into one of the pipes. When the dirt stops coming out, tightly close any heater pipe, and fill the second with a pre-prepared solution. And it's better if it's hot. Leave the radiator to cool for about an hour.
After the specified time has passed, drain the cleaning agent from the heater and rinse it again with running water. For greater effect, you can use a hose by putting one end on the radiator pipe and connecting the other to the water supply. We rinse until dirt stops coming out of the heater. How effective the cleaning was can be determined by blowing into the connected hose. If air passes through the radiator channels freely, then our work was not in vain. All that remains is to screw on the faucet and install the heater in place.
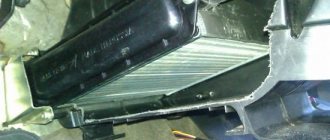
Drain the coolant
The heater is filled with antifreeze. To prevent liquid from leaking onto the floor when you remove the pipes, you need to drain it into a previously prepared container through the plug on the main radiator.
Currently reading: Buy a used Renault Logan 2014 at a price of 310,000 rubles in St. Petersburg - more than 10 used Renault Logan 2014 on Avto.ru
Since the stove is not the lowest point of the system, you can drain not all the antifreeze, but only part of it. With due care, this can be done directly through the pipes during removal.
Why does the heater radiator become clogged?
It is clear that a clogged radiator is not a normal phenomenon for a car and this phenomenon has a completely understandable reason. The thing is that during inactivity in the summer, the inner walls of the radiator tubes are subject to increased oxidation, since there is no circulation of liquid in the stove. The oxidation product settles on the walls and covers their entire area, while having the lowest thermal transfer coefficient. As a result, the copper or aluminum radiator tubes do not heat up and the heater blows cold air.
All these problems can be resolved using three different methods:
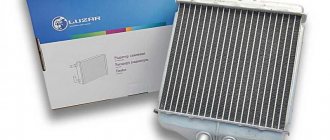
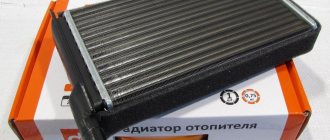
- Replace the heater radiator with a new one. An elementary way to get rid of many problems at once, but not the most economical, since the price of a new radiator is quite high.
- Wash the radiator after removing it from the car. This method is not associated with the cost of new spare parts and allows you to achieve maximum effect. However, it has one significant drawback - high labor intensity. Removing the heater radiator from the car panel is quite difficult.
- Flushing the radiator without removing it. The most economical and fastest option. Allows you to return the stove radiator to a working position without removing it. This is the method we will look at below.
Useful tips
- Do not use water, especially untreated water, as a coolant. Regular tap water contains too many different salts, which will subsequently settle on the walls of the radiator.
- Do not buy cheap coolants of dubious origin. It is not known what substances are included in their composition and how they “get along” with the metal from which the stove radiator is made.
- Replace the coolant promptly in accordance with the manufacturer's recommendations.
Let's start the washing process
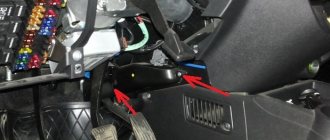
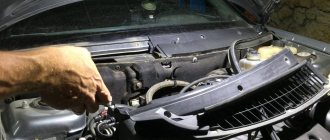
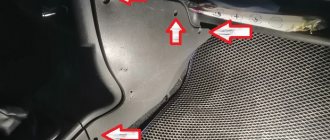
To begin with, by lifting the hood, we find two hoses that provide supply and drainage of fluid to the stove. Then:
- in the radiator fins. Having disconnected these hoses, we extend them, securing the joints with clamps and wrapping them with fum tape for tightness.
- Turning on the compressor, blow out the old antifreeze from the heat exchanger.
- Fill the radiator with diluted citric acid or another selected cleaning liquid, give it time, up to half an hour, to dissolve dirt and deposits. In more advanced cases, this time can be increased to several hours. Some people advise that before pouring, for greater effect, heat the solution to the operating temperature of the antifreeze, and in the case of using Coca-Cola, generally boil it.
- After the selected period of time, drain the liquid into a prepared container.
- This procedure must be repeated until no clear liquid comes out of the drain hose.
- By connecting the pump to one of the hoses, rinse the stove under pressure with clean water.
- By connecting the hoses back and adding antifreeze, you need to eliminate air in the system.
As an additional way to influence internal contaminants, some experts suggest connecting a pump to one of the hoses and lowering it into a bucket that serves as a container for draining liquid, driving the cleaning solution inside the stove in different directions. In order to evenly press all passages in the radiator plates.
Rinsing with Fanta, Schweppes or Sprite.
This method is also recommended by experienced car owners.
It is important not to confuse sodas, since Fanta, Schweppes and Sprite contain citric acid, and, for example, Coca-Cola contains orthophosphoric acid, which can damage the metal surface. You need to purchase 6-8 liters of soda, ideally without bright colors, and then flush the cooling system. After completing the procedure, make sure that as much liquid as possible has been drained. Then you need to rinse the parts twice with water and add antifreeze. Simplicity: 3
Cost: 2 Time spent: 5 Quality: 3 Result: recommended for moderate contamination.
On-the-go preventative cleaning
This method is recommended to be implemented in the absence of frost - in summer, early spring or late autumn. The reason is to fill the cooling system of the power unit with distilled water for several days. Due to night frosts, heat exchanger tubes may crack due to ice expansion. It is permissible to carry out flushing activities in winter if the vehicle is stored in a warm garage and does not remain outside for a long time.
How to do this cleaning:
- Completely drain the engine cooling system.
- Take the required amount of distillate corresponding to the volume of the system. Heat the water and dissolve 100–150 grams of citric acid in it.
- Pour the product into the antifreeze area and make sure there are no air pockets.
- Ride in water with citric acid for 4-5 days, then drain the solution. Fill the engine cooling jacket and pipeline network with new antifreeze of a suitable brand.
Note. A food acid concentration of 100 grams per 10 liters of water is considered quite weak - the solution is unable to damage any parts or honeycombs of radiators.
Washing “on the go” is a preventative measure. A heat exchanger heavily clogged with scale cannot be cleaned using this method; a higher concentration of acid and backwashing are required.
Washing with sulfuric acid
Dismantling in this case is mandatory to avoid damage to the rubber and plastic parts of the cooling system. In today's conditions, this is a rather exotic method, the feasibility of which is highly doubtful. Before starting the procedure, you must follow all safety regulations. It is imperative to protect your eyes with special glasses and the skin of your hands with rubber gloves. It would be a good idea to throw a special robe over your clothes. In addition, use a household respirator that will protect your respiratory tract from toxic fumes. Also use special tongs or grips to prevent direct contact with the solution. In addition, you will need a hydrometer to measure the concentration of the wash liquid. Please note that rinsing requires a 15% acid solution. Therefore, the hydrometer should show a density of 1.1 grams per 1 cubic centimeter. To obtain the solution you also need distilled water and battery electrolyte. It is important to remember that you should never pour water into acid.
On the contrary, you need to carefully add the acid to the water. Old-style radiators made of copper can be washed in a similar way. Parts made of aluminum and zinc, on the contrary, will become unusable.
Simplicity: 1
Cost: 3 Time spent: 4 Quality: 5 Result: recommended in case of high levels of contamination.
Ways to solve the problem
In order not to experience discomfort from the cold inside the car in winter, it is necessary to properly maintain the cleanliness of the cooling system. This will require a lot of effort from the car enthusiast. The main problem in servicing this system is that there is no universal means for cleaning the cooling system from both decomposition products of old antifreeze and corrosion products.
Here we can clearly see two sides of the same coin: acid solutions can easily deal with corrosion products, but they are useless for antifreeze residues (alkali is needed here). As you know from a school chemistry course, combining such products in one composition reduces their effectiveness to zero, because alkali neutralizes acid. As a result of this, we get a completely ineffective remedy.
We can draw a simple conclusion: most commercially available specialized chemicals for cleaning a car’s cooling system will not cope with this task fully, so it is necessary to service it in a timely manner so that you do not have to deal with additional difficulties.
Why does the radiator get clogged?
The reason for poor quality work may be:
- If the car is driven most of the time in cold conditions with the heater running. Accordingly, the radiator channels gradually become clogged with dirt.
- Low quality products are used as a coolant. As a result, the metal radiator begins to oxidize and reaction products clog the heater cells.
- Using ordinary water with a high salt content as a remedy.
- Entry of foreign substances into the cooling system (fuel, oils, chemicals).
Cleaning the system involves removing dirt by washing it using various means: water, special means for flushing the radiator.
Heater maintenance intervals
Most of the time, the antifreeze in the cooling system operates at a temperature of 80–95 degrees. Deposits gradually accumulate on the internal surfaces of metal tubes in contact with outside air. The cross-section of the pipes for the flow of coolant decreases, and the intensity of heat exchange decreases.
Reasons for the formation of sediment that interferes with the normal heat transfer of radiators:
- untimely replacement of old antifreeze, whose additives have lost their working properties and have begun to precipitate;
- the use of tap and distilled water instead of antifreeze leads to increased deposition of salts (scale);
- filling with fake coolant;
- Small particles travel through the system, clogging the stove tubes - metal shavings, rust, pieces of sealant and rubber.
The optimal interval for flushing the stove radiator is once every 2–3 years. The operation is carried out simultaneously with the replacement of antifreeze - the system is emptied, filled with distilled water with a special cleaning agent and warmed up with the engine to operating temperature. Then the solution is removed and new antifreeze is poured through the expansion tank.
If the above-described preventive flushing has not been carried out for many years, to restore normal heat exchange, the heater radiator will have to be cleaned of scale and debris. To avoid having to disassemble the interior, wash the stove without removing it from the car using one of the two methods described below.
Risks to the engine due to improper cleaning
Where it's thin, that's where it breaks. A simple everyday law works in our case too. Let's assume that the flushing was successful and we removed all the grease and scale from the system. Naturally, with a well-maintained engine, and especially with low mileage, nothing bad will happen.
If the engine has not digested the highest quality oil and antifreeze, it is likely that something will go wrong:
- The pump is leaking. If this happens during or after flushing, it is worth remembering when the pump was last replaced. Most likely, its resource has already been exhausted. The only thing that saved the pump from leaking was the presence of dirt and scale on the bushing or oil seal.
- After cleaning, the stove started leaking. The situation is approximately the same. The scale on the honeycomb prevented the antifreeze from penetrating outside. This can also happen due to the use of suspicious cooling system sealants. We talked about the pros and cons of their use here.
- Leaks in pipes and hoses begin for the same reasons. The composition of the flushing fluid and the technology that we offer can in no way affect the integrity of the hoses and the tightness of their connection to the thermostat housing, cylinder head or radiator.
- The head gasket was blown. The most unpleasant story, but the root of the evil is also in the neglect of the system. Most likely, the gasket had already burned through, but washing removed soot and deposits, which stopped the gasket breakdown.
In general, if the engine was in good condition before flushing and good antifreeze was used that complies with the manufacturer's tolerances, there should be no side effects from such a flush.
The best option for washing and replacing antifreeze is a stand for vacuum fluid replacement.
FAQ
What is the best way to clean a copper stove radiator?
The simplest method for flushing a copper car heater radiator is to use a 10 percent caustic soda solution (caustic soda, mole for flushing plumbing pipes). The hot solution is poured inside for 30 minutes, then drained. If necessary, repeat the procedure two or three times. Washing with a mixture of citric acid and vinegar also shows good results. However, for an old copper radiator, it would be best to remove, unsolder it and mechanically clean it by hand.
What is the best way to clean an aluminum stove radiator?
To wash aluminum stove radiators, it is recommended to use acid-based products. The best options are whey, citric acid (such mixtures should only be very hot - 90°C) or phosphoric acid solution (heat to 40-50 degrees). And for a copper-brass heat exchanger, only professional products designed for flushing a car’s cooling system will be safe.
How to wash and what proportions for flushing the stove radiator with citric acid?
The proportion for flushing the radiator of a car heater with citric acid is 50 grams of acid per five liters of water. If the radiator is heavily clogged, the amount of acid can be increased to 80 grams. The acid is poured into 0.5 liters of boiled water, stirred until dissolved and then the bulk of distilled water is added. The liquid is poured into the cooling system instead of antifreeze, the engine is warmed up to operating temperature, and then left to idle for another 15 minutes. Then drain and wash the system 3-4 times with distilled water.
How can I clean the heater radiator without removing it?
Alkaline, acidic or special cleaners are used to flush car interior heater radiators. Alkaline compounds remove scale (lime), and acidic compounds remove rust.
How much does it cost to flush a stove radiator at a service center?
It is necessary to understand that different services, including in different cities, may charge different prices for the service of cleaning the stove radiator without dismantling it. However, as of the summer of 2022, on average, the price of this procedure starts from 1,500 Russian rubles. As for the procedure time, it is about two hours. If the radiator is severely clogged, it may take more time, and the payment will increase, since more cleaning products and worker time will be spent.
How can this be done
Before you start cleaning the radiator, you should know the properties of the material from which it is made. Alkaline-based cleaners are not suitable for an aluminum heat exchanger. Wash it with concentrated, undiluted acid, since the use of water can disrupt the corrosion protection of the surface.
Acid can damage copper or brass radiators. It is good to clean such material using soda and other alkaline compounds.
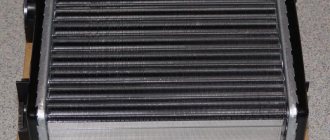
Severely clogged radiator = inoperative heater
Specialty chemistry
The stores sell a fairly extensive range of specialized chemicals. Among them are:
- FELIX cleaner;
- safe complex composition Radiator Flush Complete;
- for complex stains Radiator Flush 2×1 from the Russian manufacturer Lavr;
- foreign product Hi-Gear.
Experts recommend using special. means It is possible to use battery electrolyte (1.27), which will help clean the entire cooling system.
When using such products, there are no problems with proportions; they are as safe as possible for car parts. To achieve the desired result, you should strictly follow the instructions for use of the cleaners.
Home methods
Among available means, many motorists prefer citric acid, household chemicals like Anti-Scalp, Mole or even Coca-Cola. For copper radiators, use caustic soda or any alkaline solution.
The use of household and improvised means requires special care. It is important to know the proportions in which to breed them. They usually require adding a lot of water.
If there is not a lot of dirt, citric acid can help. 70% vinegar will need to be diluted in the amount of 50 ml per bucket of hot water, and citric acid - at the rate of 250 g per 10 liters of water.
Coke or Fanta contains a lot of sugar, which can damage engine performance, so they should be consumed with caution.
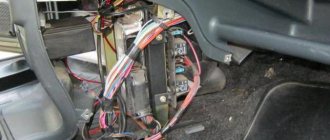
The equipment required is simple: two hoses and a container
You can gently and safely clean aluminum parts and remove dirt using whey (600 g of lactic acid diluted in 10 liters of water) or highly diluted oxalic acid.