Replacing the Fuel Pump Mesh for VAZ 2107 Injector AUTOTEXNIKA.RU
Replacing a VAZ injector fuel pump
Cases when you need to replace a VAZ 2107 injector fuel pump are not that frequent, and its service life depends not only on the properties of the gas pump itself, but also on the condition of the gas tank. The reason why I had to change it was because a small speck got into it because the filter came off.
Electric fuel pump device
The design of an injection fuel pump is conventional and can be divided into two parts:
The most important thing is its structure itself. The fuel pump in the VAZ 2107 is a replacement. The fuel pump fuse (injector) is also clogged. Testing and replacement of the VAZ injector fuel pump, replacement of the VAZ 2110 fuel pump. The electric fuel pump itself is hermetically sealed to protect against the ingress of fuel. The fuel enters the pump through the filter and the intake hole and is supplied to the power system through the outlet hole (sealed from the electric motor).
Where is the fuel pump on the VAZ 2107 injector?
On carburetor engines, the fuel pump is installed on the right side of the block and is visually accessible. On the injector, it is located in the gas tank and only the output tubes coming from it are visible, and replacement is somewhat more complicated.
Symptoms for replacement
Signs of a malfunction of the VAZ 2107 injector fuel pump appear both when starting the engine and during operation:
- “heavy”, long engine start;
- jerking when moving;
- uneven operation at idle;
- The fuel pump doesn't pump.
Diagnostics
The primary conclusion whether the fuel pump is working or not can be assessed by ear when the ignition is turned on. If you don’t hear a quiet buzzing noise from behind, then you need to check the voltage supply to the gas tank block and then draw a conclusion about its malfunction.
This has never happened in a gas tank before.
Computer diagnostics. Replacement of electric fuel pump. Cleaning (washing) of injectors (injectors) on VAZ 2107 Engine.
Strange crap found. Replacing the fuel pump VAZ 2107
Add to the group in VK Donat to pay for the Internet: WEBMONEY- R394885703159 YANDEX.
You can check the serviceability of the fuel pump using the MTL-2 pressure gauge; this is the most correct way. You can somewhat roughly estimate the pressure using air pressure gauges to check tire pressure. On the bottom side of the fuel pump there is a neat former VAZ 2107 from 2004. Color 2107 injector. To do this, screw a rubber hose to the sensor and connect it to the fuel system.
The pressure of the VAZ 2107 injector fuel pump when the ignition is on should be 4.0 atmospheres, and when the ignition is running 2.8-3.2. Replacing the fuel pump mesh on the injector with your own. In reality, the pump pressure is different and was slightly less, but this may be an error in the pressure gauge.
The carburetor pump is checked by setting the camshaft position by cranking the engine so as to ensure free movement of the pump foot. The hose is unscrewed from the carburetor or filter and the presence of fuel supply is determined by pressing the foot.
To replace the fuel pump on an injection vase you will need:
- key to 10;
- 2 keys for 17;
- key to 7;
- crosshead screwdriver;
- a simple screwdriver.
I recommend removing the gas tank mount for ease of repair work. Replacement of fuel pump VAZ 2110, 2112, replacement, etc. To remove the fuel pump you need:
- disconnect the pressure relief pipes in the gas tank;
- Unscrew the main pipelines using 2 17mm wrenches;
- remove the gasket from the gas tank neck;
- unscrew the tank mount;
- move the tank to the side;
- remove the power and fuel level block;
- unscrew the fuel pump flange;
- remove the fuel pump filter;
- remove the tube from the pump after heating it;
- We take out the old pump and install a new one.
When installing the filter, do not hesitate to give it a good tap, otherwise it may fall off like mine. The fuel pump mesh on the VAZ injector is replaced if the old one is dirty or torn. Replacing the VAZ 2110 fuel pump mesh: description of the work. Its replacement is carried out in the same way. Usually it is sold complete with a fuel pump; if not, you will have to buy it, the price is 25 rubles.
Reassemble in reverse order. We heat the hose again in boiling water; if the mounting location of the old electric fuel pump does not allow the part to be properly secured, then we cut it off.
Important
When choosing, pay attention to performance and maximum pressure. Replacing a VAZ 2110 fuel pump: work procedure. I had a Bosch 0 580 454 456 and replaced it with a close analogue of FR 453-453 from WEBER
I had Bosch 0 580 454 456 and replaced it with a close analogue of FR 453-453 from WEBER.
- OEM part number 21083-1139009-01;
- Installation of VAZ 2108 - 2115;
- Pressure - 580 kPa;
- Productivity - 60 l/min;
- Voltage - 13.5 V.
Consumption per 100 km at a speed of 120 is about 8 liters. Very pleased.
Replacing the fuel pump VAZ 2107 injector video:
Removing and replacing the gas tank
We carried out the procedure for this procedure on a VAZ 2110 car; on other cars (2107, 2109-2114) the procedure is no different.
1. First of all, you need to disconnect the negative ground terminal of the battery.
2. Then reduce the pressure in the supply system.
4. After this, it is necessary to disconnect the air hose, having first loosened the tightening of the clamp securing it.
6. Then, holding the gas tank, you need to unscrew a couple of bolts securing its clamps, and move the clamps themselves behind the rear suspension beam.
7. Next, you should lower the tank a little and remove it first from under the brake pipe, and then from under the muffler. The gas tank can now be removed from under the car.
8. After loosening the clamps, remove the hoses of the filler pipe and the gasoline vapor recovery system from the tank.
9. The next step is to remove the fuel pump. To do this, you need to unscrew the 8 nuts that secure it. You should also check the condition of the pump sealing ring; if it is unsatisfactory (the ring is scored, defective, or has lost elasticity), it should be replaced.
10. If the new gasoline tank does not have rubber gaskets, you can peel them off from the old one and glue them to the new one from the bottom and top.
11. To remove the tank mounting clamps, you need to remove their hooks from the body holes.
12. Rusty or damaged clamps should be replaced with new ones. You should also remember that the fuel tank mounting clamps are different - for the right (1) and left (2) sides, and they are secured with special bolts.
13. It is necessary to install a new tank on a VAZ 2110 car in the reverse order, having first inserted the clamps into the fastenings on the body.
Video about removing the fuel tank in Opel Omega B:
Flushing the fuel system with PRO-TEC FUEL LINE CLEANER:
Gasoline pump and purification
Using a two-stage electric drive, the fuel pump pumps gasoline into the line. The pump is of a rotary type, it is not dismountable, and is installed directly in the gas tank. This reduces the possibility of a vapor lock occurring, since gasoline is injected under high pressure and not under vacuum. The pressure value is about 284 kPa on VAZ-2111 and VAZ-2112 engines, and also over 364 kPa on VAZ-21114 and VAZ-21124 engine models.
The gasoline filter is built into the supply line directly between the ramp and the electric pump. It is located under the body, directly next to the fuel tank. The filter is a non-separable element; the housing is made of steel. Inside there is a paper type filter element. For rough cleaning of fuel, a so-called diaper is used, which is installed in the lower part of the pump.
how many liters is the gas tank of the VAZ 2109 injector
But is it really possible to cram a bigger tank into the 2109? It drives, it’s easier to stick the gas in))))) it seems like the tank is 43 liters on all modes, starting with the eight and ending with the Priora. I just don’t know how much is on Kalina, but where can I buy a muffler for a VAZ 21041 injector in Moscow? In theory, 43 liters. Who can say how long this will last? depending on where and how to go Yalo. at 500 km -50 Gray. Forum > Repair of VAZ 2108, 2109, 21099 and their analogues > Engine and gearbox repair > Injector and everything connected with them >. to check, fill the tank full, drive around, fill the tank to capacity again! then how much did it take - this is your consumption for the mileage for which you burned this How many liters is the tank of the VAZ 2109? Convert the VAZ carburetor to an injector: STAGE 3 or Replacement Buy a VAZ injectorPriora Granta gas tank into the fuel injection system of a VAZ 2107 car. How to fill a full tank of a VAZ 2109 and why it’s bad to drive with an empty tank. Fuel pumps of injection engines are located in the gas tank and for their normal and reliable operation You need at least 5 liters of gasoline in the tank. 43 liters exactly. plus a couple more liters. If you know exactly the volume of the tank, you need to drain the gasoline completely. then pour it into a liter or 3 liter container, whichever is more convenient. After each filled jar, look at the device. how much it shows on the scale. so do not pour yet Operation and repair manual for VAZ 2109. Fuel tank and fuel lines: 1 fine fuel filter 2 fuel supply hose to the fuel pump 3 fuel pump 4 check valves 5 fuel drain hose from the carburetor 6 Description of the fuel tank of VAZ 2108, 2109 cars , 21099. On front-wheel drive VAZ cars, the fuel tank is located under the bottom of the car (under the rear seat). The separator capacity is 7 liters. Well done. The sleeve is long, shorter for 08-09. 2004-10-07 14:56. This is how much it needs to be wound so that 4 liters fit. Not so long ago I changed the fuel pump (naturally, with the removal of the gas tank).
Replacing the fuel tank
Before replacing the tank, it is recommended to protect yourself from possible troubles and remove the wire in the negative terminal of the battery. The work will be completed as quickly and correctly as possible only with the participation of an assistant.
It is recommended to remove the pump immediately after shutting it off to avoid damaging the sensor and fuel lines.
After removing the old gas tank, you will need to perform the following operations to install a new one:
Install a new fuel level sensor gasket and lower the sensor together with it into its place in the tank.
Then lift the tank, first from the rear, then from the front, install it on new clamps, screwing them to the body with new bolts.
Next, connect the fuel hoses, separator and air pipes.
After that, go into the cabin and connect the fuel level sensor and pump to the connectors.
Close the hatch, screw it on and put the seat cushion in place.
After installation, you must make sure that all fuel lines and sensor wires are connected
After replacing the tank, you need to make sure it is working: start the engine, see if there are any problems with the fuel supply or leaks due to poor connections.
Today, you can repair and replace the gas tank on a “ten” at any service station. However, this procedure is not considered difficult to perform independently. Therefore, it is more advisable to remove, repair or change the gas tank yourself.
Removing and installing the fuel tank on VAZ 2110, 2111 and 2112 cars
The first step is to jack up the car, or rather its rear part, or carry out this repair in an inspection hole. Of course, the second option will be preferable.
You can immediately unscrew the cover from the passenger compartment under which the fuel pump is located and turn off the power from it, and also unscrew the two fuel pipes using a 17mm wrench. The result is clearly shown below:
After this, from the side of the tank itself, we disconnect the filling pipe from the thick hose.
We release the clamp that holds the second hose from the filler neck.
And we take him aside. Then unscrew the two bolts securing the gas tank, which is clearly shown in the photo below.
And we carefully try to lower the tank down, moving all the hoses and tubes to the sides so that they do not cling to anything.
Now we are left with one more thinnest hose, which also needs to be disconnected, having first loosened the clamp screw of the clamp.
Well, now you can remove the tank from under the car without any problems. The result of the work done can be seen in the picture below.
If repairs are needed, we will make them. When replacing, we buy a new tank and install it in its place in the reverse order. You can immediately check the internal cavity for debris and foreign particles - and then rinse the container thoroughly.
The price of a new gas tank for VAZ 2110, 2111 and 2112 is from 4,000 rubles, so it is most profitable to buy such parts at a disassembly site. For example, my price tag for such things is only 1,500 rubles.
Source
How to get rid of the smell of gasoline
To understand where the smell of gasoline may be coming from in your car, you should study the car's fuel supply diagram. Let's look at the example of a car of the tenth family:
Osipov Mikhail, VAZ 2112, Toyota Camry, driving experience 11 years.
Hi all! My name is Mikhail, now I’ll tell you a story about how I managed to exchange my two-wheeler for a 2010 Camry. It all started with the fact that I began to be wildly irritated by the breakdowns of the two-wheeler, it seemed like nothing serious was broken, but damn it, there were so many little things that really started to irritate me. This is where the idea arose that it was time to change the car to a foreign car. The choice fell on the melting Camry of the tenth years.
Yes, I had matured morally, but financially I just couldn’t handle it. I’ll say right away that I am against loans and taking a car, especially not a new one, on credit is unreasonable. My salary is 24k a month, so collecting 600-700 thousand is almost impossible for me. I started looking for different ways to make money on the Internet. You can’t imagine how many scams there are, what I haven’t tried: sports betting, network marketing, and even the Vulcan casino, where I successfully lost about 10 thousand ((The only direction in which it seemed to me that I could make money was currency trading on the stock exchange, they call it Forex. But when I started delving into it, I realized that it was very difficult for me. I continued to dig further and came across binary options. The essence is the same as in Forex, but it’s much easier to understand. I started reading forums, studying trading strategies. I tried it on a demo account, then opened a real account. To be honest, I didn’t manage to start earning money right away, until I understood all the mechanics of options, I lost about 3,000 rubles, but as it turned out, it was a precious experience. Now I earn 5-7 thousand rubles a day. I managed to get the car buy after half a year, but in my opinion this is a good result, and it’s not about the car, my life has changed, I naturally quit my job, I have more free time for myself and my family. You’ll laugh, but I work directly on the phone)) If If you want to change your life like me, then here’s what I advise you to do right now: 1. Register 2. Practice on a Demo account (it’s free). 3. As soon as you get something on the Demo account, top up your REAL ACCOUNT and go to REAL MONEY!
I also advise you to download the application to your phone, it’s much more convenient to work from your phone.
Reason #1: Filler pipe (2108-1101080). This is the hose that connects the filler neck and the gas tank. It cracks due to age, the problem is solved by replacing it. Reasons: gasoline leaks when the tank is full and when refueling.
Gasoline vapor recovery system (Separator), on VAZ 2110, 2111, 2112 it is mounted under the left rear fender. We check/blow out the hoses and, if necessary, change/clean them with a spoke and a compressor. By the way, these are not the only pipes that can leak; carefully check the entire fuel line for leaks.
- We remove the separator ventilation hose from the side member (in the arch of the removed wheel).
- We heat the end of the hose in hot water or crush it with pliers.
- We put the purchased valve with a cap on this hose.
- We take our device behind the separator and secure it with clamps.
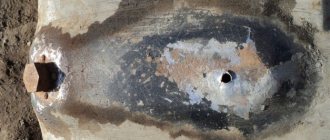
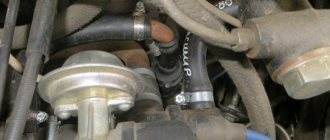
Reason No. 3: Attaching the fuel pump. The fuel pump is secured using a pressure ring, and an O-ring is installed to prevent gasoline vapors from entering the passenger compartment.
We check the condition of this gasket, the terminal block seal on the fuel pump and whether the clamping ring nuts are tightened sufficiently (removal instructions).
It is not uncommon for fuel tank studs to break and have to be rebuilt. A temporary solution in this case is to seal the gas tank flap with tape.
Our readers recommend!
In order to get rid of constant fines from cameras, many of our readers successfully use Special Nano Film for license plates. A legal and 100% reliable way to protect yourself from fines. Having familiarized ourselves and carefully studied this method, we decided to offer it to you.
Keywords:
- gas tank
- bad smells
- car fuel system
How to remove the gas tank?
- Procedure for removing the fuel tank
- Some tips and tricks
How to remove the gas tank on different cars? We remove the gas tank from VAZ 2109, 2110, 2107 and others. Where is the fuel tank located?
Almost all drivers who have owned a car for five years or more eventually wonder how to remove the gas tank. There may be several reasons for this need. For example, changing the gas pump or gas intake filter, cleaning the old tank or replacing it with a new one... In principle, there is nothing tricky or complicated in this task, except for minor differences in how the gas tank is mounted on different cars. On domestic VAZ 2110, 2109 it is installed at the bottom, on the VAZ 2106 or 2107 on the side, and on foreign cars again at the bottom. In general, different locations have their own operating nuances in each individual case, although sometimes there is no need to remove the fuel tank if you just need to clean the fuel system, of which this tank is a part.
Most often, removal is required after an accident, during body work, or to replace it with a new one, when the old tank is so rotten that it makes no sense to seal all the holes and cracks, it’s easier to buy and install a new one, it will be even cheaper. But one thing can be said for sure, in relation to any make and model of car - the gas tank, as well as the entire fuel system of the car, must be carefully monitored, periodically subjecting it to various preventive maintenance work. We must not lose sight of the change of seasons, when during the transitional spring-autumn period the tank needs to be cleaned and washed.
Procedure for removing the fuel tank
We will not focus on either domestic cars or foreign cars, so as not to mislead anyone, but we will trace the entire principle of operation point by point, so that everyone can understand how to remove the gas tank on almost any car.
- First you need to disconnect the fuel sensor by removing the wires from the connectors.
- Then you need to remove the hose from the fitting of this sensor.
- Next, you must unscrew the bolt(s) to free the tank from the fastening clamps.
- Pull the ventilation tube off the rubber gasket.
- Remove the plastic plug from the filler neck, followed by the rubber gasket.
- Then remove the ground wire from the fuel sensor.
- Unscrew the mounting nuts from the sensor and remove it from the gas tank.
- And the last thing you need to do is remove the flange gasket from the studs.
To avoid any failures, you need to strictly follow the removal order, then the entire tank replacement will be successful. That, in fact, is the whole task. As you can see, there is nothing extremely complicated or difficult about this.
Some tips and tricks
- If you constantly use your car, then you do not need any regular replacements - you just need to clean the fuel tank every three years, draining the settled gasoline and rinsing it (the tank) clean. Remember that gasoline is not a pure fuel, but a hydrocarbon mixture containing water, which, when the car is parked for a long time, begins to separate from the coal part. If this happens in winter, then condensation easily forms in the tank, turning into very light ice. To prevent a thin crust of ice from forming in the tank when the car is parked for a long time, you need to keep it at least half full.
- Of course, before removing the tank, you need to pump out the remaining fuel from it. This is especially true for leaded steel gas tanks. This is done simply, using an ordinary rubber hose that fits the diameter of the hatch hole.
- When removing the tank for repairs and patching holes, it must be very well cleaned, rinsed and dried. Gasoline is a flammable substance and there should be no open fire nearby.
- If fuel begins to leak from your car’s tank while on the road, you can temporarily plug the hole that appears with regular fatty soap. Gasoline does not react with it and does not dissolve, which will give you the opportunity to hold out at least until the nearest workshop.
Another example for 2112.
Important nuances
When replacing the gas tank and the studs on it, we must not forget about several important points:
- Fire safety. Work on the gas tank, as well as on any part of the vehicle’s fuel system, should only be carried out in a well-ventilated area or in the open air. There should be no sources of open fire or flammable materials nearby. And, of course, there should always be a fire extinguisher at hand;
During any work on the VAZ 2110 fuel system, a fire extinguisher must be nearby
When screwing new studs into a VAZ 2110 tank, it is recommended to treat them with THREADLOCKER sealant
Replacing the tank is not a very complicated procedure. Even a novice car enthusiast can do it. To successfully complete this operation, he will need not so much repair skills as physical strength: removing a large tank with remaining gasoline from under the car is quite difficult. And if the car owner cannot boast of a strong physique, then at this stage he cannot do without an assistant.
Removing the tank
If it so happens that the injector on your VAZ 2110 is rotten (considering what services sprinkle on the roads in winter, this is no wonder) or was punctured, then you need to start repairs by removing the gas tank correctly. For this we will need a set of tools and an inspection hole or overpass. Next, all the work is analyzed point by point. You can find out where everything is located in the car manual, so we won’t dwell on this.
- We disconnect the fuel sensor simply by removing the wires from the connectors.
- Remove the hose from the sensor fitting.
- Find the bolts securing the clamps and unscrew them.
- Remove the tank vent pipe.
- Remove the mass from the fuel level sensor and remove it from the tank.
- Carefully remove the tank itself.
Of course, it is advisable that the tank is completely empty, because you will need to remove it from under the car with outstretched arms, and every liter of gasoline will create an extra burden on you.
Fuel filter BAZ 2110
The main task of a car fuel filter is to clean the supplied fuel from dirt, dust, condensate and fuel resins. To ensure smooth operation of the engine and reduce the likelihood of its failure, it is recommended to change the VAZ 2110 fuel filter every 15-20 thousand. km run. However, the specific timing of replacement is determined by the quality of the fuel used, the conditions of use of the car, as well as its total mileage.
The formation of dust and dirt entering the fuel filter is explained by the interaction of gasoline with metal and air in the process of various chemical compounds. If you do not replace it in a timely manner, then this element will gradually become clogged with harmful impurities and dirt, resulting in an increased load on the engine and lower reducing its power. Also, various chemical impurities, dirt and dust will begin to enter the engine, which will inevitably lead to problems with its operation, and in the future, failure.
Flushing the gas tank of a VAZ 2110
Tank flushing sequence
To clean the gas tank, you must perform the following manipulations:
- The gas tank is removed from the VAZ 2110 as described above. After this, you need to drain all remaining gasoline from the gas tank.
- Now you need to rinse the tank. To do this, any detergent is poured into it. Even household dishwashing liquid diluted in water will do.
- After filling the liquid, the tank must be allowed to stand for at least half an hour.
- After this time, the washing liquid is drained and the tank is rinsed with clean water.
After draining the washing liquid, the VAZ 2110 tank is washed with clean water
- Next, a special composition for cleaning gas tanks, previously diluted in water, is poured into the tank. The best option would be to fill with PROLINE JC liquid. This is a concentrated and very aggressive composition that can easily cope with any contaminants.
The cleaning composition PROLINE JC is optimal for washing the gas tank of the VAZ 2110
- The final stage is drying the gas tank. The best option would be to blow out the tank using a compressor. The problem is that not every garage has a compressor of suitable power. If there is no compressor, there is only one way out: wait until the tank dries out on its own. This is a long process that can take three days.
How to Drain Gasoline From a VAZ 2110 Injector
as fusion gas from VAZ 2110: practical recommendations
Very often, motorists are faced with the question of how to drain gasoline from a VAZ 2110 tank.
Most often this is due to water getting inside. This is not because the water is pouring, but because the lid is opened very often. The temperature inside is higher than the outside temperature, especially in cold weather. When cooled air enters, condensation forms and turns into water.
If you do not want to face the question of how to remove fuel from a VAZ 2110, it is recommended to carry out a full refueling, namely in winter, because when you refuel several liters, you will have to open the lid more often and, accordingly, let it into the air. In such cases, it is urgent to get rid of the fuel and eliminate the water, since there is practically no alternative.
Recommendations from experts
If you are faced with such a problem as a leak If the gas comes from the VAZ 2110 tank, then you can use the old classic method used by most scammers, insert a pipe and pull it with your mouth, otherwise the compressor will not come out, since you cannot get rid of it. water completely. In addition to the fact that most modern cars have already begun to install an aluminum mesh, which is located immediately after the fuel intake. It is specially designed for scammers.
The method is shown as a simple fusion gas
from the injection machine.
How to get angry with gasoline from a VAZ 2112
Drain gasoline from vases
2115.
Sometimes the difficult question arises of how to remove gasoline from the Niva tank, while a more effective method can be used to look under the car itself, namely from below. It has specially designed drainage holes. All you have to do is find the hole, prepare the bowl, open the plug and remove all the liquid inside.
The above method is quite simple and does not require special knowledge or practice. But if you are still thinking about how to get fuel from the Grant tank, then the motorist may have some difficulties. If you have installed a guard you will have to remove it, but if you have welded it on and not all cars have a drain hole like this (especially a small car) then this method will not work at all.
Additional recommendations
Before merging gas from a Grant tank, you should prepare for a mess, as not all methods are effective. But don't despair, as there is another, more effective way. Open the hood and locate the fuel cable located near the gas pump. Of course the machine must be connected. Disconnect the fuel line and place it in an empty container in which you intend to dispose of the fluid.
If you're thinking about how to pool grant fuel, the next step is to step on the gas pedal. A chain reaction will be triggered, the liquid will begin to flow in and out. Pressing the pedal should be sharp and short, like jerks, so as not to create a lot of tension. When the fluid stops flowing, it means you have drained everything. Now you know how to drain the gas from the Grant tank, this often helps because condensation is not uncommon. If the task described for you is quite difficult, you can watch a video that details how to solve the problem. After all, sometimes this is simply necessary for any job.
Replacing the fuel tank
Before replacing the tank, it is recommended to protect yourself from possible troubles and remove the wire in the negative terminal of the battery. The work will be completed as quickly and correctly as possible only with the participation of an assistant.
It is recommended to remove the pump immediately after shutting it off to avoid damaging the sensor and fuel lines.
After removing the old gas tank, you will need to perform the following operations to install a new one:
Install a new fuel level sensor gasket and lower the sensor together with it into its place in the tank. Then lift the tank, first from the rear, then from the front, install it on new clamps, screwing them to the body with new bolts. Next, connect the fuel hoses, separator and air pipes. After that, go into the cabin and connect the fuel level sensor and pump to the connectors. Close the hatch, screw it on and put the seat cushion in place.
After installation, you must make sure that all fuel lines and sensor wires are connected
After replacing the tank, you need to make sure it is working: start the engine, see if there are any problems with the fuel supply or leaks due to poor connections.
Today, you can repair and replace the gas tank on a “ten” at any service station. However, this procedure is not considered difficult to perform independently. Therefore, it is more advisable to remove, repair or change the gas tank yourself.
The main reason why you have to remove the gas tank on VAZ 2110, 2111 and 2112 cars is its damage, after which further operation is impossible. If the tank is leaking, then the leak can be eliminated only by completely removing it, soldering the fuel passage areas, or replacing the gas tank assembly.
In order to perform this procedure, you will need the following tool:
- Head for 10, 8 and 13 mm
- Screwdrivers with both flat and Phillips blades
- Key 17 (for old-style cars with a 1.5 liter engine)
- Penetrating lubricant
- Ratchet handles or cranks
- Extension Cords
Self-repair and replacement of the fuel tank of VAZ 2108/09/14/15 cars
The fuel tank is one of the most reliable components of a car. However, it is subject to wear and tear over long periods of use. This manifests itself in the appearance of mechanical damage and corrosion and requires repair.
Fuel tank design
The main function of a fuel tank is to store a certain amount of fuel. At the same time, everything must be organized so that the likelihood of a fire hazard is minimized.
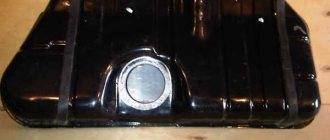
On VAZ cars the fuel tank is located under the rear seats. Due to this placement, in the event of serious accidents and car overturns, the tank in most cases remains undamaged. VAZ fuel tanks are made of leaded steel sheets. Thanks to a thin layer of lead that protects against corrosion, the service life of the tank is significantly increased. The outside of the fuel tank is covered with dark enamel.
The fuel tank, covered with dark enamel, is reliably protected from corrosionThe fuel storage volume of the VAZ 2108 and other similar models is 43 liters. This takes into account the reserve, but it is not recommended to fill the tank to the brim. You should always leave a free volume, about four liters
It is especially important to do this in the summer, since the fuel expands as the temperature rises. If the tank is filled to the brim, then after swelling it may simply burst. The volume of the VAZ gas tank is designed in such a way that the autonomous mileage is enough for 500 kilometers, and this is considered a normal road segment in modern conditions
The volume of the VAZ gas tank is designed in such a way that the autonomous mileage is enough for 500 kilometers, and this is considered a normal road segment in modern conditions.
The tank is securely fixed to the car body using flexible and durable plate-type clamps. Rubber gaskets must be placed under the clamps to ensure a tighter connection.
The tank mounting plates are very flexible and durable
Gasoline is poured through the neck on the right (in the direction of travel) rear side of the body. It is closed with a screw cap.
The neck of the VAZ 2115 tank is closed with a tight lid
Main elements of the fuel tank
The neck is connected to the tank cavity through the filler hose. The other two tubes are integrated with a seven-liter separator installed outside the tank and designed to capture gasoline vapors. As a result of wear, the separator may split along the seam and gasoline will begin to leak out. It can be replaced without dismantling the tank. Moreover, you can temporarily cover the separator seam with a gasoline-resistant sealant.
The separator tank holds seven liters of fuel
In order not to remove the separator (it is necessary to dismantle the bumper and filler pipe), experienced car owners simply disconnect the hoses of the element and cut it out with metal scissors. In place of the separator, a fine fuel injection filter is installed, which performs similar functions.
Instead of a separator, you can install a fine fuel filter
Some separators are equipped with a double-acting valve to minimize fuel leakage. The valve admits and releases gasoline vapor. Once in the tank, the vapors condense and thereby reduce fuel consumption.
The fuel system of the VAZ 2112 car is quite simple
The tank of VAZ cars produced after 2000 is equipped with a fuel level sensor (FLS), which regulates the amount of gasoline in the tank and sends data to the electronic control unit (ECU). The sensor is fixed through a rubber gasket and can be easily removed through the rear seat.
The fuel level sensor is installed on all VAZ models produced after 2000
Why is the VAZ-2110 electrical circuit needed?
When replacing or repairing an injector with 8 valves, the electrical diagram serves as a kind of guide, with the help of which you can understand all the nuances in the process of connecting specific wiring parts. In addition, the VAZ-2110 electrical diagram when using an injector with 8 valves allows you to understand the functioning of all electrical wiring devices.
In the diagram, the injector valves are evenly spaced, while the system itself is presented in the form of two combined components:
- Fuel distributor;
- Electrical equipment for the ignition control system.
Also, the diagram with 8 and 16 valves indicates the location of the electronic unit, with the help of which the operation of the above two systems is coordinated. Backup equipment, in turn, protects electrical wiring from overloads and increases the operating efficiency of the entire injection system.
Advice: if you are going to repair the injector, be sure to look at the wiring diagram for the VAZ-2106. This will give you the opportunity to replace any faulty parts without affecting the overall functioning of the vehicle's wiring.
The elements indicated by numbers in the diagram are shown below:
The diagram of electrical wires and fuses gives an understanding of the entire operation of the injection system, and also shows the specific position of each of the elements. It contains the following elements:
- Central nozzle. Acts as a distributor of fuel supply to the system. There is also a special type of fuel regulator that works as a sensor and ensures that the fuel supply does not go beyond the normal limits.
- Diaphragm regulator. Monitors fuel pressure in the ignition system and removes excess fuel back into the tank body.
Advice: make sure that the pressure in the fuel supply system does not exceed 300 MPa. Otherwise, you will see the corresponding icon on the instrument panel and you will most likely have to replace the coolant on the VAZ-2110.
Bypass valve design. It regulates the position of the cross diaphragm, which is subject to constant pressure from three sides: on one side, the pressure of the fuel itself, on the other side, the tangential load from the intake air volumes, and on the 3rd side, the tension from the spring attached to the valve.
When to replace
Such minor repairs are carried out as the grid becomes dirty, which happens quite quickly, given the quality of domestic fuel. The correct approach is to change all consumables at the same time, guided by the frequency of pouring new oil into the engine.
During this procedure, you can replace the air and oil filters, as well as the fuel pump mesh. If you make it a habit to change this mesh only after it is completely clogged, the pump will constantly work with increased load, as a result of which repair or even replacement of the VAZ 2110 fuel pump will quickly be required.
The first sign of a faulty fuel pump is the engine refuses to start. After turning on the ignition, you can hear a slight buzzing sound of the operating gasoline supply device, which stops after it creates the necessary fuel pressure in the system.
If after this the car engine does not start or even the sound of the VAZ 2110 pump cannot be heard, then you need to check the presence of gasoline pressure in the line. This is done using the bleed valve on the ramp. The verification procedure will be discussed below. If there is no fuel, it becomes clear that the fuel pump is not working or its screen is clogged.
- https://automanya.ru/lada-obzory/zamena-benzobaka-vaz-2110.html
- https://prometey96.ru/modeli/benzobak-vaz-2112.html
Signs of malfunction of the VAZ-2110 power system
Considering the number of power system components, it is quite difficult to unambiguously determine the cause of the malfunction. But, if you know the main “symptoms” of a breakdown, then the process of finding the cause will speed up many times. So, we list the main signs of failure of power system components:
- The car stalls (does not start). Check the operation of the fuel pump by listening to the sound from under the rear seat (with the ignition on).
- The revolutions “float”. This may be due to a malfunction of the idle air control or fuel pressure regulator in the rail.
- The engine "troits". As a rule, the cause is faulty injectors.
The fuel system of the VAZ 2110 16-valve injector has exactly the same features as the 8-valve injector.
What tools are needed to replace the tank?
| Heads for 8, 10 and 13 | |
| Phillips screwdriver | |
| Flat screwdriver | |
| Open-end wrench 17 | |
| WD-40 | |
| Flushing fluid | |
| File | |
| Grinder (angle grinder) | |
| Drill | |
| Key extension |
Replacing the fuel tank
Before replacing the tank, it is recommended to protect yourself from possible troubles and remove the wire in the negative terminal of the battery. The work will be completed as quickly and correctly as possible only with the participation of an assistant.
It is recommended to remove the pump immediately after shutting it off to avoid damaging the sensor and fuel lines.
After removing the old gas tank, you will need to perform the following operations to install a new one:
Install a new fuel level sensor gasket and lower the sensor together with it into its place in the tank. Then lift the tank, first from the rear, then from the front, install it on new clamps, screwing them to the body with new bolts. Next, connect the fuel hoses, separator and air pipes. After that, go into the cabin and connect the fuel level sensor and pump to the connectors. Close the hatch, screw it on and put the seat cushion in place.
After installation, you must make sure that all fuel lines and sensor wires are connected
After replacing the tank, you need to make sure it is working: start the engine, see if there are any problems with the fuel supply or leaks due to poor connections.
Today, you can repair and replace the gas tank on a “ten” at any service station. However, this procedure is not considered difficult to perform independently. Therefore, it is more advisable to remove, repair or change the gas tank yourself.
The main reason why you have to remove the gas tank on VAZ 2110, 2111 and 2112 cars is its damage, after which further operation is impossible. If the tank is leaking, then the leak can be eliminated only by completely removing it, soldering the fuel passage areas, or replacing the gas tank assembly.
In order to perform this procedure, you will need the following tool:
- Head for 10, 8 and 13 mm
- Screwdrivers with both flat and Phillips blades
- Key 17 (for old-style cars with a 1.5 liter engine)
- Penetrating lubricant
- Ratchet handles or cranks
- Extension Cords
Replacing the filler neck (gas tank pipe)
In my practice, there were many cases when, when removing the gas tank on a VAZ 2110, I had to cut off the hose or even the filler neck, since everything was stuck so tightly that it was simply impossible to do otherwise. If for some reason you have damaged the gas tank filler pipe, then the article below will show you the process of replacing this part with a new one.
Tools you will need to complete this job:
- Phillips screwdriver
- Head for 8 mm, 10 and 13 mm
- Ratchet handles
- Extension Cords
- Penetrating lubricant
- Flat blade screwdriver
Removing and installing the tank filler neck on a VAZ 2110
So, the first thing you need to do is remove the rear right wheel and first jack up the car to make it easier to carry out all the repairs. After this, unscrew the clamp bolt that secures the hose and pipe.
Now we go up a little higher and unscrew the neck fastening nut using a 13 mm wrench. This is clearly shown in the photo below.
And another clamp is located above. There you will need a key for 10.
And remove the clamp, putting it aside so as not to lose it. Next, open the gas tank flap and remove the rubber casing.
And now you can carefully move the filling pipe down to bring it to a more convenient position.
And now all that remains is to disconnect the hose from the top of the pipe, which is shown in the photo. We loosen the clamp that tightens this thin hose.
And after trying a little, we remove the hose from the tube:
Now the neck is almost completely freed, and all that remains is to disconnect it from the hose from below, the clamp of which we unscrewed at the very beginning.
After which we remove it without any problems. The end result is shown in the photo below.
The price of a new neck (filler pipe) of a gas tank on a VAZ 2110 is about 1000 rubles, but the same version can be bought at a disassembly site for half the price. Installation occurs in reverse order.
This is interesting: How to find a current leak in a car
Repair of studs on the gas tank of a VAZ 2110
The fuel pump is attached to the gas tank using studs. They, like any other part, wear out and break over time. As a result, the driver is forced to repair them. For repairs you need the following:
- bolts for 8, 25 mm long (8 pieces);
- file;
- hacksaw for metal;
- M5 tap;
- electric drill with a 4.5 mm drill bit.
Stud repair sequence:
- Use a hacksaw to cut off all the old studs. The surface of the gas tank underneath is processed with a file.
The surface of the VAZ 2110 gas tank, carefully processed with a file
The VAZ 2110 fuel pump is held in place by a ring with eight holes
In the new holes on the VAZ 2110 tank, threads are cut with a tap
New bolts are screwed into the VAZ 2110 tank so that their heads are inside the tank
Tank repair
First of all, we must assess the condition of the tank, whether it is worth repairing, and whether it is still suitable for repair. It may be much easier and cheaper to just buy a new gas tank. We only consider welding as a repair, since no glue patches will help if the VAZ 2110 injector tank is rotten or completely broken.
First you need to thoroughly rinse the tank and dry it so that there is no gasoline vapor left in it, otherwise there will be an explosion during work. If you do not have experience as a welder, it would be advisable to visit a specialist.
But, if you are familiar with this and have all the tools, then you can cope very quickly. We can only give small recommendations, including the fact that it is necessary to weld the tank only by autogenous welding using argon as a coolant. You need to start and end the seams before and after a few centimeters near the patch. This is necessary so that delamination along the seam does not occur later. In principle, the cooking tank can last as long as the entire machine will last; it will never be any worse because of the presence of a patch.
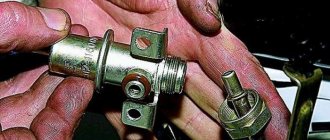
Replacing the fuel pump with “Pekar” — Lada 2107, 1.6 l., 1997 on DRIVE2
The old pump was tired... the car did not develop full power... it took a long time to accelerate and all the issues related to the faulty fuel pump. I got tired of this whole thing, I climbed onto the World Wide Web, and, after reading about gas pumps, I decided to settle on “Pekar”, it has a double plunger.
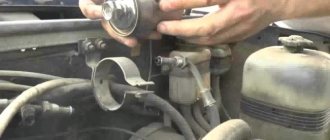
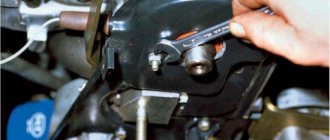
1) Using a spanner or a regular open-end wrench for thirteen, unscrew the two nuts securing the fuel pump to the cylinder block and remove it from the studs. 2) Following the fuel pump, remove the sealing gasket, it must be intact and at least 0.3 mm thick, if necessary, replace it with a new one.3) Next, remove the heat-insulating spacer and after it another sealing gasket. If necessary, replace the second gasket if it is damaged.
Now that the fuel pump is removed from the car, replace it with a new one or make some other repairs. Before installing a new pump, it is necessary to check the minimum protrusion of the pusher, this is especially true if the car has already driven more than 90 thousand. km. The operation of the diaphragm unit will depend on the amount of protrusion of the pusher, namely, it becomes possible to reduce the fuel supply by the fuel pump and, as a result, a diaphragm rupture may occur.
The amount of protrusion of the pusher should be 0.8-1.3 mm. Adjustment of the protrusion is carried out by adding shims between the heat-insulating spacer and the cylinder block, the shims are either added or replaced with a new thinner one. Before measuring the amount of protrusion of the pusher, it is also necessary to take into account that the amount of protrusion will be influenced by the gasket between the spacer and the fuel pump body, therefore, in order to carry out a more accurate measurement, install both gaskets between the cylinder block and the spacer. As an opening of the old pump showed, the diaphragm was torn, That's why the car was struggling.
Fuel system on a VAZ-2110 carburetor
From 1996 to 2000, carburetor engines were installed on the “tens”. In this series of cars, a diaphragm-type pump installed under the carburetor and driven by a camshaft (via an eccentric) was responsible for pumping fuel from the tank to the carburetor. A fuel filter is installed in front of the pump, and a carburetor after it.
A carburetor is a device that mixes incoming air and fuel depending on many factors (accelerator pedal position, speed, temperature, etc.). The finished fuel-air mixture enters the intake manifold and is ignited by spark plugs.
The supply air temperature is controlled by a thermostat installed in front of the air filter. One air channel takes in cold air, and the other passes through the exhaust manifold and heats up. Hot air is needed to prevent the carburetor from freezing.