Cars coming off the assembly line have strictly verified body dimensions. As a rule, no one pays much attention to this when buying a new car.
However, the need to measure and check the geometric dimensions of the VAZ 2110 body with the instruction manual may arise in the following cases:
- you buy a car second-hand and are not sure that it has not been in an accident. It is because of this that, as a rule, the geometry of the VAZ 2110 is most often violated;
- you yourself got into an accident, even ran into a stone, curb, etc., causing the car to receive a serious blow.
Basic reference dimensions of attachment points for components and assemblies
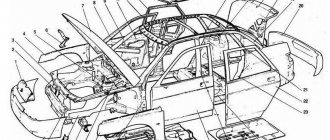
Elements and parts of the body.
Before you begin repairing the body of a VAZ 2110, you must first understand what parts and assemblies it is made of. Let's look at all the details of the body frame.
- radiator frame trim;
- radiator frame;
- upper cross member of the radiator frame;
- right front fender;
- front valve;
- hood hinges;
- hood;
- right entrance door;
- window stand;
- front door panel (inside);
- rear door panel (inside);
- right rear door;
- hatch frame;
- left side wall;
- roof panel;
- suspension spring holder (rear);
- trunk;
- trunk interior panel;
- side window frame;
- rear bumper;
- rear pillar;
- left rear door;
- rear wheel arch;
- intermediate floor;
- niche for spare tire;
- central pillar;
- left front door;
- front pillar;
- front floor;
- left front fender;
- front suspension spring support;
- bracket;
- front spar;
- fixing the towing eye;
- Front Panel;
- front bumper.
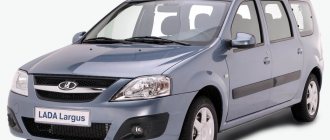
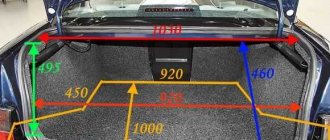
Body repair Lada Largus. Geometric dimensions of the Lada Largus body
| Openings | front side doors | ||
| Symbol | Name | 0 holes, mm | |
| ,Ah, a | Joint between A-pillar and roof panel | ||
| in,b | Joint between A-pillar and hood panel | ||
| With, with | Front side door hinge nut | 8 | |
| D, d | Front side door hinge nut | 8 | |
| Her | Assembly mark of the front pillar, | ||
| F, f | A-pillar assembly mark | ||
| G, g | Door threshold assembly mark | ||
| H, h | Door threshold assembly mark | ||
| L i | Roof panel assembly mark | ||
| ■J. j | B-pillar assembly mark | ||
| K, k | B-pillar assembly mark | ||
| UI | Rear side door hinge mounting hole | 13 | |
| M,m | Rear side door hinge mounting hole | 13 | |
| Symbols | Distance, mm | Symbol | Distance, im |
| Ee | 1,172 | E-f or e-F | 1,487 |
| Ff | 1,406 | E - h or e - N | 1,555 |
| Gg | -1,444 | E-j or e-J | 1,337 |
| Hh | 1,444 | Fj^nf-J | 1,740 |
| 1-i | 1,062; | F-kilig-K | 1,648 |
| JJ | 1,266 | H-i or h -1 | 1,594 |
| Kk | 1,426 | —J-knnnj-K" | 1,442 |
xn--44-6kchdmw3bgiawoo4b.xn--p1ai
↑ Salon VAZ-2110
↑ Features of seats and possible equipment
The front seats are separate, with adjustment of longitudinal movement and backrest angle. The headrests are removable and height adjustable. The rear seat has a one-piece folding cushion. The seat back is divided into two parts by a folding armrest. There is a hatch with a cover behind the armrest. By folding the armrest and lid, you can transport long items in the trunk, partially folding them inside the cabin. The front and rear outboard seats are equipped with retractable seat belts, while the center seat is equipped with a lap belt only.
Identification of violations
Checking body geometry is a fairly simple matter. It is usually necessary when purchasing a used car or when checking the results of a body repair.
- First you need to open and close all the doors, the hood and the trunk lid one by one. However, you don’t have to put in a lot of effort. If the doors do not close tightly the first time, it means the pillars are bent. If the hood and trunk lid do not close the first time, it means the side members are bent. The deformation may amount to millimeters, but this is already a reason for making claims or bargaining, since the damaged body geometry reduces passive safety.
- Next, you need to squat down and look along the side of the car. In this position, you will immediately notice all the irregularities and increased gaps.
- Next, you should inspect the windshield and rear window for cracks. Vertical cracks located on one side indicate displacement of the racks.
- You can check whether the geometry of the chassis is broken using measurements. To do this, you need to have a tape measure and know the exact dimensions of the wheelbase.
If for some reason you cannot measure the chassis geometry, try to find a smooth, straight road without heavy traffic. Accelerate it to a speed of 50 kilometers per hour and release the steering wheel for a couple of moments. If after this the car moves to the right or left, it means that it was hit in that direction. If the car continues to move in a straight line, increase the speed to 90 kilometers per hour and repeat the experiment.
Be extremely careful! If the car continues to move straight even at high speed, then the geometry of the chassis is normal. This does not mean that the car was not damaged; perhaps it was simply well repaired. Before carrying out the experiment, make sure that the pressure in the right and left tires is symmetrical.
Editing a damaged body
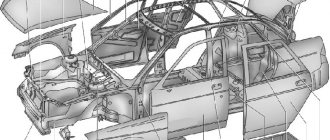
It will not be a secret to anyone that in any accident, it is the body of the car that suffers the most. Since damage can be very different, VAZ 2110 body repairs are carried out in different ways. But there is one thing in common in this matter: it all comes down to checking the geometry of the attachment points of units and groups of cars. The image below shows these points with all the main dimensions.
X, Y, Z – main axes;
- upper radiator support;
- front suspension cross member to radiator frame;
- front suspension arms;
- right power unit support;
- left power unit support;
- base points;
- upper suspension rod of the power unit;
- base holes;
- rear suspension of the power unit;
- Transmission;
- brake regulator;
- rear suspension arm;
- upper mounting points for rear suspension struts;
- base holes
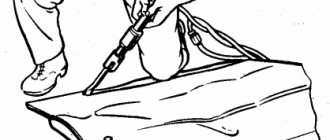
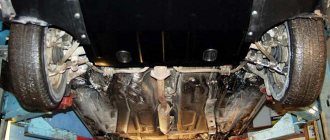
When repairing the body of a VAZ 2110, try not to use heat treatment, as this can protect the body from corrosion and try not to tear the factory seams. If the damage to the body is quite complex, it is worth removing all facing materials to make it easier to take measurements and installing hydraulic or screw jacks, which will eliminate unevenness in the body.
see also
Comments 18
I also need sizes to check, so which ones to use!
I made it approximately according to my measurements
You probably haven’t been here for a long time) I’ve already done and sold the car! I won’t edit the blog anyway!
Yes, I already made mine too. But this recording will still be useful to someone
Wow, I should try to measure it)
Didn't take any measurements? Otherwise, in just a week I’ll go on vacation, and I’ll start doing shamanism a little
Not yet, I won’t get around to it, but I’ll definitely write back if I intend to)
I would be very grateful 
Vitaly Kakhovka on YouTube did the 10th family in the video everything is there
Thank you. Let's take a look too
A1=119.5 A2=119.5 B=127 B1=46 B2=46 D1=49.5 D2=49.5 D=96))) my TV is further welded
Thanks Slav. We will still wait for at least a couple of measurements to choose the “golden mean”, so to speak.
Thank you for your quick help in measurements pandaaaaaaaaaaa And so here are his measurements: A1=118.5 A2=118.5 B=127 B1=44 C2=44 D1=48.5 D2=48.5 D=95.5 Thanks to him It seems that the dots are not seriously gone, ± 0.5 cm
Thanks for the sizes, I couldn't find them anywhere. According to these dimensions, they are one to one ±5 mm (as they measured with a tape measure) But between the glasses (shock absorber rod), according to the book there should be 1103 mm, but for me it is 1003 mm. I don’t understand how this happens((
I won't even give you a hint.
Thank you for your quick help in measurements pandaaaaaaaaaaa And so here are his measurements: A1=118.5 A2=118.5 B=127 B1=44 C2=44 D1=48.5 D2=48.5 D=95.5 Thanks to him It seems that the dots are not seriously gone, ± 0.5 cm
Is this the exact size?
Depends on what. You can choose a middle ground. There is generally little information about the VAZ-2110
I'll write first. My sizes may differ radically from yours, since I measured the points as I currently have them. And so: A: I couldn’t measure it because of the installed 3 liter receiver. B: 126.5 cm. B: left - 45 cm, right - 45 cm. (right and left, as look at the picture) D: L - 48 cm, R - 48.5 cm. D: 95.5 see. Feel free to write measurements, I really need them. It took me a maximum of 1 minute of my time. Thanks everyone for your help
Cars coming off the assembly line have strictly verified body dimensions. As a rule, no one pays much attention to this when buying a new car.
However, the need to measure and check the geometric dimensions of the VAZ 2110 body with the instruction manual may arise in the following cases:
- you buy a car second-hand and are not sure that it has not been in an accident. It is because of this that, as a rule, the geometry of the VAZ 2110 is most often violated;
- you yourself got into an accident, even ran into a stone, curb, etc., causing the car to receive a serious blow.
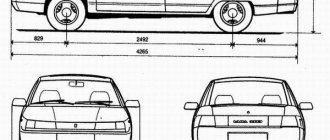
Length
The geometry of the VAZ 2110 body is described in the operating instructions. The main parameters for controlling body geometry are as follows:
- There should be 4265 meters between the extreme points of the front and rear bumpers.
- The distance between the center of the front wheel and the center of the corresponding rear wheel is 2.492 meters.
- The distance from the center of the front wheel to the end point of the front bumper is 0.829 meters.
- The distance from the center of the rear wheel to the end point of the rear bumper should be 0.944 meters.
Vehicle height is always stationary – 1420 mm
Welding and other work involving thermal heating of metal should be avoided.
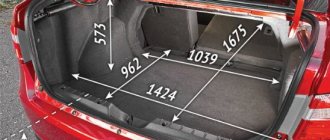
Body dimensions of Lada Kalina hatchback
Rice. 1. Control dimensions of door openings. Rice. 2. Body control points in the engine compartment.
Lada Kalina, the body of which is of great interest to motorists today, is considered one of the best creations of the Togliatti plant. Kalina is not a separate model, but a whole family of Russian small-class cars produced since 2004.
VAZ (Lada) Kalina II 2022 - present Got into an accident, the body was in the trash. I want to repair it with my own hands. Tell me, where can I find the geometric (repair) body dimensions of Kalina 2, station wagon, VAZ 219410? Thanks in advance.
Lada Kalina geometric dimensions of the body. Full dimensions with descriptions and drawings. Model: VAZ 1117, 1118, 1119 Kalina.
VAZ body dimensions, body control points, body work instructions.
Tags: body geometry, geometric dimensions, car manuals, car detailing. Hi all! And just a quick correction - PLEASE DO NOT DM ME WITH QUESTIONS ABOUT
Possible sizes of VAZ Kalina bodies: VAZ Kalina (Lada Kalina) is a family of small-class cars in sedan, hatchback and station wagon bodies, which were assembled in Russia from 2004 to 2022. The model was produced in two.
Do the body control points on Kalina 2 coincide with the grant?
Kalina is not a separate model, but a whole family of Russian small-class cars produced since 2004.
Deformed surfaces of body parts and their repair.
Parts deformed as a result of an accident are repaired in different ways, depending on the degree of damage:
- Hood
- Straightening
- Shrinkage editing.
- Cut out parts that cannot be repaired. And the cut parts are made separately from the sheets.
Dents or damaged parts of the VAZ 2110 body are removed with special tools, for example, hammers made of wood, plastic or metal, as well as other devices.
Deformed areas are also regulated by warming. Typically, this type of repair is used if the surface of the panel is greatly stretched. Heating is carried out at a temperature of 620-670 C. The diameter of the heated spot should not exceed 25-35 millimeters.
Stories from our readers
“Fucking basin. "
Hi all! My name is Mikhail, now I’ll tell you a story about how I managed to exchange my two-wheeler for a 2010 Camry. It all started with the fact that I began to be wildly irritated by the breakdowns of the two-wheeler, it seemed like nothing serious was broken, but damn it, there were so many little things that really started to irritate me. This is where the idea arose that it was time to change the car to a foreign car. The choice fell on the melting Camry of the tenth years.
Yes, I had matured morally, but financially I just couldn’t handle it. I’ll say right away that I am against loans and taking a car, especially not a new one, on credit is unreasonable. My salary is 24k a month, so collecting 600-700 thousand is almost impossible for me. I started looking for different ways to make money on the Internet. You can’t imagine how many scams there are, what I haven’t tried: sports betting, network marketing, and even the volcano casino, where I successfully lost about 10 thousand ((The only direction in which it seemed to me that I could make money was currency trading on the stock exchange, they call it Forex. But when I started delving into it, I realized that it was very difficult for me. I continued to dig further and came across binary options. The essence is the same as in Forex, but it’s much easier to understand. I started reading forums, studying trading strategies. I tried it on a demo account, then opened a real account. To be honest, I didn’t manage to start earning money right away, until I understood all the mechanics of options, I lost about 3,000 rubles, but as it turned out, it was a precious experience. Now I earn 5-7 thousand rubles a day. I managed to get the car buy after half a year, but in my opinion this is a good result, and it’s not about the car, my life has changed, I naturally quit my job, I have more free time for myself and my family. You’ll laugh, but I work directly on the phone)) If If you want to change your life like me, then here’s what I advise you to do right now: 1. Register on the site 2. Practice on a Demo account (it’s free). 3. As soon as you get something on the Demo account, top up your REAL ACCOUNT and go to REAL MONEY! I also advise you to download the application to your phone, it’s much more convenient to work from your phone. Download here.
Deformed areas of panels are straightened, as a rule, manually using special tools (metal, plastic, wooden hammers and various mandrels) and devices. Straightening with heating is used for upsetting (pulling) highly stretched surfaces of panels. To prevent sudden swelling and deterioration of mechanical properties, the panels are heated to 600-650°C (cherry-red color). The diameter of the heated spot should be no more than 20-30 mm.
Additionally, you can download the electronic document in PDF format “LADA CAR BODIES, technical requirements for acceptance for repair, repair and release from repair by enterprises of the service and sales network of JSC AvtoVAZ” (Password for the archive: lada2111.ru).
In this guide you can find:
- Dimensions of openings and clearances of mating body parts of VAZ 2110, 2111, 2112 and 21123
- Engine and suspension mounting points on VAZ 2110, 2111, 2112 bodies
- Requirements for the painted surface of a repaired body
- Classification of body distortions
- and much more
By the way, the geometry of the VAZ 2110 and Priora bodies is the same. After restoring the geometry of the body, it must be painted. Read how to do it yourself.
Have you ever used the geometric dimensions of a VAZ body?
Source
Geometry check
Here are four main types of measurements that will allow you to make sure that the car has not been in an accident and has the parameters you need:
- Matching diagonals. Before you begin detailed calculations, you should take two simple measurements that will immediately identify the problem. The vehicle must be measured diagonally on both sides. If the measurement results coincide (within a millimeter), this means that the whole body has the correct shape. But we should not stop at these two dimensions.
- Checking the height of the racks. For this measurement, the height of the posts must be measured at four points. It is important to measure both the front and rear, as well as both sides of the car. The four indicators must match.
- Determination of the deformed roof plane. To find out if your car's lid is in good condition, take measurements along the diagonals of the doors. Measure from the bottom rear corner of the door to the top front corner and vice versa. If the indicators match on both sides, it’s normal. Just in case, it's worth checking the roof diagonals.
- Determining the correct position of the front glass. Contrary to popular belief, even if the windshield is positioned correctly, its geometry can be distorted. Therefore, make sure that the lengths of the diagonals of this part match.
As a rule, after an accident, problems arise with inconsistency of vehicle parameters. However, this does not happen 100% of the time.
Welds or other repairs that involve heating the metal can affect the physical properties of the vehicle. Therefore, take the above measurements every time the car is in the garage.
Body geometry and its diagnostics
ATTENTION! A completely simple way to reduce fuel consumption has been found! Don't believe me? An auto mechanic with 15 years of experience also didn’t believe it until he tried it. And now he saves 35,000 rubles a year on gasoline! Read more"
The most important components of body geometry are called control points. It is the knowledge of their location and the ability to correctly measure the distances between them that determines the structure of checking the body for deformation. You can learn more about control points from the technical documentation for each car model.
VAZ 2110 body dimensions
After identifying damage, the integrity of the body is usually restored in special workshops. Experienced straighteners bring the body back to normal in the shortest possible time, if only the deformations are of moderate or minor severity. A body that has been in a serious accident and has received a lot of deformation is usually easier to replace with a new one.
What deformations can occur on the VAZ 2110?
VAZ 2110 control body dimensions
The “Ten” involved in the accident will have certain deviations from the standard positions marked at the factory. And destruction in this case means the following:
- Deviations in terms of the standard wheel arrangement, as evidenced by poor vehicle stability and increased tire wear;
- The diagonals, again, standardly installed at the factory, are violated. Doorways, pillars and other areas of the body, one way or another, associated with the impact zone are especially often affected.
Body geometry dimensions of the VAZ 2110 after the accident
In most cases, the destruction of functional elements is associated with the appearance of folds in the floor or other components of the body. In addition, external impacts cause a significant increase in the part in areas far from the point of impact.
Note. Such structurally weak areas include empty spaces between welds, side members and other elements where free mutual movement of metal sheets is observed.
Several ways to check the body for deformation
You can determine the deformation of a body that has been in a moderate accident at first glance. On the contrary, if the blow was weak, then it can be extremely difficult to determine the damage by eye. In this case, you have to carefully carry out diagnostics, measure compliance, and so on.
VAZ 2110 body geometry dimensions and tools
A hydraulic jack helps to carry out an initial inspection of the car. Thanks to the lift, you can examine the condition of the floor, feel those parts of the body that are inaccessible for inspection with the normal position of the car, for the presence of folds. After detecting the latter, as a rule, they are marked with a marker, which makes it possible to easily find deformed areas during subsequent stages of work.
If such a check does not give any results, proceed to the next stage of the examination, which involves checking the wheels. It is no longer a jack, but a special stand that helps carry out the check. Using such equipment, it is easy and faster to carry out the second stage of diagnostics. Check the front and rear wheels of the car at control points using calipers with a special profile shape.
Geometry and body dimensions of the VAZ 2110: measuring setup
Checking the compliance of the control points of the “shoes” of the car involves verification (comparing) the wheel coordinates located on one side of the car with the coordinates on the other side. Body deformation becomes obvious if measurements show significant deviations from specified standards.
Another method of diagnosing damage to the “tens” body is to compare the diagonals. The exact coordinates of the main diagonals are given in the table below. This diagnosis is considered the most correct, since it is carried out using a symmetry check.
Body geometry VAZ 2110 dimensions via computer
Modern technologies make it possible to check body geometry using various tools. A computer on which appropriate measurements are carried out helps a lot in this matter. The option of checking using template tools and mechanical measurements is also used.
As a rule, at home on a VAZ 2110 you can remove the geometric dimensions of the body yourself using a standard tape measure. But at the service station, a special telescopic ruler is already used for the same purpose, which gives more accurate results.
VAZ 2110 body dimensions and geometry
But both of these measurement methods have a significant drawback. Thus, they do not make it possible to measure spatial deformations. The latter can only be diagnosed using template or computer methods. This will give a complete picture of the deformations, which will allow the damage to be eliminated most effectively. Although, the price of such a check will be many times higher.
The car body is an intricate and complex structure that has a number of values required for normal operation. Their violation causes significant deviations, the configuration of the entire body changes. By measuring the geometry of the body, the car owner has the opportunity to detect even the most minor defects, which can lead to big problems in the future.
Body geometry dimensions of the VAZ 2110
How to make a screed:
- We heat the metal from the edge to the center of the damaged part using a gas stove or a semi-automatic welding machine with a carbon electrode. When the area heats up, we begin to bring it down with a wooden hammer. When doing this, use a flat stand.
- We repeat this operation several times until the required surface is obtained.
- You may not line up without flaws right away, but don't despair. These defects can be hidden using putty, thermoplastic or epoxy putty.
What does the VAZ suspension consist of?
1 — transverse arm mounting bracket, 2 — stabilizer bar cushion, 3 — bar cushion bracket, 4 — stabilizer bar, 5 — transverse arm, 6 — stabilizer strut, 7 — ball joint, 8 — steering knuckle, 9 — telescopic strut, 10 — transverse arm extension, 11 — front mounting bracket for the transverse arm extension, 12 — cross member.
What should you pay attention to?
If you hear a knock in the front suspension while driving, the main reasons may be:
- — Malfunctions in the rack;
- — The bolts have become loose, the stretch marks or cushions with which the cross member is equipped may have worn out;
- — The attachment to the body is loose;
- — The rubber parts have collapsed, and the knocking has a distinct “metallic” sound;
- — A “limp” or even a broken spring knocks;
- — Wear of hinges;
- — Knocking due to wheel imbalance;
- — Settlement or breakage of the suspension spring;
The car pulls to the side when driving straight. The reasons for this malfunction may include:
- — Each spring has its own compression ratio. In this case, the spring that has lost its elasticity must be replaced;
- — Tires have different pressures. We check and correct;
- — The rubber element near one of the strut supports was destroyed. At the same time, a characteristic knocking sound is also heard while driving. The problem is solved by replacing this element;
- — The wheel alignment angles are incorrect. Increased tire wear may be associated with this malfunction.
Tire wear. This may be due to improper driving (rash acceleration, braking, exceeding the permissible load of the vehicle), or other reasons:
- — violations of wheel alignment angles;
- — high wear of the hinges;
- — wheel imbalance;
When driving with increasing speed, metallic noise increases:
- — Check the wheel bearings;
- — When starting to move, a characteristic “crunch” appears;
- — Inspect the CV joints, such a sound can only be made by balls that roll along the grooves, because have too much output.
Knowing the meaning and design of the suspension, you can check its condition every time you inspect the machine on a pit (overpass) and perform maintenance. Pay special attention to the condition of the protective covers on the ball joints. Check to see if any deformations, cracks or dents have appeared on the suspension due to shaking and bumps. You should also check the tightness of all nuts.
Be sure to check the condition of all rubber and rubber-to-metal parts, as well as the ball joint of each wheel. We must remember: a malfunction noticed and corrected in time is much less evil than repairs when everything is already falling apart.
Radiator frame
This part of the body of the “tens” is called the TV. The element is replaced in case of a strong frontal impact, when the “original” part is easier to replace than to repair.
As a rule, during a frontal impact, the upper frame and the beam that serves to strengthen the bumper are more deformed. But the TV is still completely changing.
According to experts, replacing a TV with a “ten” is much easier than with a “nine” or other models previously produced by AvtoVAZ. This is due to the simplicity of the design of the “ten” radiator frame.
Note. In some cases, the top frame and bottom bar are sold separately.
The TV is attached to the body using soldering points. They are located in 4 places: the radiator frame is fixed at the junction with the wing reinforcements (“arrows”) and with the spars. To disassemble the TV, it will be enough to drill points in these places and then cut with a sharp chisel.
Advice. In the process of removing the TV, it is possible to disassemble the radiator itself, only in this case you must remember to disconnect the radiator pipes.
After installing the new radiator frame, the weld areas will need to be thoroughly cleaned with an abrasive wheel and putty. Where the chassis touches the body, sealant must be applied.
Subtleties of body repair
Body repairs are most often carried out after an accident, but also if some parts are rusty. But you should still try to avoid welding and other work that involves thermal heating of the metal.
Small scratches and chips can become a source of corrosion in the future. In order to avoid this, it is best to tint small defects. Details: https://vazweb.ru/desyatka/obschee/kak-podkrasit-skolyi-na-mashine-samomu.html
If possible, try not to remove bezels. This can also lead to changes in body geometry. And after any repair work related to the body, be sure to check its linear dimensions.
- Author: ratico19
Rate this article: (4 votes, average: 4 out of 5)
What putties should I use?
I recommend using “Chempropol-P”, it consists of two components: saturated polyester resin and hardener. This putty adheres well to panels. Such work must be carried out at temperatures above 19 C. The putty must be applied very quickly, since after 10 minutes it begins to harden. After an hour, the putty will completely harden. And the moment! The layer of polyester putty should not exceed 2 millimeters. By the way, if you don’t find this putty, you can still use “PE-0085”; it is very similar in composition and quality.
Front wing
In the top ten, the front fender is disassembled for repair or replacement, as is the radiator frame. Here are the instructions to follow when replacing:
- Another bolt fixing the sash from below is unscrewed from the head by 10;
- The covering is removed;
- The protective cover is removed, after which the socket with the lamp is disconnected;
- The wing moves slightly to the side, the side repeater is removed from its place;
- Then the decorative element of the threshold is dismantled;
- Now you need to unscrew the 5 nuts that secure the crankcase protective element;
- There is a bolt at the bottom that secures the trim on the side; it needs to be loosened;
- A new sealant is installed, the bracelet also needs to be changed;
- All that remains is to unscrew the rear and top bolts. It will be more convenient to do it through the wheel arch;
- After carefully adjusting the gaps, the bolts are finally tightened.
- Wing removed;
- The battery is de-energized by disconnecting the terminals;
Use of thermoplastic.
What does thermoplastic look like? It looks like powder. It begins to have the desired properties at 155-165 C. Before applying thermoplastic to the surface, it is necessary to clean the area of old paint, rust and other debris. Thermoplastic adheres better to rougher surfaces.
Next, we heat the part of the metal panel that we will level to a temperature of 170-190 C. We roll out the applied thermoplastic (powder) with a metal roller. Apply the next layer, roll it up and so on until all irregularities are eliminated.
Doors
It is also recommended to disassemble them and replace them with an assistant. If electrical equipment is attached to them, then the wires must be removed without fail. It should also be remembered that in case of replacement, it is recommended to transfer all removable parts from the old door to the new one.
This is how the doors on a VAZ 2110 are disassembled:
- The 2 bolts connecting the door to the A-pillar are disconnected;
- The door opens;
- The new door is installed in the reverse order.
- The bolts securing the upper and lower hinges are turned;
Advice. Before the bolted hinges are fully tightened, the door must be slammed shut and adjusted to even out the gaps in the openings along the entire edge. Then you will need to open the door with decorations and tighten the latches all the way. It is advisable to double-check everything. If something goes wrong, the door lock has already been adjusted.
Bumpers
These elements of the VAZ 2110 body are disassembled not only for the purpose of replacement or repair, but more often for the purpose of modernization and tuning:
- The negative terminal is removed from the battery;
- The radiator grille has been removed.
Advice. It will be easier to unscrew the 2 screws that hold the grille at the top with a 10 mm wrench.
- Using head 8, unscrew the bolts securing the bumper to the brackets;
- The bolts securing the bumper to the front panel are unscrewed with a 10mm socket;
- The front bumper can be easily removed by sliding it forward slightly.
- Using a curved screwdriver, unscrew the screws, fixing the wing skin on the top and bottom sides;
- Now you need to loosen the fastenings of the power unit protection. This is where a 10mm socket wrench comes in handy;
The rear bumper is removed in almost the same way as the front.
Some tips for underbody repair
- When preparing the iron for patches, it is necessary to take into account its thickness - metal that is too thin will be brittle, and a thick sheet will not weld well and is more difficult to work with.
- Although electric welding is cheaper to use, it is better to weld metal with a semi-automatic one - it is easier to use, and the welding is smoother and more accurate.
- When cutting metal parts and installing patches, the part being installed must fit exactly.
- When replacing the bottom, the weld bead cannot be continuous, since it has high rigidity, and insufficient elasticity negatively affects the strength of the body.
And if you undertake body repairs with your own hands, you should be patient, careful, deliberate, carry out all the necessary operations, without saving time and effort when processing the metal, and clean it of rust. Poor preparation and poor anti-corrosion treatment lead to the rapid appearance of corrosion, which negatively affects the service life of body elements.
Features of the bodies of “Ladovo” models
Since we started with QOL, let’s continue this topic. For the frame of Ladovsky models without glued glass, the quality of life is 14 thousand N*m/degree, which is a very good mark. And with glass this figure is even higher.
The testing of the Lada body in the rear turned out to be especially good. Thus, in the rear door opening, after a tough diagonal pressure test, the changes were recorded as only 1.5 mm, whereas on most foreign cars the same figure was 5-6 mm.
The body design of the Lada Largus and other similar models fundamentally complies with current European standards in terms of protecting passengers and the driver. The front subframe on Ladovsky models is one of the most important body elements responsible for this indicator. It is even considered an auxiliary spar, significantly increasing the strength of the body, as well as absorbing impact force.
VAZ overall body dimensions
The high quality of life of the Ladovsky body also has a beneficial effect on obtaining high-quality sound comfort in a car showroom. The frame does not twist over bumps and bumps, no deformations or anomalies occur between the interior and body elements, which ultimately has a positive effect on the absence of squeaks.
Note. Of course, in addition to the quality of life indicator, the quality of interior elements also affects the high level of sound comfort. They were obtained through proper calculation so as not to come into contact with the body in places where squeaking might occur. This was achieved by fixing the plastic components with special fasteners and minimizing the various gaps that arise one way or another between them and the body.
VAZ 2113 body dimensions
A lot of original parts, interchangeability of interior elements between Ladovsky models, enlargement of some parts of the body - all this was only a plus. In particular, the increase in some body elements led to a decrease in their number, which reduced production time and had a positive effect on performance.