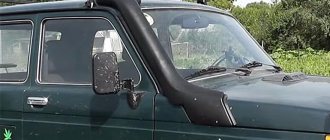
Types of snorkels
The literature on the selection, installation and operation of snorkels identifies several varieties. Moreover, those of them that are designed to supply the power unit with oxygen under water are, in any case, installed on the car so that they can take air from the surface of the reservoir for this purpose.
From a technical point of view, they represent an air intake pipe placed on top of the car. In some cases, a snorkel can power an SUV’s engine from a depth of up to two meters, which significantly expands the capabilities of your Niva when driving in extreme conditions.
Depending on the conditions under which the owner of the Niva intends to operate it, the following types of this air intake are distinguished:
- "safari". This version of the device is intended for installation on SUVs operating in desert conditions or in sandy areas. A design feature of the snorkel is that its upper part is positioned towards the movement of the machine. This technical move prevents sand from penetrating into the power compartment and engine due to the rarefaction of air created at the air intake while the car is moving.
- "swamp". In this case, the engines do not receive dust, but this is precisely where it is necessary to overcome water obstacles and wet sections of roads. To do this, the upper part of the snorkel is turned against the movement of the car, and the pipe is supplied to the filter secretly, for which the hood or wing is cut. As a result, the device is protected from damage when moving from contact with tree branches, as well as when falling to one side.
In addition, it is worth noting that there are both homemade snorkels and industrially produced devices. So, for example, if you purchase a “hundred-fold” snorkel, then all you have to do is install it on your Niva, since it is produced in a ready-made form. If you are going to make this air intake yourself, you will have to spend additional money and time on it, but the accessory will fully satisfy all your needs.
Technical characteristics of snorkels
Snorkels are used to prevent water hammer when the car is immersed in water, as well as to supply the engine with oxygen while the SUV is in the water. Naturally, for the normal performance of these functions, the air intake must meet certain requirements. Usually, when choosing it, pay attention to the following characteristics:
- the material from which the product is made;
- type of head nozzle;
- main pipe diameter;
- mounting options.
Where can I find a suitable snorkel?
You can purchase a ready-made model; a large number of manufacturers make additional devices for SUVs, or you can make it yourself. A factory-produced part will have several advantages: build quality, service life and the ability to contact the manufacturer in case of warranty claims.
The only disadvantage can be the cost, which is usually at least 14,000 rubles
But it is important to understand that the price is determined by the use of high-quality materials, namely especially durable LLDPE polyethylene, which provides a number of advantages:
- resistance to high temperatures and cracking
- mechanical stability
- design created specifically for a specific type of car
But there are also cheaper models characterized by simple design, the cost of which does not exceed 6,000 rubles. It is not recommended to use the cheapest options, because despite the apparent benefits, they may suffer minor mechanical damage over time. But due to the use of less plastic material in the composition, microcracks will appear on the body, through which water can enter the engine when forcing various kinds of obstacles
When using such materials, it is important to periodically inspect the snorkel in order to identify damage in time.
But there is also the most budget option - making a snorkel yourself. To do this, you first need to ensure reliable fastening in the engine compartment in order to prevent air leaks and bring the pipe as high as possible in the hood. To do this, first a horizontal part is laid under the hood, then a connecting tube is inserted into an additionally prepared hole between the windshield and the hood.
It is important to remember that the straighter the pipe and the shorter the path to the air intake, the better the aerodynamic qualities of the snorkel. https://www.youtube.com/embed/0CA4S-YDl_8
Making a snorkel with your own hands
In the event that an industrial air intake is not suitable for you for some reason, you will have to make a snorkel for the Niva with your own hands. Typically, a plastic pipe, corners and sealing materials are used for this. The pipe is cut into pieces of the required length, which are connected to each other by corners. In addition, there is also a snorkel for Niva made by hand from a solid plastic pipe. To do this, it is heated with a hair dryer and bent according to the geometry of the body.
Installing a snorkel on a Chevrolet Niva with your own hands.
The factory snorkel always comes with special instructions that contain complete information on its correct installation. You should adhere to this if you decide to install a snorkel on the Niva yourself.
If you don’t pick on the details, then in general terms the procedure for installing an external air intake on a Niva will look like this.
- The necessary tools are being prepared; in addition to the standard kit, you will need: a drill (4×10 mm drill), a jigsaw, sealant, a marker and tape.
- The left side of the car is jacked up
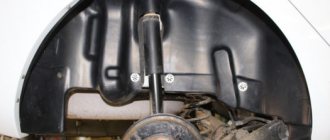
- The protection from the wing, the air filter barrel and the wheel are removed.
- The surface of the body is cleaned and prepared for further work (the body along with the cuts must be sealed with tape).
- The outline on the wing is marked with a marker, then a cutout is made. As a rule, a factory snorkel always comes with ready-made markings, which you can simply apply to the surface and make a hole in the right place.
- The pipe from the air filter is connected to the drilled hole.
- The stand is covered with tape and marked with a marker in the places where the vertical part of the air intake will be attached to it. Next, holes are drilled at these points.
- The snorkel is installed directly.
- The last step is to install threaded rivets, all holes are treated with sealant, and all parts removed from the car are installed in their places.
That's all, the snorkel on the Niva is installed with your own hands and is completely ready for use.
Snorkel installation
In order to install the snorkel on the field, you must perform the following operations:
- mark the places where the air duct is attached to the machine body;
- drill holes for them;
- install the extended air duct in place and adjust it to the geometry of the body;
- tighten fastenings;
- connect the air duct to the air filter using a corrugated hose.
Marking the mounting locations of the described device is usually done using patterns made of cardboard. Their silhouette is outlined with a felt-tip pen, and holes for the bolts are also marked with it. Next, using a drill and a metal cutter, a main hole with a diameter of approximately 50 millimeters is made along the main pipe of the device. In this case, it is necessary to ensure its tightness using rubber gaskets and sealants.
The accessory is attached directly to the car body using M6 bolts with cage nuts. If the pipe wiring is hidden, nothing else will be needed; you won’t even need an additional hole in the hood. In the same case, when the pipe will be brought out, you will need a mounting bracket, for example, Roxel Pro 531163 and a cage nut.
The design of the Niva 2121 car provides for its own body geometry, so the snorkel will have to be adjusted to it, warming the product with a hair dryer and attracting it to the car body with bolts. After this, you will need to connect the air filter to the engine, and at the same time its pipe is connected to the snorkel via a corrugated hose. Upon completion of work, the air intake system must be well sealed using rubber corners and clamps.
Lada 4×4 3D panda › Logbook › Installing a snorkel
So my father and I decided to install a snorkel on the field ourselves.
I gave him a snorkel for his birthday and 10 days later he arrived. We liked the snorkel itself and all the materials - high quality, but there were no instructions in the box. Therefore, I downloaded instructions and a pattern from the Internet for installing a snorkel on 21214.
Let's get started
Removed battery and filter for more space
Apply masking tape
Glue the pattern and mark it with a pencil
We start cutting with a grinder
We put a seal in the place where we cut it and lubricate the ends with sealant
We take polyurethane sealant and coat the snorkel with it
Place the snorkel on the body and attach it with masking tape
Since the filter pipe is too long for us, we shorten it
We connect the corrugation and the filter with sealant and put a clamp on top
Then we also connect the corrugation and the snorkel itself
Put the filter and battery in place
Everything is ready, just wait 24 hours for the sealant to dry
All is ready! We finished it in 5 hours. The same installation in the service costs 6,000 rubles! Next time we will make branch cutters
Source
Features of installation on the injector and carburetor
Installing a Chevrolet snorkel on a Niva has its own characteristics when it is done with your own hands. The fact is that cars of this brand are produced with both injection and carburetor engines. Connecting a new air duct to them has its own characteristics and is usually done using adapters. So, for example, if you are installing a snorkel on a Niva 2121, you will have to install the carburetor body with just these adapters. They should be selected depending on the specific engine model installed in your car.
Usually the snorken on the Niva is installed by experienced car enthusiasts who know how to perform such an operation. Beginners should be advised to pay special attention to sealing the entire system. So it is imperative to seal the hole in the hood through which the air duct will be inserted into the engine compartment, as well as all pipe joints. Such an improvement will cost you very little, and as a result, you will be able to overcome fairly deep bodies of water with a hard bottom on the Niva as standard.
autsatsuatsautsua
Lada 4x4 is famous for its cross-country ability, but this is not the limit. Sometimes low air intake does not allow you to overcome deep bodies of water. To force ford deeper water obstacles, motorists modify their SUV. For example, they install a snorkel on a Lada 4×4.
The owners of such cars will have to decide how often they are going to drive in deep water, based on this they can:
- Make a removable, homemade snorkel;
- Buy a ready-made accessory and install it forever.
What is a snorkel for?
- Main purpose. The engine inlet pipe, located at the level of the car roof, is necessary to protect the engine from water ingress when crossing water obstacles;
- Additionally. Air intake through a snorkel reduces contamination of the air filter when driving on sand and dusty roads (which was the root cause of the appearance of snorkels on cars);
- Additionally. Cooler air helps increase engine power (cold intake). This is relevant if the air intake is made outside the engine compartment (the snorkel is removed from the engine compartment).
How to make your own snorkel
If activities to force water obstacles are planned to be carried out infrequently, then it is recommended to make a snorkel yourself, and it is better if it is removable. What can a snorkel be made from for a Lada 4×4? Most often, a plastic pipe for heating and water supply is used for this.
You will need: a plastic pipe with a diameter of 50 mm (19 and 46 cm long), three plastic corners, one furniture corner, a coupling and a clamp.
Remove the engine air filter housing and remove the tip of the cold air intake. In its place we install a sealing coupling.
Now we assemble the snorkel from plastic pipes, as shown in the drawing. To ensure that the structure is rigidly fixed, we use fastening using a clamp and a furniture corner. The gander is turned down to prevent water running from the hood from entering.
The process of making a removable mini snorkel for Lada 4×4 is also shown in the video:
If necessary, you can enlarge the snorkel by running it along the windshield pillar to the roof, but in this case you will have to cut off part of the hood.
Correct snorkel installation
If you are not going to remove the snorkel, then it is recommended to consider ready-made kits. We'll tell you about installing one of the popular models.
Lower snorkel mount:
- Cover the edge of the hood with masking tape. Place the snorkel on the hood and mark the cut lines;
- We cut off part of the hood with a grinder. We process the edges with a file.
- We cover the edges with anticorrosive. We put the door seal from the “classic” on the cut edge;
- We make a hole in the wing using a drill. We secure the snorkel using a self-tapping screw. Under the snorkel we treat it with anticorrosive.
Upper snorkel mount:
- Option No. 1: Attach the snorkel with sealant to the windshield pillar or roof;
- Option No. 2: We attach the snorkel to the roof using bolts and nuts, making holes in the ceiling;
- Option #3: Attach the snorkel to the roof rails (see photo).
We secure the snorkel corrugation with clamps. If necessary, increase the diameter of the pipe on the air filter housing using thermal tape.
How to install a ready-made snorkel kit is also shown in the video:
At this point, the Lada 4×4 tuning can be considered complete. What do you think is the best snorkel for the VAZ 2121? Leave feedback on the use of this accessory. By the way, in order to be sure to overcome the water obstacle, it is recommended to move the generator a little higher and make a Lada 4x4 elevator.
11/06/2013 USEFUL TIPS Installing a snorkel on a VAZ 21213 NIVA.
We are often asked the question - how to install a snorkel on a VAZ 21213, 21214, 2131, NIVA car. With this article we will try to explain how to install a snorkel on a NIVU. And we hope that those customers who have already purchased snorkels for the VAZ 21213, 21214, 2131, NIVA in our store www.OffRoadRunner.ru will find useful information for themselves, and those potential customers who doubt the purchase of a snorkel for the VAZ 21213, 21214, 2131, NIVA, after reading the article, they will understand that there is nothing complicated in this and will buy a snorkel from us for the VAZ 21213, 21214, 2131, NIVA.
Let's try to explain everything step by step.
1. You need to stick masking tape as shown in the photographs. We need this so that the snorkel does not scratch the paintwork of the VAZ 21213, 21214, 2131, NIVA and so that we can later draw lines along which we will cut off the hood with a pencil or marker.
2
It is very important to align the hood and hood latch so that the gaps between the body and the hood are the same, and also so that when closing the hood of a VAZ 21213, 21214, 2131, NIVA car, the hood does not move to the side
3. Next, we apply the snorkel and mark the places where there will be holes for the screws in the wing of the VAZ 21213, 21214, 2131, NIVA, with these screws we will attach the snorkel to the car. We drill holes.
4. We apply the snorkel to the VAZ 21213, 21214, 2131, NIVA car and mark the holes for the screws on the snorkel through the holes in the wing, this is convenient to do with any thinner screw. That is, through the holes in the wing you can scratch the places where there will be holes in the snorkel of a VAZ 21213, 21214, 2131, NIVA car
5. Drill holes in the snorkel for VAZ 21213, 21214, 2131, NIVA
6. We apply the snorkel of the VAZ 21213, 21214, 2131, NIVA car to the wing and screw it to the car with self-tapping screws.
7. Next, when the snorkel is installed, on that part of the tape that is glued to the body on the right and below the windshield, mark with a pencil or marker the line of the edge of the snorkel, we will need this in order to mark the line on the hood along which we will cut the hood along its upper part.
8. On the right wing of the VAZ 21213, 21214, 2131, NIVA car, apply masking tape under the snorkel, applying a long ruler to the part of the snorkel that remains outside the hood. draw a line along the masking tape on the wing, we will need this in order to get a cutting line for the hood on the right (as the VAZ 21213, 21214, 2131, NIVA is moving) vertical part of the wing.
9. Remove the snorkel and, closing the hood, apply to it the pattern that you receive when purchasing a snorkel for a VAZ 21213, 21214, 2131, NIVA, orienting it along the lines that you marked before. 10. We cut the hood along the marked lines on the masking tape, trying to do it as carefully as possible.
11. Open the hood and apply a layer of paint to the cut on the hood, we need this so that the hood of the VAZ 21213, 21214, 2131, NIVA does not rust, this is not necessary if you bought a fiberglass hood from us for a VAZ 21213 car, 21214, 2131, NIVA.
12. We put a seal on the edge of the hood.
13. We put the snorkel in place by screwing it to the fender of the VAZ 21213, 21214, 2131, NIVA car, in order for the snorkel to hold more firmly, on the part that is adjacent to the roof of the VAZ 21213, 21214, 2131, NIVA car, you can attach the snorkel before installation Apply a couple of drops of polyurethane sealant.
14. After this, all you have to do is attach the snorkel of the VAZ 21213, 21214, 2131, NIVA car to the air filter basket, but we will describe this in the next article.
Snorkel on Niva
Well, it came to this “trunk”. I’ve always been somewhat distrustful of this particular snorkel design, but the ones with a “gander” somehow appealed to me more. But the circumstances turned out the way they did :). At least one of the undeniable advantages of this option is its harmonious coexistence with representatives of forest solid flora).
I don’t have any photos of the process of attaching the snorkel to the body; I didn’t have a camera on hand that evening. It went something like this:
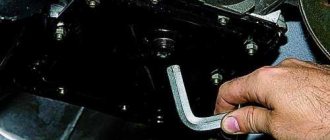
— Three holes in the wing flange under the hood (there are screws there, respectively). It's simple, the main thing is to mark it in the right way; — Two holes for two screws in the rack. Remove the plastic trim in the interior. We mark, estimate, apply, etc. The stand seems to be “double-layered”. First, we drill a hole with a large drill (for example d8) in the first “layer” (from the interior), then we drill a hole in the second “layer” with a small drill (for example d3). We repeat this whole thing twice.
Thus, my snorkel is held on by five self-tapping screws (the diameter of the screws is just over 3 mm). He behaves quite confidently. It seems to me that the screws will not affect the “tightness” in any way.
The snort was supplied with a corrugated tube of enormous diameter and an o-ring (essentially a fragment of a rubber pipe; it had to be divided lengthwise into two parts). I had to buy another piece of pipe with an outer diameter of 70 mm in order to fuse the filter housing with the corrugation. The case had to be removed, it would be more convenient to deal with this perversion. To be honest, I don't like such connections. The fewer parts there are in the connection, the more reliable this whole thing is - an axiom, but here somehow everything is not quite so... But on the whole it turned out quite well. Everything is generously coated with fashionable sealant (999)... It seems normal.
It is quite easy to attach the corrugation to the snorkel pipe (the reliability of the joint is not a cause for concern). Use the remaining half of the O-ring. There is no need for any sealants here...
Well, this is how it came together:
I specially attached it so that the upper part of the snort did not fit close to the roof, so that it rose slightly above the roof (the gap is about 1-1.5 cm between the lower surface of the snort and the roof). In my opinion, this can help a little to prevent water from getting into the snorkel during heavy rain (I understand that drops bounce off the roof, I read similar reviews).
It is quite easy to correctly mark the hood for trimming. The main thing here is to gradually adjust everything. But I still messed up when cutting the horizontal plane). It was already late and I was already a little tired). The cutting line along the horizontal plane should run at a certain angle, repeating the outline of the snorkel in this place, everything is clear and understandable. But for some reason I was wedged and I automatically decided that the cut needed to be strictly parallel to the edge of the hood, I carefully measured everything, checked the parallelism and cut)). As a result, I got an extra 1.5 cm in the form of a gap. But essentially this is not a problem, I have already come up with a rubber pad for it, everything will be fine.
The side cut was almost perfect.
Now we are with a trunk)
Lada 4×4 3D › Logbook › Installing a snorkel in a field
I was wondering how to secure it, and how to cut the hood as accurately as possible. — I removed the battery, attached the snorkel to the wing, and secured it on the reverse side with 2 screws, through the edge of the wing.
— I secured the paper with masking tape and cut through the paper using the snorkel.
— I took off the snorkel, closed the hood, and used paper to mark the snorkel lines on the hood.
— I cut the hood along the line, and then cut the petals with a 1cm indent towards the engine and bent them down. — I screwed on the snorkel, checked the gaps, and slightly modified the gap with a hammer and pliers — Welding went into action, welded the petals, thus strengthening this corner of the hood, cleaned, treated with sealant and paint the inside of the hood. — I finished the outer edge using putty with fiberglass, glued a “gap” of 8 mm to the installed snorkel, spread putty on the edge of the hood, which is adjacent to the snorkel, and carefully closed the hood, when everything was dry, I got a clear gap of 8 mm .
Attaching the snorkel with 2 self-tapping screws, for me, is not enough, and the line of the snorkel did not perfectly follow the line of the windshield pillar. — I took off the snorkel, and in the upper part of it, I walled up a bolt, securing it with fiberglass and resin.
— Drilled a hole in the roof for the bolt — Installed the snorkel, first applied sealant to the upper edge of the wing, where it is fixed with 2 screws, and at the top, under the bolt, between the snorkel and the roof, put a rubber spacer on the bolt and applied sealant on both sides.
— In the cabin, I dismantled the upper ceiling trim, tore off part of the upholstery, and tightened the snorkel with a nut through a washer. The angle of inclination of the snorkel has leveled off relative to the windshield pillar.
I connected the snorkel a little later, because... There was no corrugation for connection. After I purchased it, I installed it using 2 pieces of 50mm sewer pipe - I cut off the excess in the place where the pipe expands, then I installed these adapters in the snorkel and in the box with the filter (on the sealant), and using the same black sealant, I put it on corrugation on the adapters and generously and carefully spread sealant on top. — The next day I checked the joints with soapy water, nothing is pulling or inflating)
Niva: what is a snorkel, how much does it cost and how to install it
A snorkel is a device necessary for operating the engine underwater; it is a structure in the form of a pipe with an air intake.
What is it and what is a snorkel for?
A device such as a snorkel appeared during the war and was intended to enable submarine diesel engines to operate underwater without surfacing, supplying air from the surface and removing exhaust gases. Then the same principle was used to supply air to engines during safari in Africa, trying to reduce the entry of dust into the engines, which rises in huge quantities when the car is moving. Well, now such a device is most often used to eliminate water hammer when moving through water. Water hammer occurs when water enters the cylinders of a running engine through the air intake system. The consequence of this may be deformation of the connecting rods and the appearance of cracks in the block. This can be avoided by taking air for engine operation at the level of the car roof, for which a snorkel is used.
What is it like?
There are several possible options for equipping a car with such a device.
1. Purchase a product manufactured by well-known companies. As a rule, it is characterized by high quality workmanship, a well-thought-out design and a guaranteed result. But the cost of such a snorkel will be hundreds of dollars. It is true that it is better to install a device for five hundred dollars or to repair the engine due to its absence - this is everyone’s personal choice. 2. Buy a domestically produced snorkel. Now there are many manufacturers of such devices, but in this case there is no guarantee how effectively such a product will work. But the price will be quite acceptable - several thousand rubles, and it will depend on the snorkel model. You can take thousands for 3-5.
3. Make it yourself, in this case the price will be minimal, but what you get in the end is an open question.
What is a snorkel, how can it help you overcome fords on the Niva, and how to choose and install it. How much does this whole thing cost? In addition to the above, it should be noted that the installation of the snorkel can be done both in the workshop and on your own. And it must be taken into account that in most cases the snorkel is located on the right side of the windshield, and to connect it to the standard air filter you will have to cut an additional hole in the hood or in the left fender. True, there are separate snorkel models for some car models that do not require such modifications, but usually to install such devices it is necessary to cut the car body. The material used in manufacturing can be either plastic or metal. Its use is preferable due to its increased strength.
What to look for when choosing and installing
In this case, regardless of all other factors, the cross-section of the air ducts is decisive. In no case should it be less than the diameter of the pipe running from the air filter to the engine. Otherwise, the running motor will not receive the required amount of air and will begin to “suffocate.”
However, the fact that a car is equipped with a snorkel is not enough for off-road driving. It is necessary to ensure the tightness of the entire air supply system. Despite the fact that it is taken from the height of the car roof, neither the air filter itself nor the air ducts are airtight. After installing the snorkel, it must be provided additionally, first of all this concerns the air filter.
Useful observations and conclusions
Having done all of the above - choosing a suitable snorkel and correctly installing it on the car, it is worth remembering that you have received a car capable of moving on water and traversing deep swampy areas, and not a submarine. Of course, this is already a lot, especially if you plan to go on rally raids or off-road runs. It would be more accurate to say that equipping a car with such a device is part of preparing the car for participation in such trips. Without this, you simply cannot go anywhere further than the nearest suburban forest. But we must remember that you have a gasoline engine and for its operation you need a successfully functioning ignition system, for which you will need to take some additional measures to protect power supply units. Therefore, under any circumstances, try to avoid a situation where water floods the generator and spark plugs. To do this, it is not necessary to go to great depths; when driving even through a relatively shallow puddle in front of the car, a wave is formed that raises the overall water level. And don’t forget about the engine cooling fan. If during its operation water gets under the blades, it will splash all over the engine compartment.
Video of Niva wading (without a snorkel such actions will be impossible):
There is nothing unexpected in this approach to the snorkel. This is just an additional device that significantly expands the capabilities of your Niva, but in no case is it a magic wand that can turn your car into a tank, plane or submarine at will.
A snorkel can be considered an indispensable element of a car that has to overcome water-filled areas, ford or participate in rally raids. Without it, it’s best not to try to cope with serious off-road conditions. Therefore, the selection, installation and operation of such a device must be taken responsibly, and this approach will allow you to realize the hidden capabilities of the car.
Useful tips
- Having installed a snorkel on the Niva, remember that now you have a car capable of moving on water and overcoming huge wetlands.
- Do not forget also that the car has a gasoline engine and requires a properly functioning ignition system to operate. Why is it worth taking additional measures to protect power supply units?
- In any case, avoid situations where the generator and spark plugs are flooded with water. Also, do not forget about the cooling fan; if water gets under its blades, it will be splashed all over the engine compartment.
- Any car enthusiast knows what an important role the cooling fan plays in a car. This device protects the engine from overheating in hot weather. However, if you drive an SUV across small bodies of water, the fan can cause damage to the car, since it is not capable of spinning its blades in water. As a result of such actions, the radiator may become unusable, which is extremely dangerous when the car is moving. To solve this problem, there are viscous couplings, which already have a fan when entering a denser environment. You can also use a regular forced rejection toggle switch.
- When lubricating spark plugs, be sure to check their condition. Car enthusiasts spend a lot of time treating the entire electrical system with sealant, but it is much easier than installing a snorkel. At the same time, silicone sealant is easy to apply and can be washed off if necessary.
- Drivers should also pay attention to turning off their headlights. Always do this if you are going to cross a swamp or body of water, as water entering it can cause an immediate explosion. The headlights may also have sluices to drain any trapped liquid.
- The snorkel is installed on a Niva car by experienced car enthusiasts who know how to perform a similar procedure. Drivers who do not have such experience should pay attention to sealing all systems. It is imperative to seal the hole in the hood through which the air duct will enter the engine compartment and all pipe joints. This option will not cost too much and as a result, motorists will be able to overcome fairly deep bodies of water in an SUV.
- A snorkel is an additional device that expands the capabilities of the VAZ 2121, but not as a converter of a car into a tank or aircraft.
- It can be recognized as one of the mandatory parts of the car, which has to overcome areas flooded with water. It is extremely necessary when participating in rilly raids. Therefore, the selection of a snorkel, its installation and operation must be taken seriously and responsibly.
- When a homemade air intake is assembled and installed, sealing all dangerous areas, any car enthusiast will want to try his car in action. Well, good luck to you! And take care of yourself and your car.