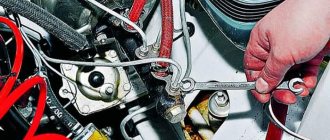
Holding the tip of the VAZ 2110 brake hose with a “15” wrench, use a “10” wrench to unscrew the tube fitting.
To prevent brake fluid from leaking out of the tube, we put a protective cap from the bleeder fitting on its end.
If the tube nut is severely oxidized, you should use a special “10” wrench covering the five faces of the nut.
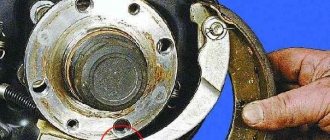
We remove the wire of the VAZ 2111 pad wear sensor from the rubber holders covering the hose.
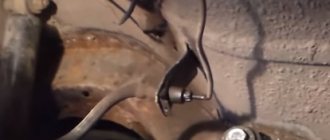
We remove the hose coupling from the shock absorber strut holder.
Using a 15mm wrench, unscrew the hose fitting from the wheel cylinder of the VAZ 2112.
A copper O-ring is installed between the cylinder and the fitting and must be replaced.
After installing the hose, we bleed the brake system of the VAZ 2110 (see Bleeding the brakes).
If you don’t want to contact service center specialists, you can figure out for yourself how to replace brake hoses on a VAZ 2110, and then evaluate your strengths and capabilities in order to begin repairs. The main thing is to understand all the risks and not be afraid of unforeseen situations. Be sure that replacement of small auxiliary parts will be necessary sooner or later, and there is no point in delaying repair or maintenance work. Firstly, if one part fails, it can provoke a decrease in the level of functionality of another, no less important component in the technical system of the car. Secondly, any deformation of parts, their “boiling”, or damage can lead to the undesirable effect of uncontrollability of the car. Just imagine what can happen if a vehicle's brakes malfunction! It is better not to let the car you have at your disposal fall into this state; you should think in time about how to replace the brake hoses of a VAZ 2110 and what you will need for this.
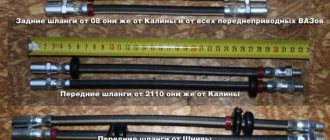
Brake hoses for VAZ 211
Let us remember that the main task of the hoses is to supply brake fluid from the main brake cylinder located in the hood to the working brake cylinders at the wheels. And everything is carried out under considerable pressure and at a fairly high temperature. The hoses are interconnected with moving suspension elements, and therefore are made of wear-resistant rubber, but hoses cannot be called eternal, so sooner or later you will have to decide how to change the brake hoses on a VAZ 2110, and whether it is worth doing it yourself.
Preparing to replace hoses
A garage equipped with an inspection pit or an installed overpass can significantly facilitate the work - you do not have to jack up the car and remove the front wheels. If there is no hole, you need to prepare the following tools: a jack, several wooden blocks; wheel chocks; special wrench for unscrewing brake hoses; standard set of open-end wrenches from 8 to 17 mm; brake fluid; rags; gloves; set of copper washers.
Attention! The brake fluid must be selected similar to that poured into the car’s brake system - otherwise there is a high probability of changes in performance characteristics when mixing different fluids, which can lead to brake malfunction.
Copper nuts must be installed only of a certain diameter - you can find it in the car’s owner’s manual or in the online spare parts catalog by entering the car’s VIN. Original hoses are supplied complete with all washers, duplicates - depending on the manufacturer. How to choose hoses and why change them? The frequency of replacing brake hoses does not have a clearly established time frame - much depends on operating conditions, the age of the car and the quality of the spare parts used. But there are general recommendations for replacing brake hoses: 3–5 years of car operation or 80–100 thousand kilometers.
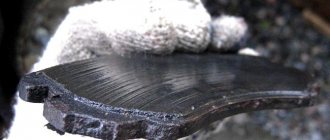
Brake hoses are made of high-strength rubber and must withstand pressures in excess of 10 MPa (working pressure in the brake system of passenger cars is within 10 MPa). Over time, rubber loses its performance characteristics, which leads to delamination, swelling or rupture of the hose. This is fraught with the following consequences:
- when detached, part of the rubber inside the hose begins to work like a valve - it either does not allow brake fluid to pass to the piston, or does not allow it to pass in the opposite direction. In the first case, the brake pads do not compress and the wheel does not brake; in the second, due to excess pressure, the pads remain constantly compressed, which leads to overheating of the brake disc and pads and their destruction;
- if the hose is swollen, the brakes will work with some delay, which can lead to loss of control over the car during braking;
- A rupture of the hose will lead to leakage of brake fluid, loss of pressure in the entire brake system and complete brake failure.
The consequence of any of the above options is loss of control over the car, which leads to an emergency situation. Therefore, it is very important during periodic replacement of brake pads and seasonal replacement of wheels to check the condition of the front brake hoses: they should not show signs of brake fluid leakage, swelling or cracks.
When choosing brake hoses, it is recommended to pay attention to original parts or those produced under the control of the car manufacturer. Some parts manufacturers mark their products as “suitable” for use on certain brands of cars. But this does not mean the automaker’s approval for the use of these components and their passing compatibility tests.
What to do to prevent brake pipes from souring in the future
There is no universal recipe here, it all depends on the time. But the use of penetrating anti-corrosion compounds for hidden body cavities, which envelop parts, prevent the development of corrosion due to the inhibitors contained in the composition, and do not allow water and oxygen to pass through to the threads, helps a lot.
The connection of the tube, nut and mating part is generously moistened with one of these compounds. After drying, they remain in a fairly elastic state.
This is interesting: What to do if the battery terminals oxidize
On top of this treatment, you can apply a layer of protection with more durable characteristics. These can be compositions such as anti-gravel or other body sealants. If necessary, they are easily removed.
Before screwing, the thread itself is coated with a special lubricant containing finely dispersed copper. Such auto chemical goods have recently been widely used during repair installations, significantly facilitating subsequent unscrewing.
Procedure for replacing front brake hoses
To gain access to the front brake hoses, you need to either drive into the inspection hole or jack up the car and remove the wheel. When jacking up the car, do not forget to install wheel chocks. It is not recommended to leave the car on a jack when performing work - it is better to install wooden beams under the threshold and lower the car on them.
After raising the car and removing the wheel, you must perform the following steps:
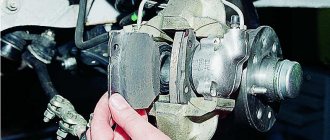
- Remove the bolt securing the brake hose to the caliper. The bolt has special channels for the movement of brake fluid, and if necessary, you can clean them with wire.
- Bend the hose 180 degrees and secure in this position with wire. This must be done to prevent brake fluid from spilling out.
- Unscrew the second part of the brake hose from the tube, then quickly plug the tube using a bolt of suitable diameter or a syringe needle tip.
- First screw the new tube to the brake caliper, not forgetting to place copper washers on both sides of the bolt. Only new copper washers can be installed - otherwise a tight connection will not be achieved.
- Remove the plug from the brake pipe, install and secure the second end of the hose.
It is worth considering that replacement work must be carried out quickly, avoiding large leaks of brake fluid. The fact is that if the brake fluid runs out in the reservoir, this causes air to enter the system. In this case, you will need to bleed the brake system - the procedure depends on the configuration of the brakes in the car and is shown in the car's operating manual. After replacing the hoses, it is necessary to bleed the front wheel brakes in accordance with the instructions.
Source
How to dismantle correctly
The task is divided into two parts - to preserve the edges of the nut as much as possible and not allow it to be cut off, leaving a fragment in the body of the mating part.
If the whole faces
While the edges of the nut are still intact, you should use the correct loosening tool. The use of a spanner or even more so an open-end wrench is inappropriate here.
For brake pipes, special spanners are produced that are of considerable width, equipped with a slot for the pipe and a clamp with a power screw. The key is put on the nut with the tube passing into the slot and securely fixed with a threaded clamp. In this case, it will no longer be possible to tear off the edges.
There remains a danger of shearing the nut due to excessive applied torque. The part is thin-walled and weak, and is damaged by very moderate force on the short lever of the key, so the soured connection should be loosened as much as possible.
There are several methods that must be applied sequentially to avoid troubles:
- the connection must be flushed with a penetrating compound such as a “liquid wrench”; usually a universal lubricant such as WD40 or the like is sufficient; it will take about half an hour to obtain the effect of wetting the thread;
- the nut must be carefully tapped in the lateral and axial directions; it is convenient to do this along the axis using the same special wrench, but smaller, placed on the tube and placed firmly on the nut; the blows are applied with a small hammer close to the head of the wrench, sharply and abruptly;
- from the side you should hit through the blunt beard along the edges of the nut with the same hammer, it is not strength that is important, but sharpness and repeated repetition, between attempts you should try to unscrew the nut without applying excess force, skill and a sense of proportion play a big role;
- An extreme but effective measure would be to repeatedly heat the part with a gas burner with a thin point nozzle; when heated and cooled, the expanding porous products will be crushed; you should not twist the hot nut, since it is expanded and clamped even tighter; you can cool it with the same penetrating liquid.
Of course, when working with heat, the brake fluid must be completely drained and fire safety measures must be taken.
If the edges are torn off
It happens that illiterate attempts at turning away have already led to damage to the edges. At a certain stage, this will not prevent you from reliably hooking with the same special key; it will tightly embrace and clamp everything that is still left.
Alternatively, you can cut off the tube and use a reduced-size socket head that grips the middle of the edges. But the special key is still more effective.
Sometimes a welding machine is used for dismantling, welding another, larger diameter, to the protruding part of the nut. The main effect with this method is the extreme heating of the part, after which it turns away surprisingly easily with a little effort.
The last option is to drill out the remaining nut and remove the threads. Work carefully so as not to damage the mating part.
Even if the tube was removed, it would be better to replace it. After dealing with soured threads, the connection will lose properties such as strength, reliability and tightness. You can use standard parts or make a new copper tube yourself, using repair technologies for flaring it on the side of contact with the caliper or hose.
Copper is much less corrosive, which will ensure increased safety in the operation of the braking system. Factories do not use it to save money in mass production.
Replacing the brake hose. Practical guide.
The order of work performed to replace the brake hose.
The braking system plays an important role in the operation of any vehicle. If at least one of its elements turns out to be faulty, this can lead to disastrous consequences. Therefore, you should be especially vigilant about the serviceability of all elements of this system.
An important component of any braking system is the brake hose. Cracking and wear of brake rubber hoses is a fairly common problem. To prevent this, you need to lubricate it with silicone grease, and also periodically check its serviceability. If there is any suspicion of a defect, you should immediately replace the brake hose, because its malfunction in the future can have a detrimental effect on road users.
Excursion into history
In the first half of the last century, engineers experimented with braking systems. For example, drum brakes appeared, which for some time replaced the still imperfect disc brakes almost completely. But the problem that could not be solved for a long time was the drive problem. Initially, the main brake drive was mechanical. It included cables that stretched from the pedal to various mechanisms and only then to the wheels. Of course, such a braking system was not only not very practical (it required a lot of effort when pressing the pedal, for example), but also suffered greatly from pollution and the effects of chemically aggressive driving. In addition, the cables rusted and deformed under the influence of time and temperature changes. Malcolm Lockheed managed to solve the problem of a mechanical cable drive.
The first hydraulic brake, which had a fairly complex hose system by the standards of the last century, was installed on a Duesenberg back in 1921. ]Chrysler[/anchor] already finalized the system, and then Ford achieved success in this field together with General Motors.
How to replace the front brake hose
There are several reasons to replace the front brake hose on your car, the most common being a leak. This problem can cause your brakes to malfunction because these hoses supply fluid, and when the brake calipers do not have the required amount of brake fluid, they will not work and the car will not brake. Luckily, replacing the front brake hose on your car is not a difficult project. However, there are some very important steps that you must follow to ensure the safety of your vehicle.
Additional Resources for Bleeding BMW Brakes
- BMW E30/E36 Brake replacement | Episode 3 from PelicanParts
- Flushing and bleeding BMW Brembo brakes (preparing for the track!) From Kies Motorsports
Related articles:
- What should I do if there is air in the brake line?
- What are the signs of a cut brake line?
- How to Diagnose Brake Master Cylinder Failure
- 2010-18 Mazda 5 Brake Fluid, How to Add, Symptoms
- How to Replace a Brake Line in a Neon Plymouth
- How to add brake fluid, check the level. 2004-2013 BMW 3-Series