It's no secret that over time, all the upholstery of a car's interior begins to rapidly lose its appearance. This is reflected most strongly on the ceiling: it darkens, fades, spots and cracks appear on it. This is especially noticeable if you smoked a lot in the car. In this case, the cheapest way to correct the situation is to reupholster the car ceiling with your own hands.
The process, of course, is quite labor-intensive, but it allows you to save a considerable amount on the services of specialists. In addition, before work you can watch a video on this topic, then many questions will disappear by themselves.
Execution Rules
To reupholster the sheathing, in addition to new material, you will need:
- adhesive composition;
- degreaser (alcohol, acetone, gasoline);
- screwdrivers;
- fine grain sandpaper;
- hard sponge;
- roller for leveling the surface;
- masking tape.
It is also recommended to purchase a hair dryer, which will speed up the drying of the glue, and plugs. The latter are torn off during retightening and cannot be restored.
Replacement of the coating is carried out in several stages. If the ceiling is tightened, then first remove:
- pens;
- visors;
- lampshades and other decorative elements.
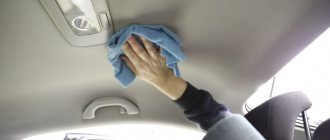
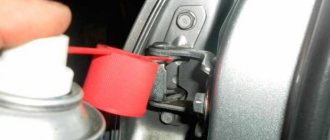
Then the old covering and foam rubber are dismantled. The surface is then treated with a soap solution and a hard sponge. Next, the ceiling needs to be degreased with appropriate means. This must be done, since traces of old glue remain on the surface, due to which the new canvas will not be fixed firmly enough. Finally, the ceiling must be sanded.
After preparation, a thin layer of glue 10 centimeters long must be applied to the surface in the center (if necessary, the sheathing is also treated with the composition). Then the selected material is glued to the ceiling. Next, the next layer of adhesive is applied in increments of 10 centimeters, and the sheathing is attached.
When performing the described procedure, you need to carefully handle the niches and bends. In these places, the finishing material often sags, which is why it will be necessary to re-upholster it in the future. During gluing, the skin must be immediately leveled using a roller or hands. To avoid sagging, the material must be tensioned.
If, after completion of the work, sagging is detected, this area must be heated with a construction hairdryer. Otherwise, a new banner will be required. It should also be taken into account that roof leaks are possible in older cars. Therefore, before starting work, it is necessary to check the tightness of the body and eliminate any identified defects.
When to contact specialists
You should not reupholster the car ceiling if the overhead airbags have deployed. This will require certain knowledge and good skills. In this case, simply re-tightening is not enough.
This will require restoration of the original shape and, additionally, strengthening with epoxy resin and fiberglass. After this, you can start reupholstering the ceiling, but first it’s better to install new pillows.
The headliner reupholstery procedure described here is suitable for most vehicles. As you can see, this is quite doable, you can do everything yourself. At a low cost, you won’t regret the time spent - the new ceiling will look much fresher and better.
- DIY ceiling reupholstery
Do you want to replace your car's old headliner material, change the color, or restore your car's headliner after an airbag deployment? At the same time, you do not plan to seek help from specialists. Be prepared for the fact that reupholstering the ceiling with your own hands will take quite a lot of time and sometimes require an investment comparable to reupholstering the ceiling in a car workshop.So, how do you reupholster the ceiling yourself? In this article we will look at the following nuances of re-upholstering the ceiling: - how exactly the ceiling is re-upholstered;
- what material is better to reupholster the ceiling; - what glue to use;
- how to repair the ceiling with your own hands; What you will need to reupholster the ceiling with your own hands:
None - glue;
— brushes or a compressor with a spray gun; — if repairs are necessary: automotive putty, sandpaper (80), scraper, fiberglass, epoxy resin;
- super glue and anti-super glue; — iron and natural fabric (cotton, linen).
[custom_ads_shortcode1]
Car ceiling painting
If the ceiling in your car has acquired an unpleasant color over time or after cleaning, do not rush to re-tighten it. Perhaps painting will help you.
For a high-quality result, it is best to remove the ceiling. If you don’t have the time or desire to remove it, you can simply paste over and cover the parts that cannot be painted.
You can choose aerosol paint for suede or fabric, or water-based paint, which is applied with a sponge, roller or brush. Plain enamel cannot be used for cars, as it is not intended for painting.
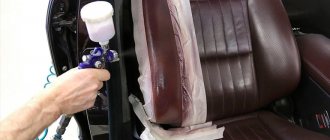
It is best to paint in dry weather; be sure to use personal protective equipment when carrying out work. To make it convenient to paint from bottom to top, it is better to use a spray gun; a spray can may not cope with this task.
The surface must be clean and dry before painting. the paint is applied alternately, in several layers. The quality of painting depends on the skills of the artist.
A well-painted surface looks no worse than a repainted one, and the cost of paint is much less. Therefore, in some cases it is more profitable to try painting the upholstery than reupholstering.
Painting the ceiling with a spray gun will allow you to achieve an impeccable result.
Car reupholstery cost
The total cost of updating the ceiling consists of:
Depending on the combination of options, reupholstering a ceiling can take 2-5 days and cost between $30 and $400.
In some cases, after weighing all the pros and cons, reupholstering the car interior should be postponed until better times or abandon this idea altogether. However, it should be noted that a neat, updated interior is an excellent reason to increase the value of the entire car when selling.
Reupholstering car interiors is an area for individual specialists to work on. This article was created to encourage you to make your first attempts at DIY repairs. If all goes well, you'll be left with a great skill that can come in handy during challenging times. By altering the car ceiling with your own hands, you will have a fun time, learn something new, while saving some money. If you have entrusted the matter to a professional, the information received will help you in choosing a professional, materials, save money and protect you from mistakes.
Source
Operating rules
Before starting reupholstery, it is important to remove the ceiling. Old tissue is completely removed
Dismantling is carried out through the passenger compartment door. For convenience, the seat is removed. Technicians often recommend removing the windshield.
Before removing the ceiling, the elements are dismantled - handles, canopies, lampshades, plugs, etc. The old coating, remnants of glued decor, and foam rubber are removed. Small contaminants are washed out with a soap solution using an abrasive sponge. The surface is carefully treated with a solvent, removing any remaining adhesive. It is recommended to sand the ceiling.
Apply glue along the central part of the ceiling with a short length of 10 cm. Press down the material and move to the sides, retreating 10 cm, to apply glue
Pay special attention to the curves of the ceiling, carefully attach the fabric. Poorly treated areas will sag and peel off over time.
It is recommended to glue the fabric with an assistant. For better adhesion, one person pulls the material, while the other smooths out the folds and presses it to the surface. Any unevenness in the ceiling must be ironed out more actively. Along the edges, the material is folded under the ceiling, glued, and the extra centimeters are cut off.
At the final stage, special holes are made for bolts for fastening the interior elements. Upon completion of the work, the ceiling is returned to its place.
Ceiling material
The first thing to do is to choose the material for reupholstering the car ceiling. Today, the choice is simply huge; the ceiling can be upholstered with flock, carpet, Alcantara, natural or artificial leather, or fabric can be used. They all have their own merits, and making a final decision can be difficult. On average, it takes at least 5 square meters to reupholster the ceiling and racks. m of material, be it leather or fabric.
Automotive leather
Perhaps the best material that you can choose for upholstering a car ceiling with your own hands is automotive leather. The list of its advantages is impressive:
- it is strong, durable and abrasion resistant;
- not afraid of open fire;
- it cannot be damaged by chemical compounds used to clean the interior;
- not afraid of water;
- does not deteriorate from temperature changes and high humidity.
Perhaps the only drawback this material has is its high price, so not everyone can afford it.
Ecological leather
As an alternative to natural leather, you can use artificial leather to reupholster the ceiling. This material also has very high performance characteristics, but is much cheaper. Here are its advantages:
- it is easy to care for, you just need to wipe it periodically with a slightly damp cloth; you can use ethyl or ammonia to remove greasy stains;
- does not crack at low temperatures;
- does not get wet;
- does not wear out;
- the surface is smooth and soft;
- rich color range;
- long service life;
- low cost.
Externally, eco-leather differs little from natural leather, so it can be used to give the car interior an equally impressive look. In terms of performance and quality characteristics, it ranks second among materials used for car interior finishing.
Alcantara
Alcantara, or faux suede, is a synthetic fabric made from ultra-fine fibers. Outwardly, it really resembles suede. This fabric is quite often used in auto tuning, for the manufacture of various inserts in the interior of the cabin and seats.
Alcantara has deservedly earned the title of “breathable” material - air passes through it unhindered. The advantages that Alcantara has allow us to classify it as one of the best options for do-it-yourself interior reupholstery:
- has a pleasant appearance and is pleasant to the touch;
- long service life without loss of quality (does not wear out, does not fade, does not stretch);
- not afraid of temperature changes and high humidity;
- wide choice of colors.
Flock
This material is not used for reupholstering car interiors with your own hands as often as the previous ones. However, it has a number of advantages that make it recommended for use:
- attractive appearance, variety of colors and textures;
- high wear resistance;
- noise-absorbing properties;
- ease of care.
Re-upholstering the ceiling with flock will require, in addition to glue, the use of a flocking agent and a degreasing agent, i.e. is associated with additional costs.
Carpet
Finally, you can use carpet to reupholster your car ceiling with your own hands. This is one of the most affordable synthetic materials. In addition to the price, it also has other advantages, namely: it is wear-resistant, does not fade, is not afraid of mold, and acts as an additional heat and sound insulation layer.
Reasons for getting a reupholstery
Some reasons when you need to replace your car's headliner:
- Dirty or worn areas (head marks, soot from cigarette smoke, stains of road dust or dirt).
- Mechanical damage to the casing (scratches, impact marks, tears or cuts).
- The desire to change the design, make a new color scheme. Owners seeking to improve the appearance of their car are trying to radically change its interior lining.
- Natural wear and tear from prolonged use. For example, with frequent washing, the fabric wears out from detergents.
In every car, the ceiling is subject to wear and tear.
[custom_ads_shortcode3]
How to cover a car ceiling with your own hands
You need to pull the ceiling with your own hands in a place where there is no draft and heat. At the preparatory stage you will need a screwdriver and a knife.
Handles, visors, plastic caps, clips and additional accessories are first unscrewed; the old casing must be removed. In this case, it is advisable to remember the order of the process so that there are no difficulties when installing the parts in their original places when the car ceiling is covered.
Car headliner
Important! The sheathing should be installed on a large, convenient surface. Tensioning the car interior ceiling should begin by applying a thin layer of glue
First of all, the canvas is applied to the front part of the ceiling, then the rest is pulled over. Excess material must be trimmed with scissors and, bending, glued to the back
Tensioning the car interior ceiling should begin by applying a thin layer of glue. First of all, the canvas is applied to the front part of the ceiling, then the rest is pulled over. Excess material must be trimmed with scissors and, bending, glued to the back.
After this, all holes are cut out.
Car salon
When the car ceiling is covered, it is allowed to dry for 3 hours. At this time, the process of tightening and gluing the fabric occurs. Afterwards, you need to carefully install the ceiling back into place, twisting all the necessary parts.
Materials for the design of ceilings and interiors, which are offered by the modern textile industry, will satisfy the needs of the most demanding car owner.
https://www.youtube.com/watch?v=mkWE2S3ll-M
Iceberg Motors Estela concept car › Logbook › 22 - homemade ceiling
The need to make a car ceiling “from scratch” arises not only in such exotic cases as mine.
It happens that the standard ceiling on some rare car has become unusable, and there is simply nowhere to get a new one.
Or the ceiling may not be provided at all (on cargo-passenger buses, for example).
So, there is no ceiling, what to do?
In general, there are two types of ceilings: rigid, molded in one piece, and slatted, sewn from dermantine.
A solid ceiling can theoretically be made from fiberglass, but the labor costs will be enormous and I, for example, don’t know whether such components are intended for installation in the cabin, i.e. Will such a ceiling then release any toxic substances?
The slatted ceiling definitely won’t highlight anything, but it’s not realistic to do it yourself. It has a very complex design, such ceilings, even those made at the factory, always mess with people’s minds: sometimes they sag, sometimes they don’t fit, etc.
So I decided to do it my way. I have no pininfarina here, it was decided to take the simplest route.
Even at the welding stage, I welded brackets to the roof. It was possible not to cook them, but simply glue them on the finished ceiling, but it was easier for me.
Next, we cut a piece of hardboard to the size of the flat part of the ceiling, punch holes in it that correspond to the holes in the brackets on the ceiling and glue dermantine to it.
Then we put our ceiling in place, fixing it with ordinary foreign-made pistons.
Further installation of the ceiling is similar to any slatted ceiling: cut off the excess, glue the edges.
By the way, on the Volga the ceiling fabric is tucked under the windshield and rear window seals. That is, to remove the ceiling you need to remove the glass. This is genius.
I did not repeat this nonsense. I decided to make small strips that would press the edge of the fabric to the body along the glass (In a good way, this is exactly how the rack ceiling should be attached from the factory on all cars).
For now I just glued it with glue, having previously drilled holes for the pistons for the strip.
Source
Reupholstering the interior at home - step-by-step photo report
1. First of all, you need to remove the ceiling from the interior. In some cars, you even have to remove the windshield to do this. This option is definitely not suitable for me, so I didn’t even think about it and tried to get it that way. I took it out through the back door, having first removed the passenger seat, and after a little torment I managed to get it out.
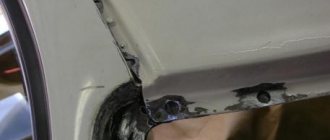
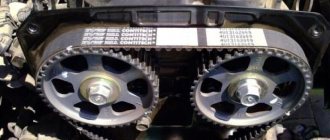
2. The frame of the ceiling of my car is a matrix onto which glass mat was sprayed, after which epoxy was applied. I tear off the remnants of velor and foam rubber and prepare the surface for gluing a new one.
3. Using a metal brush, a knife, a dishwashing knife and other sharp cutting tools, we remove the remnants of the old glue. Finally, the surface must be “sanded” with sandpaper of the smallest possible grit. This will make the surface smoother and improve the adhesion of the glue and material.
To glue the fabric, I used glue “88”; you can use another glue with similar characteristics.
4. The fabric for the ceiling is also up to you personally; there is a large selection of different options in stores. Personally, I chose black fabric with large grain and expressive structure. It looks beautiful and is pleasant to the touch, and besides, there will be no stains or other marks that remain on white velor.
5. In fact, the ceiling reupholstery can be safely called gluing, because the fabric is glued and not stretched using rivets and staples. It’s better to call an assistant for gluing, so the quality of the work will be higher and the work itself will end much faster and more fun.
6. Sticking. Apply a thin line of glue about 10 centimeters in the center of the ceiling frame, then apply the center of the fabric to it.
7. Next, slowly, gradually glue each side, starting from the center of the ceiling. Everything is about the same, 10-15 cm each. An assistant should pull the fabric from the glued center, while you should gradually smooth the fabric with your hands (wear mittens or cellophane gloves) from the center to the edges. If your fabric is light-colored, your hands may leave marks, so gloves are a must.
8. Carefully watch the edges, corners and bends, do not be lazy to properly tuck the fabric in the corners and press it in the recesses, you should not have sagging or un-glued places, the future service of your ceiling depends on this. The edges of the fabric must be folded and glued, and the excess can be carefully trimmed if necessary.
9. We make holes for fastenings, after which you can begin installing the finished laminated ceiling at the place of further service.
The result is visible in the photo. It seems to me that it turned out pretty well. When I first decided to reupholster the ceiling with my own hands, I didn’t even imagine that it would turn out so well. Over time, I even began to catch myself thinking that I was even glad that the old ceiling had become unusable, since I liked the new one much better.
Current:
- Self-upholstery of the steering wheel with leather or a leather steering wheel with your own hands
- What is carbon film? DIY carbon fiber pasting
Advantages
Nowadays, in stores you can buy absolutely everything you might need to reupholster the ceiling with your own hands, so there shouldn’t be any difficulties here. Moreover, doing this simple work yourself will allow you to save quite a significant amount, since such services are expensive. There is no need to wait in line at the service station, pay much more and worry about whether the result will be of high quality. How nice it will be to see the creation of your own hands every day!
[custom_ads_shortcode2]
How to glue the ceiling in a car without removing it
We continue the “Repair” section and the “Do it yourself” subsection with the article “Ceiling tiles: how to glue them optimally?
How to wash a crystal chandelier with pendants without removing it from the ceiling
We continue the “Repair” section and the “Do it yourself” subsection with the article “Ceiling tiles: how to glue them optimally?
Where we will tell you how easy it is to decorate the ceiling without any extra effort.
After all, the ceiling, especially in not very new houses, quite often is nothing more than a collection of cracks and falling plaster, which does not decorate the house in any way.
However, you need to choose - either optimally, or some other way. But let's start from the beginning, and let's deal with ceiling tiles as such, as well as with the usual, not optimal methods of gluing them.
How to clean the carpet in a car yourself
Because when there is a task to turn a room into candy without spending extra money and time, then ceiling tiles are what you need. And then we’ll make a knight’s move
What kind of glue should be used for re-upholstering the ceiling?
Sheathing material plays an important role. It is necessary to glue the ceiling lining with a high-quality compound. The glue must meet the requirements:
- Non-toxic. Toxic fumes accumulate in a confined space and can harm the body.
- Connect materials tightly.
- Easily and evenly distributed across materials.
- Don't leave streaks. It is not recommended to glue a black ceiling with white compounds.
The choice should be taken responsibly.
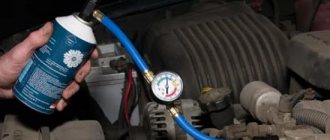
Based on polychloroprene
Craftsmen recommend using polychloroprene-based glue. The product is applied to two surfaces. The chemical composition contains a solvent, which upon contact gradually evaporates. The result is a strong bond. The adhesive base may contain resins or metal oxides that increase joint strength and resistance to temperature changes.
The ceiling upholstery in the car interior is characterized by activation of properties under the influence of high temperature on the area of application. Above 60 degrees, the chemical composition begins to melt and release vapors. After pressing the surfaces, the exposure to temperature is stopped. During the cooling process, the cladding material is firmly fixed to the ceiling. The advantage is the ability to operate the vehicle 30 minutes after completion of work.
Noteworthy ceiling adhesives from the following manufacturers:
- Glue-88 is universal, has a wide range of applications, and tolerates high air humidity. Disadvantages – strong chemical smell, characterized by low fixing properties.
- GTA Boterm is a Polish manufacturer. Requires exposure to high temperature to activate. During vehicle operation, high resistance to temperature changes and high humidity was observed.
- Mah is a German manufacturer. In many respects it is considered the best glue. Tolerates loads without losing fixation, heat-resistant, moisture-resistant.
The first two adhesives are most often used when covering the ceiling with your own hands. Mah is preferred by professionals who make money reupholstering interiors.
Polyurethane based
Craftsmen recommend gluing the ceiling to the car using polyurethane glue. The composition has a minimum of components that make the glue universal and the fixation strong. It is characterized by a long hardening time, which makes work easier. Easy to use for beginners. They are not inferior to other types of glue in strength.
Polyurethane compounds include:
- Moment is a popular brand. It has disadvantages - it takes a long time to dry, is toxic, liquid, and difficult to work with. Car owners choose to reupholster themselves, as it firmly fixes surfaces and is sold at affordable prices. This remedy is best used only as a last resort.
- Kaiflex K414 - insulates heat and has a high degree of fixation. Lots of positive feedback.
- Titanium is a universal product and is widely used in everyday life. Craftsmen do not recommend using it to reupholster the interior, since the composition does not allow for strong adhesion of surfaces and does not withstand heat.
- Demoskol is a brand that is resistant to high temperatures, moisture resistant, and does not react to temperature changes.
Each brand has pros and cons
It is recommended to pay attention to products that are sold in auto supply stores.
These formulations are produced in liquid form.
Other options
Convenient for finishing car interiors with adhesive in aerosol form. These are used in car dealerships by professionals. Have characteristics:
- Easy to use, do not stain surfaces, do not leak.
- Evenly distributed in a thin layer on the surface.
- They do not form lumps, the fabric is smoothed evenly.
- Dries in a short time.
- Do not penetrate fabric and leave no marks.
They are used for covering dashboard panels and other interior elements.
Adhesive-based cladding has appeared on the market. Self-adhesive fabric is convenient to use. For beginners, it is recommended to test the material. There is no need to use glue.
We recommend that you look at the criteria for choosing adhesive:
https://youtube.com/watch?v=0Ac5QD8vYlY
Glue selection
The choice of glue should be approached more than responsibly - it is important that it is fully compatible with the selected skin. It is also necessary to take into account a number of factors:
- upper temperature limit;
- smell;
- compound;
- Is the composition exposed to “direct fire” sunlight?
Some car enthusiasts don’t think at all about how exactly the skin will hold up and put it on a well-known composition - “Moment”. But this glue is unacceptable! Under prolonged exposure to the sun, the product can release toxic fumes.
The optimal choice is the universal composition 88. It is inexpensive, and is able to hold the material firmly, and for this reason this glue is widely used in household use. It is better to find a special composition that is designed for lining the interior ceiling. A good option is spray adhesive, which is easier to spread over the surface and dries quickly. It is recommended to read the instructions only before using it.
Removing the headliner
To properly repair a car's ceiling trim, it must be dismantled. To do this, you need to remove all the plastic trim parts that are adjacent to the ceiling trim and interfere with its removal. It is also necessary to remove the interior lighting lamps (in the front part), sun shields, plastic handles and all the clips that hold the trim. The lampshade, which is located in the middle part, should be removed last, as it will keep the casing from falling down while you unscrew and dismantle all other parts. Each car has its own characteristics of removing various elements, so if difficulty arises, it is better not to apply excessive force, but to find instructions on the Internet. Sometimes it is enough to know in which place you need to insert a flat-head screwdriver to make the part give way.
To remove the removed trim from the interior, it may be necessary to remove the front passenger seat.
So, when all the edges of the ceiling trim are free from fastenings, you need to unscrew the interior lamp and pull the trim out of the cabin to the workplace where it will be repaired. On cars with a fifth door this will be easier to do, but on sedans you will have to contrive to stick the headliner through the door. To remove the removed trim from the interior, you may need to bend (or twist) it a little. Here you need to be careful not to bend it too much.
It may be necessary to dismantle and remove the front passenger seat from the passenger compartment so that it does not interfere with the removal of the headliner from the passenger compartment.
GAZ 31 WagonTeam › Logbook › Hard ceiling!
In the near future, the ceiling of the car will be noisy and the car will be given to the guys to make a hard ceiling from fiberglass (with Alcantara covering). The question is that this ceiling costs me almost 5 thousand without Alcantara (the price is determined by a single copy), there is an opportunity to pay a couple of thousand extra and I will have a matrix at my disposal to make the ceilings there will be about 1800-2500 (without pasting, without delivery, from my margin 300-500r.). Are there people interested in purchasing hard ceilings for our station wagons?
I’ll say right away that you need at least 5 people willing (for me this is the payback of the matrix)
How to reupholster a car's headliner: instructions
Having chosen the appropriate material and adhesive base, you can proceed directly to work, but it is better to first test the selected consumable components. Take a small piece of fabric and try to fix it with the selected adhesive on a surface close to the one to which the ceiling trim will be glued. You can, for example, reupholster small car inserts, sill parts, handles or other small elements.
Next, proceed directly to the work of reupholstering the ceiling sheathing:
The first step is to remove the ceiling. There is a misconception that this can only be done with the windshield removed, but this is not true. It is enough to dismantle the front passenger seat, after which the ceiling can be reached; Next, you need to remove the current sheathing and clean the surface of old glue. This can be done using a metallic sponge or sandpaper. Once the old adhesive has been completely removed, run fine-grit sandpaper over the surface to remove any unevenness; After this, you can proceed directly to gluing the material. First, apply a thin bead of glue to the center of the surface and glue the central part of the fabric to it. Next, from the center, glue the other sides of the material, 10 centimeters on each side.
When you glue, it is important to have an assistant who can pull the material away from the glued center. At the same time, the person who works with glue must constantly ensure that “bubbles” do not form by smoothing the material; Having reached the edge of the roof, fold the material onto the back side of the surface and glue
Cut off the remaining excess pieces of fabric; After this, if necessary, make small cuts in the fabric to attach the surface to the car interior, and then install it.
It is recommended to carry out the work described above with gloves.
It is better to use cellophane or cotton gloves, but it is important that they are clean, otherwise marks will remain on the new fabric
Work procedure and valuable tips
The ceiling frame has already been cleared of the remnants of old fabric and foam rubber. You can sand it with 80-120 sandpaper for better adhesion. Before gluing, you need to remove any remaining dust and grease from your hands - we use degreasers, but it is not recommended to apply a lot - if the composition saturates the top layer of the frame, it can cause delamination of the material. Therefore, we are testing this method in a hidden area.
Pasting the frame with material
The ceiling has been laid on the table, fabric has been purchased, and a jar of glue has been opened. Let's get started!
Safety precautions require the use of safety glasses, a respirator and rubber gloves. It should be noted that glue that gets on the front surface of the ceiling will spoil the appearance and will not be cleaned off, so we apply the glue with rubber gloves and smooth the fabric without them.
Using a brush, apply a thin layer of glue to the frame area. We wait for a while according to the instructions, lay the fabric and press it in order, paying more attention to bends and indentations. A small roller, a plastic spatula, fingers and a cloth will help you press the fabric. It is important that the layer of glue is small and uniform; it is not advisable to rub the same place with your fingers - it can leave a stain.
You should not cover the entire frame with glue - there is a risk of not having time to press the fabric. Therefore, we apply in strips of 30–40 centimeters, this slowness will allow us to avoid mistakes.
The fabric at the edges can be cut along the edge with a sharp knife, or it can be folded onto the back side of the frame by 1-2 centimeters, cutting it with “teeth”. In this case, the fabric will hold up better. However, it is worth considering that installing the ceiling will be more difficult - it will become wider by the thickness of the fabric.
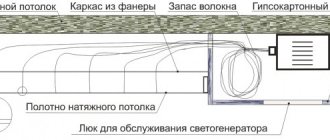
Video: plywood ceiling of a car in a workshop
What mistakes can a novice master make:
The ceiling is glued - we give it a soak, the time of which depends on the instructions for using the glue. After this, we proceed to installing the ceiling.
Ceiling installation
To mount the ceiling, you must first carefully place it inside the car. Practice shows that it is easier to remove the ceiling from a car than to install it in place. Therefore, you should use the services of an assistant and wear clean gloves. We put the ceiling in place and fasten it. An assistant must support the sagging parts of the ceiling, preventing the frame from breaking or bending. If this is not done, wrinkles or folds will appear that will spoil the appearance of the finish.
It is better to select the fasteners in advance to match the color of the trim so that it does not stand out. It is also better to replace clips that are broken during disassembly. When tightening the screws, you should be extremely careful; a broken screwdriver will scratch the plastic or fabric.
Evaluation of work and rewarding of the master
The critical stage is acceptance of the completed work. A new ceiling in a car always looks nice, but don’t relax - we must look at all the shortcomings, loose spots, and dirty spots. We correct them if possible.
If you did the work yourself, be sure to reward yourself with a good emotion; if the work was done by a professional, in addition to money, you can leave a good review of his work, tell your friends about the talented master.
Installation of a car ceiling needs to be done only by two people: then the work will be done carefully