Payment for goods and downloading of the book in electronic form (PDF format) is made on the website.
To do this, you need to find the book you are interested in and click on the “Buy” button. The price of the book is indicated on the button.
For convenience, the price on the website for residents of Russia, Belarus and Kazakhstan is presented in rubles.
For residents of Ukraine in hryvnias, and for all other countries - dollars.
After clicking on the “BUY” button, a payment window will open where you can select a payment system with which you can pay for the selected book using any bank card (Visa, MasterCard, MIR, etc.)
When you click on the “Pay by bank card” button, the Portmone payment system will open, which is the easiest way to make a payment.
In addition, the website offers four payment systems for payment:
- Yandex (payment from any bank cards, Yandex Money account, QIWI Wallet, terminals, etc.);
- Portmone (payment from any bank cards, Portmone account);
- PayPal (payment from any bank cards, PayPal account);
- WebMoney (payment from any bank cards, payment from WebMoney wallets).
Payment via Yandex Cashier
After selecting payment via Yandex, the Yandex Cashier payment system will launch, where you need to select a convenient payment method (bank card, QIWI, Yandex Money account, etc.)
After specifying payment details and confirming payment, payment for the goods will occur.
If you have a bank card in a currency other than the ruble, then the money will be debited from the card at the rate of the Central Bank of Russia at the time of the purchase.
This payment method is optimal for residents of Russia, Kazakhstan and Belarus.
Official website of the Yandex Kassa payment system https://kassa.yandex.ru
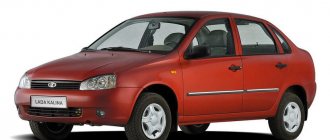
Priora car headlight: Bosch and Kirzhach - what is the difference
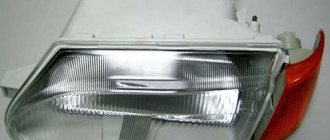
We report on two manufacturers (excluding shotgun copies of Chinese origin) that have a number of differences. Popularly known as Kirzhach, Bosch. There is a significant difference between them: Kirzhach is a corrugated inner surface of the well, a fused low-beam lamp reflector without a cutout, glass (plastic) is secured with fire-resistant sealant. The level indicator is located at the bottom of the reflector compartment. Two separate plugs for the rear of the optical instrument. The device from the manufacturer Bocsh (Bosch) has a smooth inner surface of the well, a low-beam reflector with a cutout, and a low-melting sealant is used to secure the glass (plastic). The marker light is located in the upper part of the compartment; a plug is used in the rear part of the lighting unit. There are minor differences in design, quality of parts, and the presence of a chrome-plated edge on the rotating element of the signal magnifier. There are many taillight design options available to the buyer.
Payment via Portmone
After selecting payment through Portmone, the payment system will launch, where you need to select the payment method: bank card or Portmone account.
The price in the Portmone payment system is converted into dollars at the exchange rate of the Central Bank of the country where you are located.
If you have a bank card in a currency other than the dollar, then the money will be debited from the card at the rate of the Central Bank of your country at the time of the purchase.
After specifying payment details and confirming payment, payment for the goods will occur.
Official website of the Portmone payment system https://www.portmone.com
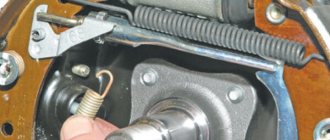
The main reasons for replacing and adjusting headlights
- cracks and breaks in the body;
- breakdown in the electrical connectors of the headlight;
- damage to reflectors;
- defects in fasteners;
- clouding of the optics (the headlight sweats or becomes dirty).
Replacing a headlight is one of the activities after which it is impossible to do without adjusting the lighting fixtures, since the light must be properly dispersed. Headlight leveling plays a decisive role in improving driving safety. Therefore, knowing how to replace front or rear lights is only half of the whole replacement process, where an important role is also played by how to adjust new headlights correctly.
With the right approach, the process of replacing headlights is not difficult. It is important to follow the exact sequence of actions when disassembling and assembling the flashlight.
Payment via PayPal
After selecting payment via PayPal, the PayPal payment system will launch, where you need to select the payment method: bank card or PayPal account.
If you already have a PayPal account, then you need to log into it and make a payment.
If you do not have a PayPal account and you want to pay using a bank card via PayPal, you need to click on the “Create an Account” button - shown with an arrow in the picture.
PayPal will then prompt you to select your country and provide your credit card information.
After specifying the information required to make the payment, you must click on the “Pay Now” button.
Official website of the PayPal payment system https://www.paypal.com
Useful tips
Car owners often encounter such a problem as Priora headlights fogging up. In this case, lighting technology does not provide high-quality illumination of the road. This problem must be eliminated using modern methods. The reason for this is that there are small channels in this part of the beacon assembly.
Find them and wipe them with a thin thread.
In this case, there is no need to change the headlights. It is not necessary to turn off the headlights completely even if a crack appears in the glass. In this case, it is necessary to carefully coat it with sealant.
Payment via WebMoney
After selecting payment via WebMoney, the payment system will launch, where you need to select the payment method: bank card or WebMoney wallet.
If you already have a WebMoney wallet, then you need to log into it and make a payment.
If you do not have a WebMoney wallet and you want to pay in another way, you need to select any of the methods that WebMoney offers and make the payment
After specifying payment details and confirming payment, payment for the goods will occur.
Official website of the WebMoney payment system https://www.webmoney.ru/
How to understand that the headlight is faulty
The headlights of the Lada Priora often fail, resulting in poor road illumination. Replacing Priora front headlights may be required if the following defects are present:
- the headlight mounting elements are broken;
- headlights constantly fog up;
- reflector malfunction;
- faulty electrical connectors.
We recommend: Correct installation of piston rings
The Lada Priora headlights have a non-separable design. Therefore, for tuning, replacement or repair, you will have to remove the headlight completely.
Downloading a book
After successfully completing the payment (by any method) and returning to the KrutilVertel store from the payment system website, you will be taken to the successful payment page:
On this page you need to indicate your e-mail, where access to download the book will be sent.
If you are already registered on our website, then simply follow the link to your personal account.
The book you purchased will be in your personal account, from where you can always download it.
Please note that after making the payment, you need to return back from the payment system website to the KrutilVertel website.
If for some reason you did not return back to the site and closed the payment system tab with a message about the successful completion of the payment, please let us know - we will send you a letter indicating access to download the book.
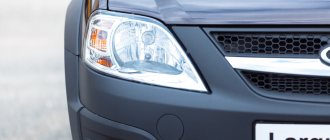
Why do Priora headlights sweat?
The most common problem with the optics of domestic cars is moisture getting inside. The headlight sweats due to loss of sealing of the unit. The back cover has lost its tight fit relative to the surface of the case. To fix the problem, it is better to remove it entirely. Open all existing plugs and dry thoroughly in a warm, dry room. Seal the gaps between the covers and the body (use different types of seals, silicones, sealants). Some car enthusiasts advise spraying a small amount of alcohol inside. After drying, reassemble and install on board your car.
Problems when paying with bank cards
Sometimes difficulties may arise when paying with Visa/MasterCard bank cards. The most common of them:
- There is a restriction on the card for paying for online purchases
- A plastic card is not intended for making payments online.
- The plastic card is not activated for making payments online.
- There are not enough funds on the plastic card.
In order to solve these problems, you need to call or write to the technical support of the bank where you are served. Bank specialists will help you resolve them and make payments.
That's basically it. The entire process of paying for a book in PDF format on car repair on our website takes 1-2 minutes.
If you still have any questions, you can ask them using the feedback form, or write us an email at [email protected]
What tools are needed to remove headlights on a Priora?
The process of removing the headlight unit on a VAZ-2170 is not complicated, and for all modifications of this car model it is identical. In order to correctly perform the dismantling procedure for the purpose of subsequent repair or replacement of the front lights, you will need to first prepare the following tool:
- The key is "10". For convenience, it is better to use a head with a ratchet.
- A Phillips screwdriver (preferably several screwdrivers with different tip diameters) for unscrewing self-tapping screws and mounting bolts.
- A slotted screwdriver with a long shaft (preferably at least 20 cm). It is needed to disconnect the bumper from the body part. You can use a screwdriver with a shorter shaft length, but in this case the likelihood of damaging the paintwork on the bumper or car body increases.
To carry out work, the car does not need to be placed on an inspection hole or jacked up. For safety reasons, it is recommended to only disconnect the negative terminal from the battery, after which you can begin performing the planned manipulations.
This is interesting! Many people are wondering how to remove the headlights on a Priora without removing the bumper. This is almost impossible to do, since it is under the bumper that the fastening elements of the device are located. However, it is not necessary to completely remove the bumper, especially if the headlight is removed only from one side.
Headlight breakdowns
There are several different typical failures of Priora headlights, such as:
- Fogging;
- Cracked protective glass;
- Damage or burnout of the reflector;
- Broken headlight mount;
- Polishing, etc.
Let's look at each of the reasons.
Fogging
Over time, almost every prior driver is faced with the problem of sweating headlights on a Priora. This is due to the fact that the tightness of the headlight is compromised due to aging of the sealant or loose sealing of the protective rubber covers on the rear side of the headlight.
This problem can be eliminated by dismantling the headlight and gluing the glass, as well as replacing the rubber covers.
Cracked protective glass
When operating a car, it is exposed to various types of influences, both mechanical and thermal, as a result of which damage to the headlights themselves is possible. For example, in the event of an accident, the protective glass of the headlight may break, or if the power of the lamps is incorrectly selected, the glass may melt.
This problem can be resolved by removing the headlight and replacing the glass with a new one. The cost of glass starts from 200 rubles per piece.
Burnout and damage to the reflector
Over time, with intensive use, the headlight reflector can lose its reflective properties or even burn out, which will worsen the luminous flux emitted by the headlight. Also, in the event of an accident, the reflector mounts may break.
The problem is eliminated by replacing the headlight or replacing the reflector, depending on the nature of the breakdown.
Broken headlight mount
This problem occurs in most cases due to traffic accidents. In this case, this problem can be eliminated by gluing the headlight mounts or replacing it with a new headlight.
Polishing
After a run of 100 thousand km. On a Priora, quite often the headlights begin to become cloudy and yellow, which leads to their unsightly appearance and ages the car. In this case, you can restore the headlights using regular polishing.
As you can see, for all reasons for headlight breakdowns, they must be dismantled.
Below are step-by-step instructions for removing a headlight from a Lada Priora car.
Why film
The main reason is failure, failure to comply with the direct functions of the device. There can be many reasons for replacing a headlight. Destruction of the outer glass, loss of tightness, fogging of the lenses from the inside, wear of the reflector itself, breakage of fasteners. Replacement, repair of old contacts, installation of new types of light bulbs. To fix them, you will have to unscrew the entire module from the housing, which will make repairs and upgrades of optical devices more convenient. The block is not completely dismountable - to separate the glass from the body, it is better to heat the joint with a hair dryer until the sealant softens. Then, if possible, remove the melted sealant using improvised means. We try to separate the glass with a screwdriver, clean all the parts that have separated from the old glue, use a knife, and sandpaper. The glass is repositioned onto the sealant.
Changing the lamps in the headlight of Lada Priora
Replacing any of the lamps in the headlight unit of a Lada Priora is not at all difficult. Our step-by-step illustrated instructions will help you cope with this task. There are differences in the procedure for replacing lamps in the headlights of cars manufactured before and after 2013, which we will show.
Attention! High and low beam lamps are halogen. You should not touch their glass flasks, as fingerprints will darken when the flask is heated. You can remove dirt from the flask with a clean rag soaked in alcohol.
Replacing headlight bulbs on a car manufactured after 2013
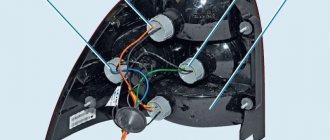
Headlight unit for Lada Priora produced after 2013: 1 - electrical connector; 2 — headlight beam control in the vertical plane; 3 — protective cover of lamps; 4 — direction indicator lamp socket; 5 - regulator of the headlight beam in the horizontal plane.
Headlight unit for Lada Priora produced after 2013: 1 - electrical connector; 2 — headlight beam control in the vertical plane; 3 — protective cover of lamps; 4 — direction indicator lamp socket; 5 - regulator of the headlight beam in the horizontal plane.
Headlight unit for Lada Priora produced after 2013: 1 - electrical connector; 2 — headlight beam control in the vertical plane; 3 — protective cover of lamps; 4 — direction indicator lamp socket; 5 - regulator of the headlight beam in the horizontal plane.
We demonstrate the work on the left headlight unit (for clarity, the work is shown on a removed headlight unit), and change the lamps in the right headlight unit in the same way.
It is more convenient to perform operations to replace lamps in the left headlight unit with the battery removed. To replace the turn signal lamp...
...turn the lamp socket counterclockwise.
...turn the lamp socket counterclockwise.
...turn the lamp socket counterclockwise.
...and remove the lamp socket from the headlight housing.
...and remove the lamp socket from the headlight housing.
...and remove the lamp socket from the headlight housing.
Pressing the lamp, turn it all the way counterclockwise and remove the lamp from the socket.
Pressing the lamp, turn it all the way counterclockwise and remove the lamp from the socket.
Pressing the lamp, turn it all the way counterclockwise and remove the lamp from the socket.
The cartridge is sealed in the headlight housing with a gasket. If the gasket is torn or has lost elasticity, replace it with a new one.
Install the new PY21W lamp in the reverse order. In this case, two protrusions, located asymmetrically relative to the axis of the lamp, must fit into the corresponding grooves of the socket.
To replace the remaining lamps...
...turn the spring lock of the cover.
...turn the spring lock of the cover.
...turn the spring lock of the cover.
Remove the headlight cover by removing its hooks from the hinges on the headlight body.
Remove the headlight cover by removing its hooks from the hinges on the headlight body.
Remove the headlight cover by removing its hooks from the hinges on the headlight body.
Turn the high beam lamp with daytime running light function counterclockwise.
Turn the high beam lamp with daytime running light function counterclockwise.
Turn the high beam lamp with daytime running light function counterclockwise.
Step by step guide
Removing a headlight on a Priora is a simple process, but it has some features that you should familiarize yourself with in advance.
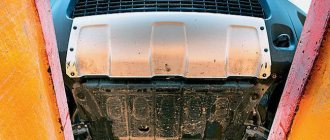
- To completely detach the headlight from the existing mounts, you first need to remove the bumper. In order not to unscrew extra nuts and bolts, you can try to partially remove the bumper. After removing the bumper, you need to unscrew the fastening bolt from above, and then from below.
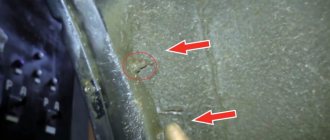
- The third headlight mount is located on the side. To remove the headlight from this mount, you need a Phillips screwdriver.
- After working with a screwdriver, all that remains is to unfasten the block and the harness from the headlight itself. To make removal easier, you can pry the lock with a thin screwdriver.
- After all the above steps, you can easily pull out the headlight; nothing will hold it in place.