In this article I will tell you how to paint camouflage correctly. Let's consider what paints and colors should be used, how to use stencils to create patterns or spots with a clear or blurred border. We will analyze in detail the process of painting camouflage, as well as the correct use of spray cans for painting.
The content of the article:
- What is camouflage? Real camouflage and camouflage stylization
- Stencils for painting camouflage
- What paint should I use for camouflage?
- What colors to use for camouflage?
- Preparing the surface for painting
- Painting in camouflage
- How to paint with a spray can?
What is camouflage? Real camouflage and camouflage stylization
Camouflage (from the French camouflage) is a camouflage concept that is part of modern military tactics. Simply put, camouflage helps objects painted in it be less noticeable. For the first time, camouflage in a simple form was used in the mid-18th century. Camouflage for weapons and equipment was used by the French in 1915, then began to be used by other armies in the First World War. Camouflage then became popular in fashion and art. Many designers past and present use camouflage in their clothing lines.
Effectiveness depends on the contrast of colors. A strong contrast with the base color, which breaks up the contours of the vehicle, is better suited for forests where the play of light and shadow is important. While low contrast is better suited for open areas with little shadow structure.
The so-called digital camouflage provides a camouflage effect due to the pixel print.
It helps to reduce the visibility of an object at different distances. When painting camouflage, visual destruction of the shape is achieved by adding uneven lines to objects with an even shape. The object is painted using 2 or 3 contrasting colors. The colors of the actual camouflage must match the colors prevailing in the area where the object is used. Objects appear darker in the upper layers and lighter in the lower layers as the upper part receives and reflects more light. This principle is especially important when painting vehicles. There are no special rules for the size of camouflage patches. They depend on the size of the object being painted and the size and type of objects in the environment. If you look at an object from a distance, small spots merge into one common color and do not visually destroy the shape of an object painted in camouflage. Thus, small spots in true camouflage are ineffective.
Real camouflage can be easily distinguished from imitation. True military camouflage is designed to camouflage the shape of a vehicle so that it blends in with the surrounding area. If you look at military equipment, you can see how camouflage spots of different colors seem to envelop and pass over the lines of the body, making it shapeless from afar. Therefore, it is important for what purpose you paint camouflage. If this is just an imitation and creation of a military style, then it does not matter how the spots will be located and what color they will be.
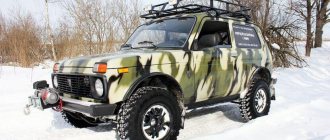
Types of camouflage car colors
There are many varieties of painting a car in camouflage. Camouflage, as you know, is a method of camouflage characteristic of military equipment. So, depending on various external factors, various changes were made to it to give the car greater stealth.
It is customary to distinguish at least 5 types of camouflage. Each of them is strikingly different from each other, both in the method of application and in appearance.
Camouflage happens:
- urban;
- winter;
- sandy;
- pixel;
- universal.
The first type of camouflage, as the name suggests, is used to covertly move vehicles in urban environments.
It has a number of distinctive features. Thus, it is characterized by more angular straight lines. The choice of colors is largely limited to two or three shades. Among them: blue, white, gray.
The winter variety of camouflage is characterized by gray and blue blurry spots against a white background. In some cases, the use of several chopped corners and edges is quite justified.
From an aesthetic point of view, white camouflage is not very popular. It is most often preferred by those who are not averse to hunting somewhere in the taiga forests in winter.
In addition, there is the so-called sand camouflage. Its second, no less popular, name is “desert storm”. In this type of color, pale yellow, brown and yellow shades can be traced. The method of its application has a number of nuances.
So, when applying layers, they resort to various spraying methods. Final finishing with several coats of varnish completes the operation. It is worth noting that such camouflage, in the case of its civilian use, hardly lives up to its name. It is used only for aesthetic purposes.
Anyone who likes to play games often chooses a pixel color for their car, it looks unusual and attracts the attention of others.
But the traditional type of camouflage, made in the “Khaki” style, looks much more colorful. Dusty earthy tones give the car the features of a real military vehicle, skillfully hidden from enemies.
Stencils for painting camouflage
- Make your own stencils or choose ready-made stencils. On the Internet there are quite a few free, ready-made drawings, after printing which you can cut out stencils from them.
- Make several stencils. While one dries, after spraying the paint, you can use the other one in another place.
To make a stencil with your own hands, you can draw a design of any shape and cut it out.
- You can also use leaves, twigs and grass to create their shape on the surface to be painted. We will consider this option in detail in this article below.
- There is a classic camouflage, and you can also use almost any shape to create stencils, including skulls, logos, emoticons, and more. You can also use different types of grids that will create a cellular background.
- Transparent film, which is used in airbrushing, is also suitable. This is a film with a slightly sticky layer that sticks, but peels off easily without leaving marks. You can use a sharp blade to cut any shape out of it, or a template onto the edges of which you can spray paint.
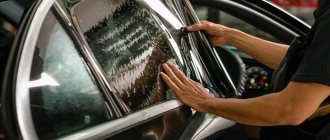
We wrap the car with vinyl film
Modern technologies offer another method, camouflage film for a car - pasting with vinyl film with a camouflage pattern. The advantage of this method is that you can choose any pattern for your car - you will not need to draw it.
Your possibilities are limited only by the range of films, and it can be quite wide.
Vinyl wrapping has the following advantages:
- a spectacular pattern on your car;
- additional protection against scratches and chips;
- neutralization of the negative influence of atmospheric factors;
- durability, provided that washing is carried out according to the rules;
- the ability to get rid of coverage at any time;
- the opportunity to process the car with your own hands.
Before starting work, you need to thoroughly wash the machine and remove all dust and dirt. Afterwards, dry it thoroughly. Then degrease the surface of the body and get to work:
- The first step is fitting. Together with the backing, we apply the vinyl to the surface and place marks with construction tape. After all this, we carry out cutting, taking into account that more material will be needed for irregularities and bends.
- Place the material on a flat surface and remove the backing. We make sure that no debris or dust gets on the adhesive surface, and also avoid the formation of creases and folds.
- Using a spray, spray the adhesive surface with a soap solution and place it on the gluing site. We can move and adjust the position of the film.
- Smooth it with pressure using a rubber squeegee, expelling air and water from under the vinyl. At the same time, we heat the film with a hair dryer, making sure that overheating does not occur.
- At the bends, heat the film and stretch it. Here the material will have to be stretched more strongly, so we pay special attention to the heating.
- Use a felt squeegee to expel the remaining air and warm it up again with a hairdryer. Cut off the remaining vinyl with a knife. We treat the edges and joints with sealant.
- Let the car dry for 12 hours. After this, the work is considered completed. Refrain from washing your car for another week. This is necessary for complete shrinkage and fixation of the film.
Pasting film on cars
What paint should I use for camouflage?
There are paints from some companies (for example, Krylon Camouflage) in cans that are specifically designed for painting surfaces in camouflage. These are matte paints that adhere well to various types of surfaces, including plastic.
You can also use regular paint (when painting a car, automotive paint) by selecting the desired colors. It is better to paint with matte paint to create a real camouflage. If you want to make a camouflage stylization, you can cover the surface painted with camouflage with varnish.
What tools will you need to create camouflage on your car with your own hands?
Painting a car always requires preliminary preparation of the surface, provision of the necessary tools and the purchase of quality materials. The set of tools changes based on the specific type of drawing.
When painting a vehicle in camouflage color, you will need minimal skills in working with paint. To make the task easier, it’s good to have special stencils. You can do without them, but then the complexity of the work increases.
During the work process the contractor will need:
- plenty of paper, you can use old notes, newspapers, magazines or unnecessary books;
- a considerable amount of masking tape, preferably with different strip widths. Basically, the process takes 5 narrow and 5 wide tapes;
- more flannel rags, they must be dry and clean;
- 1 glass of gasoline;
- 0.5 l of solvent;
- a special varnish that will be used to open the surface to create a matte and glossy look;
- one halogen lamp with a power of 1 kW;
- an ordinary metal spatula, it is better to work with a relatively narrow working surface - 7 cm;
- auto enamel is present on the shelves of most stores in the form of a high-pressure spray can. To cover the entire body you will need about 4 pieces of all colors.
Masking tape for car painting
If you plan to use a stencil, you must first decide on the shape and size of the spots. After the thinking stage, you need to stick a vinyl film on the surface or use cardboard, just be sure to use a dense base. These materials will be used to create the drawing. Vinyl film is simply glued to a one- or two-color body, and a shape is cut out of cardboard and the recess is treated with a spray can.
When creating a drawing with a stencil, you will need the same tools and materials as in the first case, as well as:
- a construction knife, which will be used to trim the edges of the film;
- a special spray for coating the film during gluing;
- squeegees made of rubber and felt, they will be needed to eliminate air under the film and level it;
- powerful heating device;
- sealant, it is required to fix the edges of the film.
Squeegee for gluing film
What colors to use for camouflage?
Krylon offers 6 basic colors for painting camouflage:
- black,
- khaki,
- brown,
- olive,
- sand,
- light green.
In addition to the standard colors used when painting camouflage, you can use other brighter colors (pink, orange, blue, white and others). In this case, the meaning of camouflage is lost, and style comes to the fore.
Usually you need to choose three different colors, but you can have more if you wish.
Advantages of each type of camouflage
If you still have questions or doubts regarding the choice of pattern or color, it is worth exploring the advantages of camouflage varieties:
- winter. Optimally suited for winter, the car receives a coloring of white snow and dark spots that appear when the cover lies for a long time. In other seasons, the car will not have camouflage, but in the city it looks interesting and unusual. The advantage is the minimal visibility of surface contamination; after hardening, it is difficult to distinguish between the design itself and the dirt;
- digital. It is the most modern option, which is in demand among young people. It is not intended for camouflage, it performs only a decorative function;
- deserted. Mainly used for people living in arid regions with clay and sandy soils. It camouflages especially effectively in the autumn, but in other seasons it does not help hide the position;
- forest. It is deservedly considered the most universal, as it is well suited for almost any season, and also does not impair the appearance in urban environments. Among all the options considered, this is the most striking camouflage.
Winter camouflage for car
Preparing the surface for painting
You need to prepare the surface in the same way as for any painting. If there is any damage, dents or rust, they need to be repaired. The primer or old paintwork must be prepared by sanding so that the surface is matte and the new paint adheres well. You can read more about preparing the surface for painting in the article “preparing a car for painting.”
After preparing the surface of a car (or other object) for painting, you need to seal the body parts that will not be painted with masking tape and covering material.
How to paint with a spray can?
To ensure that the spray paint goes on smoothly, follow these steps:
- Shake the can for 1-2 minutes until all ingredients are thoroughly mixed.
- Test your spray technique on a piece of scrap material. Remember at what speed it is better to paint so that the coating turns out smooth and without smudges.
- Spray at a distance of 15–30 cm from the surface.
- Apply paint in several thin layers instead of one thick one.
- Start and stop spraying outside the open portion of the stencil, finishing at the end of each pass.
- Make even movements from side to side.
- Overlap each previous pass with the next by about 1/3.
Painting in camouflage
- Paint in a well-ventilated area. Use a respirator and gloves. Do not spray paint near open flames.
- Start with a base color that covers the entire piece, and then work your way down to individual pieces.
- The main color that paints the entire surface is usually the lightest. This way, other colors will be more visible on this base. In most cases, two thin coats are enough to cover the surface with the base color.
- Next, you need to let the paint dry. Then the stencil is glued and another paint is applied.
- Start with a light color and work your way to a darker color. Decide in what order you will paint the subsequent colors. Paint each color in stages, one color at a time. Thus, if the base color is yellow-brown, then the spots will be dark brown, then black. Yellowish-brown spots never appear on top of brown or black. Brown never goes over black. It is important to follow the order (sequence) of applying and overlapping colors to get a good result.
- Secure the stencil with masking tape to ensure it stays in place after spraying while the spray paint dries. They don't have to be glued straight. They can be located in different ways. This will create a personalized look to your work.
- Place the second spot or pattern in a free area where there is no spot or pattern yet. You can slightly overlap the previous stencil print with a new print.
- You can make 4-5 designs in one color (or more, depending on the size of the part), then move on to another color.
- You can make sure that spots or patterns of different colors do not have clear boundaries between each other. One color will transition smoothly into another. To do this, you need to hold the template or stencil with your hand and not lean it completely against the surface. This will make the edges look a little blurry, and there won't be a clear contrast between the edges and the rest of the surface.
- When painting with a spray gun, adjust the torch to a narrower spray pattern. Paint the edges of the stencil first, then fill in the middle.
- Different distances will give different degrees of smoothness to the edges. A farther distance provides a blurred edge, like a shadow, while a closer distance provides a sharper color change.
- Unpainting and minor unevenness are not critical. The main thing is that there are no leaks.
- When using natural objects (leaves, branches, grass), you need to lean them against the surface and spray paint on top. It is better to collect a variety of specimens. It will be more convenient to use flatter leaves so that they fit well on the surface. You can spray paint only on their edges. This way the outline of leaves and branches will be imprinted on the surface. After the paint has dried, the process must be repeated, using paints of other colors and leaning other leaves, positioning them differently. You can also overlap already painted leaves with subsequent ones.
- There is no need to do too many designs or spots so that the base color does not disappear and remains the main one.
- If you want to paint a car or other object in a camouflage pattern consisting of several large segments of different colors, as in the photo below, then each, before painting each segment, you need to cover the adjacent surface with masking tape and covering material. After one color has dried, you need to move on to masking the already painted surface and painting a new one.
Camouflage consisting of two colors.
- If the surface was not painted with special matte paints, then the resulting “camouflage” can be varnished. The varnish serves as protection for the base paint. Special matte paints do not require varnish.
- You can use the painted car the next day.
Draw without a stencil
To paint camouflage without a stencil, you will need the following equipment:
- a large number of unnecessary newspapers;
- masking tape - narrow and wide, five rolls of each;
- dry, clean flannel rags;
- 0.2 liters of gasoline;
- half a liter of solvent;
- auto varnish with matte or glossy effect;
- kilowatt halogen lamp;
- construction spatula 70 mm wide;
- auto enamel in spray cans - 4 cans for each color of the design.
To begin, we select a drawing. We sift through a mountain of relevant sites on the Internet, leaf through catalogs in stores with military literature, consult with friends, turn our heads 360 degrees on the streets, looking for something suitable on other cars. Having decided on the design, we choose each color for it - you can use any range you want. Or you leave everything as in the found original.
Necessary materials for painting a car
Next, we prepare the room. To work, you will need a well-lit garage with effective ventilation. No dirt or dust is allowed - it will settle on the freshly painted surface, nullifying all your efforts.
Now let's prepare the car. This process consists of the following steps:
- Thoroughly wash the car, remove all dust and any types of contaminants.
- Drying the car dry.
- Removing headlights to protect them from paint splashes. If you don't want to mess with it, you can cover them with newspapers and masking tape. You should also seal the windows and door frames. Be sure to cover all rubber gaskets - paint should not get there.
- Degreasing the car body. It is wiped with a lint-free cloth soaked in gasoline. If swelling of the old paint coating occurs, it needs to be heated with a lamp and the unnecessary peeled off with a spatula.
Preparing the car for painting
Now the car is ready for further work - we can start painting. The step-by-step process is as follows:
- Using narrow masking tape, we form spots on the car. We try to make them large, capture several elements of the body, and make sure that the tape lays down without creases. Each crease is a thin colored scratch in the drawing.
- We cover all the spots with newspapers, forming smooth lines. We fix them with wide tape.
- Using an aerosol can, apply the darkest color.
- We wait until the paint dries, after which we apply the second layer.
- After the paint has dried, remove the tape and newspapers, and then begin to form spots for the second color. They should overlap the first paint. We also cover the narrow tape with newspapers and secure with wide tape.
- Apply the second color, wait for the paint to dry and apply the second layer.
- Thus, we apply spots of different colors. The darkest color always comes first. The last one is the lightest one. We carefully ensure that each layer is applied only after the previous one has dried.
- We remove the newspapers and remove paint particles with a solvent from those places where it got accidentally.
- We varnish the body. Mix the autovarnish with the fixative and solvent according to the instructions. We cover the body with it in several layers. Apply each next layer only after the previous one has dried.
Painting a car in camouflage with your own hands
When the varnish is dry, the work can be considered complete. The disadvantage of this method is that some types of drawing cannot be made using it. This to some extent limits our possibilities.
How the paint works
Painting a car with Raptor creates the most durable and high-quality polyurethane coating. Paint is used to form a protective layer on body parts and wheels. The material protects the body from ultraviolet radiation, water and mechanical damage, i.e. the product eliminates the car’s vulnerabilities.
The manufacturer initially developed the substance for coloring wooden and cement products to protect against water. Now the purpose of Raptor is reduced to treating car bodies; it is important to coat SUVs and cars that are used in difficult conditions with the composition.
Do-it-yourself Raptor painting does not create a visible change in the body, but it becomes much stronger and prevents damage. Other positive properties include:
- tolerates sunlight well;
- resistant to many chemicals;
- can be cleaned from dust and dirt;
- creates reliable protection against rust.
After applying the product, the body acquires a lumpy and matte effect, reminiscent of citrus peels. Such a phenomenon cannot be classified as positive or negative - it is a matter of taste. It is worth considering that this effect cannot be removed.
Raptor coating does not have to be carried out in a specially prepared room
How to properly glue camouflage film
Car wrapping with film involves some nuances of the technology. Therefore, it is recommended to contact trusted salons where specialists can apply vinyl film without any problems.
The algorithm for applying vinyl coating is as follows:
- Thoroughly clean the car body, first wash and remove external contaminants, and then remove surface contaminants with isopropyl alcohol.
- The installation itself must be carried out in a clean, warm and dry room, this guarantees a long service life.
- When gluing, you will need the following tools: soft and hard squeegees, a breadboard knife, a hair dryer, a centimeter, and a soft cloth.
- Then measure and cut the film, preferably with a margin.
- Place the material face down on the table and carefully place the backing at a 30° angle.
- Lightly stretch and apply the material to the body part.
- Using a squeegee, roll the film from the center to the edges, expelling air from there.
During gluing, the film must be heated to activate the adhesive layer in the most inaccessible places.
The original pattern of the film will not only help protect the car’s paintwork, but also give the car its individuality in any conditions.
Camouflage using film
When performing this process, it is convenient to use vinyl film. Of course, the overall price of this method will not change much, but the process will go faster. This is done as follows:
- Preliminary cutting of the film into large fragments. You need to make holes in them that will become stains in the future.
- Preliminary preparation of vinyl sheeting. Using a unique technology, it must be glued to the car and to those areas that remain uncovered.
- This procedure is repeated with brown and green. The stencil film, which is designed to create brown spots, is glued so that it covers all the previously created black spots. As for the green color, the stains are applied overlapping the black and brown ones.
- After the body is completely painted, all layers of film are removed without exception. If you don't like clear contours, refine the finish with an airbrush.
- The final stage of work is applying a layer of varnish.