It seems that nothing can reduce the popularity of car window tinting. For example, even bans on tinting front and side windows did not affect the demand for this type of tuning. At the same time, one can note a slight reduction in orders for front window tinting due to an increase in fines, but people with the opportunity continue to drive with dark windows, preferring to pay fines. At the same time, people with low incomes comply with the standards for permitted glass tinting.
On a note
Any film, regardless of its light transmittance, is glued using the same technology. Please note that for a comfortable stay in the cabin it is not necessary to tint the windows with the darkest film. Even permitted tinting eliminates the “aquarium” effect, and in cloudy weather it looks quite dark.
Preparing everything you need
Before applying the tint, you need to prepare a clean and dry place to work, as well as a standard set of tools:
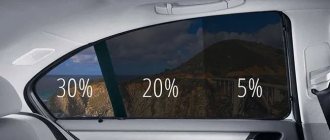
- Tinting film that meets the requirements of GOST 5727-88. Light transmittance for the windshield should be at least 75%, for the front side windows - 70%, for the rear side and rear - any. Typically, 4 side windows require 1 roll of film filter.
- Liquid soap (without dyes) to fix the film. It is better to use special installation compounds that do not leave streaks, or a 10-20 percent solution of any transparent shampoo.
- Plastic sticker for smoothing tint. Usually it comes complete with a film filter, but if you don’t have one, you can use any elastic plastic, rubber spatula or construction rubber eraser. Also in the store you can find special distillers for removing bubbles (chisler - for hard-to-reach places, slammer - for squeezing the edges, bloomax - for forcing out liquid).
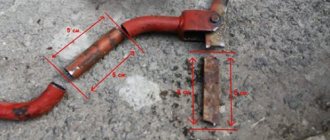
- Scrapers for cleaning glass surfaces. 12 cm products of various shapes are best suited.
- Spray bottle (manual) for applying soap solution.
- Blade or utility knife. The latter is made of mild steel, so it is convenient to cut the film without fear of the glass being scratched.
- Soft rags, clean rags or napkins made of lint-free material.
- Industrial dryer.
If you are tinting your car yourself for the first time, it would be a good idea to purchase special camouflage markers and tapes. With their help you can correct minor errors.
You should also ensure that you have easy access to clean, cold tap water. The room should be free of insects and dust.
If everything is prepared, you can start cutting the film filter.
Question of legality
On thematic sites such as drive2, the topic of whether tinting can be installed on the windshield and whether there are any restrictions is actively discussed.
There are rules according to which the operation of a vehicle is prohibited if there are any objects on the windshield that can limit visibility. This is logical, since any objects blocking your view of the road create a safety hazard.
But tinting does not fall under these criteria, since it is transparent. Therefore, you can install it on your VAZ 2107, VAZ 2114, Hyundai ix35 or any other car. But there is one amendment. Installation is only permitted if certain conditions are met. Namely:
- on the windshield, the tinting density should be no more than 70%;
- all other glasses can be covered with any films, with the exception of mirror-type tinting;
- the rear window can be tinted with materials of any density, but subject to the presence of a pair of side rear-view mirrors;
- Mirror tinting is prohibited on any glass.
If you follow these rules when choosing protection elements for your VAZ 2110 or other car, there should be no problems with the law.
We cut out the tint
Before gluing the tint onto the car, it is better to study the video instructions for cutting the tint material (at the end of the article), since all further work depends on this stage.
Cutting can be done directly on the glass of the machine, but for beginners it is better to prepare a special glass stand for this. Next, we cut out and apply the film in one of two ways.
1 way
- Cut out a rectangle.
- Wet the glass. This is necessary so that the tinting material does not “run around”.
- Place a film filter on the glass outside of the pattern machine. In the future, the film will be glued from the inside, but for cutting it is more convenient to work from the outside.
- Cut the blank along the curves of the glass with an allowance of 5-10 mm; for convenience, lower the window by at least 5 cm.
- Perform molding.
- Transfer the pattern to the stand and cut off the sharp corners a little.
- Prepare strips of film (10 cm each) and stick them on the front side to make “tails” for which you will remove the protective layer.
Method 2
- Use ready-made patterns that can be selected for a specific car model in any store.
- Cut out the workpiece, leaving a small allowance of 5-10 mm.
- Apply the installation compound to the inside of the glass and attach the pattern.
- Perform fitting and shaping.
- Glue the tails.
Types of tint films for car windows
To facilitate the selection process, it is necessary to understand the basic properties of the material. Let's divide them into certain groups:
- A budget option with a short service life is dyed films. They rarely last more than two years and fade badly in the sun.
- Metallized ones are more durable and protect from ultraviolet radiation. They consist of three layers: protective, tinting and metal spraying between them. May interfere with radio or mobile communications waves. Reflects the sun's rays well.
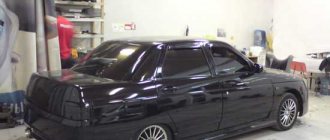
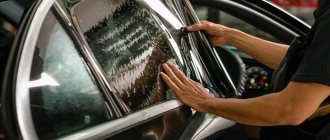
The car looks stylish and attracts admiring glances
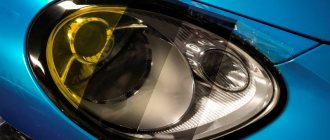
Not so long ago, mirror films that were popular are now prohibited by law
Atermalka is an expensive pleasure, and it’s unlikely that you’ll be able to roll it yourself if you don’t have professional skills.
Removable tinting is unlikely to perform its functions well enough to pay fines for its presence every time
Glue the film on the side windows
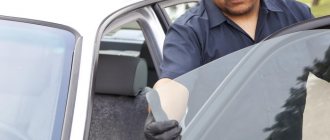
It is best to start the process with the side windows, since their area is smaller and you can “get your hands on it.”
Take the blade and lightly scrape from top to bottom to clean the inside surface of the glass. Try to get rid of all inclusions, dust particles, glue residues and other particles. After this, you can treat the glass with clean water from a spray bottle.
If the glass has become perfectly clean, in your opinion, then it is time to apply the installation solution to it. Spray it over the entire surface.
Important! You cannot use ordinary water at this stage, otherwise the film will immediately stick tightly and you will not have the opportunity to “turn.”
Now it's time to remove the protective coating from the film and apply soap solution to its sticky side. After this, it is very important to ensure that no dust gets on the adhesive surface.
- Carefully take the film by the “tails” and place it on the glass.
- Using gentle movements, gently smooth it out using a pressing tool to get rid of all bubbles.
- Warm up the glass with a hairdryer (start from the top edge). This way the film will press well and will not peel off when you lift the glass to process the bottom part.
- Smooth the edge again and remove any bubbles.
For 10-15 minutes the film will still move easily, so you can adjust it. After this time, it will take its place and you will need to expel the soap solution. To do this, it is most convenient to use a rubber spatula, moving from the center to the edge of the glass.
When we made the pattern blanks, we left small allowances, which we now need to get rid of. To do this, take a stationery knife and make cuts at an angle of 30 degrees relative to the glass, so that the light filter does not reach the edge by 1-2 mm.
After this, you can dry the film again with a hairdryer. You can start using the car after the filter has completely dried - after about 2 days.
For the windshield, tinting is done in the same way, but with the rear window things are a little more complicated.
Peculiarities
In addition to the excellent appearance and beautiful photos, such tints have a number of advantages and features.
First of all, it protects from scorching sun rays. Even without climate control, the cabin will be cooler than in a car without blackout. Tinting does not allow some light to pass through, which reduces the degree of heating. Also, darkening allows you to preserve the appearance of interior elements longer. This is especially important for budget cars that have a fade-resistant finish.
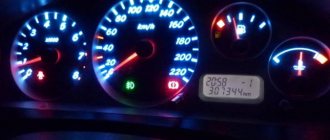
Traffic safety is also ensured. During the day, through a tint of such density, everything is visible just fine. It will be a little more difficult at night. From the car, visibility through the tinted glass is slightly reduced, although not so much as to cause problems. But, if the driver does not have very good eyesight, it is better not to use 35 percent tint.
Can be used for driver's side windows. From 2022, the standard stating that the permissible light transmittance of side windows is 70% has been removed. Now this parameter is not regulated, but it is still not worth covering windows with plywood. This will already be an intervention in the design of the car.
In practice, the inspector may require you to stop driving if, in his opinion, the film on the driver's side door is too dark. This happens infrequently, formally it is an abuse of power.
When choosing a film, you need to take into account that glass also blocks the sun's rays. As a result, using a 35% tint, after gluing it onto the glass, you will obtain a transparency for rays of 28–32%. Take this factor into account, especially at night and in poor visibility conditions.
Tinting the rear window
If you have already processed the front and side elements of the car, then you have already approximately mastered the concept of tinting yourself. The rear window is more difficult, so be sure to practice.
The main difficulty is that this window is very curved, which is why it is rarely possible to tint this area with one piece of film. In order not to suffer with insets, after applying the tint (with a protective layer) to the soap solution, you need to pull it very tightly onto the glass. Don’t be afraid to tear the tint; it has good ductility and durability.
Also, before applying the tint to the rear window, it is recommended to call an assistant. He should heat the film with a hairdryer while you stretch it. Don't be afraid to use a lot of force when "driving" the bubbles out of the rear window. This will also help the material adhere better. In all other respects, the same operations are performed as described above.
If you can’t tint the rear window in one piece, use several pieces of light filters. It is better to cut them horizontally rather than vertically, so you can hide the traces of the resulting “designer”. If you can make a cut along the line of the heating element, this will be the best option.
Nuances of choice: how to cover the rear and front windows of a car
Having decided on your attitude to GOST and its standards, you can proceed directly to choosing an option for yourself. Please note that the glass itself does not transmit 100% of the light (usually 90-95%). Before installation, it is advisable to take a small piece of material and check the total light penetration rate with the device.
Let's start with the "state employees". If finances are very limited, then you can even look towards Chinese film. Just don’t glue it yourself - you’ll suffer, use the services of pasters (you can then demand that the defects be eliminated from them). If you are consciously prepared for a short service life and gradual loss of color, this may be your option.
Stories from our readers
“Fucking basin. "
Hi all! My name is Mikhail, now I’ll tell you a story about how I managed to exchange my two-wheeler for a 2010 Camry. It all started with the fact that I began to be wildly irritated by the breakdowns of the two-wheeler, it seemed like nothing serious was broken, but damn it, there were so many little things that really started to irritate me. This is where the idea arose that it was time to change the car to a foreign car. The choice fell on the melting Camry of the tenth years.
Yes, I had matured morally, but financially I just couldn’t handle it. I’ll say right away that I am against loans and taking a car, especially not a new one, on credit is unreasonable. My salary is 24k a month, so collecting 600-700 thousand is almost impossible for me. I started looking for different ways to make money on the Internet. You can’t imagine how many scams there are, what I haven’t tried: sports betting, network marketing, and even the volcano casino, where I successfully lost about 10 thousand ((The only direction in which it seemed to me that I could make money was currency trading on the stock exchange, they call it Forex. But when I started delving into it, I realized that it was very difficult for me. I continued to dig further and came across binary options. The essence is the same as in Forex, but it’s much easier to understand. I started reading forums, studying trading strategies. I tried it on a demo account, then opened a real account. To be honest, I didn’t manage to start earning money right away, until I understood all the mechanics of options, I lost about 3,000 rubles, but as it turned out, it was a precious experience. Now I earn 5-7 thousand rubles a day. I managed to get the car buy after half a year, but in my opinion this is a good result, and it’s not about the car, my life has changed, I naturally quit my job, I have more free time for myself and my family. You’ll laugh, but I work directly on the phone)) If If you want to change your life like me, then here’s what I advise you to do right now: 1. Register on the site 2. Practice on a Demo account (it’s free). 3. As soon as you get something on the Demo account, top up your REAL ACCOUNT and go to REAL MONEY! I also advise you to download the application to your phone, it’s much more convenient to work from your phone. Download here.
Tinting
Peel off the protective film from the tint . During peeling, immediately spray with soapy water. It is better to find an assistant here. One will hold the transparent layer, and the second will carefully pull off and spray the dark one. also spray the glass from inside the car . The soap solution neutralizes the adhesive on the film for several tens of minutes .
Apply tint film to the glass and make adjustments. As long as the glue on the tint is neutralized, you can move it freely on the glass. Using a scraper, we begin to remove the solution from under the film, moving from the center to the edges. Wipe off the squeezed-out solution with napkins. The excess film at the edges is cut off (Some cut the film at an angle of 30 degrees to the glass) so that it does not reach the edge of the glass by about 1-2 mm. Otherwise, over time, the film will begin to peel up. If the glass is tinted on a car, then the part of the film adjacent to the lower seal is not inserted under the seal by 2-5mm. This will eliminate scuffing when lowering the glass.
If you have a hairdryer, dry the glass around the perimeter . If there is no hairdryer, then wait 3-4 hours in a warm place and carefully install the glass back on the car.
The film finally dries in about a day or two, depending on the weather. During this time, do not lower the windows.
Conclusion of side window tinting
How long did it take to do the tinting yourself and remove the glass:
- Removing glass 1-2 hours.
- Tinting
4-5h.
Installation of glass in cars at 2h.
If you have chosen a high-quality film and are not too lazy to remove the glass from the car. If you carried out the work of tinting windows at home, and not on the street, then in 95% of cases the result of tinting should pleasantly surprise you. After tinting the side windows with your own hands, you will already be able to evaluate your strength and think about tinting the rear window. And if you don’t dare to take such a brave step, you can always tint the rear window at a car service center. The price of tinting just the rear window will be much less than tinting the entire car.
Rear window tinting
Unlike side windows, tinting the rear or windshield is more labor-intensive and requires some experience.
The whole difficulty of tinting the rear window is that it has a curved shape. Of course, the film stretches within certain limits (you can’t do without an industrial hair dryer) and in most cases this is enough for tinting. But it is unlikely that it will be possible to tint a strongly curved surface in one piece. You will have to resort to several patterns.
Let's consider the case when it is tinted without cuts , but only by stretching the film. Before gluing the film, you need to shape it into a curved surface (or called molding ). Without removing the protective layer, stretch the film onto the glass moistened with soapy water from the outside. Smooth the film with a scraper from the center to the edges, expelling air bubbles and excess solution, while heating the film in curved areas with a hairdryer. This will stretch the film and take the shape of the rear window. Afterwards, the tinting technique is the same as with the side windows . Remove the protective film, moisten it with soapy water and apply it to the glass from the inside. While the glue is neutralized, smooth the film from the center to the edges, expelling bubbles and solution. Trim the edges and dry them with a hairdryer around the perimeter.
Rear window tinting with cuts : If the bend of the rear window does not allow the film to be applied evenly, then tinting should be done in 2-3 stripes. The stripes should be glued one at a time, overlapping each other, starting from the top. At the same time, moisten it abundantly with water. To make the film joint less noticeable, you need to make a cut along the rear window heating line. After tinting, do not turn on the rear window heating for two days.
Armor film
What are the advantages of armored film over conventional tinting film:
- Armored film protects glass from mechanical damage (impacts of pebbles jumping out from under the wheel), scratches, and chips.
- Armored film has a sound and heat insulating effect.
- Armored film resists forced entry into the car
- Armored film blocks up to 99% of ultraviolet radiation
For example , the effectiveness of armor film when gluing on transparent glass 6 mm thick:
- Reduced heat gain: 46%
- Reduced heat loss: 0%
- Reducing the glare of bright light: 58%
- UV attenuation: 99%
The armor film is glued in the same way as a regular tinting film. There is no difference in technology. The only difference is in the film itself. The armor film is simply thicker (up to 300 microns) and tougher. But this makes it easier to work with her. By the way, the film can be glued to another film, thereby creating different combinations. For example, tinting + armor, or double armor, or double tinting, etc.
Art tinting
Tinting according to GOST
Conclusion
Tinting video
A lot of text sometimes gets boring. Sometimes it's easier to just watch a video on tinting car windows. Tinting according to GOST
Car tinting technique
Car tinting
Rear window tinting
Molding
DIY car window tinting
I believe that he can tint a car with his own hands..
| Wash the glass on both sides . To remove sand particles during washing, use a scraper/spatula. If you perform tinting in a car, then before washing the windows, remove the seals and, if desired, cover or remove the upholstery to prevent the ingress of water or soap solution. | |
| Cut out the tint film from the outside of the car. That is, we initially spray glass from the street with soapy water. Then we apply the tint film to the glass. The soap solution will make it stick. Then we cut out the film along the contour of the glass with a stationery knife. |
Selection of film material
High-quality tinting will be obtained by those who do not skimp on purchasing high-quality film. There are a lot of Chinese-made materials on the market that are of very low quality. This film has low light transmittance, which can seriously increase the risk of accidents.
When dismantling cheap material, some of the tinting paint often remains on the glass, since it was initially mixed with glue. Professional films produced on special equipment do not have such a flaw, since only one layer is painted.
When choosing materials, car owners and workshop workers should give preference to proven brands known for their quality. Their products also have a protective layer that protects the film from scratches, cuts and other troubles.
How to find out the light transmittance?
There are special regulations and rules for this, which many motorists are not aware of. Therefore, they find themselves in situations where fines are issued on illegal grounds. It’s worth mentioning right away that light transmittance readings can only be taken using the Blik device. It must have the appropriate serial number as well as a certificate.
It turns out that the device must be connected to the vehicle’s on-board network during testing. In this case, the driver may refuse to connect if he believes that the cigarette lighter is in poor condition.
Measurements cannot be carried out in wet weather, since the main condition is a dry and clean surface. Readings should be taken from three points for greater accuracy. As for the device, it must have an appropriate seal and tag, which indicate that it was timely verified for accuracy.
If the inspection conditions are not met, do not try to argue with the inspector. He can do the work, but you will indicate all violations in the protocol in writing. It is important to remember that a motorist can appeal the decision of traffic police officers within 10 days in court.