How to independently replace the diode bridge on a VAZ 2107
A diode bridge or rectifier is one of the parts of the VAZ 2107, the replacement of which requires almost complete disassembly of the generator.
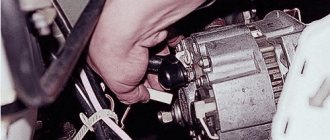
As a rule, the failure of a generator, or more precisely one of its elements, is primarily determined by a loss of battery charging. Before you begin the repair, you need to remove the generator from the VAZ 2107 engine. To do this, you will need two keys - 17 and 19. Use the 17 key to unscrew the fastening nut on the adjusting plate. This will relieve the tension on the drive belt, which can be freely removed.
After this, using a 19mm wrench, you need to unscrew the nut securing the generator to the VAZ 2107 engine housing. Having removed the bolt from the holes, remove the generator from the engine and begin repairing it.
Here you will additionally need:
- Hammer;
- Heads for 8 and 10;
- Head extension
First, let's disassemble the body. To do this, unscrew the nuts located on its back cover.
To separate both halves, you need to lightly tap one of the halves with a hammer in a vertical position at the point of their connection.
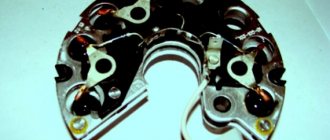
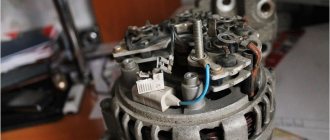
As a result, we get two parts - one with a rotor, the other with a stator. The diode bridge that we need to change is in the second half, so that’s what we’ll do.
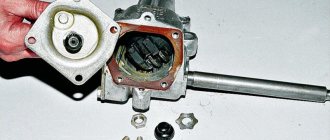
A careful inspection of the part and the diode bridge inside will determine that the coils are held on by three nuts that clamp the wire terminals. An extension cord will come in handy here, since without it it is almost impossible to unscrew the nuts deep in the housing that secure the diode bridge.
After freeing the coil wires, the stator is easily removed from the metal case and we get free access to the rectifier. By pressing on the bolts (3 pcs.), we finally release the diode bridge and remove it from the housing.
Next, it is replaced with a new one, and you can begin assembly. It is done in the reverse order and usually does not cause any difficulties.
However, before starting assembly, it is recommended to check the remaining parts of the VAZ 2107 generator to ensure they are working properly. First of all, this concerns the bearing. Check them for lubrication and absence of play, and if the slightest suspicion arises, immediate replacement is recommended. This simple procedure will help you avoid repeated disassembly and reassembly in the future.
After replacing the diode bridge and assembling the generator, we install it in its original place. Do not fully tighten the nut securing it to the body. First, put the belt on the pulley and tighten it in accordance with the recommendations of the VAZ 2107 manufacturer. Usually, a pry bar or a large screwdriver is used for this. We fix the generator in the desired position by tightening the nut on the adjusting plate and check the degree of belt tension. The deflection of the belt, when pressed in the gap between the pulleys, should be 10-17 mm.
This procedure should not be neglected, since if the belt is loose, charging may be lost, and if it is too tight, it can cause premature failure of the bearings.
More details about replacement
Of course, this procedure can easily be performed by a technician at the nearest service station. However, many car enthusiasts prefer to repair or change parts on their car themselves. If you have knowledge and experience in this matter, then follow this algorithm:
- At the very beginning, you should turn off the power to the VAZ-2110.
- Next you need to disconnect the battery.
- Then pull out the pink wire that turns on the generator. To do this, unscrew the nut from the positive bolt.
- Then you need to loosen the upper and lower nuts and remove the tension bolt. After all this, you need to remove the belt.
- Next, the generator is turned 90 degrees, removing the lower mounting bolt.
- Then all connections need to be cleaned, including the rectifier housing.
- The upper part must be cleaned especially carefully.
- After this, the mechanism is replaced, and all connections are assembled in the reverse order.
- Finally, you need to check how the generator works.
When purchasing a new mechanism, you need to know that it must come with a warranty card. That is why you should buy only in specialized stores. If you find it difficult to replace the diode bridge yourself, then it is better to entrust this work to specialists from the technical service. They will easily perform the replacement, without removing the generator and with a guarantee.
Checking the diode bridge on the VAZ 2107 generator
In order for the car to be started, it contains a battery. In order to restore the battery capacity after starting the engine and ensure the normal operation of all electrical appliances, devices such as generators are used in the design of cars. Initially, they generate alternating current, and to convert it to direct current, a rectifier unit or diode bridge is used. We will look at how to check the diode bridge on a VAZ 2107 generator with your own hands below in the article.
How to determine the health of the generator
Information about the operating status of the main unit responsible for generating electrical energy in the car is displayed on the dashboard for the convenience of motorists. The icon on the instrument panel that resembles a battery should go out after starting the vehicle’s power unit. This means that the power to the main electrical components has been switched from the battery to the generator. If the indicator does not go out, this indicates a breakdown in the electrical circuit. Problems may also be indicated by insufficient battery charge due to the lack of normal current rating.
The main function of the diode bridge on the VAZ 2107
The diode bridge of the VAZ 2107 generator is its integral and integral part, which serves to transform alternating current into direct current. The current is converted due to the fact that the vehicle's on-board network has a constant voltage of 12 V. An alternating current is supplied to the bridge, which is converted, and then goes to the battery in rectified form. And the voltage is removed from the battery and used to power all electrical appliances on the car.
This is interesting! Many people are accustomed to thinking that the on-board network of a car has a voltage of 12V. However, 12V is the battery voltage at rest, and in order to charge it, a charge of 13.5 to 14.5 volts must be generated. To ensure normal voltage supplied from the battery, the diode bridge is assembled from 2D219B diodes.
Signs and reasons why a diode bridge breaks
Malfunctions of the rectifier unit on the seven and other cars lead to complete immobilization of the car. If at least one diode located inside the generator fails, the supply of charging current to the battery will stop. The car will not drive for a long time without charging the battery (maximum 1.5-2 hours, provided that the car has a new and working battery and all electricity consumers are turned off) . Like all parts on a car, diodes tend to deteriorate (burn out), so if a decrease in the voltage of the on-board network is detected, which usually drops below 12V, and then begins to gradually fall, then the device should be checked and repaired.
The causes of breakdowns of the generator rectifier unit are as follows:
- Moisture getting into the generator. This can be either condensation or water that comes from outside during the operation of the car in rainy weather.
- Development of diode life. Usually in this case one diode fails, while all the others remain intact. The average service life of diodes is about 10 years, but it also depends on the mileage of the car.
- Burnout due to motorist negligence. Most often, diodes burn out when the car is not properly lit. If you light it incorrectly, then in this case you may have to change not only the diode bridge, but also the entire generator.
The first symptoms of rectifier unit breakdowns are identified by the following signs:
- The voltage of the on-board network decreases while the engine is running. This can be detected by the presence of an electronic voltmeter, which can be installed independently by the owner of the VAZ 2107. If the car has an on-board computer, it will also notify the driver of the malfunction. If there is no voltmeter or on-board computer, then a decrease in voltage can be diagnosed by such a sign as a decrease in the brightness of the lighting fixtures.
- The car loses power, and the longer you continue to drive with a faulty generator, the more the battery will discharge.
To establish the exact cause of such symptoms on the VAZ 2107, it is necessary to test first the charging current of the generator, and then the diodes. Sometimes the cause of a decrease in voltage may be oxidation of the terminals and contacts on the generator, and after cleaning them, the problem will be solved.
Checking the diode bridge
You can find out why the on-board network voltage is decreasing by checking the generator to ensure its serviceability. Burnout of the generator winding occurs rarely, but such a breakdown cannot be ruled out. The diode bridge can be checked by the vehicle owner independently without the need to visit a service station. If the check shows that the element is working, it means that the generator itself needs repair, but looking ahead, it must be said that sometimes it is easier to buy a new element than to change the winding on the old one.
Functions and connection diagram of the generator
How to remove and replace windshield wiper blades
The generator, like all other car parts related to movement, plays a certain multifunctional role. And does the following functions:
- charging the battery;
- replenishment of the starter at the moment the engine starts.
Proper and early care of the generator will preserve the functionality of not only the generator itself, but also the battery. This is due to the fact that with a constantly reduced charging voltage, the power source is discharged, as a result of which this will lead to degradation of the storage plates and their further premature destruction. And this, in turn, will lead to an urgent replacement of the battery, the cost of which is sometimes more expensive than the generator.
To deal with possible generator malfunctions, you need to have a good understanding of its structure and connection diagram.
Connection diagram for the VAZ 2114 generator
Modern automobile generators have 3 windings, wound in such a way that an alternating voltage source is obtained. The stator windings act as magnets, and they are powered by a constant voltage from the battery. A magnetic field is formed in which a rotor rotates with a leaf-type magnetic core and a winding from which voltage is removed through slip rings and graphite brushes, with a rating of more than 18 V and a current of 60 to 120 A, depending on its power and number of revolutions. But since the battery voltage should not exceed 14.7 V, a rectifier unit and a stabilizer are used. They are installed on the generator itself, because based on the diagram, it is clear that the wires go directly to the battery and to the starter relay.
Generator in analysis
The VAZ 2114 generator includes a rectifier unit, which is located inside it. And to replace it in the event of a malfunction, you will have to disassemble the generator itself. There is also a brush mechanism along with a voltage regulator, more precisely, it should be called a stabilizer. Because the rectified voltage from the generator is pulsating, which is of course smoothed out by capacitance. But to keep it at the required level, an additional electronic device is required. And since it is impossible to regulate the voltage on it manually, this means it is a stabilizer. Generators with an output current of 80.9 A are installed on domestic cars.
THE GENERATOR VOLTAGE REGULATOR RELAY
. GENERATOR BRUSHES
.
Replacing generator brushes
.
VAZ
2110.
Found the answer to the question “how to change brushes on a VAZ 2114 generator?” is not always limited to just replacing them, because as the brushes wear out, all other parts that require any action wear out. Therefore, due to the complex design of the generator and the large number of functional parts in it, many malfunctions arise, and usually when one of them is eliminated, the overall problem does not disappear. But it is only dulled and will arise again in the near future. So, let's consider the possible main faults that occur with generators, determined by the control devices of the machine itself or a multimeter:
- reduced battery charge voltage (less than 14.3 V);
- increased charge voltage (more than 14.7 V);
- fast, almost instantaneous battery discharge when the ignition is turned on;
- lack of battery charge.
Depending on the type of fault, appropriate approaches must be used. But also with all the above malfunctions, the brushes may be faulty. They can also have a number of reasons for failure:
- wear of the brushes themselves;
- breakage or discoloration due to poor quality material or workmanship;
- rectifier failure.
On VAZ 2114 cars, replacing alternator brushes does not seem difficult, but time-consuming. Because there are a lot of actions that need to be taken.
We independently change the diode bridge on a VAZ 2107
A modern car is literally crammed with complex electronics, which are not so easy to repair. It is for this reason that car owners, at the slightest problem with on-board electrical devices, do not fool themselves, but immediately contact the nearest car service center. However, there are exceptions to this rule. For example, if the diode bridge on a VAZ 2107 is burnt out, then you can completely refrain from visiting a car service center and replace the burnt-out device yourself. Let's figure out how this is done.
Diagnostics
Replacing the rear axle gearbox seal on a VAZ 2107
If the voltage generator does not charge the battery, this is a real problem. It is for this reason that disassembly, replacement or repair of faults, as well as assembly are carried out.
How to properly diagnose:
- Check the voltage generator on the VAZ 2107 by diagnosing the dashboard. If there are problems with the operation of the brushes, bridge or other components, the battery discharge lamp will light up on the device.
- If the VAZ 2107 unit does not charge the battery or an overcharge is detected in the system that needs to be checked, this also indicates a malfunction.
- Another sign of trouble to check is if the headlights are dim because the unit is not giving the battery the required charge. During engine operation, extraneous sounds may appear.
- If there are problems in the operation of the brushes, diode bridge or other components, the system may be overcharged, it is necessary to check. In this case, the brightness of the optics may increase as the speed increases.
The main function of the diode bridge on the VAZ 2107
The diode bridge is an integral part of the VAZ 2107 generator. The car's generator produces alternating current. And the main task of the diode bridge is to convert the alternating current of the generator into direct current of the on-board network with subsequent charging of the battery. That is why car enthusiasts usually call a diode bridge a rectifier block. The peculiarity of this unit is that it allows direct current to pass only towards the battery. The current passed through the diode bridge is subsequently used to ensure the operation of the heater, low and high beam headlights, side lights, audio system, etc.
The charging voltage in a VAZ 2107 car ranges from 13.5 to 14.5 volts. To provide the required voltage, 2D219B diodes are most often used in the diode bridges of this car.
And there is a diode bridge inside the VAZ 2107 generator. And in order to get to the bridge, the car owner will first have to remove and disassemble the generator. There are no other options.
VESKO-TRANS.RU
AutoNews / Reviews / Tests
- Home
- Auto garage
- How to Check the Diode Bridge of the VAZ 2107 Generator
VAZ 2107 oil seals for rear axle gearbox, crankshaft, axle shaft ooo mp credo
How to check the diode bridge of a VAZ generator with your own hands
Welcome friends to the car repair site. Generator. Without exaggeration, the main unit of the machine. Its task is to supply all the electronic parts of the car while driving (cassette recorder, headlamp, navigator, etc.).
How to test a diode bridge generator
When the generator fails, the entire load shifts to the battery (Batteries). As a result, after a few hours the car is completely immobilized.
Most car owners immediately switch to 100, where they spend a lot of money on repairs. Take your time. in 90% of cases the problem lies on the surface.
If you know how to check the diode bridge generator, you can quickly identify the fault, fix it and save money.
Tasks, causes and malfunctions of the VAZ diode bridge
The generator circuit is very common. it consists of a rotor with an excitation winding and a stator made of thin iron plates.
The three-phase stator winding is placed in special slots connected to the zero point and a group of 4 (sometimes 6) diodes.
The task of the diode bridge is to convert the type of current from alternating current to alternating current. The peculiarity of its operation is that the current is transmitted exclusively in one direction. from the generator to the on-board network.
One of the most common failures is the burning of one or more diodes. The reasons may vary. water (dirt, oil or dust) entering the generator, polarity errors in case of "lighting" another machine, etc.
As we have already mentioned, checking the diode bridge of a VAZ even according to the criteria of a garage. All you need is a 12V lamp and a multimeter.
It is better to remove the protective cover of the mechanism and disconnect the regulator terminals before starting work.
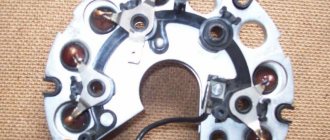
Please note that the positive diodes are reddish and the negative ones. dark
Here are two ways to check the diode bridge:
Login to my site
How to properly check a generator diode bridge
They briefly described and illustrated with an example how it is true to check a diode
.
- Using a multimeter (tester).
- With a light bulb.
Proceed as follows:
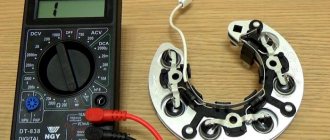
Remove the diode bridge from the generator (otherwise the test will fail). Each diode must be tested separately.
Set the tweeter mode to the multimeter. In this case, a characteristic squeak is emitted when the sensors are closed. If this function is not available, the tester switch can be set to the “1 kOhm” position.
Touch the sensors to the edges of one diode and take a measurement by changing the sensors. A diode can be considered serviceable if it is infinite on one side and infinite on the other. about 500-700 Ohm.
If the resistance in both dimensions is too small or, conversely, infinite, then the diode (group of diodes) is faulty.
check the diode bridge bulb?
If you don't have a multimeter handy, you can use a simpler method. use a standard 12-volt light bulb for diagnostics. The work is performed in the following sequence:
Connect the diode bridge housing to the negative battery. Make sure the plate fits snugly against the surface of the generator. Also be sure to read the article on how to properly charge a car battery.
First step. check all diodes. To do this, connect the light bulb with one end to the “minus” of the generator, and the other “plus” to terminals “30” from the battery. In the case of a light bulb, we can safely say that one or more diodes are damaged (there is a short circuit in the circuit).
Second step. checking the negative group of diodes. Connect the “negative” end of the light bulb to the generator housing, and the positive end to the bridge mounting bolt. Is the light on or off? There are problems in the negative group of diodes.
Third step. checking the positive group of diodes. Here you need to put a "plus" on the terminal "30" and a "minus" to finish the mounting bolt. If there is a light bulb, then the problem is in the group of positive diodes.
Fourth step. check for additional diodes. To do this, leave the end of the minus in the same place and move the plus to terminal 61. Is the light on? Then there is a malfunction.
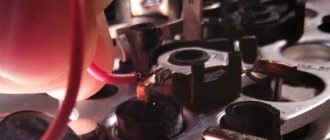
The solution to the problem is quite simple. Just solder the perforated diode and solder a new one in its place (obviously, it works). You can, of course, buy the entire diode bridge, but it will take a lot more money out of your wallet.
Diagnosis and replacement of a damaged diode takes no more than one to two hours. Therefore, before you go to the service station and spend a large amount of money, work in the garage a little. Good luck on the roads and without breakdowns.
Signs and causes of diode bridge failure
As mentioned above, a generator equipped with a diode bridge is the most important component of a car. If the alternator fails for some reason, the battery will stop charging. And this is the only sign of a faulty diode bridge. Without additional recharge, the battery will work for a few hours at most, after which the car will be completely immobilized. A diode bridge fails when one or more diodes burn out in it. Here are the reasons why this happens:
- moisture has entered the generator. Most often, this is condensation that forms on the internal surfaces of the generator in the autumn-spring period, when relatively warm weather alternates with frosts;
General useful information
The VAZ 2107 generator converts the mechanical energy of rotation of the engine crankshaft into electrical energy. It is also intended to power the entire on-board network, and is also necessary to recharge the battery. To convert alternating current to direct current, the unit is equipped with a rectifier unit, which consists of six diodes. A special relay-regulator serves to maintain the voltage at a given level. This device is located outside the generator.
When the ignition is turned on, the voltage, passing through the vehicle's warning lamp, reaches the regulator, and from it is transmitted to the excitation winding. It is powered by three diodes. They are located in the rectifier block. If the warning lamp continues to light during startup, this means that the battery is not sufficiently charged. You need to check the voltage status of the on-board network. If it is below normal, it means:
- a short circuit has occurred in the network;
- there are faults in the battery;
- a malfunction of the automobile relay-regulator has occurred;
- malfunction of the VAZ 2107 generator.
In this situation, you should check the belt tension, as well as the condition of its bearing, and see if the relay regulator is working. It would be a good idea to look again at the expiration date and actual condition of the battery. If everything is normal, but the voltage is not enough, you need to contact a specialist auto electrician. The generator of the presented car model does not require special care. You just need to make sure that water and dirt do not get on it. You should also check the condition of the belt (it needs to be tensioned, approximately as in the video), and it is also important that the bearing is constantly lubricated and does not create noise during operation.
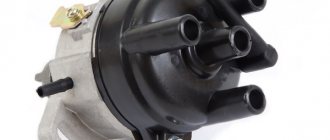
A car generator is designed to generate electrical energy and power the vehicle's on-board circuit. It is driven by transmitting torque to its pulley from the engine crankshaft pulley. The generator structure consists of a stator, a rotor, a cover and a rectifier that converts alternating current into direct current.
VAZ 2107 is equipped with alternating current generators models 372.3701 or 9412.3701.
How to ring a diode bridge on a VAZ 2107
To find out whether the diode bridge is working, the car owner does not need to have any special skills. All he needs is basic knowledge of electrical engineering and a couple of instruments:
- household multimeter;
- 12 volt incandescent light bulb.
We check the diode bridge with a regular light bulb
Before starting the test, make sure that the battery is charged. It is desirable that the battery charge level is maximum.
- The base of the diode bridge (i.e., the thin plate into which the diodes are screwed) is connected to the negative terminal of the battery. The plate itself must be firmly secured to the generator housing.
- Two wires are connected to the light bulb. Then one of them should be connected to the positive terminal of the battery, and the second wire should first be connected to the output provided for the additional diode, and then with the same wire you should touch the positive output bolt of the diode and the connection point of the stator winding.
Checking the diode bridge for open circuit
This verification method is similar to the one described above, with the exception of two nuances.
- The negative terminal of the light bulb is connected to the positive terminal of the battery.
- The second wire of the light bulb is connected to the negative terminal of the battery. Then the same points are checked as indicated above, but here the control light should be on. If the light does not light (or it lights up, but very dimly), then there is a broken bridge.
Checking the diode bridge with a household multimeter
Before checking the diode bridge using this method, it will need to be completely removed from the generator. There are no other options. With this testing method, each diode will have to be ringed individually.
- The multimeter switches to ringing. In this mode, when the electrodes touch, the multimeter begins to beep (and if the multimeter’s design does not provide sound signals, then in the ringing mode, a resistance of 1 kOhm should be displayed on its display).
It should be noted here that when burnt diodes are discovered, today no one fools themselves by replacing them. A bridge with a burnt-out diode is simply thrown away. Why? It's simple: firstly, the burnt-out diode will have to be desoldered very carefully. And for this you need to have the skill of working with a soldering iron, which not everyone has. And secondly, diodes of the 2D219B brand must be installed in the bridge, and only them. Yes, there are many other diodes on the market with similar electrical characteristics. There is only one problem with them: they burn, and very quickly. And finding the above-mentioned 2D219B on sale is becoming more and more difficult every year. I don’t know why this happens, but this is a fact that I personally encountered.
Checking generator operation
Replacing the alternator belt on a VAZ 2107 injector
You can check the functionality of the generator in several ways using certain methods, for example: you can check the output current of the generator, the voltage drop on the wire that connects the current output of the generator to the battery, or check the regulated voltage.
To check, you will need a multimeter, a car battery and a lamp with soldered wires, wires for connecting between the generator and the battery, and you can also take a drill with a suitable head, since you may have to twist the rotor by the nut on the pulley.
Basic check with a light bulb and multimeter
Connection diagram: output terminal (B+) and rotor (D+). The lamp must be connected between the main output of the generator B+ and contact D+. After this, we take the power wires and connect the “minus” to the negative terminal of the battery and to the generator ground, the “plus”, respectively, to the plus of the generator and to the B+ output of the generator. We fix it on a vice and connect it.
We turn on the tester in DC mode, attach one probe to the battery to “plus”, and the second one too, but to “minus”. Next, if everything is in working order, then the light should light up, the voltage in this case will be 12.4V. Then we take a drill and start turning the generator, accordingly, the light bulb will stop burning at this moment, and the voltage will already be 14.9V. Then we add a load, take an H4 hologen lamp and hang it on the battery terminal, it should light up. Then we connect the drill in the same order and the voltage on the voltmeter will show 13.9V. In passive mode, the battery under the light bulb gives 12.2V, and when we turn it with a drill, it gives 13.9V.
Generator test circuit
Strictly not recommended:
- Check the functionality of the generator by short circuit, that is, “to spark”.
- It is also undesirable to allow the generator to operate without consumers turned on; it is also undesirable to operate with the battery disconnected.
- Connect terminal “30” (in some cases B+) to ground or terminal “67” (in some cases D+).
- Carry out welding work on the car body with the generator and battery wires connected.
Here I recently received a question in my previous post (about the generator pulley) where and how is a diode installed in the LV circuit on the generator in order to increase the voltage in the car network and better charge the battery? I searched in my archives and did not find the material from which I read this decision. I searched on the Internet... for the phrase “boost diode on the LV” you can find the same text. But in order not to send those reading this note (and myself too) to this albeit narrow-minded address, I present a specific excerpt here along with some found pictures: source: 2126.ru/forum/index.php?topic=9799.0 or www.lsx1600.bos .ru/regylator1.htm (the picture on the original site has disappeared, but they have all been here for a long time) “Structurally, voltage regulators have an upper limit of 13.6V. This is due to the “old” connection diagram, from which the new one was copied and “successfully improved”. In it, the necessary voltage from the on-board network, supplied to the regulator for comparison, passed through a chain of wires. On them it dropped to normal. According to the new scheme, we have a chronic undercharge of the battery. Which, with the arrival of winter, makes starting the engine in the cold quite problematic. It should also be noted that the battery begins to absorb energy (charge) only when its temperature is above zero. Therefore, in winter, if you make short runs and the battery does not have time to warm up under the hood to at least zero (plus charging time), it will be constantly discharged. And soon it will die... It is believed that after starting the engine, in order for the battery to recover, you need to drive for at least 20 minutes. Just go, and not stand in traffic jams! How to increase the voltage in the network? Very simple! It is necessary to make the regulator “think” that we have low voltage in the network. Thus, the generator will give us the missing volts. A diode will help us do this. In a generator with a built-in voltage regulator, you need to place a diode in the circuit, as shown in the figure.
The process of replacing the diode bridge on a VAZ 2107
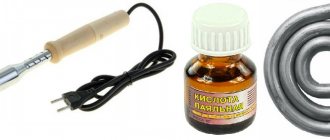
Before we get started, let's select the necessary tools. Here's what we need:
- open-end wrench 17;
- open-end wrench 19;
- socket head 8;
- 10mm socket with long wrench;
- flat screwdriver;
- a new diode bridge for the VAZ 2107 (cost about 400 rubles);
- hammer.
Sequencing
When getting started, you should understand the following: before removing the diode bridge, you will first have to remove the generator and disassemble it almost completely. Without this, it will not be possible to get to the diode bridge.
- Using a 19-mm open-end wrench, unscrew the fastening nut holding the generator bracket. The generator is removed.
Video: changing the diode bridge on a VAZ 2107
One mechanic I know, who was dismantling the diode bridge of the “seven” before my eyes, several times drew attention to the following nuance: if you have already disassembled the generator, please check not only the diode bridge, but also everything else. And special attention should be paid to generator bearings. They must be checked for lubrication and play. If even a very slight play is detected, it’s time to change the bearings. Moreover, it is “bearings”, not a bearing. This is the second important nuance: under no circumstances should you leave one old bearing and one new one in a VAZ generator, because such a design will last a very, very short time. I decided to change the generator bearings - change everything. Or don't touch them at all.
Method number 2 - using a multimeter.
This option will help to identify which (or which) diode is faulty. True, this check can only be carried out by completely dismantling the alternator rectifier unit from the car, so do this first. Next, proceed to the following steps.
- Turn the multimeter into beeper mode. If your device does not have such a mode, set it to 1 kOhm.
- Place the probes against both ends of the diode, then swap them. If in one case the multimeter shows infinity, and in the second - 400-700 Ohms, the diode is working. If both indicators are equal to infinity, then the diode under study is broken; if they have the same or low resistance, it is broken and requires replacement.
- Check all the diodes in this way and you will know exactly which one to solder, which one to replace, which will save you a lot on repairs. Although if you don’t have a great desire – and, by the way, no skills either – then maybe it’s not worth wasting your time. In this case, it would be easier to overpay a little and completely replace the entire diode bridge.
I recommend reading:
About installing an additional diode
Installing an additional diode is quite rare. Why is this being done? In order to slightly increase the voltage of the on-board network. The need for this increase arose due to new laws. As you know, in 2015, changes were made to the traffic rules, forcing drivers to constantly drive with their running lights on. And owners of classic VAZ models are forced to constantly drive with their low beams on. In such a situation, both battery charging and on-board voltage drop significantly. To somehow solve this problem, craftsmen install additional diodes, which are located between the voltage regulator terminals and the common output wires for the additional diode, as shown in the figure below.
For installation, KD202D diodes are usually used, which can be found in any radio parts store.
If the above diode is not available, you can choose any other one. The main thing is that the direct forward current is at least 5 amperes, and the maximum permissible reverse voltage is not lower than 20 volts.
So, in order to change the diode bridge on a VAZ 2107, you do not need to go to the nearest service center and pay a mechanic 800 rubles. Everything can be done on your own, and in a fairly short time. To remove and disassemble the generator, 20 minutes is enough for an experienced car enthusiast. It will take a beginner more time, but in the end he will cope with the task. All you need to do is follow the recommendations given above exactly.
DM functions
Replacing generator brushes VAZ 2107
If we recall the physics course from school, we will conclude that there are two types of electric current. It is constant and variable. How are they different from each other?
There's nothing complicated here. The key difference is that alternating current has charged particles that move in different directions. In the case of direct current, movement always occurs in only one direction.
Do-it-yourself car blanket: is it safe, what to make it from
Category: Auto gadgets
I would like to note that alternating current has noticeably better economic characteristics. They cope more effectively with transmitting current over fairly long distances. The only problem is that most electrical appliances in vehicles are powered by direct current. In order for a vehicle to function properly, electrically dependent equipment must receive a certain amount of direct current. The generator itself cannot provide it, since it produces alternating current.
Our today's hero allows us to solve this problem. That is, a diode bridge. It looks like a pair of metal conductive plates. They contain diodes that act as semiconductors. They are installed in a certain sequence.
The DM allows current to pass, but the bridge sets one direction. That is, the straightening process occurs. Another nuance is that the bridge sets traffic in only one direction. Namely, from the generator to the on-board network.
The serviceability of the DM is not eternal. Periodically, the generator element fails
And it doesn't matter what kind of car you have. It could be:
- VAZ 2107;
- VAZ 2114;
- Toyota Corolla;
- Lada Priora;
- Nissan Qashqai;
- Daewoo Matiz;
- VAZ 2110;
- Mitsubishi Lancer;
- Ford Mondeo;
- UAZ Patriot;
- Hyundai Solaris, etc.
Regardless of the car, you can and should check the functionality of the device with your own hands. For these purposes, it is important to use a tester.
If you are not sure about the correctness of your actions, watch visual videos. Don’t rush to blame the bridge for everything. Without disassembling or unsoldering the diodes, first make sure that it is faulty.
We are sorting out the VAZ 2107 37.3701 generator
So in this article I will describe the generator overhaul. We will talk about the 37.3701 generator, although everything on the G-222 generator is almost identical and this article will be suitable for it with some adjustments. I bought for replacement: 1. Diode bridge - 190 rubles 2. Generator capacitor - 15 rubles 3. Bearings - I took Andycar - 65 rubles 4. four nuts for 8. The relay regulator on the generator is new, so I decided not to change it. We will also need a universal puller (I personally used a rod puller instead, it wasn’t very convenient, but after fiddling around I removed the bearing with it). It is very desirable to have a brush for metal; I bought a set of three brushes and some sandpaper.
So the generator itself
Clean the generator from dirt with a brush. And unscrew the pulley nut. We place the generator so that the pulley rests on the floor, put a 19mm wrench on the nut and, holding the pulley with one hand from turning it, apply strong and sharp blows to the wrench with a hammer. The pulley will of course turn, but the nut will eventually begin to unscrew, I knocked like this for 2-3 minutes
Using a 10mm wrench, unscrew the four bolts and remove the studs holding the generator together.
further, unfortunately, several photos were lost