The belt is necessary to connect the generator and crankshaft pulleys, and on front-wheel drive classic models, the water pump pulley also takes part in the connection.
It is not so difficult to independently replace a torn or stretched alternator belt in a VAZ-2107 with an injector-type engine that has an additional carburetor.
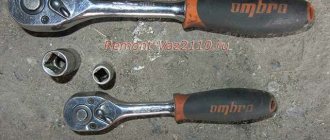
For this you will need:
- a mounting spatula, which can be replaced with a crowbar or a strong flat stick;
- wrenches 17 and 19.
This is quite enough to carry out repairs. Of course, if you at least have an idea where this very belt is located.
Types of devices installed on the VAZ-1111
A little about what kind of generator is used at Oka. The small car was equipped with several types of this unit. The most common and frequently encountered generator is type 37.3701, which was also installed on the VAZ models of the classic family (21010-2107), as well as the VAZ-2108. On some variants of the Oka, a device model 371.3701 was installed. Both of these options are identical in performance characteristics and differ only in minor design features.
The third version of the generator installed on the Oka is type 26.3771. In terms of performance characteristics, it is the same as 37.3701, but has a slightly different design, and the overall dimensions are smaller. It’s not difficult to visually recognize which generator is on the Oka. Model 26.3771 has internal ventilation (there are no impellers on the outside), while 37.3701 has external ventilation, so the latter has a pulley combined with the impeller.
Design and features of the timing belt drive of the VAZ 2107 car
Production of the 8-valve 1.3-liter VAZ power unit with a belt instead of a timing chain began in 1979. Initially, the VAZ 2105 internal combustion engine was produced with the index 21011 and was intended for the Zhiguli model of the same name, but was later installed on other Tolyatti cars - the VAZ 2107 sedan and the VAZ 2104 station wagon. The decision to install a belt drive instead of a timing chain drive was caused by the increased noise of the latter. The engine, which was not the quietest, began to make even more noise as the mechanism parts wore out. The modernization made the power unit more modern, but in return it required increased attention to the condition of individual structural elements.
A timing belt drive has the advantage of reduced metal consumption and quieter operation, but is inferior to a chain drive in terms of reliability.
The functions that were previously performed by the chain were assigned to a belt drive. Thanks to it, it is set in motion:
- camshaft, through which the opening and closing timing of the valves is regulated. To transmit torque from the crankshaft, a toothed belt and a pair of the same pulleys are used. One cycle of operation of a four-stroke internal combustion engine is carried out in two revolutions of the crankshaft. Since each valve needs to be opened only once, the camshaft speed should be 2 times lower. This is achieved by using toothed pulleys with a gear ratio of 2:1;
- the drive shaft of auxiliary units (in garage slang “pig”), which transmits rotation to the oil pump and ignition distributor of carburetor engines, and also ensures the operation of the fuel pump.
When developing the design of the timing belt drive, VAZ engineers used the experience of FORD car developers
Transverse teeth on the timing drive parts prevent slipping of the rubber structural element and ensure synchronous operation of the crank and gas distribution mechanisms. At the same time, during operation the belt stretches, so to prevent it from jumping on the pulley teeth, the drive was equipped with an automatic tension unit.
In order to prevent damage to the parts of the crank and gas distribution mechanisms if the belt breaks, the pistons of the VAZ “belt” engine were equipped with special grooves, which drivers often call counterbores or scrapers. After the rotation of the crankshaft and camshaft is desynchronized, the recesses in the piston prevent it from hitting the open valve. Thanks to this little trick, you can restore the performance of the power unit in less than an hour - just set the mechanism according to the marks and replace the damaged part.
Interchangeability of VAZ timing belts
The prototype of the VAZ “belt” engine was the OHC power unit, which was installed on the FORD Pinto passenger car. Its timing mechanism drove a fiberglass-reinforced timing belt that had 122 teeth. Due to the fact that the VAZ 2105 belt has exactly the same number of teeth and similar dimensions, some owners of the domestic “classic” had an alternative to Russian-made belts. Of course, only a few had such an opportunity - in times of total shortages, one had to be content with less reliable products. Initially, only belts from BRT were installed on the engine, but a little later, more durable belts from Gates, which is the world leader in this market segment, began to be supplied to the conveyors of the Volzhsky plant.
Today in the retail chain you can find VAZ 2105 timing belts from not only domestic, but also well-known global manufacturers
Today, the owner of a VAZ 2107 has a huge selection of spare parts, including for the timing belt drive. When purchasing, you must keep in mind that the VAZ 2105 power unit is suitable for timing belts with catalog number 2105–1006040 (in another spelling 21051006040). It has already been said above that rubber products produced by Gates and Bosch are considered to be some of the best. The products of global industry giants such as Contitech, Kraft, Hanse, GoodYear and Wego are no less high-quality. The cheaper offers of domestic Luzar cause the most criticism, despite the fact that they are not represented in the retail network as widely as the market leaders.
On my own behalf, I can add that owners of “sevens” can use a standard timing belt from FORD cars. Belts from OHC engines of Pinto, Capri, Scorpio, Sierra and Taunus cars of 1984 and later are suitable for the “five” engine. Please note that until 1984, the 122-tooth belt was installed exclusively on power units with a volume of 1800 cm3 and 2000 cm3. The drive element of the weaker 1.3 and 1.6 cc power units was shorter and had 119 teeth.
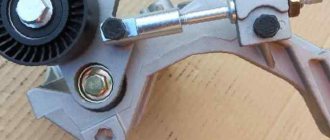
Tension mechanism
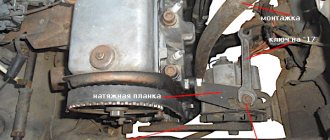
In order for the timing belt of the VAZ 2107 to be constantly tensioned, a simple (one might even say primitive), but at the same time extremely effective and reliable design is used. Its basis is a shaped metal plate (hereinafter referred to as the tensioner lever), on which a smooth roller with a pressed-in rolling bearing is mounted. The plate base has a hole and a slot for movably attaching the lever to the cylinder block. The pressure on the belt is carried out thanks to a powerful steel spring, which at one end is connected to a bracket on the rotating plate, and at the other is rigidly attached to a bolt screwed into the cylinder block.
The tension roller from the VAZ classic is also suitable for later, front-wheel drive models VAZ 2108, VAZ 2109 and their modifications
During operation, both the surface where the roller contacts the rubber belt and the bearing wear out. For this reason, when replacing the timing belt, be sure to check the condition of the tensioner unit. If the roller is in good condition, then the bearing is washed, after which a fresh portion of lubricant is added. At the slightest suspicion, the rotating structural element should be replaced. By the way, some drivers prefer to install a new roller at the same time as replacing the belt, without waiting until its bearing fails. It must be said that today the cost of this part ranges from 400 to 600 rubles, so their actions can be considered quite appropriate.
Generator repair
First, you need to clean the generator from dirt, oil, dust and everything that has accumulated on it over the entire period of operation.
Unscrew the pulley nut, placing the generator so that the pulley rests on the floor, and then put a 19mm wrench on the nut. While holding the pulley from turning, it is necessary to make several strong and accurate blows on the key. It is unlikely that you will be able to clamp the pulley tightly with your hand, but your efforts may be enough to tear the nut out of place.
Using a 10mm wrench, you need to unscrew the 4 bolts of the tie rods that assemble the generator device into one whole. Using a chisel, knock out the key. This can be done by installing the generator with the shaft up. Place the chisel against the key and start knocking it out with a hammer. Once you have knocked out the key, remove the front cover of the device. If it goes too hard, you need to try to knock it out by weight.
Belt whistles
Often, when a certain malfunction of the VAZ 2107 appears, you can hear an extraneous sound, which allows you to confidently diagnose the problem. One of the malfunctions may be the belt slipping, resulting in a whistle from friction against the pulleys. This problem leads to unstable operation of the generator and lack of battery charge.
Due to the fact that the generator always has the same type of drive, the problems are always the same. The main difference between injection and carburetor models is the presence of a crankshaft position sensor, which must be removed when replacing the belt.
In fact, you can determine the cause of a belt whistling without any problems by eliminating it without the help of professionals. It is only necessary to determine the diagnosis. Among the main causes of slipping are the following:
- generator bearing failure;
- insufficient tension;
- contamination of fuels and lubricants.
In all these cases, self-repair takes little time and does not require special tools. You will need two wrenches and a pry bar.
How to tighten the belt?
Low tension may be due to the fact that the belt has stretched during operation and began to slip on the pulleys. If its length does not exceed the permissible limit, you just need to tighten it. Otherwise you will have to change it. To tighten it yourself, you should do the following:
- using a 17mm wrench, loosen the nut that secures the generator to the bracket;
- loosen the generator rod nut;
- if you cannot tighten it manually, you need to use a pry bar;
- Having fixed the position with a nut on the adjusting bracket, you should check the degree of tension.
Checking the tension is easy. You need to press the belt between the crankshaft and the pump. The deflection should be within 12-17 mm, and between the generator and the pump - 10-17 mm. After tightening the belt, taking into account these requirements, you need to tighten both nuts in order to prevent spontaneous loosening.
Bearing problem
If the cause of slippage is related to difficult rotation of the VAZ 2107 generator pulley caused by bearing failure, repairs will be required. It is necessary to dismantle the generator and replace the bearings. After this, you should install the device in place and tighten the belt as described above. Not every motorist can replace bearings on their own, so it is often better to immediately contact a workshop. This way you will avoid problems with the generator in the future. The last reason for slipping is a dirty belt. Perhaps the problem can only be solved by replacing it, since you are unlikely to be able to completely clean the belt of dirt without damaging it.
Sometimes, especially in the cold season when the engine is not warmed up, a whistle may be due to the poor quality of the belt, which has become stiff in the cold. After the engine warms up, the whistle disappears. This is a normal phenomenon, that is, no repairs are required in this case. You just need to make sure that the drive belt is intact to avoid it breaking on the road.
Video:
Video:
Video:
Step-by-step replacement instructions
Replacing the alternator belt on a VAZ 2107 is a very simple job and can be done in normal garage conditions without the involvement of a specialist.
Tools
To change the belt, we need:
Keys of required sizes
Stages
- Next, use a pry bar to move it towards the motor block.
- If the power unit of your car is fuel-injected, then you need to remove the crankshaft sensor.
- Remove the old belt.
- We install a new one and tighten it on all the pulleys.
- In order to tighten the belt using a pry bar, move the generator. Having reached the required tension, tighten the fixing nut.
- Do not allow it to be overtightened, otherwise it may rupture during operation.
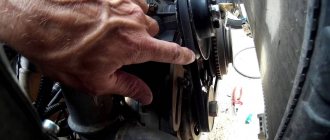
- Tension is checked in the following way. Take a screwdriver and use it to press on the branch, as shown in the photo. Next, measurements are taken using a regular ruler. If the deflection is within the normal range, then the work can be considered completed. If not, then unscrew the nut and move the generator in one direction or another to obtain the tension we need.
As you can see, everything is quite simple and there is no need to contact a service station to fix such a malfunction. If you have any questions, watch the video or leave a comment below.
Sorry, there are no surveys available at this time.
Installing a new timing belt
To install a new timing belt, you must follow the steps below.
- First, we install the camshaft pulleys according to the marks, after which we securely fix them from accidental rotation.
- To align the crankshaft to the mark, you need to open the inspection window in the clutch housing. Only if all marks match is the correct installation of the new belt drive guaranteed.
- After aligning the timing components according to the marks, we install new rollers (tension and bypass).
- The belt itself is threaded through the pump and is first located on the crankshaft pulley.
- Installing the belt on the camshaft pulleys occurs last.
- The position of the tensioner, pre-lubricated on both sides with machine oil, is adjusted using a special key and counterclockwise*.
- Further installation is carried out in reverse disassembly sequence. If the marks are accidentally lost, they must be set again.
- At the end of the work, you should start the engine and listen for any extraneous noise. If there is any rustling or humming coming from the timing belt, this most likely means that the belt is too tight and needs to be loosened a little.
*For proper tension of the timing belt drive, it is necessary that the part of the belt between the shaft pulleys rotates 90° without applying any serious force. If this is done with little to no force, then greater belt tension is required. If the belt cannot be turned at all, then the tension should be loosened.
Detailed instructions on how to remove a generator with your own hands using the example of a VAZ 2107 generator
The step-by-step diagram for removing the VAZ 2107 generator looks like this:
- Before starting work, you need to completely de-energize the car; to do this, you just need to remove the negative terminal from the battery;
- The engine protection on the right side and the mudguard are removed;
- You need to disconnect all the wires from the generator, while remembering their location (if you have an installation diagram, you don’t have to remember);
- Now you need to disconnect the generator from the engine housing (this will definitely be difficult);
- We get the generator. If it does not unscrew, fill the fastenings with a wedge and knock out the bolt with a hammer (you don’t need to hit it too hard, otherwise you can tear out the fastenings).
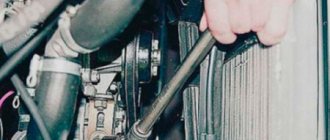
Often, to remove the generator assembly with mountings, you have to remove the cooling radiator. Just don’t take it out and dismantle all the radiator pipes; just move it to the side to gain access to the brackets. Having removed all obstacles, you can easily get the generator with fastenings.
Sometimes the removal and installation of a generator follows a simpler scheme; this happens when replacing a relatively new generator with a more powerful one or when the car is still new. In this case, some specialists manage to pull it out through the right wheel arch. The removal procedure is no different from the above, only you will not need to remove the radiator. To remove the generator through the wheel arch, you need to turn the steering wheel all the way. Before removing the generator, be sure to remove the drive belt from the pulley.
DIY belt replacement process
To remove the belt, you will need access not only to the upper front part of the car, but also to the lower one.
Therefore, if a crankcase protection is installed, you will need to remove it. Some craftsmen, for convenience, to facilitate access to the belt, also remove the battery. Once you have access to the required element, inspect it. If there is no visually visible damage to the canvas, just check the tension, it may have weakened. This is easy to do, just press the belt with your fingers, simulating a pressure of approximately 10 kg, and by the distance of deflection you can determine whether the element is in acceptable tone. The maximum standards in a narrower place are 10-15 mm, and in those where the space between the pulleys is wider - 12-17 mm.
You only need to remove the belt from the pulleys if it is completely replaced; you do not need to do this to retighten it. At the bottom of the car, unscrew the nut securing the generator underneath by one turn. In the engine compartment, loosen the upper fastening nut of the same device a few turns. Under no circumstances should you completely unscrew the fasteners, just loosen them until they begin to turn freely.
To remove the belt, you will need to press the alternator slightly against the engine, but under no circumstances do this with your bare hands. Then remove the belt. You need to start with the top pulley, and then with the rest. Only in this order will it be easy to remove the element. On injection car models, you will also need to remove the crankshaft position sensor, otherwise it will interfere with the removal of the belt.
To adjust the blade tension, place a previously stored spatula or a flat piece of crowbar between the engine and the generator, using it as a lever. Having moved the generator in this way, without releasing the blade, but holding it in this position, tighten the nuts of the upper and lower fastenings, after which you can release the “lever”. It will be easier if someone helps you with this.
After the manipulations have been completed, check the belt tension again using the previously described method.
To put on a new belt, you need to know some of the nuances of this process. For example, one of the most important points: you need to put the belt on, starting with the crankshaft pulley, then on the generator pulley, and only finally on the pump pulley.
Thanks to the video instructions, you can learn in more detail and clearly how to change or tighten the alternator belt if you plan to do it yourself for the first time.
Source
Replacing the alternator belt on a VAZ 2101-VAZ 2107
Changing the alternator belt on an 8-valve VAZ-2114 with your own hands: tips, adjustment
Welcome! This part links the alternator pulley to the crankshaft pulley and the water pump pulley on classic models. On front-wheel drive vehicles, the pump pulley connects the timing belt. A broken alternator belt on a classic will cause poorly functioning devices, because the energy will come only from the battery, and accordingly, if the charge is poor, the devices will malfunction. On the contrary, if the battery is powerful and sufficiently charged, then the devices will not go out for some time and you may not even notice that the belt has broken
And here you need to remember about the pump and pay attention to it. Since the belt binds it, a rupture will lead to the cessation of coolant circulation in the system and the car will begin to overheat
Note! you will need the following tools: a mounting spatula (a convenient thick stick or a small metal crowbar will do), you will need wrenches for “17” and “19”.
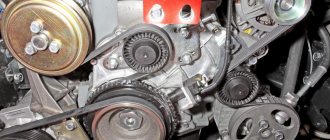
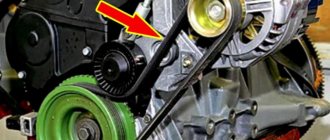
Belt location
Located in the front of the car. In the photo, the red arrow shows the radiator of the cooling system and the bar on which the battery sits (now removed). The belt connecting the three pulleys is indicated in the photo with a blue arrow.
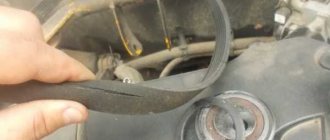
When to change the belt?
The main reason is wear: various kinds of cracks, worn edges, worn teeth. We do not recommend delaying the replacement of the belt, otherwise a rupture will lead to overheating of the engine and even boiling during extreme heat. The battery will quickly discharge in the absence of support from the generator, which will stop spinning and giving out energy.
Note! Have you ever heard a car whistle? The timing belt makes a sound; it occurs for various reasons:
- severe wear often leads to whistling;
- water or any liquid getting on it (for example, coolant gets on the belt when the cooling system pipes are worn out and leaking. Inspecting the belt and pulleys for moisture will help identify the problem);
- low belt tension (adjustment will come to the rescue, read below);
- poor quality of the belt, sometimes it’s just an oak belt (by the way, it hardens in cold weather).
Most cars in the winter make a whistle when starting the engine, but a warm car no longer whistles - a sign of a stiff belt.
The video below can save you in an emergency: if your belt suddenly breaks on the road and there is no spare, a regular belt or tie will come to your aid! Watch the video in detail and remember, you never know, anything will come in handy in life.
DIY belt replacement process
To remove the belt, you will need access not only to the upper front part of the car, but also to the lower one. Therefore, if a crankcase protection is installed, you will need to remove it. Some craftsmen, for convenience, to facilitate access to the belt, also remove the battery. Once you have access to the required element, inspect it. If there is no visually visible damage to the canvas, just check the tension, it may have weakened. This is easy to do, just press the belt with your fingers, simulating a pressure of approximately 10 kg, and by the distance of deflection you can determine whether the element is in acceptable tone. The maximum standards in a narrower place are 10-15 mm, and in those where the space between the pulleys is wider - 12-17 mm.
Generator care
The most important thing is to understand that the generator, like all components of the car, must be monitored and serviced in a timely manner. Change brushes in a timely manner, do not allow large amounts of dust and dirt to get in, not to mention water. Ensure that the alternator V-belt is properly tensioned so that it is neither loose nor overtightened.
It is recommended to check the technical condition of the generator every 15,000 km. mileage Typically, with proper care of the generator, it can last up to 160,000 km. mileage and repairing the generator with your own hands is simply not necessary, you just replace it and that’s it.
But in order for a car generator to last for so long, you need to learn how to properly maintain it, and you can’t do this without disassembling the generator.
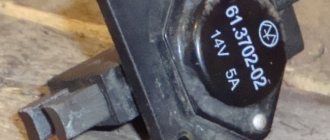
Checking the removed voltage regulator
To clarify the condition of the regulator, it must be removed. It is better to test the device complete with brushes and brush holder. This will allow you to immediately detect:
- poor contact between the terminals of the brush holder and the voltage regulator;
- breaks in the output conductors of the brushes.
A voltmeter or a 12 V lamp with a power of 1–3 W is connected to the brushes of the device removed from the generator 37.3701. For the regulator from the G-222 generator, the connection is made to terminals “B” and “W”. The “plus” of the power supply is connected to the terminals “B”, “C” (when they exist), and the “minus” to ground. First, a voltage of 12–14 V is applied, and after that – 16–22 V. A sign of the device’s serviceability will be the lamp lighting up (deviation of the voltmeter needle) in the first case and going out (zeroing the voltmeter) in the second.
When the lamp lights up in both cases, this means that there is a breakdown in the device. If in both cases the lamp does not light, then there is no contact between the regulator terminals and the brushes, or there is a break in the device. Another cause of improper voltage regulation can be worn or stuck brushes. They must protrude from the housing of the electronic device or the brush assembly of relay regulators by no less than 5 mm.
In what situations is replacement necessary?
Element wear is characterized by such manifestations as cracks or tears in the blade, worn teeth and uneven edges
If you ignore such a deplorable state of a very important element, it will come back to haunt you with overheating and boiling of the engine, independent operation of the battery, which will lead to its rapid discharge
If the belt is severely worn, it also shows signs of noise to the owner - it begins to whistle, especially at low speeds. Another reason for a whistling belt may be moisture getting on its surface, which occurs due to worn-out pipes of the cooling system - antifreeze begins to leak.
Some belts - oak - whistle when the car is started in frosty weather, and after warming up the sound disappears. A weak tension is expressed by a whistle, but in this case it is enough to simply tighten it.
What to do if your belt whistles
After the VAZ-2107 generator has been disassembled, you can troubleshoot problems that have arisen in the operation of the device. But the serviceability of the unit itself does not always suffer; it happens that the breakdown lies in something completely different. For example, when you feel a squealing noise caused by the belt rubbing against the pulleys, it is not surprising if the alternator stops working at full capacity.
When comparing a carburetor and an injector, the main difference in cars is the presence or absence of a crankshaft position sensor, which is removed when the belt is replaced. Why does the whistle appear? There may be several reasons for this:
- The bearing related to the VAZ-2107 generator is faulty.
- Insufficient tension level.
- Contamination in fuel and lubricants.
You can tighten the belt yourself; it’s easy to do:
- Take a 17mm wrench and lightly unscrew the nut securing the generator to the bracket.
- Loosen the generator rod nut in the same way.
- If manual tightening does not produce results, then use a pry bar.
- After fixing the control bracket, check the tension level. To do this, press the belt between the crankshaft and the pump. Ideally, the deflection should be from 12 to 17 mm, and the distance between the generator and the pump should not exceed 17 mm, but a value less than 10 mm is considered detrimental. Tighten both nuts well; this is the only way to avoid spontaneous loosening of the tension.
The purpose of the timing chain and its length
To understand the purpose of the timing chain, it is necessary to outline what the engines of classic VAZ models are. All these engines are overhead engines. That is, the timing shaft (aka timing) is located in the upper part of the engine, above the crankshaft and above the oil pump shaft.
The timing chain is the main connecting link in the VAZ 2107 engine
https://youtube.com/watch?v=kx3VxkUlNsQ
Do-it-yourself VAZ 2101 generator repair
Repairing a VAZ 2101 generator with your own hands is quite simple. All work can be divided into five stages:
- Removing the generator from the car.
- Disassembling the generator.
- Troubleshooting.
- Replacement of worn out and faulty elements with new ones.
- Generator assembly.
First stage: dismantling the generator
To dismantle the VAZ 2101 generator you will need:
- open-end wrenches for 10, 17 and 19;
- mounting blade.
Before dismantling the generator, you must disconnect the negative cable from the battery.
To remove the generator you will need to perform the following steps:
- Remove the right front wheel from the vehicle.
- Securely secure the car on a jack and additional supports.
- Climb under the car on the right side and find the generator housing.
- Loosen, but do not completely unscrew the housing fixing nut.
- Loosen, but do not completely unscrew the nut on the bracket stud.
- To loosen the V-belt, slightly move the generator housing.
- Disconnect the power cable going to the generator.
- Disconnect all wires and contact connections.
- Remove the fixing nuts, pull the generator towards you and remove it from the studs.
Video: dismantling the VAZ 2101 generator
Stage two: disassembling the generator
The removed generator should be wiped with a soft cloth, removing the main layer of dirt. To disassemble the device you will need:
- open-end and ring wrenches 19;
- extension;
- heads for 8 and 10;
- hammer.
Disassembling the VAZ 2101 generator is quite simple
The disassembly itself is carried out in the following order:
- Unscrew the four nuts on the back cover of the generator.
- The nuts securing the pulley to the body are unscrewed.
- The pulley is removed.
- The housing is divided into two parts (one will contain the stator, the other will contain the rotor).
- The winding is removed from the part with the stator.
- The shaft with bearings will be pulled out from the part with the rotor.
Further disassembly involves pressing out the bearings.
Video: disassembling the VAZ 2101 generator
https://youtube.com/watch?v=pUAgp4kTgzo
Third stage: generator troubleshooting
At the troubleshooting stage, faults of individual generator elements are identified and eliminated. Moreover, some of the work can be performed at the disassembly stage
Particular attention should be paid to:
- signs of wear on the surfaces of parts;
- the appearance of carbon deposits on wires and contacts;
- the presence of dirt and working fluids inside the generator housing;
- cracks, nicks and other mechanical damage to parts.
All damaged and worn elements must be replaced with new ones.
When troubleshooting, you do not need to pay attention to the generator housing: after several years of service, it may have an unsightly appearance, but at the same time it will protect the insides of the device well.
Stage four: generator repair
The difficulty of repairing the G-221 generator is that it is difficult to find spare parts for it. If bearings can still be purchased on the Internet, then choosing a suitable winding or rectifier will be very difficult.
Video: repair of VAZ 2101 generator
Therefore, the list of situations for repairing a VAZ 2101 generator is very limited. So, if bearings jam or brushes wear out, replacement elements can be easily found in car dealerships.
DISMANTLING WORK
It is recommended to remove the generator from the “seven” after the engine has cooled down. It is not recommended to work with vehicle components immediately after driving due to high temperatures and the risk of injury.
Immediately before removing the generator, you will need to remove the right front wheel, since the installation can only be reached from under the bottom of the car through the right fender.
It is imperative to securely fix the position of the car with a jack and auxiliary devices (hemp, stands) in order to eliminate the risk of the car falling during operation.
The jack must be rested against the beam of the car.
The progress of work comes down to the sequential implementation of the following actions:
- Find the generator housing in the mechanical structure of the car, feel for the bar that secures it to the engine.
- Using a wrench, unscrew the fastening nut halfway.
- Unscrew the nut on the bracket, but do not remove it from the stud.
- The generator housing can be pulled and moved in any direction - this will become possible due to the loose fastening.
- Remove the belt from the landing pulleys and remove it from the work area.
- Disconnect all incoming wires to the generator housing.
- Unscrew the fastening nuts completely.
- Pull the generator towards you and remove it from under the body.
Immediately after dismantling work, you should inspect the generator landing site. All joints and fastenings must be cleaned of dirt and, if necessary, treated with acetone.
Accordingly, installation of the new generator will need to be carried out in the reverse order, paying special attention to tensioning the new belt.
VIDEO: INSTRUCTIONS FOR REPLACING THE GENERATOR ON A VAZ 2107
Diagnostics of the voltage regulator
Replacing the alternator belt on a Chevrolet Niva without air conditioning
You can check it in several ways. Start the engine and let it run until its temperature reaches operating temperature. Turn on the low beam headlights and fog lights (if any). Arm yourself with a multimeter and measure the voltage on the battery. The maximum value should be 14.8 Volts. If you observe an excess of this value, then you need to change the voltage regulator relay. This is the easiest way to diagnose a device.
The one in which you need to remove the regulator from the generator will be a little more complicated. True, for this you need to do very little. Using a Phillips screwdriver, unscrew the two bolts, disconnect the wire and remove the device along with the brush assembly. This way the voltage regulator is removed on VAZ 2108 and similar models. If it is installed in the engine compartment, as in the VAZ 2106, then removing it is much more convenient.
For diagnostics, you will need a regular light bulb designed to operate at 12 Volts. It is desirable that its power be no more than three watts. The regulator has two terminals, designated by the Russian letters “B” and “V”. With their help, the device is powered from a DC source. A light comes on between the contacts that go to the brush mechanism.
If the output of the power source is no more than 14 Volts, then the light should be on. If it rises above 15 Volts, the lamp should go out. If in both cases the light bulb lights up or does not light up at all, then there is destruction of the semiconductor elements. Then only a complete replacement of the regulator will help.
And so the saga with the on-board network continues. Last year I changed my native generator to a 372.3701 55A generator from a VAZ 2108 (I bought it used, www.drive2.ru/l/1322019/), my native one gave, in principle, normal voltage, but when driving at night the light flickered at XX the voltage dropped and everything dimmed, after replacing it with a new generator everything became normal, but the voltage was a little low, it didn’t reach 14 without load, but the battery was charging and there were no problems, but I want perfection!
I purchased a Three-level voltage regulator produced by Energomash (67.3702-01), read a lot of good reviews about it, in the fight against low voltage, here it is:
a little theory about it: Switching of regulated voltage levels is done by a three-position toggle switch built into the regulator, depending on the following conditions: “Minimum” level - 13.6 Volts for operating the car at air temperatures above +20 ºС, long climbs, etc.; “Normal” level "— 14.2 Volts for operating vehicles in temperature conditions of 0 ºС — +20 ºС; “Maximum” level — 14.7 Volts for operating vehicles at subzero air temperatures; when turning on numerous additional current consumers; after long-term parking; after a significant discharge of the battery caused by connecting devices (radio tape recorder, TV, refrigerator, etc.) while the engine is not running.
more details here______________________________________________________________
Well, let's move on to the installation, first I measured the voltage with the old regulator under load and without load, at XX, as we see, “not so hot”
Then I removed the generator, I wanted to unscrew the old regulator in place, but the bolts were stuck, I had to remove it, I unscrewed the old regulator with brushes and screwed in the brushes from the new one
It would seem that the matter is ready, BUT when I turned on the ignition, the relay that went to the charging lamp immediately started rattling (after all, the system was built for 2108), after reading the forums I found a solution to the problem in 2 options:
1. We pull off 2 wires (double orange and yellow) from the charging relay and connect them to a light bulb (12V 3-4W), this light bulb will also serve as a battery charge indicator lamp.
— BUT in this situation, the indicator on my panel will not work and it will only be under the hood, and why do I need an indicator under the hood)2. I liked the second option better! — We remove the Yellow and Black wires from the Relay, connect them together (I re-crimped one wire from mom to dad), and insulate them, then we removed the Relay and put it away, insulated the orange wire and laid them to the wiring harness so that they do not dangle, that is, we connected the Black and Yellow a I hid the orange one (I didn’t cut anything because I’ll have to install the original one)
P.S. I bought it a long time ago but never got around to installing it, the price was about 90 UAH, at the moment the price of the regulator is about 140 UAH.
The VAZ 2106 voltage regulator relay ensures the normal functioning of important vehicle mechanisms and devices. In particular, the adequate operation of the car’s ignition system and its generator, as well as the condition of the battery, depend on it.
Repair of generator on VAZ 2107
Hello, dear users of our site! Today we are publishing relevant material for all owners of a VAZ 2107 car - do-it-yourself generator repair. Here we will look at the main faults that classic owners often have to fix.
— wrench size 19—socket wrench is more convenient;— socket heads size 8 and 10;— extension cord;— hammer.
Let us remind you that in the previous article we looked at how to replace the wiper motor on a VAZ 2107 with your own hands. The windshield wiper motor is very vulnerable in winter, so this breakdown occurs quite often in the cold season.
Now below I will describe in more detail the disassembly procedure, and I will also analyze the dismantling of each part separately.
Replacing brushes on the generator
For this we need a Phillips screwdriver and that's it. The photo below shows the location of the brush holder.
Take a Phillips screwdriver and use it to unscrew one bolt securing the brushes to the generator.
After this, you can remove them from their seat.
Next, you need to check how much the brushes protrude, that is, their working area in height. Make sure it is at least 12mm. If this value is not reached, then the brushes need to be replaced. It is also worth paying attention to the uniformity of wear.
If necessary, we replace this part, the cost of which is no more than 100 rubles in most stores. And after that we perform the installation in reverse order.
Complete disassembly into parts
First, unscrew the 4 nuts that are located on the back cover of the device, and they are very clearly visible in the bottom photo.
Then we try to unscrew the pulley mounting nut with a 19mm wrench. Usually, it is very tightly tightened and it is quite problematic to do this with the generator removed, unless you clamp it in a vice. But there is a way out of the situation - you can press on the bolts from the reverse side, where we unscrewed the nuts, so that they rest against the impeller blades, thereby fixing it in a stationary state. Next, you can try to unscrew this nut, holding the generator stationary.
Now we take a hammer and, with light tapping, try to separate the generator into two parts, as is clearly demonstrated in the photo below.
As a result, it should look something like this.
As you can see for yourself, there will be a rotor on one part, and a stator (winding) on the other. Removing and replacing the rotor
It is very easy to remove; first we remove the pulley, removing it from the shaft.
Then we remove the key.
And now you can easily remove the rotor of the VAZ 2107 generator, since it is easily released from the housing.
Now you can move on.
Let us note that our website has long published an article about replacing the generator on a VAZ 2107 with your own hands. When the generator cannot be restored, you simply need to replace it.
Removing the winding (stator)
To do this, you need to unscrew the three nuts from the inside with a head, as shown in the photo.
And after this, the stator can be removed without any problems, since it is disconnected from the diode bridge.
If it needs to be replaced and you need to remove it completely, then of course you will need to disconnect the plug with the wiring, which is visible in the top photo.
Replacing the diode bridge (rectifier unit)
Since after removing the winding, the diode bridge is practically free, there is almost nothing to say about replacing it. The only thing you need to do is push the bolts from the inside so that they pop out from the outside.
And the diode bridge has been completely removed and can be replaced.
After carrying out the required repairs to your generator, we reassemble it in the reverse order and do not forget to connect all the winding wires correctly.
How to tighten the alternator belt on a VAZ 2107
If you correctly determine what exactly is causing the slippage, it is quite possible to fix the problem yourself. There are two reasons why the alternator belt slips:
- Weak tension.
- Contamination (usually motor oil).
Also, a whistle, similar to the sound of slipping, can be produced by a faulty generator bearing.
In any of these cases, repairs do not require particularly high qualifications and do not take much time. Specialized devices and instruments are also not required. You will need a pry bar and two open-end wrenches (or heads) for 17 and 19. The easiest way is to eliminate the weak tension of the generator belt. Usually, over time, the belt stretches a little and begins to slip on the pulleys, producing an unpleasant whistle. The VAZ 2107 generator belt, the size of which exceeds the maximum permissible, must be replaced. You should also change the belt if it is cracked or has noticeable damage.
To check the length of the alternator belt, it is not necessary to remove it. We can assume that if the belt can still be tensioned, its length is within acceptable limits. To tension the belt you will need to do the following:
- Using a 17mm wrench (socket), loosen the nut that secures the generator to the bracket.
- Loosen the generator rod nut using a 19mm wrench.
- Tension the belt while moving the generator using a pry bar.
- Secure the generator to the adjusting bracket with a nut and check the tension. The deflection of the belt between the pump and the crankshaft when pressed by hand should be approximately 12-17 mm, between the pump and the generator - within 10-17 mm.
- Tighten the nuts firmly, preventing spontaneous loosening.
If a generator bearing fails, repairs are required. To do this, it is necessary to dismantle the generator by unscrewing the mounting nuts indicated above, disassemble the generator and replace the shaft bearing with a new one. This operation is not simple, therefore, if you are not confident in your skills, the best solution would be to turn to specialists. This will help to avoid problems associated with the further operation of the generator and obtain certain guarantees of the quality of repairs.
After replacing the bearing, the generator must be secured in place and tensioned according to the recommendations outlined above.
If the belt is contaminated with oil, you can try to clean it by first loosening the tension and removing it from the pulleys. However, substances that can efficiently clean oil contaminants can harm the alternator belt. Considering the low cost of the belt, you can immediately replace it without wasting effort trying to wash it. Of course, this advice is only suitable if you have a spare parts store at hand.
It is worth noting that whistling can occur when the bearing is in good condition and the belt is well tensioned. This phenomenon is observed in severe frosts, when the belt material freezes and becomes too hard, losing adhesion to the pulleys. This whistle occurs after starting the engine in the cold and disappears after the engine warms up. This is normal at low temperatures. In this case, no repair work is required. You just have to make sure that the belt is not damaged (in severe frosts it becomes fragile) to avoid it breaking during the trip.
Checking and adjusting the tension of the generator drive belt
Checking and adjusting the tension of the generator drive belt
Repair and operation manual - Electrical equipment VAZ-2101 - VAZ-2107 - Checking and adjusting the tension of the generator drive belt Checking and adjusting the tension of the generator drive belt and replacing it Insufficient tension of the generator belt impairs the charging of the battery and leads to increased wear of the belt. If the alternator belt is too tight, the alternator and water pump bearings may fail.
This is what the alternator drive belt looks like from the top right of the engine compartment. The generator drive belt 2 is installed on the pulleys of the generator 1, water pump 3 and the crankshaft (not visible in the photo).
NOTE Checking the tension of the generator drive belt is performed from above in the engine compartment.
Tension is characterized by the amount of deflection of the generator belt between the pump and crankshaft pulleys (deflection B) or the generator and pump pulleys (deflection A) when a force of 98.1 N (10 kgf) is applied in the middle of the distance between the pulleys. Deflection A should be 10-15 mm, deflection B -12-17 mm.
USEFUL ADVICE It is more convenient to check the deflection A.
To adjust the tension and replace the alternator belt on a VAZ car, you will need: keys “17”, “19”, and a mounting blade. Adjust the belt tension on a VAZ vehicle mounted on a lift or inspection ditch. The belt is adjusted by moving the generator relative to the engine.
Scheme for checking the tension of the VAZ generator drive belt: 1 - generator pulley; 2 — pump pulley; 3 - crankshaft pulley.
1. Remove the mudguard.
2. From the bottom of the VAZ car, loosen the nut of the lower mounting of the generator by about one turn.
3. From the top of the car from the engine compartment, loosen the nut securing the generator to the tension bar by about one turn.
USEFUL TIPS For easy access to the nut securing the generator to the tension bar, remove the battery from the car. To loosen the nut securing the generator to the tension bar, use a socket with a universal joint and an extension.
4. To increase belt tension, move the generator away from the engine.
WARNING When moving the generator to increase belt tension, apply force only to the generator housing, placing a mounting blade between the housing and the engine.
5. To reduce belt tension, move the generator towards the engine.
NOTE To reduce belt tension, move the generator by hand.
6. Without changing the position of the generator, tighten the nut securing the generator to the tension bar and the nut of the lower mounting of the generator.
NOTE Tightening torques: — nuts securing the generator to the tension bar 28.08-45.3 N•m (2.9-4.6 kgf•m); — nuts for the lower mounting of the generator 57.3-72 N•m (5.95-7.35 kgf•m).
7. Install the mudguard in the reverse order of removal.
8. To replace the generator belt, follow steps 1, 2 and 4 (taking into account the recommendations thereto) provided for adjusting the tension of the generator belt.
9. Remove the generator belt first from the pump pulley, then from the generator pulleys and crankshaft.
10. Place the new alternator belt first on the crankshaft pulley, then on the alternator pulley.
11. Place the new alternator belt onto the pump pulley.
HELPFUL ADVICE
If the new alternator belt is tightly placed on the pump pulley, and the alternator is pushed all the way towards the engine, carefully turn the pump pulley by hand or slowly turn the crankshaft until the belt is completely seated on the pulley. Have an assistant turn the crankshaft.
12. Follow steps 3, 5-7 (taking into account the recommendations thereto) provided for adjusting the tension of the generator belt.
Quote
How to replace the alternator belt on a VAZ 2107
The quality of such a Soviet, and now Russian car, as the VAZ 2107 has been proven over the years. Over time, during the operation of any car, including foreign cars, the need arises to replace some important wearable elements. These engine elements include the alternator belt of the VAZ 2107 car. How to determine that the VAZ 2107 alternator belt needs to be replaced, what is required to carry out such a procedure, as well as the purpose of the device, we will find out in the material.
The need to replace the belt
Initially, it is important to note that the generator and its drive on a VAZ 2107 car, both injection and carburetor, are absolutely similar. The only difference between an injector and a carburetor is that the injector is equipped with a crankshaft position sensor
When it is necessary to replace the alternator belt on an injection-type VAZ 2107, this sensor must be removed.
During the operation of the VAZ-2107 car, the part in question wears out. The need to replace an element can be determined by the following signs:
- the appearance of cracks;
- whistling when starting the engine, or when sharply pressing the gas pedal, or after driving through a puddle;
- disheveled;
- sagging.
The device in question, unless of course it is a defect, has a certain resource during normal operation of the vehicle. This resource is usually 50-60 thousand kilometers, after which the belt should in any case be changed. How to do this not only correctly, but also quickly, we will consider in the material.
Alternator belt VAZ 2121 size
V-belt (profile A) Used on “Classic”, Samara, Niva 710 mm cars – VAZ 2108-21099 with a carburetor engine and generator drive. Of the most common 715 BRT cat. number 2108-3701720-01RU,
820 mm – VAZ 111, 1113 (OKA) – generator drive The most common are BRT 1111-3701720-01RU (geared), BRT 1111-3701720RU (simple).
840 mm – used on LADA 4×4 in a variant version to drive the power steering pump (vehicles of new years of production)
940 mm – for the generator drive of the VAZ “Classics” 2101-2107 of their modifications, the VAZ 2121 NIVA, the generator drive and the steering hydraulic pump drive of the VAZ 21213 (costs 2 belts) in a variant version a poly V-belt is installed, we will consider it below. AvtoVAZ 21010-1308020-82 (geared), BRT 2101-1308020RU (can be either simple or geared).
Poly V-belts (ribbed) are used to drive the generator and auxiliary mechanisms.
6PK698 – drive of the VAZ 21093 generator with an injection motor, 2113-2115 with an 8-valve injection motor. The belt tension is produced by a generator, without additional rollers or mechanisms. BRT 21082-3701720RU
6PK742 – drive of the VAZ 2110-2112 generator without power steering, found on the first production LADA Priora. BRT 2110-3701720RU
6PK823 Lada Granta – generator drive. Engine 2116, 8 valves. There is no belt tensioning mechanism. Elastic belt used 6PK823SF
6PK882 – drive of the LADA Kalina (1118) generator with an 8-valve engine, the belt tension is carried out by a mechanism.
4RK913 – drive of the generator and air conditioner Lada Largus, engine 1.4 BRT 4RK913RU
5K990 – alternator belt Lada Largus BRT 5K990R
6PK1005 – Lada Kalina (1118-1119) generator and power steering drive.
6PK1015 – drive of the generator and power steering VAZ 2110-2112 with a 16-valve engine, LADA Priora, Priora2 with a 16-valve engine, LADA Kalina, Kalina2, Kalina-cross with a 16-valve engine, LADA Granta with a 16-valve engine. Motor VAZ 21126, VAZ 21127
6PK1025 drive of the generator and air conditioning compressor of VAZ 2110-2112 with a 16-valve engine, LADA Priora, Priora2 with a 16-valve engine, LADA Kalina, Kalina2, Kalina-cross with a 16-valve engine, LADA Granta with a 16-valve engine. Motor VAZ 21126, VAZ 21127
5РК1110 – generator drive LADA Largus engine 1.4. BRT 5RK1110RU
5PK1747 – generator drive, power steering, air conditioning LADA Largus 8 valve engine. BRT 8200833541RU