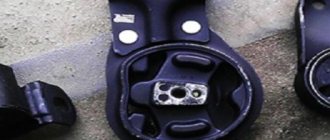
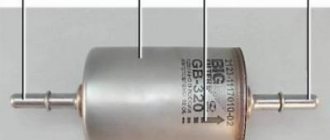
Hatchbacks of the 2112 family were produced with different 16-valve engines - 21124 and 21120. Before removing the valve cover, on the VAZ-2112 you will need to disassemble the intake module mount, as well as remove all the brackets attached to the top of the cover. The high-voltage wires are also disconnected, and the ignition module is removed from the 21120 engine. Let's look at all the steps in more detail.
The following video shows what the part that needs to be removed looks like.
Necessary parts and tools for repair
Troubleshooting the cylinder head begins with the purchase of original parts and various consumables, the list of which is as follows:
- Fuel intake system valve 8 pcs. (art. 21120-1007010).
- Exhaust gas valve 8 pcs. (art. 21120-1007012).
- Set of hydraulic compensators 16 pcs. (art. 21120-1007300).
- Gaskets for valve cover, cylinder head, intake manifold, exhaust manifold (all come as a set art. 21120-1002064-86).
- Bolts securing the cylinder head to the engine crankcase (art. 21120-1003271-018).
- Timing belt (art. 2112-1006040-02RU), timing tension roller (art. KT100507/100513), drive belt for mounted units (art. BP638).
- Engine oil and oil filter.
- Cooling system fluid.
Installation of valves on a VAZ 2112 is carried out using a standard set of tools, as well as several specialized types of keys:
- standard set of spanners from 8 to 24 mm;
- socket sockets in a set from 8 to 27 mm;
- end internal hexagons;
- mechanical valve retaining ring remover (depressurizer);
- torque wrench for tightening the cylinder head and camshaft bolts;
- paste for grinding valves (set for rough and fine grinding);
- metalworking cloth gloves to protect hands while working.
The work of replacing 16 valves on a VAZ 2112, the price of which as of this fall is about 50 thousand rubles at AvtoVAZ dealerships (or approximately 35-40 thousand rubles at ordinary car repair shops), is not a very complicated process. You can carry out the work yourself, for which it is enough to purchase the above-described spare parts and the necessary tools.
[custom_ads_shortcode1]
General rules for performing work, methods used
There are a number of general rules that must be followed when installing the block head:
- It is important to strictly observe the tightening torque. For these purposes, a special tool is used - a torque wrench. It is not recommended to perform this operation with regular keys;
- The head bolts must be pulled smoothly, jerking is not allowed. Since the tightening force on the last approaches is significant, extending the wrench arm with a pipe can simplify the procedure and ensure smooth, uniform tightening;
- Before installing the bolts, you need to carefully inspect the condition of the threads on them. There should be no dirt or foreign particles on the coils.
- The threads of fasteners should be lubricated with engine oil before tightening. But you should not pour grease into the holes for the bolts (especially for “blind” holes), since in the future it will not allow the fasteners to be fully tightened.
Despite the fact that each engine has its own characteristics of tightening the cylinder head, the general technology of this operation is the same. In general, two methods are used to tighten fasteners:
- In several approaches, bringing the tightening force to the required value;
- Tightening the fasteners to a certain force (in one or more approaches), and then tightening the bolts twice to a certain angle.
The tightening method is selected based on the type of bolts.
The first method is used when using non-stretching bolts (these are not used now, but they can be found on old cars). But often this type of fasteners requires tightening after a certain period of engine operation in order to compensate for the shrinkage of the cylinder head gasket. But such fasteners are allowed for reuse, and more than once.
The second method of tightening the block is relevant for most modern cars. And all due to the use of tensile bolts (the so-called TTY type).
Such fasteners, due to elastic deformation, are able to compensate for thermal expansion of the head and shrinkage of the gasket, but for this they need to be put into deformation mode (in fact, just stretched a little).
To do this, it is necessary to tighten the bolts twice to a certain angle. On some cars this angle is 45 degrees, on others it is 90 degrees.
But after the elements are put into elastic deformation mode, they will no longer be able to return to their original state, and therefore their reuse is not allowed due to the high probability of destruction.
Dismantling
It begins with the removal of all cylinder head attachments (intake and exhaust manifolds, radiator pipes, air filter duct, high-voltage wires and spark plugs), timing belt protective cover, resulting in access to the valve cover fasteners. We unscrew the tension roller of the generator and timing belts, remove them, then proceed to dismantle the valve cover fastenings, unscrew them, gaining free access to the cylinder head bolts. We unscrew them, after which the cylinder head can be removed from the engine crankcase.
[custom_ads_shortcode1]
General procedure
Although tightening the cylinder head has many nuances and features, the general technology of the operation is not complicated, it is only important to comply with the conditions.
The general algorithm of work is as follows:
- We study the documentation (tightening order and force);
- We prepare the tool;
- We inspect and wipe the surfaces of the block and head, clean the mounting holes (with a rag or compressed air);
- We lay the gasket;
- We put the block head in place (the correct placement of the gasket and head is ensured by guide bushings);
- Lubricate the threads of the fasteners;
- We install the latter in the holes and tighten them by hand;
- We specify the drawing scheme, the number of approaches and the force of each of them, as well as the time of breaks between approaches (all this is indicated in the documentation);
- We make the first approach, observing the tightening order (for convenience, you can mark the bolts according to the order with a marker). In the photo is a VAZ 2103;
- We carry out all subsequent approaches.
Some vehicles additionally require re-tightening of fasteners after a certain period of vehicle operation. This information must be indicated in the technical documentation.
Repair
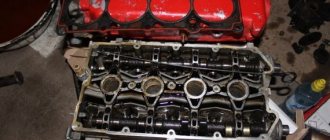
The cylinder head removed from the engine and placed on a workbench is disassembled. The fasteners of the camshafts are unscrewed and they are carefully removed, then the hydraulic compensators are removed from their seats and, using a screw depressurizer, the valve retaining rings (crackers) are dismantled, after which they are pulled out from their workplaces. After disassembling the cylinder head, we thoroughly clean it of technical contaminants. Each new valve must be ground into its working surfaces; this is done using a drill and a special grinding paste.
Having finished sanding, the working surface is thoroughly wiped with a cloth. All new parts are installed on the cylinder head. The timing mechanism (valve lifters, hydraulic compensators, camshafts and their front seals) is reassembled and the cylinder head is ready for installation on the engine.
[custom_ads_shortcode2]
Consequences of incorrect cylinder head installation
Correct tightening of the cylinder head is very important, since the performance of the motor directly depends on it. The cylinder head acts as a cylinder cover, and any violations in its fit affect the processes occurring inside the power unit.
Insufficient tightening of the head leads to a drop in compression due to loss of tightness at the junction of the cylinder head with the cylinder block, burnout of the gasket, breakthrough of working gases from the cylinders and their entry into the channels of the lubrication or cooling systems, penetration of technical fluids into the combustion chambers, which in turn is negative affects the functioning of the power unit and can cause very serious damage.
Excessive tightening also does not bring anything good; in this case, damage to the head often occurs - cracks appear, or fasteners are destroyed - bolts break, threads break, etc.
Uneven or incorrect tightening often causes warping of the head, due to which gaps appear at the junction of it with the block, which leads to the same consequences as insufficient tightening.
Installation
They start by cleaning the surface of the engine crankcase from gasket remnants and traces of leaks of technical fluids, then a new cylinder head gasket is installed in the seat and the assembled head is carefully put on special guides, after which, according to a special scheme, its mounting bolts are tightened with a torque wrench to the required forces.
The next step is to install the timing belts and generator, screw all the attachments into place, pour new oil and antifreeze into the engine, start the engine and carefully monitor it for fluid leaks and extraneous noise. Also watch the video of replacing valves on a VAZ 2112 (16-valve):
Hatchbacks of the 2112 family were produced with different 16-valve engines - 21124 and 21120. Before removing the valve cover, on the VAZ-2112 you will need to disassemble the intake module mount, as well as remove all the brackets attached to the top of the cover. The high-voltage wires are also disconnected, and the ignition module is removed from the 21120 engine. Let's look at all the steps in more detail.
The following video shows what the part that needs to be removed looks like.
[custom_ads_shortcode3]
Bolt tightening conditions
When installing the cylinder head, it is important to comply with the tightening technology, which includes a number of criteria:
- Tightening order;
- An effort;
- Condition of fasteners (for example, studs with nuts);
Each engine has its own tightening order, which must be followed to ensure uniform tightening of the head to the block and to prevent the occurrence of stress on any surface areas. For example, on a VAZ 2105 it looks like this.
Force is another important factor for the correct fastening of this engine element. Attracting the plate is carried out in several approaches (their number differs on different motors), each of which is performed with its own force.
The cylinder head fasteners are tightened with quite a lot of force, which leads to them being pulled out. Therefore, on many engines, bolts cannot be reused; they must be replaced. But there are also motors for which replacement of fasteners is not necessary and their re-installation is possible.
Removing the valve covers on engine 21120 (16v 1.5)
None Removing the box with the air filter To remove the filter, loosen clamps 1 and 2, and then disconnect connector 3. Pipes 1 and 2 are removed from the box. Use a 10mm wrench to unscrew the screw on the body, then remove the box from its mountings.
With a plastic cover, everything looks simple: either it is screwed on with bolts (key “10”), or held on with rubber bands. In the first case, the bolts are unscrewed, in the second, the cover is pulled up. The main thing is to unscrew the filler plug.
To disconnect high-voltage cables, you need to pull the caps out of the wells. The cables are also disconnected from the ignition module. It is pressed to the valve cover with three 10mm nuts.
We've sorted out the ignition module. Don't forget to disconnect the low-voltage connector and dismantle the module. If you do not unscrew the module, you will not be able to remove the valve cover on a VAZ-2112.
[custom_ads_shortcode1]
When to replace
This gasket must be replaced immediately after a leak is detected. If you do not replace it on time, then soon the entire surface of the engine, as well as all units near the internal combustion engine, will be covered in oil.
Then dust and dirt will certainly stick to the oily elements. Dust not only significantly spoils the appearance of the engine, because the valve cover is the first thing that catches your eye. A layer of oil and dust on the surface of the internal combustion engine greatly worsens heat exchange processes - the engine temperature will rise.
During operation of the engine with a leaking valve cover, oil will inevitably get to the sensors and other electronic devices - the sensors may fail. If the leak is quite severe, the oil level will quickly drop - driving without oil leads to very sad consequences.
This is interesting: Symptoms and signs of crankshaft sensor malfunctions and checking it
Most often, the cover is changed in the following cases:
- Engine overhaul;
- Determination of oil leaks at the seal installation site;
- Cylinder head repair, timing belt repair, unit maintenance.
The frequency of replacement differs on different car models - it all depends on the gasket material. Original products are of higher quality, non-original and cheaper ones are most often a low-quality copy from the Middle Kingdom.
The service life of the gasket depends entirely on the quality of the product and the material. The average price of an element is small, so everyone tries to buy something inexpensive, because the element is insignificant. Many people do the same. As a result, oil leaks under the hood. There is no need to do this.
Among the reasons for replacing the valve cover gasket, the first thing to highlight is the low quality of consumables for the car. It happens that you buy a product at an average price, but after a few days of intensive use of the car, the leak appears again.
When choosing, you should carefully examine the surface of the gasket and its materials; it is important to make sure that the part is elastic. Hard gaskets will not provide the required tightness, and gaskets that are too soft will certainly be pressed through during installation.
Another popular reason that leads to replacement is improper installation. The gasket is destroyed during its installation.
The part called “receiver”
First of all, you need to remove the throttle assembly: unscrew the cap on the antifreeze tank, disconnect the TPS and IAC connectors, unscrew the two fastening nuts (wrench “13”). It is also advisable to disconnect the negative terminal from the battery.
What to do before removing the receiver: Using a “10” wrench, unscrew the cable mounting bracket from the receiver. All that remains is to remove the throttle assembly: the operation is carried out so that the assembly remains above the expansion tank. The assembly itself is finally attached to the body partition.
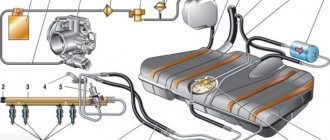
On motor 21120 we remove the receiver, that is, the upper part of the intake module:
- The ignition wires come out of brackets 1 and 2.
Then, loosening the clamp, you need to disconnect the brake system hose. What needs to be disconnected from the receiver. - From the studs on the 1st and 4th tubes, remove the clamps holding the wiring harness.
- Using an “8” wrench, loosen the nuts on the four clamps. Using a “10” wrench, the two fastening nuts are unscrewed, and the receiver can be removed.
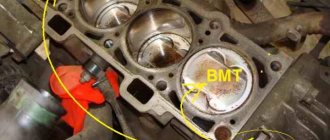
The crankcase ventilation hose is disconnected from the cylinder head cover. The final touch before dismantling In the photo, the intake manifold holes are closed with plugs. The filler plug is screwed in.
[custom_ads_shortcode2]
Common Mistakes
Despite the fact that automakers clearly indicate the procedure and nuances of tightening the cylinder head, many car enthusiasts make mistakes when assembling the engine. The most common of them are:
- Pouring oil into the mounting holes to lubricate the threads (the liquid is incompressible, so poured oil will not allow the head to be properly tightened);
- Over-tightening (exceeding tightening forces leads to damage to the cylinder head and the fasteners themselves);
- The use of damaged or inappropriate keys (the edges of the bolt heads may be torn off, after which it will be problematic to tighten or unscrew them normally);
- Use of unsuitable bolts as replacements (fasteners from different engines may differ in length, thread spacing, head height and diameter);
How to remove a plastic intake module
A wiring harness is attached to the front of the intake module. The cables go to the DPKV, DPRV (DF) sensors and to the adsorber valve. All connectors must be disconnected, then the wiring harness is removed.
The photo shows how the brake system hose is disconnected, as well as the crankcase ventilation hose. It is also necessary to remove the oil dipstick and tube by unscrewing screw 1.
Plastic part attachment points:
- Key “10” : two nuts 1;
- Key “13” : three nuts 2, two bolts 3.
All elements are shown in the photo.
[custom_ads_shortcode1]
What you need to know about a torque wrench
The bolts are tightened in a certain sequence - from the center to the edges, one at a time. If you are not a motor mechanic with extensive experience and an experienced hand, then the main condition for the correct performance of the work will be the use of a torque wrench. This tool is widespread everywhere, it is easy to buy or rent - just look at the newspaper advertisements or go to your neighbor’s garage.
Torque wrenches come in different designs, but they are all designed to measure the tightening force of threaded connections. When choosing a key, you need to find out in what units the measurement is taken and whether it matches the car manufacturer’s instructions.
In the international SI measurement system, the tightening force is called newton meters, in Russia it is often called kilogram meters, for some foreign cars you can find measurements in pound-force feet. To avoid errors when converting one unit of measurement to another, you can purchase a key with different scales.
Table: how to convert measurements from newton meters to pound-force feet
| Newton meter | 10 | 50 | 100 | 250 | 500 | 1 000 | 2 500 | 5 000 |
| Pound-force-foot | 7.376 | 36.878 | 73.756 | 184.391 | 368.781 | 737.562 | 1 843.906 | 3 687.811 |
To make sure your actions are correct, you can use a protractor to monitor the angle of rotation of the bolt after tightening it with a torque wrench.
This is what a torque wrench looks like, allowing you to correctly determine the force for tightening threaded connections
Which one to choose
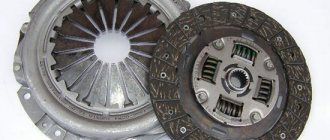
There are a lot of products on sale from different manufacturers. There are original components and replacements. Original cuffs are a priori better. They provide tightness longer, but cost several times more.
On the other hand, the quality of some analogues can also be excellent. A lot depends on the brand. For example, the Viktor Reinz brand is a worthy analogue. Reinz gaskets are equipped with special thickenings (or protrusions) so that when tightening, not the entire surface of the seal is pressed in, but only the profile. This ensures the reliability of the product; the rubber can withstand temperature changes longer.
Analogue products from Viktor Reinz are very popular. They are installed on Lacetti, Duster, Almera. They cost less than the originals but last longer.
Watch the video
The valve cover is a part that often has to be removed, especially if we are talking about a car from the domestic auto industry. So, for example, if we talk about the VAZ-2106, the valve cover is removed when adjusting the valves, and when checking the timing belt tension, and when dismantling the engine, and when replacing gaskets, and for many other tasks.
Of course, everyone should be able to perform this procedure independently. Fortunately, it’s quite simple to do and takes about half an hour, so it’s not even advisable to go to the salon to have it done. Let's figure out how to remove the valve cover to replace this or that part, using the VAZ-2106 as an example.
Adjustment of valves
If knocking, unstable operation, or increased vibration occur, you should pay attention to the valves.
If the valve timing of the gas distribution mechanism is disrupted, they do not operate accurately, that is, the full volume of gas does not enter the working area of the cylinders, complete combustion of the fuel-air mixture in the working chamber does not occur, and the cylinders are not purged. This is all accompanied by the appearance of a shock load on the camshaft cams on the drive lever and the shaft rod. Fuel and engine oil consumption also increases. What happens if you drive with unadjusted valves? Answer: rapid wear of engine parts, increasing cost and repair time.