It is indispensable if you live outside the city, it justifies itself as a car for the whole family and is very stable. With the arrival of the autumn-winter period, good and high-quality operation of the heater will be relevant. If the stove does not heat well, the Chevrolet Niva will become a very uncomfortable car, and you will have to forget about its advantages. Moreover, if the car was parked in the garage overnight, it is problematic to be in it and feel the cold comparable to that of a basement. Let's consider the main components of this technological unit of the car:
- radiator;
- fan;
- dampers;
- pipes;
- air duct;
- unit for regulating fluid movement.
The stove will work properly if each of its parts works properly and in a coordinated manner.
Main malfunctions and methods for eliminating them in the Chevrolet Niva car stove:
- The ventilating elements of the heater burned out. This will be immediately visible in winter by the formation of characteristic condensation on the windows. They simply need to be replaced with new ones;
- the unit that regulates the temperature breaks, since it can be made of plastic rather than rubber or rubber, which has greater wear resistance. Naturally, the possibility of the cable falling off should also be considered. Depending on the situation, you either carefully return the part to its place and it continues to perform its traction function, or you need to purchase a new one and replace it;
- poor filter performance due to clogging. Accordingly, they need to be cleaned or purged, otherwise air pockets will form in the stove, disrupting its productive operation;
- problems with the cooling system - you should rinse and fill in a new coolant - antifreeze or antifreeze, which is changed annually for prevention;
- The damper that regulates the supply of cold and hot air has broken. It will have to be replaced;
- The thermostat is not working well. It might simply get jammed. Please note that the heater will malfunction when driving fast. It must be replaced immediately, because poor quality work will lead to an increase in temperature throughout the Chevrolet Niva;
- The resistor on the radiator has burned out or the radiator is clogged. There can be many reasons: antifreeze, insects, leaves and other debris. Also, water should not be allowed to get into this part of the stove. The radiator must be cleaned periodically, and in case of a malfunction, a new resistor must be purchased and installed. Cleaning is carried out with compressed air or a vacuum cleaner, an industrial hair dryer;
- The heater control unit, the so-called controller responsible for regulating the interior temperature, may fail. This is already a problem with electronics; to fix it, you need the services of a specialist.
Recommendations for normal and long-term operation of the heating-cooling system in a Chevrolet Niva:
- periodically lubricate the bearings of the stove ventilation device;
- Check the filters and radiator regularly, and if necessary, clean them or purchase new ones. The filter cleans the air from dust and infections coming from the street;
- remove air pockets when the engine is idling and muffled;
- clean the pipes with citric acid or a special product, since poor quality coolant forms sediment and build-up in the pipes.
At a temperature of minus 20 degrees, the Chevrolet heating system should heat the top of the cabin to an average of 10 degrees, and the temperature in the legs is 5-7 degrees higher. Passengers in the rear seats will receive air with a temperature of about 14 degrees. This way, everyone will be in comfortable conditions, and the trip in winter will be quite pleasant.
To avoid problems with the heating and ventilation system, preventive maintenance should be carried out systematically. After all, a car is a complex device that will drive well and function properly only with proper care.
Of course, problems with the stove are not the most critical troubles or breakdowns, but your health, mood and, naturally, performance depend on your comfort and the comfort of your passengers. We value not the quantity, but the quality of the years lived, so let your Chevrolet Niva be a high-quality, elegant and capable car.
How to fix the problem in which the stove on a Chevrolet Niva does not blow at your feet
It is not difficult to fall in love with a vehicle like the Chevrolet Niva with all your heart. The car is truly beautiful and comes with a fair amount of benefits. Unfortunately, in modern reality it is almost impossible to find a device or mechanism that does not have flaws.
The Chevrolet Niva was also no exception, so it is not at all surprising that after some period of direct operation of this vehicle, complaints from car owners begin to arrive. This flow of some discontent especially intensifies in the winter.
Complaints are related to the fact that on the Chevrolet Niva the stove does not blow into the feet at all, which freeze very quickly, depriving both the driver and passengers of comfort. Why the stove refuses to blow in this direction is not a mystery. It’s just that most drivers are convinced that this is a technical defect due to insufficient attention from the designers who developed such a model.
To ensure proper comfort for the driver and passengers, it will be necessary to modify the heater damper drive.
This way you can come to an agreement with the Niva Chevrolet stove and make it evenly warm up the interior.
The stove is good (if it works). The stove is hot, the cabin is warm, I can’t find where to blow into my feet...
The filter cleans the air from dust and infections coming from the street; remove air pockets when the engine is idling and muffled; clean the pipes with citric acid or a special product, since poor quality coolant forms sediment and build-up in the pipes. As a result, it cannot effectively blow in several directions at once, but when the flow is directed towards the legs, the air is distributed anywhere, but not in the desired direction. This is done as follows:
If you move the lever in the opposite left direction until it stops, air will flow between the side and top deflectors. Actually, this is a design feature of this model.
Unfortunately, in modern reality it is almost impossible to find a device or mechanism that does not have flaws. The Chevrolet Niva was also no exception, so it is not at all surprising that after some period of direct operation of this vehicle, complaints from car owners begin to arrive. This flow of some discontent especially intensifies in the winter.
Complaints are related to the fact that on the Chevrolet Niva the heater does not blow into the feet at all, which freeze very quickly, depriving both the driver and passengers of comfort.
Why the stove refuses to blow in this direction is not a mystery. It’s just that most drivers are convinced that this is a technical defect due to insufficient attention from the designers who developed such a model.
The radiator must be cleaned periodically, and in case of a malfunction, a new resistor must be purchased and installed. Cleaning is carried out with compressed air or a vacuum cleaner, an industrial hair dryer; The heater control unit, the so-called controller responsible for regulating the interior temperature, may fail.
We recommend: Why antifreeze boils in the expansion tank: a review of common breakdowns
This is already a problem with electronics; to fix it, you need the services of a specialist. Recommendations for normal and long-term operation of the heating-cooling system in a Chevrolet Niva: The filter cleans the air of dust and infections coming from the street; remove air pockets when the engine is idling and muffled; clean the pipes with citric acid or a special product, since poor quality coolant forms sediment and build-up in the pipes.
At a temperature of minus 20 degrees, the Chevrolet heating system should heat the top of the cabin to an average of 10 degrees, and the temperature in the legs is degrees higher.
You can also relatively smoothly regulate the amount of air supplied in different directions. After such a modification, you may encounter a decrease in air flow. This is due to air redistribution.
Chevrolet Niva 2004, 80 l. With. — self-repair
The result is that in the middle position the cabin is still quite cool. To eliminate this drawback, you will need an unnecessary plastic canister.
We cut off the neck from it and attach it to the deflector. The result is a fairly powerful and targeted flow.
The cause of cold in the cabin may also be a simple heater failure. Therefore, we will consider the most common causes of breakdowns. All of them lie on the surface, and in principle are characteristic of many modern cars. The most common cause is a blown fuse. Check the appropriate fuse and replace it if necessary.
Heater diagram
If the temperature with a fully warmed-up engine is within degrees, we look for the reasons for the lack of air in the legs in the heater design.
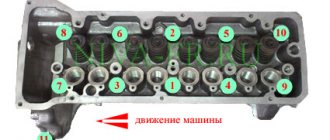
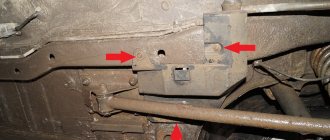
A feature of the stove on a Chevrolet Niva is the absence of a heater radiator tap, that is, antifreeze circulates in a full circle in winter and summer and passes through the heater radiator. Taking this fact into account, the factory somewhat complicated the design of the air ducts and air dampers - there are two of them in the Chevrolet Niva. One works for frontal airflow, the second is responsible for supplying air to the feet of the front and rear passengers and the driver.
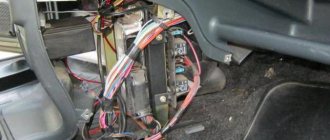
It is with this damper that problems arise that we will try to solve. We take out the central air duct and the air duct that conducts air to the driver’s feet.
Unscrew 2 screws on the radiator.
And we begin to assemble in reverse order. If during assembly you have a couple of extra screws left, then you have assembled everything correctly! If you have any questions or maybe I forgot to add something, please contact me, I’ll be happy to help.
Niva Chevrolet Shaitan Cyclone in the legs, revision!
The selection of the stove operating mode, temperature and air flow direction is made using the stove control unit located on the center console. Heating system with air conditioning The principle of operation of a car heater with air conditioning is similar to that described above. However, its design is significantly different. Instead of an intermediate heater housing, an air conditioner evaporator is installed, hidden by a plastic casing.
When the air conditioner is turned on, air is supplied to the cabin through the evaporator using a damper. The design of a car heater with air conditioning is somewhat different: To carry out high-quality repairs, you first need to understand the reasons and identify the faulty element of the system.
The stove does not heat the footwell. There may be several reasons why the stove does not direct air to the feet. First you need to find out whether this mode is turned on correctly.
Due to the design features of the damper system, the direction of air to the legs is carried out as follows: Set the fourth rotation speed of the stove fan. Set the heater mode switch to the upper vertical position.
Switch the mode controller one position to the left. After this, air should begin to flow into the legs. If this does not happen, the procedure should be repeated several more times.
If the mode still does not turn on, you should check the following components: Coolant leakage If antifreeze leaks from the cooling system without visible streaks on the radiator and pipes, you need to pay attention to the condition of the heating system
The main signs of a coolant leak through the heater are: Typically, the leak occurs through the heater radiator. To verify this, you need to remove the lower part of the center console.
DIY heater replacement
If traces of moisture are detected in the area of the stove body, it is recommended to replace the radiator. If a coolant leak is detected through the heater radiator, it should be replaced. Before replacing the heater radiator, you should check the tightness of the heater pipes and their connections.
The stove does not warm up the air well. Often the stove does not warm up the interior effectively enough. Instead of hot air, slightly warm or even cool air comes from the deflectors.
This usually happens for the following reasons: Before the decisive step of removing and replacing the heater, you should pay attention to the heater core. It may well be that the reason for the non-working state lies precisely in this
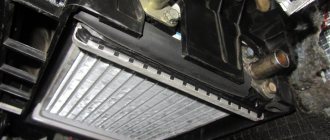
In a Chevrolet Niva car, the stove can be installed and removed without any problems, the main thing is to follow the procedure. Radiator The radiator of the Niva-Chevrolet stove is a sensitive topic and deserves separate consideration.
The standard heating system in this car does not always work well and produces little heat. The standard radiator begins to leak over time, and you have to replace it.
But don’t rush, maybe it makes sense to clean it or solder it? But if there is no option other than replacement, then that’s what you should do.
Before replacing the radiator, you need to understand the existing types of such devices. Types of radiators Radiators are made from two types of materials: Each has its own pros and cons. An aluminum radiator heats up quickly, is inexpensive and has good rigidity with low weight.
DIY heater replacement
So, your heater radiator is leaking, to make sure of this and not engage in “monkey work”, touch the radiator pipes on the front passenger side, if they are dry, then look for a puddle under the driver’s carpet. If the puddle is from antifreeze, it will taste greasy and sweet. So, if all the signs match, then most likely the radiator is leaking.
We go to the store and buy a radiator. I bought a regular aluminum one for 500 rubles and some clamps just in case. You will also need 10 liters of antifreeze. Also stock up on boxes for self-tapping screws, because there will really be a lot of them!
Drain the antifreeze. To get as much as possible, blow into the expansion tank.
I’ll say right away that you need to remove the dashboard if you don’t want to end up at a gas station, although judging by my guesses, even in that case you’ll have to remove the dashboard.
First of all, we remove the glove compartment, it is easy to remove, there should be no problems.
Unscrew the center console along with the radio. There is nothing complicated here either.
Next, unscrew the decorative panel of the center console, which is on the side. We loosen the lining of the checkpoint tunnel. To do this, it is enough to unscrew one (seemingly) extreme screw. On the driver's side closer to the pedals, the passenger moans similarly.
Next, we begin to disassemble the decorative cladding
dashboard, simultaneously throwing off the dashboard and the steering column housing with switches. We take out the air duct, which is located behind the dashboard. Here you will have to suffer with the cables. Why can't you remove the entire dashboard? - you ask. This bolt won't give you anything.
This is the bolt. And how did the designers even manage to make it twist on the evaporator side? So we have this thing. Dashboard frame with steering column.
Unscrew the steering column universal joint. And we begin to unscrew the dashboard frame, having first removed all the wiring from it. We carefully pull it all out of the car and voila. You've almost reached the radiator.
Next, unscrew the radiator housing from the evaporator and the gearbox tunnel. Here you will come across a screw, which is located between the evaporator casing and the radiator casing. This is really an ambush! Unscrews with a tambourine and obscenities.
When assembling, you don't have to tighten it, because... it is even more difficult to screw it on, and it holds practically nothing. We take out the central air duct and the air duct that conducts air to the driver’s feet. That seems to be it. Unscrew 2 screws on the radiator. We take it out and install a new one. And we begin to assemble in reverse order.
If during assembly you have a couple of extra screws left, then you have assembled everything correctly!
Thank you for your attention! If you have any questions or maybe I forgot to add something, please contact me, I’ll be happy to help. The most important thing is not to be afraid of the amount of work and take care of yourself!
The stove is the central element of the interior heating system of any car. Any malfunction, especially in the cold season, leads to very unpleasant sensations. A well-functioning stove is the key to a comfortable climate inside the car.
Heater diagram
The most common reason for its failure is: Warm air does not enter the lower part of the cabin Before starting repairs of the stove, you should check the temperature of the coolant. Perhaps the problem is not in the interior heater, but in the cooling system.
With the help of damper position regulators, warm air is directed to different parts of the cabin. First, the dampers should be adjusted. To supply hot air to your feet, follow these steps: The engine warms up until the warm air can be felt with your hand. Consequently, it is almost impossible to open the tap without breaking it.
stove Niva Chevrolet
https://youtube.com/watch?v=UNMCm8ypDbI
To get to it, you need to dismantle the dashboard in the cabin on the passenger side. The stove tap is mounted in a special niche in the engine compartment. If the tap has been replaced, then it is better to install new pipes along with it, because during operation they have probably lost their elasticity.
Collective farm tuning of the Niva Chevrolet stove: In some cases, the correct switching method does not work and then you have to modify the heater in order to achieve its full functionality. The main problem with dampers and ducts is leakage.
We will improve the cracks and eliminate leaks in the stove. Remove the heater control unit by disconnecting all wires and cables from it. If there is a radio, remove that too. Disconnect the transmission tunnel lining.
You don’t have to remove it completely, but only lift it by unscrewing two screws on the driver’s and passenger’s sides. Remove the steering wheel, steering column trim and unscrew the screws securing the front panel. When removing the dashboard, mark all the wires to make it easier to reattach them in their places in the future.
Without removing the entire front panel, when dismantling the heater unit, some elements of the air conditioner and the stove itself can be damaged. Remove the front panel frame attached to the body with screws. The heater housing cannot be removed without dismantling the front panel frame. Behind the frame you will find the heater unit casing, connected to the intermediate housing of the heater or to the evaporator section on a car with air conditioning.
Chevrolet Niva 2012, 80 l. With. — self-repair
Installation of a new unit is carried out in reverse order. The most common purpose of such tuning is to improve the air supply to the driver's and front passenger's footwells. To do this, install additional air ducts and adjust the shape of the damper drive strip
For such modification you will need: You must work with the plastic of the heater housing very carefully, as it is quite fragile
The steps are performed in the following order: Select tubes suitable for the role of additional air ducts. You can use plumbing pipes as additional air ducts. Remove the side trims on the center console on both sides.
Air flows in the cabin are distributed by air ducts, which are located under the instrument panel and under the floor tunnel lining, and under the floor upholstery to supply air to the feet of the rear passengers.
To control the distribution of air flows, use the distribution regulator handle on the center console of the instrument panel, as well as the regulators and guides of the central and side deflectors on the instrument panel.
To heat the interior, move the temperature control knob to the hot red zone. In this case, the outside air is directed using a damper through the heater radiator, which is integrated with the engine cooling system.
Remove the screws of the tie rod brackets. Disconnect the rods from the heater damper levers. Unscrew the screw of the bracket securing the recirculation flap drive rod and remove the lever bracket and disconnect the wiring harness block from the heater electric fan switch.
Heater diagram First of all, we want to orient you that the Niva already has a liquid-type heater installed, which allows you not only to supply warm air into the car interior, but also to cool the running engine, preventing it from overheating. It's no secret that overheating the engine entails extremely undesirable consequences.
An electromagnetic clutch is built into the compressor pulley, which engages and disengages the compressor shaft from the pulley according to signals from the engine control system controller. Refrigerant vapor from the compressor under high pressure enters the condenser located in front of the radiator of the engine cooling system. Passing through the honeycombs of the condenser, the refrigerant is cooled by the counter flow of air and with the help of fans of the cooling system.
The device of the stove of the Niva Chevrolet car
The Chevrolet Niva is equipped with a liquid-type heater. It supplies warm air to the cabin and cools the engine, overheating of which can lead to disastrous consequences and costly repairs.
Without air conditioning
The Chevrolet Niva heating system consists of the following elements:
- ventilation duct;
- windshield heating duct;
- intermediate body;
- air intake filter;
- fan;
- interior heating duct;
- foot heating duct;
- heater radiator.
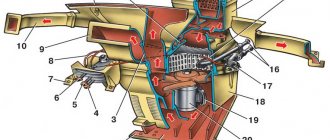
The intensity of the hot air supply is regulated using dampers. The air duct system distributes the heat flow to various areas of the cabin: windshield, side windows, legs, doors, etc. In addition, there is a four-speed air supply switch.
Heating system for the interior of a Chevrolet Niva car, where 1 is the side deflector air duct; 2 — windshield air duct; 3 - intermediate body; 4 - intermediate air duct; 5 — outside air filter housing; 6 — fan housing of the heating and ventilation system; 7 — central deflector; 8 — air duct for blowing the front passenger’s feet; 9 — facing of control units; 10 — front air duct for blowing the legs of rear seat passengers; 11 — rear air duct for blowing the legs of rear seat passengers; 12 — heater assembly; 13 — air duct for blowing the driver’s feet; 14 - side deflector
With air conditioning
The air conditioning system allows you to regulate the temperature and humidity in the cabin. Before turning on the air conditioner, the heater fan is turned on, and the temperature control knob is set to minimum. Almost the entire air conditioning system is located in the engine compartment. Only the evaporator is brought into the cabin between the heater and the electric motor, providing heat exchange between the incoming air and the refrigerant.
Heater and air conditioner diagram, where 1 - heater housing; 2 — inlet pipe of the heater radiator; 3 — heater radiator outlet pipe; 4 — air conditioner evaporator housing; 5 — evaporator outlet pipe; 6 — evaporator inlet pipe; 7 — fan housing; 8 — control cable for the external air supply damper
As the refrigerant moves through the evaporator tubes, it absorbs heat and turns into a gaseous state. The evaporator fins are cooled, and the fan directs cold air into the cabin and reduces the temperature. Gaseous refrigerant from the compressor under pressure enters the condenser, cools and turns into a liquid state. After this, the liquid is supplied to the receiver, and from it to the evaporator reducer, where it again turns into a gaseous state. A new cycle begins.
Replacing the stove fan
Replacing a heater motor is quite simple.
Required Tools
To work you will need:
- set of hex keys;
- Phillips screwdriver;
- new electric heater motor.
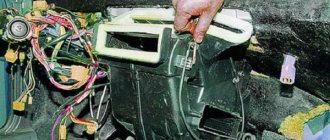
Removing the stove fan
The stove fan is removed as follows.
- The negative terminal of the battery is disconnected.
- On the right (in the direction of travel) under the windshield there is a cabin filter protected by a snap-on lid. After removing the cover and removing the filter, access to the heater fan is available. To access the heater fan, the cabin filter is removed
- The impeller is removed. To do this, use a Phillips screwdriver to unscrew the bolt holding the mounting bracket. The impeller moves to the side and is removed. To remove the impeller, you need to unscrew the bolt and remove the mounting bracket
- In the cabin, in front of the passenger seat, the fastening of the glove compartment panel is unscrewed. To access the electric motor, the glove box panel is removed
- The connector with the power wires is disconnected. To remove the electric motor, you must disconnect the connector with the power wires
- Use a short 10mm hex to unscrew the mounting bolts and remove the electric motor. The heater motor is secured with three bolts
- After removing the engine, the impeller is carefully removed through the cabin filter niche. The impeller can be pulled out freely from the cabin filter side
Installing a stove fan
The faulty electric motor is repaired or replaced with a new one. A damaged impeller should also be replaced. A thin wire is threaded through the holes in its body and the cavity of the cabin filter is secured. The impeller must be installed in such a way that the groove located inside it fits into the pin of the electric motor shaft.
Before installing a new engine, the axle is lubricated with a special lubricant.
Assembly is performed in reverse order. If the impeller does not fit into place, it should be moved several times in different directions until it is completely seated on the motor shaft. Then, under the hood, the wire is cut with wire cutters, the mounting bracket is installed and the bolt is tightened. New heater fan installed.
Thus, diagnosing faults, repairing and replacing the heater fan on a Chevrolet Niva is not very difficult. This will require a minimum set of standard tools. Keep an eye on the stove, and the inside of your car will always be warm.
Causes of poor stove performance
The recirculation lever is removed and the panel trim is removed. Behind the cladding, use a screwdriver to unscrew the screws and remove the backlight bulbs for the instrument panel of the heating system.
The terminal block is disconnected and the bolts securing the rods are unscrewed. The heater damper rods and the heater fan switch are disconnected.
The heater is repaired, if required, and reinstalled in the reverse order. Before you begin removing the radiator, you must purchase a new radiator. Drain the antifreeze from the radiator and remove the air supply filter.
To remove the filter, you need to unscrew the housing screws. Disconnect the power wires for the electric fan and heater. We unscrew the screws securing the fan and the heater itself.
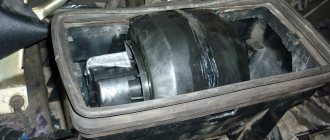
We remove the heating duct, which is designed to warm the feet of passengers sitting in front. Unscrew the 2 self-tapping screws securing the heater and slightly pull the radiator out of the socket.
Use pliers or side cutters to break the upper corner of the plastic radiator flange. When installing a new radiator, first cut off the corner. After installation, seal the hole in place of the cut corner. Turn the fan on to maximum and check for cold air leaks at the entrance of the air duct from the fan to the stove. There is no factory seal and if there are air leaks, cold air will blow into the passenger's feet.
I sealed it with sealant and it became warmer in the car. The old and thin radiator was removed.
New in the process of installation. When removing the old radiator, I was very upset by the amount of coolant with which he filled the heater. I also felt for the damper with my hand through the hole for the radiator and realized that the lever opened it by one percent. I set the damper to the vertical position with my hand, the lever did not react at all.
My account
After removing the glove compartment, access to the heater valve opens. A rod is attached to the crane lever using a clamping bracket. Use an open-end wrench size 7 to loosen the nut located on the bracket.
The traction cable is removed from the crane lever. Using an open-end wrench, the fastening of the rod is loosened. Using a 10mm socket, unscrew the two bolts securing the faucet to the wall of the engine compartment. The mounting bolts of the heating tap are unscrewed with a 10 mm socket wrench. The heater tap is removed from its niche and replaced with a new one.
The heating tap is removed from its seat. The tap is assembled and installed in the reverse order. Initially, you should disconnect the hose from the pipe. This action is quite difficult, since the hose sits tightly on the pipe. If you move incorrectly, your hand may slip and you may be injured.
For this reason, we recommend that you wear gloves to avoid such unfortunate consequences. Now, using a screwdriver, unscrew the screws that secure the seal, pressing it against the partition.
To dismantle the stove faucet, it is necessary to drain the antifreeze. Open the faucet as far as possible. We substitute the hose and insert one end into the basin. To drain the antifreeze, you need to unscrew the plug on the cylinder block. Lightly hold the hose with your hand and gradually open the cap located on the expansion tank.
We do this work carefully, as the stream of antifreeze will gradually increase
In order to remove the stove valve, it is necessary to completely drain the antifreeze. Loosen the clamp on the carburetor heating pipe and remove this part from the fitting. After all the coolant has flowed out, screw the plug into the block and tighten it well. Antifreeze leakage from the stove In used cars, coolant often begins to leak from the stove. The reason for this is usually wear and tear on the pipes or a malfunction of the heater tap.
Since antifreeze circulates under pressure, all connections must be tight. However, during prolonged use, hoses and gaskets lose their elasticity and burst. After inspecting the heating system and identifying the leak, the worn part is replaced with a new one. When making repairs, you should not use clamps made in China due to their poor quality.
Due to loss of elasticity, the stove pipes crack over time and leak antifreeze. The coolant can also leak from the heater radiator itself. In this case, it will have to be replaced with a new one.
Replacing a Chevrolet Niva Chevrolet heater core
https://youtube.com/watch?v=PgDz4rJ2GJ0
The stove does not heat well. To diagnose the malfunction, turn on the ignition, start the stove and try to change the intensity of the air supply. If at the first three speeds the air is not supplied or is supplied cold, the cause of this is a faulty resistor that needs to be replaced.
The reason for the inability to switch speeds is the failure of the resistor. If the resistor is OK, the diagnosis continues. If it is low, add antifreeze to normal and check it after a few days.
If the level has noticeably decreased, you should pay attention to the hoses and pipes, wear of which is usually the cause of coolant leakage. One of the reasons for poor heating of the interior by the heater may be a low level of coolant in the system. If the control unit malfunctions, it will have to be removed
Faucet replacement process
Repairing the unit at home is only possible if you have the appropriate tools - it’s easier to contact a car service center.
Another reason for the stove stopping may be a dust-clogged cabin filter.
In this case, the load on the electric motor increases, which, in turn, leads to failure of the heater fuse. In this case, it should be washed. This is true when purchasing and operating used cars. However, it can sometimes fail. Replacing the heater cable Sometimes it is not possible to change the position of the heater damper.
The reason for this is a broken cable. To replace it, you will need a standard set of tools and a headlamp. Replacing the cable is carried out as follows. The driver's seat moves back. The handles are removed from the damper control panel and the screws are unscrewed.
The panel is dismantled on the left side at the location of the driver's feet. To access the cable, you will need to remove the heater control mechanism. The latches securing the cables are removed. The recirculation damper mechanism is dismantled and the cable is removed.
Each end must be twisted into a ring and securely fixed. Using a cable, the position of the air supply flap is changed. Assembly is carried out in the reverse order.
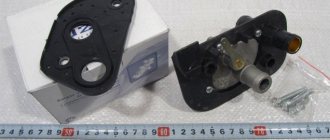
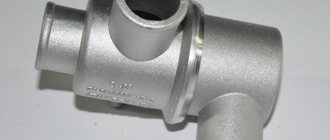
What is a stove tap, its functional features and location
The stove tap is a metal part that resembles a regular water tap. Antifreeze (coolant or coolant) constantly flows through it.
In the Chevrolet Niva, the coolant can flow through 2 cooling circles: winter and summer. The heating tap gives the driver the opportunity to switch to one of them. For example, with the onset of summer, when the tap is fully open, it is almost unbearable to be inside the car due to the heat, so it is closed for this period of time, and with the onset of cold weather, the tap is opened again. Due to active use, the part eventually becomes unusable and leaks coolant.
It is very easy to determine whether a part is faulty - lift the cover in the Chevrolet Niva interior. If there are obvious signs of leakage, the unit must be replaced.
In the diagram you can see where the heater tap is located and the circulation of antifreeze in two circles
It is best to replace the metal faucet of the stove with a ceramic one, which will increase its service life several times.
How to remove and install the stove tap
To replace a part, you must initially prepare the appropriate consumables, as well as tools:
- open-end and socket wrenches;
- pliers;
- flat screwdriver;
- a five-liter tank into which you will need to drain the liquid from the radiator;
- new faucet.
After preparing the necessary tools, you can begin replacing the tap, and the sequence of actions should be as follows:
- We install any container with a volume of about five liters under the radiator and unscrew the cap on it. Wait approximately 10 minutes until all the coolant has drained.
- Next, open the hood of the car and loosen the pipe clamp on the tap pipe.
- We take pliers, carefully bend them and pull out the short cotter pin.
Remove the heating tap clamp using pliers
Unscrew the screws securing the seal using a 7" wrench
Remove the sealing plate from the faucet
In order to get to the stove tap, unscrew the nuts and remove the glove box
Using an open-end wrench, loosen the nut fastenings to remove the traction cable
Unscrew the heating tap mounting bolts
A pipe is installed on the part, as well as rod fastenings; in this case, new gaskets must be used, which are pre-coated with sealant.
Sealing plates are coated with sealant to reduce the risk of coolant leakage
The tap is put in place as follows:
- We tighten the two nuts on the pipe with the rod using a “10” wrench.
- We put the part in place and tighten the fastening bolts located on the tap.
- We install the rod and tighten the clamping bolt using the key to “7”.
- We tighten the self-tapping screws that hold the sealing gasket with an “8” wrench.
- We insert the pipes into the fittings and tighten the clamps.
The new heating tap is installed in the reverse order
Check whether the second pipe is tightly connected to the radiator; if not, then replace the gaskets there too. In addition, we strongly recommend installing new hose clamps.
When filling the system with liquid, fill it slowly to avoid air pockets. Antifreeze is poured in until it begins to flow out of the pipe. Moreover, the heating tap must be open.
Antifreeze must be poured into the heating system carefully, avoiding the formation of air pockets.
Video: how to install a heater tap on a Chevrolet Niva
Replacing a broken tap with a new one on a Chevrolet Niva is easy. To do this, you need to acquire the usual set of tools that are found in every car, and buy a new faucet. After which even an inexperienced driver will be able to install it on the car.
Advantages and disadvantages
The design of the Chevrolet Niva stove is considered successful, since in principle it is similar to the design of the heating system of many foreign cars that are not equipped with air conditioning. In this regard, a number of advantages of such a scheme can be identified.
- Quick heating of the interior. Now there is no need to wait for the thermostat to open. The air becomes warm as soon as the coolant begins to heat up.
- Possibility of engine cooling through the heater radiator. A very common failure in the cooling system is a stuck thermostat. And if a thermostat stuck in the open position does not interfere with getting to the service station, then it is impossible to move the car with the cooling radiator closed. By turning on the heater, you can remove some of the heat and cool the engine somewhat.
- The recirculation mode helps to quickly heat the interior or temporarily stop the penetration of outside air.
Types of radiators
Radiators are made from two types of materials: copper and aluminum. Each has its own pros and cons. An aluminum radiator heats up quickly, is inexpensive and has good rigidity with low weight. However, such a device cannot be repaired, since it is very problematic to solder it. Aluminum also does not retain heat well, so it cools quickly.
Copper radiators are more expensive, but have their own positive characteristics:
- Unlike aluminum ones, they last longer because copper does not corrode.
- They maintain the set temperature for a long time, despite the fact that they heat up slowly. In the Niva SUV, the stove requires heating more space than in conventional sedans. This is why you should choose a high-quality radiator.
The downside of a copper radiator is one thing: acquiring parts of acceptable quality is not very easy. A copper device is more expensive than an aluminum one. Its price is in the range of 2000–2500 rubles.
Symptoms of a malfunctioning stove fan
The main signs of a stove fan failure are as follows:
- the electric motor does not work;
- the rotation speed of the electric motor decreases;
- The fan starts to creak.
Depending on the symptoms that appear, the procedure for eliminating the problem is determined.
The electric motor does not work
If the electric motor stops working, the noise in the cabin disappears when the heater is turned on.
Often the reason for this is the failure of fuse F18 with a rating of 25A in the corresponding block, through which voltage is supplied to the stove motor.
Another reason may be damage to the fan motor winding - if the wire insulation is damaged, an interturn short circuit may occur. In this case, the electric motor must be replaced.
When there is an interturn short circuit, the electric motor stops working.
The rotation speed of the electric motor decreases
When the rotation speed of the motor shaft decreases, it is somewhat more difficult to determine the source of the problem. The noise level becomes noticeably lower as the motor power decreases. This may be due to severe wear on the armature or brushes. In addition, the fan begins to consume much more current, and this can lead to the failure of fuse F18.
If the armature is heavily worn, the electric motor will rotate much more slowly.
The fan starts to creak
The fan begins to creak when the motor bearings wear out. The more wear, the stronger the squeak. If you do not take any action, the heater fuse will burn out and the motor itself will jam. In this case, the electric motor should be replaced with a new one.
Replacing the heater fan fuse
Almost any malfunction of the stove motor leads to the replacement of fuse F18. On a Chevrolet Niva car, the fuse box is located in the passenger compartment under the instrument panel and is closed with a cover secured with two self-tapping screws. When replacing F18, it is recommended to check and, if necessary, replace other fuses.
The heater fuse is located in the fuse box under the instrument panel
If fuse F18 has to be changed quite often, then the problem should be looked for elsewhere. There may be a short circuit somewhere in the motor power supply circuit. Sometimes the fuse blows as a result of severe contamination of the cabin filter. In this case, the electric motor does not have enough power for normal air ventilation, and the fuse fails.
Often the cause of the heater motor stopping is a blown fuse.
The suspicious fuse is removed from its seat in the block using special tweezers. If it burns out, a new one is installed in its place. When checking, it is better to use a multimeter, since it can be difficult to visually determine the integrity of the fuse.
Chevrolet Niva heater housing
Generations of Chevrolet Niva
Heater housing for Chevrolet Niva in Moscow stores
city Shcherbinka st. Kosmonavtov, house 1, building “B”, building 33, (in Yandex Navigator: “Autoservice Superstore”)
Car service Superstore
Auto dismantling and auto service, sale of used spare parts Auto dismantling of Chevrolet Cruze, Captiva, Lanos, Aveo, Lacetti, Orlando, Spark, Daewoo Matiz, Daewoo Nexia, Opel Antara, Astra H and J, Ford Focus 1 and 2 and 3, Fusion, Fiesta, Nissan Qashqai, Land Rover Freelander. Car service, maintenance and repair. Body work, painting. Engine repair, chassis repair, muffler repair. Electrical repair.
Lenin Ave., bldg. 2
LLC Akkom
Akkom LLC is an auto dismantling shop for such well-known car brands as Chevrolet and Daewoo. For more than 10 years, it has been offering used spare parts on the market that have not lost their consumer qualities. Constant price monitoring allows us to offer spare parts at very competitive prices.
st. Sovkhoznaya, 10A, territory of the Motor Depot of the Ministry of Agriculture
(985) 922-20-56 engine/gearbox department
(905) 503-77-71 spare parts department
MotorKPP.RF
Our company specializes in the supply of contract engines and gearboxes from automobile dismantling yards in Europe (mainly Sweden, Germany and England). We also cooperate with many dealerships in Minsk and Moscow, and if suddenly you URGENTLY need a motor that is not available in our warehouse, then we will buy it for you from our partners, check it for you, organize DELIVERY to any location in Russia, Belarus and Kazakhstan, if necessary, to the gate of your car service. In Moscow (South-Eastern Administrative District) we have the main engine warehouse and car service center, where, if necessary, you can install the unit purchased from us. We are always happy to help you. We also have several small warehouses in Moscow and the region (for the convenience of transporting motors to different transport companies).
Signalny passage 16 building 3
Er-Motors
Used and new spare parts for all models of SKODA, SUZUKI, CHEVROLET, DAUGHTER, SSANG YONG, CITROEN, PEUGEOT, RENAULT, MITSUBISHI, FORD, JEEP, OPEL, SEAT, CADILLAC. In stock: spare parts for the body, optics, amplifiers, components, radiators, glass, chassis parts, etc.
Motorfrance
Used store motorfrance spare parts operating hours from 10-00 to 20-00 CAR SERVICE AUTO ELECTRIC! OUR MAIL Sales of used. spare parts and units from Europe for the brands Mersedes-Benz, Renault, Nissan, BMW, Chevrolet and Hyundai, all spare parts are imported only from Europe!
Moscow (m. Vladykino)
st. Malaya Botanicheskaya, 24 A building 1
Carfix.rf
Sale of auto parts for Mercedes-Benz, BMW, Land Rover cars. New/used, original/non-original. More than 2000 items in stock and on order from 1 day. Original oils and filters in stock fenders hoods bumpers radiators, etc. low prices for new parts to order
Sevastopolsky prospect 51/2
Tahoe Trekker Blazer
Used contract auto parts, new original and non-original ones in stock and on order. Large assortment, reasonable prices. Warranty for spare parts. We do not calculate interest on returns. We do not sell insurance or repair parts. Direct deliveries from the USA from our warehouse. We are accredited with increased leverage at many US auctions. We ourselves deliver the cars to our own warehouse located in North Carolina, disassemble them, load them into a container, clear them through customs and deliver them to Moscow. We try to bring the best spare parts because... The cost of delivery is high, it’s better not to ship it than to throw it away here
Zheleznodorozhny (Zheleznodorozhny)
st. Avtozavodskaya, 48
Auto Forward in Zhelezka
The auto shop is located geographically in the Moscow region. City of Balashikha microdistrict Zheleznodorozhny. A wide range of used auto parts from Europe for cars of the following brands: Opel, Kia, Chevrolet. Products are in stock and to order. Units, spare parts and accessories. All products are of high quality, along with affordable prices. Delivery is also carried out to the regions.
st. Marshala Katukova, 3, bldg. 1
IP Rykov
— DISASSEMBLY OF FORD / CHEVROLET / OPEL / DAEWOO / RENAULT CARS - ONLY ORIGINAL SPARE PARTS - HUGE ASSORTMENT - PAINTING OF PARTS - BODY REPAIR - CAR SERVICE - TIRE FITTING - WORK WITH WHOLESALE AND REGIONAL CLIENTS - KA WARRANTY HONOR
Moscow (Degunino station)
st. Pomorskaya, 39 a, area st. Degunino
ZipAutoGrad
ZipAutoGrad is a direct supplier of used spare parts from South Korea. A huge range of spare parts (ICE, automatic transmission, manual transmission, gearbox, axle, transfer case, etc.) are available in our warehouse in Moscow