If you want to make soundproofing of a car with your own hands for the first time, it is better to start with the hood. Modification of this body element will cause the least difficulties and will not require large amounts of money. Let's look into the features of this modification and, in general, is hood soundproofing necessary?
Cars Lada Granta, Priora, Kalina, Largus, Lada 4x4 (Niva), Vesta or XRAY have similar instructions for installing noise vibration insulation (SHVI). Differences can only occur at the stage of removing the hood trim.
Instructions
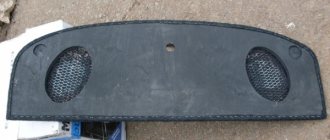
- Remove the standard hood trim (on LADA cars it is held in place using plastic clips)
- Degrease the surface (White Spirit).
- We glue vibration-damping material between the stiffening ribs. We preheat the bitumen base with a hairdryer, and then roll the material onto the metal of the hood with a hard roller.
- The second layer is a heat insulator or sound absorber.
- We install the standard casing in the reverse order.
The process is also shown in the video:
Is it worth contacting a car service?
Of course, many drivers turn to car services to solve the issue of hood sound insulation once and for all. This may be correct if there is no time, and there is an urgent need to make the machine quieter. But this is not small money that can be spent on more important technologically complex problems.
Now that many modern and affordable soundproofing materials have appeared on the market, do-it-yourself hood soundproofing has become quite realistic and accessible in complexity to any driver.
Reviews after soundproofing the hood
There will be no “wow” effect. You will hardly notice the difference by ear. Here is an example of one experiment on video:
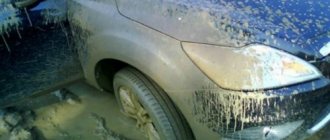
You will notice noticeable differences in other things, for example, the hood will become heavier, its closing will be more comfortable. In winter, the engine will not cool down so quickly, and there will be no ice on the hood from melted snow.
To reduce the noise level in the cabin by 2-4 dB (a difference of 1 dB is barely noticeable or not noticeable at all), it is necessary to take a comprehensive approach to car sound insulation, work on all parts of the body (floor, doors, roof, trunk, etc.). ), wheel arches and fender liners. Also, on LADA cars it would be a good idea to install additional door seals (instructions for XRAY, Vesta, Granta/Kalina/Priora, Largus and Lada 4x4).
What do you think, is it worth soundproofing the hood? Take part in surveys and share your feedback in the comments.
To be honest, among my friends, opinions on under-hood soundproofing differ significantly. Some say that they really got the effect, others insist that it is a waste of time and money. But there is one thing in common between them, both of them agree that with comprehensive sound insulation of the entire car, it will not be superfluous to treat the hood.
Personally, I can say the following: if you completely lack standard hood sound insulation, then you need to carry it out, but if you have it, you can skip this step, you shouldn’t expect a super effect, besides, if you do something wrong, it may get even worse.
Insulation of other areas - trunk, wheel arches and arches
The trunk repeatedly amplifies the sounds reflected in it and turns them into a general hum. Unsecured loads also create additional noise. The insulation of the luggage compartment follows a similar scheme with other parts of the car: dismantling all items, cleaning, degreasing, installing a vibration absorber and sound insulator.
Materials are used to cover the entire area joint to joint. The sequence is as follows: rear wheel arches, horizontal surface of the trunk floor, rear wing niches. The final stage is soundproofing the trunk lid like a car door.
The wheel arches also require special attention. They create noise in the cabin from the contact of the wheels with the road surface, and in winter - from the studs on winter tires. There are different options: you can stick the material from the engine side, luggage compartment or interior, as well as from the outside - from the wheel side. In each case, you can use materials from the Liplent line. Do not forget about pre-cleaning and drying the metal.
You can do all this work yourself. Be patient, act slowly and carefully. Liplent tapes do not require special installation skills. The main thing is to properly prepare the surface and press the sound and vibration insulator tightly. Step by step - from the hood to the trunk - you will improve the acoustic background in the cabin and will no longer be distracted by unpleasant sounds while driving your favorite car.
Why do you need hood soundproofing?
First, you should find out what soundproofing the hood will give you:
1. Creates the effect of additional thermal insulation (works great in winter, but only gets in the way in summer).
2. Protection from sound waves transmitted through the windshield and trunk.
From this information it follows that if your car does not “roar” while driving, drowning out speech and music in the cabin, then the soundproofing material will serve as thermal insulation - creating a kind of thermos that will keep the temperature under the hood at the same level for longer.
Where to begin
Many car owners, not only domestic ones, but also those of the Volkswagen Polo sedan, have a question over time: what materials are needed (used) for soundproofing the hood, and whether it is possible to do the sound insulation yourself. So:
- The problem of soundproofing the hood is solved by ridding the car hood of extraneous noise
- However, is it feasible and is it necessary, let's figure it out
- In the case where you are talking exclusively about the hood, it would be more advisable as the main goal to make thermal + sound insulation of the hood at the same time, and then in the winter the engine will cool down more slowly, and in the summer (warm) period it will heat up less under the influence of the sun
- And to reduce engine noise, soundproofing just the hood will not help you, the only effect will be that the roar of the engine will not be so loud on the road for everyone around
- Therefore, in order for the Citroen C4 to not be heard in the cabin as the engine is running, it will be necessary to completely isolate the interior of the car from the inside, in addition, carefully perform noise and vibration insulation of the engine compartment of the car
- But the hood insulation will be useful without a doubt for any car
How to make soundproofing for a trunk with your own hands
In the paragraph above, we looked at the steps of how to soundproof the hood. Now let's move on to upgrading your trunk. It is worth noting that the trunk does not need insulation as much as the hood, so the instructions for installing soundproofing materials will be slightly different.
Placing the Shumka in the trunk also takes place in 2 stages (vibration insulation and thermal insulation). For the trunk we will use BiMast Bomb and Splen 3008.
The first layer is to lay BiMast Bombs. Before installation, we carry out preparatory actions (clean and degrease the surface; cut out the required models of sound insulator and heat insulator for “gluing”). To install it, we will need a construction hair dryer (heat it to a plastic state and apply it to the desired area to form a shape). After the material takes the required shape, remove the protective film and glue. After gluing, you need to smooth the surface with your hands to avoid swelling and deformation.
We proceed to gluing the second layer. We take eight-millimeter Splen, which will act as a heat insulator. We treat the first layer with a solvent and glue the cut-out models from the heat insulator onto it. We level it with our hands and the “gluing” is complete.
When calculating the consumption of soundproofing material for a car, you need to take into account the area of the working space that will be covered with insulator. You can use other options for noise and heat insulators, depending on your preferences.
An important rule is the sequence of gluing materials (first - vibration absorber, then - heat insulator), which cannot be changed. Also, we do not recommend gluing only a sound insulator without an insulating layer, as the effect will be weak and you will not achieve the desired result.
We have analyzed in detail what and how to glue on the hood and trunk in order to get a good effect of sound insulation and heat insulation in the car. We listed the necessary installation tools and materials that can be used during the installation process. This article will help you insulate your car, make it quieter, and protect it from external noise and vibration.
Subscribe to our feeds on social networks such as Facebook, Vkontakte, Instagram, Twitter and Telegram: all the most interesting automotive events collected in one place.
Materials
The choice of material for sound insulation, as well as insulating the entire car, just the engine compartment or just the hood of the Peugeot 308, of course, is up to you, the main thing is to understand which one is intended for what purpose:
Vibroplast Silver
It is a flexible and elastic vibration-absorbing material, which is a polymer and self-adhesive composition, which is backed with aluminum foil:
- The applied drawing with markings (5x5 centimeter squares) will allow you to easily cut the sheet into the desired size of the part.
- Plus, the material does not absorb moisture and does not decompose under the influence of sunlight and the environment, and also has sealant and anti-corrosion properties.
- It is easily mounted even on surfaces with complex reliefs and does not require any heating during installation
- It has a mechanical loss coefficient in the range of 0.25-0.35 conventional units. and weight 3kg/m2 plus thickness 2mm
- Recommended treatment areas for Daewoo Lanos are the floor in the cabin, roof, doors, as well as the sides of the body, trunk and hood lids, and the dashboard on the interior side
Vibroplast Gold
In principle, the same as Silver vibroplast, but it is thicker, which means it has greater vibration insulation:
- Its loss coefficient is 0.33 conventional units. and weight 4 kg/m2 with a thickness of 2.3 mm
- Recommended areas for processing the Chevrolet Cruze are the interior floor, roof, doors, trunk and hood lids, body sides, front panel on the passenger compartment side
BiMast Bomb
This is a vibration-absorbing material, it is a complex multi-layer structure, which consists of a front layer (this is aluminum foil), inside a bitumen-based sheet and a rubber-based sheet, additionally protected with an anti-adhesive (water-repellent) film. So:
- During installation, it will require heating (using a hairdryer) to 40 - 50 degrees
- It also does not absorb moisture and does not decompose under the influence of the environment.
- This is the best vibration-absorbing material with the highest efficiency. Ideal for preparing speakers
- Its loss coefficient is not lower than 0.50 conventional units.
- Thickness is 4.2 millimeters and weight 6 kg/m2
- Recommended areas for processing VAZ 2115 and other brands are the front panel, wheel arches, tunnel, area above the driveshaft and muffler
Splen 3004
It is a sound-insulating material with a special adhesive layer, it has good heat-insulating properties:
- Splen can be easily mounted on any vertical, as well as curved surfaces, does not absorb moisture, and does not decompose under the influence of the environment
- The weight is 0.42 kg/m3, its thickness is 4 millimeters and can be used in the temperature range from -40 degrees to +70 degrees
- Areas recommended for treatment are the interior panel, doors, wheel arches, and tunnel
- In addition, there is splen 3008, its thickness is as much as 8 millimeters, as well as splen 3002, with a thickness corresponding to 2 millimeters
- Splen3004 is used as a second layer, on top of vibration-absorbing material
- Suitable for Renault Megane 2 doors, as well as front and rear arches, used in sidewalls
- To create strong connections, all bonded surfaces must be cleaned and dried as much as possible.
- When cleaning bonded surfaces, it is allowed to use acetone or white spirit
- The optimal temperature for applying adhesive tape is 18-35 degrees, which guarantees complete preservation of its adhesive properties in the range from -40 degrees to +70 degrees
- When the room temperature is below +10 degrees, it is not recommended to stick Splen3004 due to low adhesion force
- The adhesive tape should be applied without the slightest tension, and the protective layer should be removed immediately before application.
Car soundproofing mat UR Convenience
The UR Convenience brand has launched a new automotive insulator for the hood and interior. The noise insulating mat is made of powder-free aluminum material.
Car soundproofing mat UR Convenience
The metal sheet is mounted on a cotton backing. The car mat provides reliable sound insulation of the engine compartment and reduces vibration vibrations by 80%.
| Manufacturer/series | UR Convenience |
| Sound insulator type | Sheet, metal sheet on cotton backing |
| Dimensions: width\length\thickness (in cm) | 50x20000x2 |
| Sheet weight | From 30 gr. |
| Application | Hood, roof, doors, mudguards |
| Installation features | Self-adhesive. Not used as a heat or sound insulator. |
| Sales party | 1 PC. |
| Link to the product | https://alli.pub/5t73rl |
Isolate sound as much as possible
To isolate the sound coming from under the hood as much as possible, you can use special gaskets that are made of rubber, but given that they are different for each type of car, it will not be easy to find such gaskets.
So, to soundproof the hood with your own hands, you may need:
- Special noise-insulating material, at least 2 standard sheets.
- Sharp cutting objects, knife, scissors, etc.
- Glue, not ordinary, but heat-resistant, ask the sellers, they usually know which one.
- Sheets of paper and sheets of cardboard.
- The usual standard set of automotive tools.
- Any detergent if necessary.
- Large flat surface (table or flat, clean floor).
The work location can be anywhere, the main condition is low humidity and lack of wind if the work is carried out outdoors. Preferably it should be clear sunny weather.
We remove the hood.
In order to carry out all the work efficiently and get a good effect, it is necessary to soundproof the entire engine compartment. To do this, it is recommended to completely remove the hood. This will give you full and free access to the engine compartment of the car. POPULAR WITH READERS: How to properly prepare a car for winter
What to do with factory insulation.
Next, we look for the factory sound insulation and, if necessary, remove it, unless of course you find it. Also, if there is a plastic casing in the engine compartment, and many cars have one, then we also remove it.
Then the process of soundproofing the hood with your own hands takes place in standard operating mode.
Making a template.
Using paper, templates of the required hood planes are made. The resulting shapes are first transferred to cardboard, and then the required shapes are cut out from a soundproofing sheet using a cardboard template.
This must be done carefully and as accurately as possible.
Subsequently, we lubricate the side of the soundproofing material that is without foil with heat-resistant glue and apply it to the desired places. Drying time will take about one hour.
Main areas of work.
Also, do not forget about the most important area of sound insulation, this is the place between the interior of the car and, directly, the engine compartment. If you do not soundproof this area, then all the work will go down the drain, because the sound will still penetrate into the cabin, and it may even be even stronger than before.
Unfortunately, in different car models this section of the engine compartment between the passenger compartment and the engine may be different. In some cars you can easily stick sound insulation to this area, but in others you won’t find the slightest free space for sticking a small piece of material.
But in any case, soundproofing the hood with your own hands, if you did everything correctly, will bring you the desired result, and traveling in the car will become much more pleasant and comfortable for you and your passengers.
Do-it-yourself hood soundproofing - video from partners. https://www.youtube.com/embed/QkoNT3Y2Y0Q?rel=0
Soundproof Car City Sticker
If you need to ensure airtight closure of the interior doors, trunk, and hood, it is better to select a universal type of black sealing tape. The Car City brand model is designed for installation in place of the standard seal on any brand of passenger car.
Soundproof Car City Sticker
Made from heat-resistant rubber polymer. The high elasticity of the material, resistance to aggressive reagents and resistance to temperature changes provide high sound insulation of the interior.
| Manufacturer/series | Car City |
| Sound insulator type | Sealant |
| Dimensions: width\length\thickness (in cm) | Molded, for installation in standard places - 1.2, 3 meters |
| Application | Hood, roof, doors, mudguards, wheel arches |
| Installation features | Self-adhesive. Used as a heat and sound insulator. |
| Sales party | From 1 meter |
| Link to the product | https://alli.pub/5t73ha |
Car sound insulation Excellent Auto Accessories
Waterproof polyurethane foam automotive insulation is the right choice when it comes to providing acoustic and thermal protection to your vehicle. The sheet insulator is made from environmentally friendly materials, has no odor, and will not emit toxic products when heated. Maximum operating temperatures – -40 – +150 degrees.
Car sound insulation Excellent Auto Accessories
It is easy to cut a block of the required shape from sheet material. The self-adhesive side is protected by a durable backing. During installation, a roller is used to level the surface. The material is hermetically applied to the body and provides protection against corrosion.
The service life of acoustic film is from 10 years. The material is resistant to mechanical damage and quickly returns to its original shape after compression. Has lateral tensile strength.
| Manufacturer/series | Excellent Auto Accessories |
| Sound insulator type | Sheet, rubber with textile backing |
| Dimensions: width\length\thickness (in cm) | 200x50x0.3 (maximum thickness – 30 mm) |
| Sheet weight | From 30 to 1260 gr. |
| Application | Hood, roof, doors, mudguards, wheel arches |
| Installation features | Self-adhesive. Used as a heat and sound insulator. |
| Sales party | 1 sheet |
| Link to the product | https://alli.pub/5t73g4 |
DIY Soundproof Seal
To improve the heat and sound insulation of the interior, it is necessary to use sheet materials that protect most of the body and do not forget about seals. Door rubber strips of a certain size and thickness ensure the tightness of the interior; soft rubber serves as an impermeable gasket between the door and the frame.
DIY Soundproof Seal
The door seal must be used according to the manufacturer's recommendations: insert into the standard hole, having first removed the adhesive backing, align the joints, connect the tape at the bottom of the door frame. The door seal protects the paintwork from chipping and corrosion. Water flowing from the roof does not penetrate the door cavity and provides an aesthetic appearance.
| Manufacturer/series | DIY, series B |
| Sound insulator type | Door strip seal |
| Dimensions | 1 meter, Z-shaped |
| Material | Soft heat resistant rubber |
| Application | Doors |
| Installation features | Self-adhesive, sealed joint |
| Sales party | 1 meter |
| Link to the product | https://alli.pub/5t73de |