Many farmers cannot imagine working in the fields without a tractor. They are interested in how to make a trailer for a walk-behind tractor with their own hands from the rear beam 2108 for transporting building materials or other items.
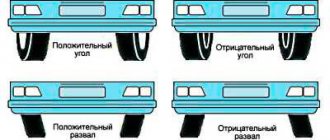
Rear suspension parts
1 – wheel hub; 2 – suspension arm mounting bracket; 3 – silent block; 4 – shock absorber casing; 5 – compression stroke buffer; 6 – casing cover; 7 – support washer; 8 – shock absorber cushions; 9 – spacer sleeve; 10 – shock absorber; 11 – rubber gasket; 12 – rear suspension spring; 13 – lever connector; 14 – lever of the rear suspension beam; 15 – shock absorber mounting bracket; 16 – lower spring support cup; 17 – rod; 18 – upper spring support cup.
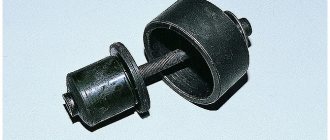
Reasons for failure of the rear struts of the VAZ 2110
The main reasons for the failure of the rear struts on the VAZ 2110 include the following factors:
- Wear of a part associated with its service life
- Aggressive driving style
- Poor quality road surface
- Wear of another part in the rear suspension, which collectively affected the serviceability of the struts
All of the above factors directly or indirectly affect the wear of the rear shock absorber struts of the VAZ 2110.
Description of design
The rear suspension is with 12 coil springs and 10 double-acting hydraulic telescopic shock absorbers.
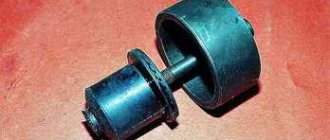
The main load-bearing element of the suspension is a beam consisting of trailing arms 14 and a connector 13, welded together through reinforcements. At the rear, brackets 15 with eyes for attaching shock absorbers 10 and flanges for attaching the rear wheel axles and brake shields are welded to the suspension arms. At the front, the levers 14 are equipped with welded bushings with silent blocks 3 pressed into them. A bolt passes through the central bushing of the silent block, connecting the lever to the bracket 2. Three welded bolts are provided to secure the bracket to the body spar.
The suspension spring 12 rests with its lower end on a cup welded to the shock absorber reservoir, and with its upper end, through a rubber gasket 11, on a support welded from the inside to the body arch.
The lower eye of the shock absorber is bolted to bracket 15 of the suspension arm, and its rod is secured to the upper support of the suspension spring through two rubber pads 8 (one at the bottom of the support, the other at the top) and a support washer 7 (under the nut).
The rear suspension springs are divided into two stiffness classes according to their length in the free state and under load: A (more rigid, “high”) and B (less rigid, “low”). Springs of the same class must be installed on the front and rear suspensions. But in exceptional cases, if class A springs are installed in the front suspension, class B springs can be installed in the rear suspension (but not vice versa!). The quality of the springs can be fully assessed by the performance of the suspension on the car. If the suspension often “breaks through” to the bump stops on uneven roads or sags under load, stiffer springs should be installed. When replacing springs, do not forget to check the serviceability of the shock absorbers - after all, it is the shock absorber-spring pair that largely determines the characteristics of the suspension.
The hub has a double-row angular contact ball bearing, similar to the front wheel hub bearing, but smaller in size. The bearing fit on the axle is transitional (with slight interference or clearance). During operation, the bearing does not require adjustment or replenishment of lubricant. It is not allowed to eliminate the resulting play by tightening the nut; the bearing should be replaced. When dismantling the hub, the bearing is destroyed, so it is not recommended to disassemble the hub if the bearing is in good condition.
Device manufacturing process
Such an agricultural device as a walk-behind tractor has been used by summer residents as a working machine for many years. Thanks to him, a person’s labor in carrying out land work has become noticeably easier. When installed on an adapter with a seat, it will turn into a mini tractor. Picture 1.
With the help of a small tractor it is very convenient to cultivate the soil, mow the grass and prepare the ground for planting a new crop. In addition to working in the fields, a mini-tractor will be useful when transporting seedlings, fertilizers for plants or heavier objects.
Figure 1. Preparing the walk-behind tractor.
In this matter, an important role is played by the trailer (trolley), which is connected to the walk-behind tractor. Its main function is to transport heavy loads, construction materials and other agricultural items.
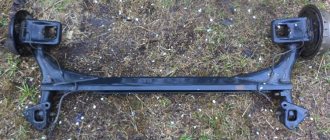
In winter, a walk-behind tractor is simply an indispensable device for cleaning roads. To get rid of excess snow, you can load it into a homemade trailer for a walk-behind tractor with your own hands from a VAZ 2108 beam. Figure 2.
Unlike factory models, you can make a device of the desired size, you just need to correctly draw up a drawing. And the whole design does not require any special costs compared to store-bought counterparts.
Figure 2. VAZ 2108 beam.
A carriage for a walk-behind tractor using car beams mainly consists of the following 4 main parts:
The body is made entirely of wood. For reliability, you can assemble a body frame from metal corners and cover them with boards. The assembled body is mounted on a frame with connected (welded) beams.
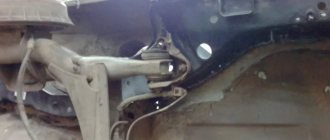
In order to begin the assembly process, it is important that all the necessary parts are prepared. The main part of the structure will be one (if the single-axle version is used) or two beams from an old Zhiguli car. Figure 3.
Figure 3. Assembly of the structure.
In addition to this, you will need the following materials:
- steel profile pipes with a cross section of 60x30 and 25x25 mm;
- wheels and springs;
- sheet steel with a thickness of at least 0.8 mm;
- duralumin sheet with a thickness of at least 2 mm;
- channel;
- and etc.
The trailer frame is located on a frame grid, so it is the center of the entire structure. In order for it to be done correctly, make two transverse crossbars measuring 25x25 mm. Make small spars from the tubes.
All parts need to be connected so that the shape resembles a lattice. Then attach a pair of longitudinal pipes to the resulting product by welding. Weld a trim from corners measuring 25x25 mm or profiles on top.
Steel sheets are deservedly considered the best materials for making sides. Proceed to the main thing - connecting the beam. Take two identical channels and insert them into the profile. One of the edges of the channel is certainly equipped with wheel axles.
Now take the already prepared springs that will connect the spar. In order for everything to work out correctly, the edge of the springs is placed on the axis of the beam. The central part should also be combined with the same beam using stepladders.
The final stage in the work will be the manufacture of a drawbar from pipes. Especially for this, the tubes need to be connected in a triangle and welded to the cart.
This is the easiest way to model a cart. However, other options are also known.
VAZ 2109 body: introduction
ATTENTION! A completely simple way to reduce fuel consumption has been found! Don't believe me? An auto mechanic with 15 years of experience also didn’t believe it until he tried it. And now he saves 35,000 rubles a year on gasoline! Read more"
Inside, the car body practically does not cause any complaints from car owners, despite its small, compact dimensions. However, there is enough space for a trip of five people of average build. The low-mounted dashboard is quite easy to operate; if necessary, you can build in modern electronic components, but this will require you to spend a significant amount of money.
There is a slight drawback in terms of the material construction of the interior, which is made of plastic. This is a significant drawback, since such a building periodically rattles and needs technical modernization to strengthen it. However, this is quite easy to do and you don’t have to spend a lot of money.
Preparatory work and elimination of minor damage
Where to start repairing the VAZ 21099 body? In any case, it must begin with an assessment of the technical condition of the car and determining the scope of body work, its feasibility and cost. To do this, you need to inspect the car and identify:
- dents and other deep damage;
- possible chips;
- scratches;
- peeling of paintwork;
- presence of rust.
It is possible to eliminate minor damage yourself if you have special tools and devices that every car owner has. The car's structure allows you to perform simple manipulations after dismantling some body elements. First of all, you need to remove the following parts:
- doors;
- trunk top;
- hood;
- radiator grille;
- bumpers.
Next, these parts should be treated with a special anti-corrosion agent. It is necessary to take into account that each part weighs a lot, so for such work, as a rule, you will need an assistant.
Before painting is carried out, damage with rusted edges requires immediate elimination, since corrosion is an irreversible process and the area of damage can quickly grow. The procedure for doing body work with your own hands involves performing a number of actions.
- Removing the old layer of paint from the entire surface area of the part using an electric drill with an attachment.
- After cleaning the part from the paint, you can understand how much space the rust occupies.
- Damaged areas of the part are removed with special scissors.
- Use a hammer to bend the edges inwards for ease of applying putty.
- To remove rust from a VAZ 21099 part, use a metal brush.
Their efficiency and quality depend on how well the sequence of work is followed.
Linear dimensions of the car body
If your car is accidentally hitched in a parking lot and small dents appear, there is no reason to panic. How much will such a repair cost? How long will it take? There is only one answer to these questions - not much, if you repair the device yourself. To do this, you will need to remove the damaged part and install a new one. If she doesn't weigh too much, she won't need a partner.
Control dimensions of the VAZ 2109 body
The body has a rather short length - 4006 mm, which is an obvious advantage of the car, since compactness is important in urban environments. If we compare the manufacturer’s previous models, the body length of the VAZ 21099 was reduced by 120 mm, while there was 60 mm more space inside thanks to rational and correct design solutions.
The first production VAZ 2109 cars had a body width of 1650 mm, however, after a few months, the developers managed to reduce it by 30 mm to 1620 mm, this further increased the compactness of the body.
The body height is approximately 1402, which is 30 mm comparatively less than the body of its predecessor models. But the designers were able to compensate for the free space by creating car windows in a convex shape. On the one hand, this made it possible to increase the amount of free space, on the other, it made the vehicle more presentable.
The luggage compartment of the VAZ 2109 deserves special attention, which at one time made a real splash on the passenger car market. Even today, this almost revolutionary design feature has not lost its practical relevance.
The standard trunk capacity of the Nine is 330 liters, but if necessary, it can be expanded to 640 liters by folding the rear seats. All this can be done in a couple of minutes and does not require much effort.
The front wheel track is 1400 mm, and the rear wheel track is 1370 mm. The compact dimensions of the VAZ 2109 body make it possible to efficiently transport small-sized cargo around the city, even during rush hour when there are a lot of traffic jams.
PayAnyWay payment:
1. Payment/transfer to Sberbank VISA card № ( 4276 1633 1094 5170 )
Payment transfer methods:
A. The simplest and most proven method, transfer from any bank card to a VISA illva.ru store through the online service of Alfa Bank, Commission is only 1.95%.
b. Through payment terminals: QIWI Instructions or Cyberplat Instructions
d. Many other methods are described on the VISA portal.
2. After payment is received in the bank account, the order is delivered to the client. When sending goods through a transport company, they are delivered to the transport company and sent for further transportation to the client’s city. The Client is provided with a bill of lading number via SMS notification or to the specified e-mail, to track the cargo on the transport company’s website;
Payment in cash upon receipt.
Payment in cash upon receipt.
QIWI (transfer to wallet +79221511117)
Practical aspects of the VAZ 2109 body
The body of the VAZ 2109 was designed as a hatchback; a revolutionary innovation was the luggage compartment, which made it possible to almost double the capacity. At the same time, the fuel consumption of the “nine” is comparatively lower than that of any SUV. On the one hand, the VAZ 2109, if necessary, can have the spaciousness of an SUV, on the other hand, low fuel consumption. All this increases the practical profitability of using this vehicle.
Of course, many owners of the VAZ 2109 regularly highlight the problem of the reliability of body fastenings: periodic squeaking, certain fastenings quickly become loose, etc. However, it is important to remember that the cost of repairing a body or replacing an individual functional fastener has an extremely low market value. If the body of modern hatchbacks is divided into large design elements, then the cost of replacing or repairing them is several orders of magnitude higher.
Despite all the shortcomings of the VAZ 2109 body, we can say with confidence that its practical reliability is at the proper quality level, despite certain “cosmetic” defects that appear during operation. If you hear a squeak somewhere, it can be quickly eliminated by inexpensively replacing a separate functional element or by basic straightening, which is carried out by each service station.
Note. Straightening can be successfully carried out with your own hands if you know the specifics of its implementation.
Watch an interesting video review of the VAZ 2109 2008
In general, the simplicity of the body structure of the VAZ 2109, small dimensions and price directly affected the degree of popularity of this car model. If we take into account today's calendar year and 1988, when the first production car was released, and the fact that the VAZ 2109 is successfully used by many motorists to this day, the question of quality immediately disappears.
The body of the VAZ 2109 is simple in structure, practical and easy to repair if necessary. You can do this, again, with your own hands according to the instructions or entrust the operation to specialists. High-quality photos and materials and a video review given in the article will help consolidate technical knowledge of the body of the Nine.
Forget about fines from cameras! An absolutely legal new product - Traffic Police Camera Jammer, hides your license plates from the cameras that are installed in all cities. More details at the link.
- Absolutely legal (Article 12.2);
- Hides from photo and video recording;
- Suitable for all cars;
- Works through the cigarette lighter connector;
- Does not cause interference to radios and cell phones.
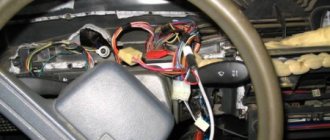
Regular replacement of silent blocks
The simplest way to replace silent blocks is as follows.
- This work must be carried out either in an inspection hole, or by jacking up the car and crawling under it. The first option is much simpler, since in this case the overview of the car will be better.
- Using a 19 mm wrench, you need to unscrew the nuts located on the rear beam mounting bolts. This way you can detach it from the bracket.
- After this, you need to remove the unscrewed bolt, moving the beam eye down. To make your actions easier, it is advisable to insert a brick-sized wooden block between the body of the vase and the beam.
- Then you need to knock out the silent block with a hammer.
- Before installing the silent block back, it needs to be lubricated with a slippery liquid so that it functions better. Now it can be pressed in.
- You need to remove the beam, return the beam to its original position and secure the bolt with the nuts.