Constant circulation of coolant through special channels allows you to maintain a certain temperature regime necessary for normal engine operation.
Failure of the cooling device, leakage of coolant, or insufficient coolant level can ultimately lead to overheating of the engine and, ultimately, to its breakdown. The VAZ 2109 radiator can be repaired after identifying the main reasons that could cause a failure in its effective operation.
Removing the radiator and its subsequent installation in place must be performed on a cold car engine. Before installing a new or repaired radiator, you should check it for leaks.
To do this, just plug the pipes, lower it into a bath of water and supply air with a pressure of 0.2 MPa. If bubbles do not appear on the surface within 30 seconds, then we can assume that the device has passed the leak test. All work on repairing and replacing the radiator can be done independently with your own hands, without the help of a specialist.
Removing the radiator
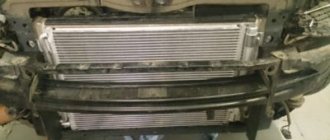
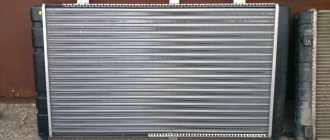
VAZ 2109 cooling radiator
Let's get started:
- first of all, you should de-energize the battery or even remove it;
- Drain the coolant completely by opening the tap;
- If the car is equipped with a fuel injection system, then you need to remove the air filter.
Note. To quickly remove the air filter, press the latch with your finger or a screwdriver, disconnect the block with wires, loosen the clamp and remove the filter, first lifting its front part.
- now you need to cut the clamp securing the wire harnesses;
- disconnect the fan wire block;
- remove the throttle linkage clamp located on the fan casing;
- Now you need to disconnect the radiator outlet hose, which is connected to the thermostat;
Disconnect the hose
- We also disconnect the supply hose connected to the cooling jacket pipe;
- remove the steam exhaust hose;
- It's time to unscrew the nut securing the radiator to the body from above.
Note. It is worth noting that the same bolt secures the fan casing.
- tilt the radiator towards the engine;
- remove it by moving it up together with the fan;
- now you need to loosen the clamps;
- disconnect all hoses from the radiator;
VAZ 2109 radiator cooling system diagram
- we unscrew the bolts and nuts that secure the casing with the fan and the radiator;
- disconnect the casing with the fan;
- You need to remove the two lower mounting cushions from the radiator.
Note. It is necessary to visually inspect the pillows and if they are torn or have lost their elasticity, replace them with new ones.
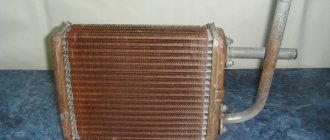
VAZ 21099 cooling radiator
Installation of a new radiator takes place in the reverse order. Don't forget to put on only the lower mounting cushions.
We fill in new antifreeze and that’s it, the radiator is ready for use.
It is definitely recommended to watch the corresponding video or photo materials while working with your own hands. The step-by-step instructions given above were written by specialists who know everything first-hand. Therefore, you need to comply with all its points. By learning how to change the radiator and other parts of your car yourself, you can save a lot on periodic repairs, the price of which is constantly growing.
The radiator is a vulnerable car part
Replacing the cooling radiator VAZ 21093
The radiator itself is a rather vulnerable part of the machine, because it has a brass body that is subject to numerous loads. And this part is thin in design, and if you take into account the huge number of solder joints in it, then the quick failure of the cooling radiator becomes understandable. The radiator is located in front of the car and a pebble from the road or a tree branch that accidentally hits it can become a fatal bullet. Even the smallest foreign objects that get into the radiator can destroy soldering and resistance welding points.
VAZ 21099 replacement of cooling radiator
In addition, the mutual influence of the elements of the car in this case plays a cruel joke. Long-term use of chemicals, whether you like it or not, weakens the contact zone, disrupts the operating mode of the pump, increases the temperature of the coolant, etc. In addition, if the radiator cap valve gets stuck, it will not allow the pressure to be relieved in time, which will ultimately lead to set of flow points.
Note. There are many reasons why a radiator can fail or function unfairly. We will not dwell on them in this article. The purpose of this instruction is to familiarize the reader with how to easily remove the radiator and replace it with a new one.
How to remove the cooling radiator VAZ 2109 injector
Over time, all car systems fail. And the radiator of the engine cooling system often fails under the influence of external factors (stones from under the wheels of cars or branches sticking out of the ground).
In this article you will learn how to replace the radiator of a VAZ 2109 and, in general, the entire Samar family with your own hands.
- antifreeze or antifreeze, or any automotive coolant
- high temperature silicone sealant
Let's start replacing the VAZ 2109 radiator ourselves
1. Disconnect the negative terminal from the battery and wait until the engine has completely cooled down.
2. Remove the crankcase protection and remove the cover of the expansion tank.
3. Unscrew the drain plug on the radiator (on the radiators of VAZ 2109, 2108, 21099 cars it is located in the lower right corner) and drain all the coolant into a previously prepared empty container (the volume of coolant is approximately 5 liters, so select the appropriate container).
5. If the car has an injection engine, then to replace the VAZ 2109 radiator yourself, you additionally need to remove the air filter.
6. Disconnect all pipes leading to the radiator.
7. Unscrew the radiator mounts to the body and remove the radiator and fan housing from the engine compartment of the car upwards, with a slight tilt towards the engine.
8. Unscrew the nut and three bolts securing the fan to the radiator. It is necessary to check the condition of the radiator cushions located on the lower mounts. If they are torn or have lost their elasticity, they must be replaced.
9. To install a new radiator, it must be placed on the lower mounts and a fan attached to it. Next, all previously removed hoses are connected, having previously lubricated them with sealant and tightened with clamps.
10. Connect all previously disconnected wires.
11. Fill in new coolant and wait 10-15 minutes until the sealant sets.
12. Start the engine, open the heater tap and let it run a little so that the coolant fills the entire system. At this moment, do not forget to monitor the coolant level in the expansion tank and top up as necessary. To fully release the air from the cooling system that appeared there after replacing the radiator, you need to raise the front of the car as high as possible and let it run like that for 10-15 minutes.
13. Tighten the expansion tank cap.
This completes the replacement of the VAZ 2109 radiator with your own hands! Good luck to all!
My blog is found using the following phrases
The radiator should be replaced if its seal is lost, because sealing is not always effective. Replacing the radiator should begin by draining the coolant. It is better to do this on a cooled engine. There is no need to drain all the liquid; we drain it directly from the radiator. It is more convenient to remove the radiator itself together with the electric fan, and then disconnect it.
We start by using the “8” key to unscrew the engine protection, if any, from the side of the radiator drain plug.
If there is no drain valve, but there is a valve, then in order to drain the coolant without losses, spills, etc., you need to unscrew it with the expansion tank cap closed. First, you need to equalize the pressure in the cooling system to atmospheric pressure by opening the reservoir cap.
ATTENTION: DO NOT PERFORM WORK ON A HOT ENGINE! There is a risk of liquid splashing out and causing burns!
We place a container under the drain where the coolant will be drained. With the lid closed...
By slightly opening and closing the expansion tank cap, we adjust this pressure. Next, unscrew the screws securing the air filter housing:
and air hose clamp:
Unplug the mass air flow sensor connector and remove the air filter housing,
while opening access to that part of the radiator where the pipes and steam exhaust hose are located:
We begin removing the radiator. Using the “8” head, unscrew the two nuts securing the pressure plate...
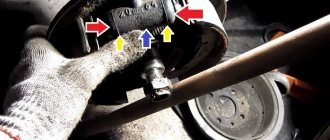
Having tilted the radiator towards the engine, loosen the clamps on the radiator inlet pipe and steam exhaust hose.
The symbols in the figure are as follows: 1. Steam hose 2. Inlet pipe 3. Inlet pipe clamp 4. Steam hose clamp
We also loosen the clamp of the outlet pipe located at the bottom of the radiator:
Disconnect the hoses and fan connector. We take out the radiator along with the fan and remove the fan. To do this, use the key “to 8”
unscrew the two nuts and two bolts securing the radiator.
We move the fan to the new radiator:
Let's put everything back together in reverse order. At the bottom, the radiator rests on two rubber pads,
which during assembly should fit into the holes of the cross member. We put the pipes on the radiator fittings and tighten the clamps. We screw on the radiator and air filter. Fill the coolant to the maximum. When filling, to reduce the formation of vapor locks inside the cooling system, it is necessary to remove the hose from the fitting of the throttle assembly:
We start the engine and check for leaks. After a while, check the coolant level; it may drop slightly. This indicates that all vapor formation and air pockets have disappeared. If necessary, coolant must be added.
Please rate the article
There were 10 comments left on the entry “Replacing the radiator of VAZ 2108, 2109, 21099”.
- Tell me, who has encountered such a problem? The radiator drain valve broke off at 15k, i.e. half remained in it, and half in the hand). Is it really possible to get the thread out of there?
The radiator must be replaced if a coolant leak is detected from it. In a workshop equipped with special equipment, the radiator can be checked and repaired.
WARNING Removal and installation of the radiator is carried out on a cold engine of VAZ 2108, VAZ 2109, VAZ 21099.
To check the tightness, plug the radiator pipes and lower the radiator into a bath of water, supplying air to the radiator at a pressure of 0.2 MPa (2 kgf/cm2). In this case, no air bubbles should appear from the radiator for at least 30 seconds. 1. Remove the battery. 2. Drain the coolant from the VAZ 2108, VAZ 2109, VAZ 21099 (see “Replacing the coolant on VAZ 2108, VAZ 2109, VAZ 21099”).
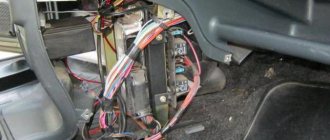
Interior heating device
VAZ 2109 radiator mount
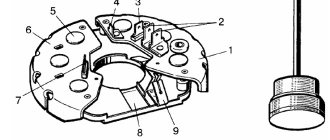
Designers of manufacturing plants have provided for the installation of a radiator for the heating system of the VAZ-2109 car interior. Under the panel of auxiliary devices, which is located between the two front seats, the design provides for the location of the interior heating stove. It contains a frame for installing a radiator. Plastic protective panels are installed on this panel on both sides (passenger and driver). They are attached to four self-tapping screws:
- Unscrew the screws.
- Take them off.
- This frees up access to the interior heating radiator.
- It is secured with four self-tapping screws.
- They are installed in holes located on the upper and lower surfaces of the radiator.
- Tighten the screws.
- After this, connect the hoses of the interior heating system.
Note: before tightening the pipes, it is necessary to put fastening clamps on them.
Tip: Before installing, clean the clamps along the inner edges with sandpaper. This is necessary to remove sharp edges. Since sharp edges can damage the rubber surfaces of the pipes.
Radiator mounting for VAZ 2109
This is the structural procedure for attaching radiators to the VAZ-2109:
Advice: it should be taken into account that before fixing the upper part of the cooling radiator, it is necessary to install the upper pipes on it.
- Secure them with clamps.
- Only then attach the top bar to the vehicle body.
- The following procedure for bringing the cooling system into working condition.
- Install the lower pipe and tighten the clamp.
Note. The lower pipe can be easily installed from the inspection hole. First you need to remove the engine crankcase protection.
Do-it-yourself replacement of a VAZ 2109 radiator
Over time, all car systems fail. And the radiator of the engine cooling system often fails under the influence of external factors (stones from under the wheels of cars or branches sticking out of the ground).
In this article you will learn how to replace the radiator of a VAZ 2109 and, in general, the entire Samar family with your own hands.
- antifreeze or antifreeze, or any automotive coolant
- high temperature silicone sealant
Let's start replacing the VAZ 2109 radiator ourselves
1. Disconnect the negative terminal from the battery and wait until the engine has completely cooled down.
2. Remove the crankcase protection and remove the cover of the expansion tank.
3. Unscrew the drain plug on the radiator (on the radiators of VAZ 2109, 2108, 21099 cars it is located in the lower right corner) and drain all the coolant into a previously prepared empty container (the volume of coolant is approximately 5 liters, so select the appropriate container).
4. Next, you need to disconnect the wires of the fan switch sensor.
5. If the car has an injection engine, then to replace the VAZ 2109 radiator yourself, you additionally need to remove the air filter.
6. Disconnect all pipes leading to the radiator.
7. Unscrew the radiator mounts to the body and remove the radiator and fan housing from the engine compartment of the car upwards, with a slight tilt towards the engine.
8. Unscrew the nut and three bolts securing the fan to the radiator. It is necessary to check the condition of the radiator cushions located on the lower mounts. If they are torn or have lost their elasticity, they must be replaced.
Radiator design and technical characteristics
The VAZ Nine has a liquid, sealed cooling system with forced circulation. Antifreeze is cooled in a radiator located in the front of the engine compartment. The tightness of the system is ensured by installing 2 valves in the cap of the expansion tank. When the pressure rises above 1.1 kg/cm², the outlet valve opens and thereby maintains the parameter value within the range of 1-1.1 kg/cm². This allows you to increase the boiling point of the coolant to 110 °C.
If the pressure in the CO drops to 0.03-0.13 kg/cm² below atmospheric on a cold engine, then the intake valve opens. When the parameters are aligned, the latter is closed. The cooling radiator of the VAZ-2109 is a CO element consisting of 2 vertical plastic tanks connected in height by 2 horizontal rows of aluminum tubes. To increase the heat removal area, cooling plates are pressed onto them. The left tank is divided by a horizontal partition to change the direction of flow.
The coolant is supplied through a pipe located at the top of the radiator and discharged through the bottom. A switch sensor is installed in the right tank, which controls the radiator fan. At a liquid temperature of about 100 °C, the electric motor turns on, and at 95 °C, it turns off. The radiator is installed in the frame. A casing with an installed fan is attached to it. The radiator frame of the VAZ-2109, in turn, is attached to the body structures of the car.
The coolant system is filled through the expansion tank. A design feature of the “nine” radiator is the absence of a filler neck. To avoid injury, do not open the reservoir cap and add fluid when the engine is hot.
VAZ 2109: replacing the cooling radiator yourself
As a rule, a modern car, be it a domestic model such as the VAZ 2109 or a foreign car, is a complex system of parts interconnected with each other. If even one link in the chain breaks, it will ultimately lead to the breakdown of others. A car is like a living organism, and for a VAZ 2109, replacing a cooling radiator is a process that will help save not only some parts, but also the engine itself, because a faulty radiator will not cool it properly. Replacing the VAZ 2109 cooling radiator is a mandatory job that you can easily do with your own hands.
Replacement
Replacing the cooling radiator in a VAZ 2109
This part must be replaced if a leak is detected. But still, first it’s better to check it to make sure where the leak is coming from.
Examination
To check the radiator, you need to remove it (how to do this will be described below), plug all the pipes and lower it into a bath of water. Work must be carried out in a specially designated place (workshop, garage, etc.). We supply air under pressure to the bath. If bubbles appear within 30 seconds of air entering, then there is a hole in the radiator and you can even find it if you watch carefully.
Methods for replacing a radiator on a VAZ-2109 car with a high and low panel
Heating system radiators have their own reserve and sooner or later it runs out - the element fails. The first and most common thing that can happen to it is that it becomes clogged with leaves or rusts. This happens especially quickly if the coolant is not changed for a long time. Another important factor influencing the reserve of a part is the quality of the material from which the part is made. Replacing the radiator of a VAZ-2109 stove is not an easy task, but it is quite doable on your own.