VAZ 2114 engines are equipped with mass air flow sensors (MAF). The VAZ 2114 MAF sensor is one of the ECM (electronic engine control system) sensors of a VAZ car with a fuel injection system.
This device is designed to determine the amount of air required to prepare the fuel mixture. In other words, the sensor “counts” the amount of air entering the cylinders during operation of the vehicle’s internal combustion engine.
Of course, if the sensor fails or does not work correctly, mixture formation is disrupted and the engine runs intermittently. Next, using the VAZ 2114 as an example, we will analyze in more detail what the specified sensor is, what malfunctions of the mass flow sensor are, how diagnostics and repairs are carried out.
The principle of operation of the DMRV sensor VAZ 2114, 2113, 2115
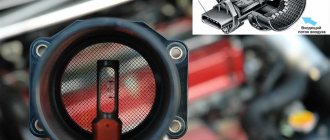
DMRV 2114, 2113, 2115 (hot-wire sample) contains a sensing part, a thin mesh (diaphragm) based on silicon, placed in the flow of incoming air. On the grid there is a heated resistor and two thermal sensors located in front of the heated resistor and after it.
The operating principle of the DMRV consists of different readings from two temperature sensors, one of which is located in front of the heating resistor, and three behind it. The heating resistor itself is located on a thin mesh (membrane) based on silicon, mounted in the flow of air passing through the air flow sensor of the VAZ 2114, 2113, 2115 hatchback model 21083-1130010. While the engine is running, the passing air flow cools the part of the mesh located in front of the heating resistor. This causes the heating sensor located in front of the heating resistor to cool down. And the temperature sensor located behind the heating resistor remains warm due to the heated air flow. The differential pulse of these two temperature sensors makes it possible to develop a characteristic curve depending on the size of the air passed through the mass air flow sensor. The pulse created by the air measurement sensor is analog. The MAF signal is a direct current voltage varying in the range from 1 to 5 V. Its size depends on the amount of air passing through it. The ECU, having received a signal from the DMRV VAZ 2114, 2113, 2115, model .21083-1130010, using its data tables, calculates the duration of the opening time of the fuel injectors. The duration of the fuel injector opening pulse corresponds to the parameters of high air consumption
Important ! Various diagrams of the VAZ 2114 car
Checking with a multimeter
Of the entire list of sensors in a car, the DMRV is the most expensive. Its cost in auto parts stores reaches 3000-4000 rubles. There is also a possibility of purchasing a counterfeit or inappropriate spare part model. Before the replacement procedure, you should make sure that the element gives the correct readings on the multimeter. A step-by-step check of the sensor using a multimeter looks like this:
- To begin, set the multimeter to DC measurement mode (readings up to 20 V);
- Use a red probe to connect to contact number 5, and connect a black probe to the third contact;
- Without starting the engine, turn the ignition key to the last position.
For a convenient interpretation of the readings from the multimeter, we will provide a complete table of voltage showing the wear of the part.
This element is quite sensitive to dirt, oil and other debris. To prevent its early failure, you should change the air filter more often and monitor the wear of the engine piston group. When there is a lot of wear, oil begins to seep into the intake system, which makes it impossible to take accurate readings of the incoming air.
You can change the mass air flow sensor yourself in a matter of minutes, so there is no need to rush and purchase a new part. Often the problem with floating speed and periodic engine shutdown at idle lies in other malfunctions. Make sure the wiring is intact, the readings are correct, and only then proceed to replacing the element. Below we present the air volume indicators that correspond to the normal operation of the 2114 engine.
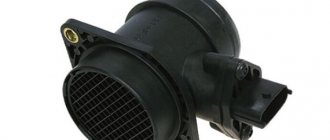
Mass air flow sensor design
| Position number | Explanation of the position in the figure DMRV VAZ 2114, 2113, 2115 |
| 1 | Frame |
| 2 | Connector |
| 3 | DMRV VAZ 2114, 2113, 2115 |
| 4 | MAF circuit |
| 5 | Metal screen |
| 6 | Air deflector |
| 7 | Inlet air flow |
What's the result?
As you can see, if there are signs of problems and the first symptoms of the DMVR VAZ 2114 or another car appear, you should check the device as soon as possible for possible breakdown. In this case, you can quickly diagnose the air flow sensor with a multimeter in a regular garage.
We also recommend reading the article about what a car engine knock sensor is. From this article you will learn about the purpose, design, as well as signs of malfunction or malfunction of the engine knock sensor. Based on the readings obtained from the device, it is possible to determine the malfunction (if a breakdown is confirmed) or to exclude the mass air flow sensor from the list of possible problem elements. One way or another, it is important to understand that this sensor is actively involved in mixture formation and affects the operation of the engine as a whole.
For this reason, it is necessary to perform regular checks of the ECM, scan for errors, and also pay attention to any failures and symptoms of malfunctions of the sensors of the electronic engine control system (TSP, DPKV, etc.).
Sources
- https://carfrance.ru/proveryaem-dmrv-na-vaz-2110-multimetrom-svoimi-rukami/
- https://labavto.com/vaz/2114/dmrv-diagnostika-i-chistka/
- https://remontvazov.com/dmrv-vaz-2114
- https://NaDomkrat.ru/ustroistvo-avtomobiley/elektrooborudovaniye/datchik-massovogo-rashoda-vozduha-vaz-2114
- https://avtozam.com/elektronika/sensor/dmrv-priznak-neispravnosti/
- https://KrutiMotor.ru/dmrv-vaz-2114-proverka/
Technical characteristics of DMRV VAZ 2114, 2113, 2115 models 21083-1130010-01
DMRV 2114, 2113, 2115 model 21083-1130010-01 has the following technical characteristics:
- Measuring range of mass air flow - from 8 to 550 kg/h;
- The error in measuring the air flow of the new VAZ 2114 air flow sensor is +/- 2.5%;
- The magnitude of the output signal when measuring the flow range from 0 to 100% is from 0.05 to 5 V;
- The sensor is powered from the vehicle's on-board network with a rated voltage of 12 V;
- The supply voltage range is from 7.5 to 16 V;
- Current consumption (at supply voltage from 7.5 to 16 V) - 0.5 A;
- Operating temperature range - from -45 degrees. up to +120 degrees. WITH;
- MTBF, no less than 3000 hours;
- Weight (gross): 0.3 kg;
- Overall dimensions of the package: 135x125x113 mm.
Causes of malfunction
Common to most domestic cars, the reason why the VAZ 2114 air flow sensor breaks is hidden in the crankcase ventilation system. It has two circuits that ensure operation with the throttle valve open or closed. If the throttle is buried, crankcase gases are discharged along the line (d=1.5 mm) into the space available behind it. A certain percentage of these gases accumulates in the idle line, where it comes into contact with the film-coated MAF resistor. It is also sensitive to fluctuations in the gas mixture in the intake system. The resin settles on the surface of the resistor, and the sensor begins to “lie.” Because of this, the idle air control sticks, and it begins to jam when starting the engine.
We recommend: 6 tips on how to deal with icing on car windows
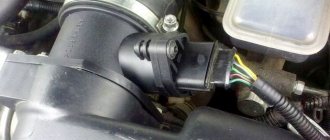
Installation location of mass air flow sensor on VAZ 2114, 2113, 2115
DMRV VAZ 2114, 2113, 2115 8 valves are attached to the air filter housing, on the one hand, and to a flexible rubber pipe, on the other hand. It is located between the atmospheric filter and the throttling device,
| Item no. | Explanation of the position on the diagram |
| 1 | crankshaft sensor mounting point (in the cylinder block boss) |
| 2 | sprayers |
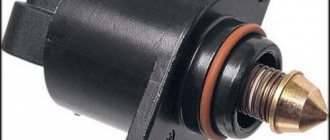
| 3 | throttle body and freewheel regulator (located on the air damper body) |
| 4 | dprv |
| 5 | DMRV VAZ 2114, 2113, 2115 |
| 6 | canister venting valve |
| 7 | dtozh |
| 8 | ignition module (salenoid) |
| 9 | spark plugs with caps of high-voltage wires put on them |
| 10 | dd |
Important ! Coolant temperature sensor VAZ 2114, 2113, 2115 model 2112-3851010 It, like the crankshaft sensor, greatly influences the start and operation of the engine of the VAZ 2114, 2113, 2115
Necessary tools and spare parts
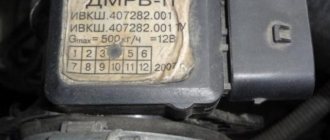
Before starting work, you should clarify which part number is stamped on the body of the old mass air flow sensor. Different sensor options were installed on different 2114 engines. Two types of article are common - 037 or 116 . Getting to the room without dismantling the case is problematic.
After determining the part number, you can begin preparing the tools and spare parts that will be useful for replacement:
- A flat or Phillips screwdriver for removing the air filter housing;
- New metal clamps (in case of breakage or wear of the old fastening);
- Spanners for unscrewing fastening nuts;
- A working mass air flow sensor to check changes (as soon as you are sure that there is a problem with it, purchase a new one).
The advantage of owning a 2114 model is that to check the functionality of the sensors, you can always find known working parts on the car of an acquaintance or friend. This simplifies the diagnostic process and can save money. To replace it yourself, it is enough to know where the mass air flow sensor on the VAZ 2114 is located.
DMRV connection diagrams VAZ 2114, 2113, 2115 8 valves
Depending on the model of the installed DMRV controller of the VAZ 2114, 2113, 2115, 8 valves have various connection options:
- 1. Connection diagram for air flow sensor with ECU BOSCH M1.5.4, M1.5.4N, January 5.1, 5.1.1, 5.1.2, VS 5.1 (* - for distributed fuel dosing modes with ECU 2111-1411020-60, -61,- 62 instead of terminal “30” of the ECU, terminal “48” is used).
- Terminal “1” is empty;
- Terminal “3” - to contact 30(48) of the controller;
- Contact “4” - to terminal 12 of the ECU;
- Terminal “5” - to pin 7 of the controller.
Contact “2” - to the main relay and speed sensor;
- Pin “1” - to pin 44 of the ECU;
Contact “2” - to the main relay and speed sensor;
Cleaning instructions
As practice shows, cleaning the mass air flow sensor is one of the most effective methods of restoring the functionality of the controller. Therefore, if the sensor breaks down, it is not necessary to change it, especially since such a pleasure today is not cheap. This procedure is necessary because over time it becomes dirty and shows other parameters.
So, how to clean the mass air flow sensor at home with your own hands:
- You will need a Phillips head screwdriver; use it to loosen the clamp securing the line from the air intake.
- Next, dismantle the corrugation and visually assess the condition of the system. You may see condensation or traces of engine fluid under the corrugation.
- Carefully inspect the inside of the controller. If everything is normal with the system, then there will be no traces of leaks or contamination. As practice shows, the sensitive element often breaks precisely due to an excess of contamination. In order not to avoid problems of this kind in the future, it is necessary to periodically replace the air filter. This procedure is carried out in accordance with technical regulations. Engine fluid may enter the controller as a result of an increased level of consumables in the crankcase. Accordingly, this occurs as a result of a clogged oil separator in the ventilation system.
- The regulator itself is fixed with two bolts on the line. The removal procedure is carried out using an open-end wrench. At this stage, if you are sure that the device has failed, you can replace it.
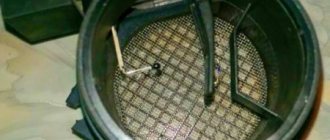
- You can see the entrance on which there will be a sealing rubber band designed to protect the device from the suction of dirty air flow. If you do not have a seal, it may have caught on the filter element. Accordingly, this will lead to the regulator input grid being contaminated.
- Clean the mesh using available materials. To do this, you can use a regular toothpick or toothbrush. After cleaning, the seal can be put back and the regulator can be put back in place.
Applicability of the mass air flow sensor depending on the controller
| Table of application of various models of mass flow sensor 2114, 2113, 2115 depending on the brand of controller | ||||||||||||
| the name of detail | Model DMRV VAZ 2114, 2113, 2115 | Controller name | ||||||||||
| G.M. | January 4.1 | M 1.5.4 | MP7.0N | M1.5.4, I 5.1.1, I 5.1.2, VS 5.1 | M 1.5.4N, I 5.1, VS 5.1 | MP 7.0N, EURO 3 | ||||||
| 8th grade | 8 classes | 16th grade | 8 classes | 8 classes | 8 classes | 16th grade | 8 classes | 16th grade | 8th grade | 16th grade | ||
| DMRV 2114, 2113, 2115 | ||||||||||||
| 2112-1130010 2112-1130010-01* | + | + | + | — | — | — | — | — | — | — | — | |
| 21083-1130010-01 | — | — | — | + | — | — | — | — | — | — | — | |
| 21083-1130010-10 | — | — | — | — | + | + | + | + | + | + | + | |
Note: * - products manufactured by GM; the arrangement of two or more numbers on one line indicates their interchangeability.
Important ! Tightening torques for VAZ 2114
Video instruction
The purpose of the throttle valve has remained unchanged since the inception of the automobile. First of all, it is responsible for the formation of the fuel-air mixture. At the same time, its structure has changed dramatically over the past few decades. This is no longer just a movable partition in the carburetor that limits the supply of gasoline, but a rather complex device that works in constant connection with the electronic control unit. This is done using a throttle valve sensor (TPS). This unit is available on all cars with injection engines, including the “ten”. The design, characteristics and main symptoms of a malfunction of the VAZ-2110 throttle sensor are discussed below.
DMRV pinout for VAZ 2114, 2113, 2115
The VAZ 2111 (l.5i) and VAZ 11183 (l.6i) engines were installed on VAZ 2114, 2113, 2115 cars. These motors have different methods of connecting the air flow sensor and therefore have slightly different wiring. The pinout options for the mass air flow sensor are presented below.
Pinout of MAF VAZ 2114, 2113, 2115 for VAZ 11183 (l.6i) engine:
- — temperature sensor signal;
- — + 12 V;
- - weight;
- — + 5 V
- - DMRV signal.
Pinout of MAF VAZ 2114, 2113, 2115 for VAZ 2111 (l.5i) engine:
- — ;
- — + 12 V;
- - weight;
- — + 5 V
- - DMRV signal.
Diagnosis of failure
If the air flow sensor breaks down, the symptoms of the malfunction can be very different. First of all, fuel consumption will increase; another symptom may be floating engine speed.
In addition to these signs of failure, the following can be identified:
- failures in the operation of the power unit;
- slower car acceleration, poor dynamics;
- the power unit can turn off when changing gears;
- decrease in power and increase in gasoline consumption;
- a heated internal combustion engine is more difficult to start;
- the Check light appears on the control panel.
The last symptom may not appear if the controller fails completely. How to check the MAF on your own? Diagnostics consists of identifying the impulse.
If the impulse is low, this indicates:
- possible short circuit or broken wiring;
- regulator failure;
- incorrect operation of the ECU;
- oxidation of contacts;
- that the controller is not connected.
Clogged air flow regulator
Malfunctions of the MAF sensor VAZ 2114, 2113, 2115
| Symptom of malfunction of VAZ 2114, 2113, 2115 DMRV on the engine | Fault signal | Remedy |
| The engine runs rough or stalls at idle | The "Check Engine" light comes on. The malfunction is typical for a frequency type sensor (System with a GM or January-4 controller). The "Check Engine" light may not be on. | Replace the faulty air sensor. You can get to the repair site by disconnecting the connector from the sensor (in this case, the engine speed will increase to approximately 2000 rpm |
| High idle speed | The "Check Engine" light comes on. Check the sensors and circuits with an autotester. | Replace the faulty sensor. Ensure contact in electrical circuits.. |
| The engine does not develop full power and does not have sufficient throttle response. Jerks and dips when the car is moving. | Typically the check engine light is on. If there is a break in the circuit or air flow sensor, the engine speed does not drop below 2000 min-1. The car accelerates poorly when you press the gas pedal. | Restore contact in electrical circuits. Replace the faulty mass air flow sensor 2114, 2113, 2115. |
| Increased fuel consumption | Typically the check engine light is on. If there is a break in the circuit or air flow sensor, the engine speed does not drop below 2000 min-1. The car accelerates poorly when the gas pedal is pressed. | Restore contact in electrical circuits. Replace the faulty air meter. |
| Increased content of harmful substances in exhaust gases | Typically the check engine light is on. If there is a break in the circuit or air flow sensor, the engine speed does not drop below 2000 min-1. The car accelerates poorly when you press the gas pedal. | Restore contact in electrical circuits. Replace the faulty air sensor. |
Purpose and principle of operation
Many car owners are concerned about how much it costs to purchase such a sensor. It turns out that the DMRV 2114 has a considerable cost, it varies between 2-3 thousand. In this case, you can use both imported products and domestically produced parts. You shouldn’t be surprised that there are corresponding reviews about domestic models.
But you shouldn’t always trust reviews; it’s better to try the products in practice. Although you can find a lot of negative reviews about domestic sensors, they are more affordable.
This sensor allows the engine to operate in different operating modes, involving different loads. If we consider the operation of the device, it consists in creating a working mixture of air and gasoline. More precisely, the mixture includes gasoline vapors. The direct task of the product is to measure two indicators that are interconnected:
- Reaction time.
- The amount of air that is consumed for the reaction.
If the measurements are accurate, the device can determine what mixture the engine requires. This allows the system to obtain information about the required proportions. There are also situations when the sensor does not work correctly, producing incorrect values.
In this case, the mixture created in the system will not correspond to the current operating mode. As a result, power may decrease and consumption will likely increase. Among the possible consequences may be a deterioration in the dynamics of the car and a disruption in the response of the car.
Attention! The response of parts from different manufacturers may vary significantly. It is important to take this point into account when checking the operation of the sensor.
How to check DMRV 2114, 2113, 2115 8 valves with a multimeter?
Checking the mass air flow sensor model 21083-1130010 with a multimeter is carried out in the following sequence:
- Open the hood of the car;
- Press the lock with your finger and remove the terminal block from the air flow sensor of VAZ 2114, 2113, 2115 model 21083-1130010.
- Take a multimeter and switch it to voltmeter mode:
- We connect the negative probe of the multimeter to the motor housing (to ground);
- We turn on the ignition in the car and measure the voltage at terminal 2 of the wire harness with a multimeter (the numbering of the terminal terminals is marked on the air flow sensor VAZ 2114, 2113, 2115 8 valves model 21083-1130010) The voltage measured with a multimeter at terminal 2 must correspond to at least 12 V. When the voltage is not supplied to the terminal connector or it is less than 12 V, then the battery is discharged, the power line is broken or the ECU is broken.
- Using a multimeter, we measure the voltage at terminal 4 of the air meter connector, twist the wires. The voltage at terminal 4 should be about 5 V. When the voltage does not meet the standard, the sensor power line is damaged or the ECU is broken.
- We dismantle the air flow sensor VAZ 2114, 2113, 2115 8 valves and inspect it for mechanical damage. If mechanical damage to the sensitive elements is visible, then replace the MAF 2114, 2113, 2115 with a new one.
Checking and repairing at home
There are eight ways to independently check amplitude and frequency mass flow sensors.
Method No. 1 - disabling the air flow meter
The method consists of disconnecting the sensor from the fuel system of the car and checking the functionality of the system without it. To do this, you need to disconnect the device from the connector and start the engine. Without a mass air flow sensor, the controller receives a signal to switch to emergency operation mode. It prepares the air-fuel mixture only based on the throttle position. If the car moves faster and does not stall, it means that the device is faulty and requires repair or replacement.
Method No. 2 - flashing the electronic control unit
If the standard firmware has been changed, then it is unknown what reaction of the controller is programmed in it in case of an emergency. In this case, you should try to insert a 1mm thick plate under the throttle stop. The turnover should increase. Now you need to pull out the chip from the air flow meter. If the power unit continues to work, then the cause of the malfunction is the firmware.
Method No. 3 - installing a working sensor
Install a known good part and start the engine. If after replacement it begins to work better, the motor does not stall, then replacement or repair of the device is required.
Method No. 4 - visual inspection
To do this, use a Phillips screwdriver to unscrew the clamp holding the air collector corrugation. Then you need to disconnect the corrugation and inspect the internal surfaces of the air collector corrugation and the sensor.
Inspection of duct corrugation
There should be no traces of oil or condensation on them, the surfaces should be dry and clean. If you do not take care of the air filter and change it rarely, then dirt can get on the sensitive element of the sensor and cause it to break. This is the most common malfunction. Traces of oil may appear in the flow meter if the oil level in the crankcase is high, or if the oil sump of the crankcase ventilation system is clogged. If necessary, you need to clean the surfaces using special cleaning products.
Method No. 5 - checking the mass air flow sensor with a multimeter
To do this, you need to turn on the tester in a mode in which constant voltage is checked. The limit value for measurements should be set to 2V.
DMRV operation diagram
Sensor pinout:
- The yellow wire is located closer to the windshield. It serves as an input for a signal from the flow meter.
- The white-gray wire is the sensor voltage output.
- The black and pink wire leads to the main relay.
- The green wire is used to ground the sensors, that is, it goes to ground.
The wires may have different colors, but their location is unchanged. To check, you need to turn on the ignition, but do not start the car. The red probe from the multimeter must be connected to the yellow wire, and the black one must be connected to ground, that is, to the green wire. We measure the voltage between these two outputs. Multimeter probes make it possible to connect without disturbing the insulation of the wires.
On the new device, the output voltage ranges from 0.996 to 1.01 V.
During operation, this voltage gradually increases and by its value one can judge the wear of the flow meter:
- if the sensor is in good condition, the voltage is from 1.01 to 1.02 V;
- in satisfactory condition - from 1.02 to 1.03 V;
- the sensor resource ends if the voltage is in the range from 1.03 to 1.04 V;
- a value in the range from 1.04 to 1.05 indicates a near-death state; if there are no contraindications, then you can continue to use the sensor;
- if the voltage exceeds 1.05 V, the mass air flow sensor requires replacement.
ADC flow meter readings
Diagnostics of the mass air flow sensor "Tseshkoy" is not difficult and can be done with your own hands.
If there is dirt on the removed sensor, you can clean it yourself. You can use WD-40 to wash it. To clean the mass air flow sensor, you must first remove the pipe from it, and then dismantle the device itself. Inside the device there is a mesh and several wires - sensors.
We recommend: Cooling system for VAZ 2109 and 21099 (carburetor and injector): design and principle of operation, replacing the radiator with your own hands
They need to be sprayed with cleaning agent and washed. Then let the liquid dry. If dirt remains, the procedure should be repeated. You need to clean the pipe with the same product. It must be free of dirt and oil stains. After replacing the air filter, all parts must be returned to their place. After the cleaning procedure, the functionality of the device can be restored to 80%, the error about the reduced sensor signal level disappears (the author of the video is “24 hours”).
Flushing the sensor will help avoid costly repairs.
Method number 6 - checking with a scanner
Test method:
- Install a diagnostic program on your phone (smartphone), tablet or laptop computer (for example, Torque Pro, Opendiag, BMWhat, OBD Auto Doctor).
- Connect your mobile device or laptop to the diagnostic connector located on the vehicle's electronic control unit using a special cable, Bluetooth channel.
- Launch the diagnostic utility on your phone (smartphone) or computer.
- Wait until the program finishes scanning all vehicle components. As a result, the utility will check the serviceability of each vehicle unit.
- Decipher the error codes that the program will show after the diagnostics are completed.
To perform this method, testers are used:
- K-Line 409/1;
- Scanmatic;
- ELM (ELM) 327;
- OP-COM.
Method No. 7 - checking by Vasya the Diagnosticist
To identify a malfunction of the mass air flow sensor without removing it from the car, you need to:
- Install a program called “VASYA diagnostician” on your laptop (laptop) and run it.
- Connect the adapter to the vehicle's diagnostic port.
- Select the item “Electronics 1” or “01 – Engine electronics” from the “Control unit” tabs to connect to the vehicle’s control unit.
- Go to “Custom Groups”.
- Select 211, 212 (passport value) and 213 (current value).
- Compare current indicators with passport data. If the deviations are high, then it is necessary to replace the mass air flow sensor.
Method No. 8 - using a motor tester
Good to know
This method is used to test frequency-type flowmeters.
To check the mass air flow sensor with a motor tester (oscilloscope), you need to connect it to the sensor (depending on the car brand) and start the engine.
Mass air flow sensor check parameters:
- transient time when the ignition is on;
- air consumption readings at idle and a sharp increase in engine speed;
- voltage in the sensor network.
It is important to know
The output data is individual for different types of engines. Before diagnosis, you should check the current indications with an official representative.
VAZ 2114 car models
| Car model | Option code | Body type | Execution | Engine | Engine capacity | Toxicity standards | Controller |
| VAZ 2114-20 | 10 ->06.05 | Hatchback | Standard | 2111-86 | 1,5 | R83-02 | 2111-1411020-60 2111-1411020-61 2111-1411020-62 |
| 30 | Hatchback | Standard | 2111-80 | 1,5 | Euro-3 | 2111-1411020-80 2111-1411020-81 2111-1411020-82 | |
| 40 | Hatchback | Standard | 2111-75 | 1,5 | Euro 4 | 2111-1411020-30 | |
| 110 ->02.05 | Hatchback | Standard | 2111-86 | 1,5 | Euro 2 | 2111-1411020-40 | |
| 120 | Hatchback | Standard | 2111-80 | 1,5 | Euro-3 | 2111-1411020-80 2111-1411020-81 2111-1411020-82 | |
| VAZ 2114-21 | 10 ->06.05 | Hatchback | Norm | 2111-86 | 1,5 | R83-02 | 2111-1411020-60 2111-1411020-61 2111-1411020-62 |
| 30 | Hatchback | Norm | 2111-80 | 1,5 | Euro-3 | 2111-1411020-80 2111-1411020-81 2111-1411020-82 | |
| 40 | Hatchback | Norm | 2111-75 | 1,5 | Euro 4 | 2111-1411020-30 | |
| VAZ 2114-22 | 10 ->06.05 | Hatchback | Lux | 2111-86 | 1,5 | R83-02 | 2111-1411020-60 2111-1411020-61 2111-1411020-62 |
| 30 | Hatchback | Lux | 2111-80 | 1,5 | Euro-3 | 2111-1411020-80 2111-1411020-81 2111-1411020-82 | |
| 40 | Hatchback | Lux | 2111-75 | 1,5 | Euro 4 | 2111-1411020-30 | |
| VAZ 2114-22 | 110 ->02.05 | Hatchback | Lux | 2111-86 | 1,5 | Euro 2 | 2111-1411020-40 |
| 120 | Hatchback | Lux | 2111-80 | 1,5 | Euro-3 | 2111-1411020-80 2111-1411020-81 2111-1411020-82 | |
| VAZ 21144-20 | 10 | Hatchback | Standard | 11183-30 | 1.6 | Euro-3 | 21114-1411020-10 21114-1411020-11 |
| 20 | Hatchback | Standard | 11183-20 | 1,6 | Euro 2 | 21114-1411020-30 21114-1411020-31 21114-1411020-32 | |
| 110 | Hatchback | Standard | 11183-20 | 1,6 | Euro 2 | 21114-1411020-30 21114-1411020-31 21114-1411020-32 | |
| VAZ 21144-22 | 10 | Hatchback | Lux | 11183-30 | 1.6 | Euro-3 | 21114-1411020-10 21114-1411020-11 |
| 20 | Hatchback | Lux | 11183-20 | 1.6 | Euro 2 | 21114-1411020-30 21114-1411020-31 21114-1411020-32 | |
| 110 | Hatchback | Lux | 11183-20 | 1,6 | Euro 2 | 21114-1411020-30 21114-1411020-31 21114-1411020-32 |
Symptoms and troubleshooting
Since the mass air flow sensor is electronic equipment, and a very complicated one at that, most car owners do not dare diagnose it themselves and take it to a car service center the old fashioned way. But quite often, having just connected the diagnostic device to the sensor, the auto repairman declares that the device is completely faulty, it cannot be repaired, and its place is only in a landfill. Rest assured, if you bring in a completely new sensor, the technician will tell you the same thing.
But any disinterested expert will say that the mass air flow sensor is an almost indestructible device. It may malfunction, sometimes seriously, but this is a completely fixable problem, something that will take no more than an hour. But how to check the mass air flow sensor for performance? Very simple. If, after installing a new sensor on your car, you notice that it works perfectly, then that is where the problem lies. If the situation has not improved at all, then there is no point in wasting your energy, time and money on the empty hassle of replacing a completely “healthy” sensor.
Just above we mentioned such a device as a multimeter. You can understand whether the sensor is working or not by finding out the voltage of the device. If everything is normal, then the multimeter produces 1-1.2 W. If there are any problems, then the scale goes down, the critical mark starts at 0.99 W. If, on the contrary, the voltage is higher than normal, for example 1.037, then this indicates one thing: the sensor is very clogged, and therefore makes errors in the readings. If you clean it, it will work again at the same rate.
If there is neither a new sensor nor a multimeter, then you can check the condition of the part in the old-fashioned way. At engine idle speed (870-910 rpm), the sensor in good condition produces 9.6-10 kg of air per hour. If the revolutions reach two thousand per minute, then this figure increases to 20 kg/h. We looked at ideal indicators. When they become higher or lower, the need for repair is obvious. What are the well-known symptoms of a sensor failure?
First of all, this is a sharp increase in fuel consumption. Here you should not blame the car for its large “appetites”: it is not to blame, and the manufacturer is not to blame, here you just need to “treat” your “iron horse”. Of course, this can happen not only in the case of a sensor failure, but from this fact alone you can come to the right idea: most likely the problem lies in the tiny device.
Also, when the engine loses power, a hot engine will stop starting. The car, previously dynamic and controllable, turns into some kind of monster on wheels, which is constantly lost in control and “freezes”. And finally, if you see a simple Check Engine sign on the instrument panel, then there can be no doubt: this sensor is asking you for an ambulance.
Repair manuals and catalogs for the VAZ 2114 car
These manuals and catalogs can be downloaded and saved to your gadget.
- CATALOG OF PARTS AND ASSEMBLY UNITS VAZ 2114, 2113, 2115. —
- 266 pp.
- Size – 7,448 MB
- Format - pdf
- 2002
- 2002
Replacing the air flow sensor
To replace the sensor with your own hands, you need to prepare a shaped screwdriver and a “10” key.
The replacement procedure consists of the following steps:
- First you need to turn off the ignition and open the hood.
- Then you need to disconnect the negative terminal on the battery.
- At the next stage, you need to loosen the clamp with which the corrugation is attached to the mass air flow sensor.
- Next, remove the corrugation from the pipe.
- Then you need to bend the comb and disconnect the sensor connector.
Disconnecting the sensor connector
- Then, using a key set to “10”, you need to unscrew the sensor mounting bolts to the air filter housing.
- Now you can remove the mass air flow sensor.
- Installing the sensor yourself is carried out in the reverse order.
Thus, if the car stalls and has all the signs of a breakdown of the mass air flow sensor, then before you start repairing it, you should check the level of its signal, it should not be low, perform a full diagnosis of the car and repair all faulty components and parts.
It is important to undergo regular vehicle inspections and perform timely maintenance, then the parts and components will last longer.
Oxygen sensor (DC, lambda probe)
An oxygen sensor, also known as a lambda probe, is installed in the exhaust manifold and is designed to record exhaust carbon dioxide gases. In some car models that were produced after 2010. There are 2 oxygen sensors. Serves to adjust the air-fuel mixture based on carbon dioxide measurements.
Signs of DC malfunction:
- High fuel consumption;
- Loss of engine power;
- Difficult starting of the internal combustion engine;
Coolant temperature sensor (DTOZH)
The coolant temperature sensor is installed in the thermostat housing and is used to turn the engine cooling fan on and off. It should be noted that turning on the fan is not the only task of this sensor. DTOZH adjusts the fuel mixture to maintain higher engine speeds when warming up, that is, if the coolant in the car is below operating temperature, the sensor will give readings about the enrichment of the fuel mixture to warm up the engine faster.
Source
Stories from our readers
“Fucking basin. "
Hi all! My name is Mikhail, now I’ll tell you a story about how I managed to exchange my two-wheeler for a 2010 Camry. It all started with the fact that I began to be wildly irritated by the breakdowns of the two-wheeler, it seemed like nothing serious was broken, but damn it, there were so many little things that really started to irritate me. This is where the idea arose that it was time to change the car to a foreign car. The choice fell on the melting Camry of the tenth years.
Yes, I had matured morally, but financially I just couldn’t handle it. I’ll say right away that I am against loans and taking a car, especially not a new one, on credit is unreasonable. My salary is 24k a month, so collecting 600-700 thousand is almost impossible for me. I started looking for different ways to make money on the Internet. You can’t imagine how many scams there are, what I haven’t tried: sports betting, network marketing, and even the volcano casino, where I successfully lost about 10 thousand ((The only direction in which it seemed to me that I could make money was currency trading on the stock exchange, they call it Forex. But when I started delving into it, I realized that it was very difficult for me. I continued to dig further and came across binary options. The essence is the same as in Forex, but it’s much easier to understand. I started reading forums, studying trading strategies. I tried it on a demo account, then opened a real account. To be honest, I didn’t manage to start earning money right away, until I understood all the mechanics of options, I lost about 3,000 rubles, but as it turned out, it was a precious experience. Now I earn 5-7 thousand rubles a day. I managed to get the car buy after half a year, but in my opinion this is a good result, and it’s not about the car, my life has changed, I naturally quit my job, I have more free time for myself and my family. You’ll laugh, but I work directly on the phone)) If If you want to change your life like me, then here’s what I advise you to do right now: 1. Register on the site 2. Practice on a Demo account (it’s free). 3. As soon as you get something on the Demo account, top up your REAL ACCOUNT and go to REAL MONEY! I also advise you to download the application to your phone, it’s much more convenient to work from your phone. Download here.
- ─ from Niva, catalog number 21214-1413110;
- ─ from Daewoo Nexia 25037223;
- ─ DTOZH VAZ (turbine needs modification).
You will also need:
- ─ Speed sensor connector (for DBP);
- ─ Connector for coolant temperature sensor (for DTV);
- ─ Vacuum hose and tee;
- ─ Wire about 2.5 meters;
- ─ Lyra type terminals.
Firmware for DBP and DTV
After replacing the mass air flow sensor with DBP and DTV, it is necessary to recalibrate the ECU firmware, because For new sensors, different calibrations must be used. Example firmware for ECU Y5.1 without mass air flow sensor: J5LS (J5 Light Sport), J5SPT0005 (J7SPT0005). How to configure firmware for video:
Result : we get high reliability, but an increased delay when pressing the gas pedal. On a naturally aspirated engine, a system with a mass air flow sensor will be more preferable, since it has greater measurement accuracy, and the use of air pressure sensor and air flow sensor on a production engine is impractical. What do you think, is it worth switching from mass air flow sensor to air pressure sensor and air flow sensor on a stock engine without tuning?
Does it make sense to switch from mass air flow sensor to DBP and DTV on an engine without modifications?
Your feedback on the operation of DBP and DTV on a stock engine:
Has the response time of the gas pedal changed when switching to DBP and DTV?
Source
Phase sensor (PF)
The phase sensor is located:
- In 16-valve engines near the intake camshaft gear;
- In 8-valve engines from the end of the cylinder head near the mass air flow sensor;
Serves for phased fuel injection. It is a fairly reliable sensor that rarely fails. The design of the sensors for 8 and 16 valve engines is different and is not interchangeable.
Signs of DF malfunction:
- Increased fuel consumption;
- Engine vibrations;
Crankshaft position sensor (CPS)
DPKV is installed near the timing belt, namely near the crankshaft gear. This sensor is responsible for counting the crankshaft revolutions from the generator belt pulley. DPKV is involved in the formation of the spark necessary to ignite the fuel mixture in the combustion chamber. If the crankshaft position sensor fails, the car engine will not start.
Signs of DPKV malfunction:
- The car's internal combustion engine does not start;
- Spontaneous stop of the internal combustion engine;
- Uneven operation at idle and high speeds;
Oil pressure sensor (OPS)
The oil pressure sensor is located near the oil filler neck. The sensor serves as a signal to the driver about a decrease in oil pressure in the engine. When the pressure decreases, it sends a signal to the instrument panel and lights up the low oil pressure warning light.
Signs of DDM malfunction:
- Constant lighting of the oil pressure lamp;
- Oil leakage from the joint in the sensor;