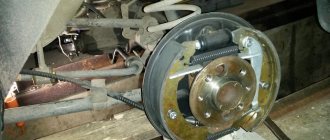
How to replace the rear axle oil seal on a Chevrolet Niva
The rear axle gear oil seal on a Chevrolet Niva requires replacement if it is found to have an oil leak. Before changing, you should check how the gearbox breather itself works, since if there is excessive pressure in it, oil will be driven through the working oil seal. You should also check how much oil is leaking, just move the breather cap itself in different directions. In addition, check how much oil is in the rear axle; if it is not enough, then add it. The plug that closes the fill hole must be crimped.
Replacing the oil seal
- We drive the vehicle into the pit, as mentioned above, check the oil level in the gearbox, if it is less than normal, top up.
- We suspend the rear wheels, shift the gearbox to fourth gear, and start the engine for about fifteen minutes, warming up the oil in the gearbox.
- After stopping the engine, thoroughly wipe the joints between the cardan transmission and the gearbox flange.
- We start the new engine and accelerate the readings on the speedometer to one hundred kilometers per hour, at this speed the engine should also run for about ten to fifteen minutes, if the oil leaks and exceeds 5 drops, then it should be changed.
What tool is required for the job?
- Screwdriver Set
- A set of keys
- Hammer
- The key is not just a torque wrench
Once the tool is prepared, you can begin to work by performing the following series of actions:
- Lower the parking brake all the way down
- Drain the oil from the rear axle gearbox
- Both axle shafts are removed
- Disconnect the cardan drive from the flange drive gear
- Unscrew the nut that secures the flange
- Let's take it off
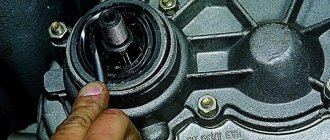
- Using a screwdriver, remove the old oil seal
- Lubricate the outer edge of the new oil seal and install it in place using a mandrel of suitable diameter.
- Screw the nut and washer into place
At this point, the work on replacing the oil seal on the Chevrolet Niva can be considered completed. The removed parts are installed in the reverse order of removal. If difficulties arise during the replacement, then it is better to contact a specialized service, where specialists will carry out the replacement.
Important nuances
- The dynamometer readings were mentioned above, and this is no coincidence. Tightening the flange is a very responsible process, and it can only be done using a torque wrench. This allows you to avoid excessive squeezing of the oil seal, which leads to a violation of the tightness of the entire gearbox. This is done like this: if at the first measurement the force on the dynamometer was 2.8 - 3 kg, then the force on the torque wrench when tightening should not exceed 6.3 kg. If the dynamometer showed 4.3 kg, then when tightening the key there should be no more than 9 kg, etc. If the dynamometer showed 2.7 kg, and the key when tightened shows 9 kg or more, it means that the gearbox adjusting sleeve is completely worn out and needs for urgent replacement.
After removal, the flange should be carefully inspected for severe abrasions and cracks. If there are any, the flange must be replaced. If this is not done, the new oil seal will very quickly become unusable.
Before driving the oil seal with a tube, it is recommended to lubricate it with lithol. This makes it much easier to fit the new oil seal into its original place. When striking a pipe with a hammer, there is no need to be too zealous: with a strong blow, the pipe easily cuts the seal.
Replacement Tips
Most people, along with replacing the oil seal, also change the transmission oil. If you are one of them, you should find out which lubricant you need to use, since mixing different types of oil is not recommended. This may lead to operational problems. Therefore, if you are not sure what fluid to fill in, flush the system before replacing.
Before replacing the fluid, it is better to drain it; if this is not possible, then raise the side where the replacement will take place higher, this way you can avoid lubricant leakage. In any case, after the work is done, you need to add oil.
To summarize, we can conclude that the problem occurs sooner or later for all owners of this car, since the rear axle of this model is weak. As we can see from the material given above, replacing a part is not such a complicated procedure and can be done independently, and it can be done in an hour.
Replacement
Unscrew the cardan (4 bolts), drain the oil. Individual bolts may not give in; they will have to be cut off with a grinder, and the rods themselves will have to be drilled out for subsequent assembly. Drain the oil from the bridge.
Further actions should follow the following scheme:
1. Using a 17-mm spanner, unscrew the four nuts of the bolts securing the axle shaft to the beam flange.
2. Using a slotted screwdriver, bend the locking plates of the axle shaft mounting bolts and pull out the bolts.
3. Using the back side of the wheel, fix it on the axle shaft. As a rule, a few turns of three nuts are enough for this, since this is not done for travel.
4. We take the wheel and with a moderate-strong jerk, move it from the seat and remove the axle shaft. At the same time, a plate on which the bearing ring is fixed will come out.
5. Dismantle the beam flange ring.
6. Install the bolts into the holes of the brake system shield and the bridge beam. This is necessary to avoid hanging the shield on the brake pipe.
7. Take the “Goebbels” and use it to hook the oil seal, pull it out.
8. Using a piece of metal pipe of the required diameter, we press the new part and seal it with gasket sealant. The last condition is not mandatory.
9. We carry out the assembly using the proposed diagram from top to bottom.
If you find deformation of the axle shaft, damage to the splines, or bearing failure, then we are no longer talking about replacing the oil seal, but about purchasing a new entire unit.
Important: at the beginning of the article we talked about the need to drain the oil. This condition is also not mandatory and is only met if you planned to replace this consumable. In other situations, you should simply check the oil level upon completion of work and add it if necessary.
Removing and replacing the axle shaft seal of the rear axle Niva Chevrolet
When it is necessary to replace the rear axle axle seal of a Niva Chevrolet, the owner does not have to immediately contact a service station. This operation refers to work that does not require high qualifications and special equipment, and if desired, it can be done with your own hands. This also applies to motorists driving regular Nivas - VAZ 21214 and 21213.
Useful video
Replacing the rear axle shaft seal of Niva 2121 will not take you more than 1 hour if you follow the suggested instructions.
1. NIVA gearbox seals :
-Oil seal for the input shaft of the gearbox (gearbox) NIVA-2121, -21213, -21214, -2131, -2123:
Catalogue number: 2101-1701043
oil seal dimensions: 28x47x8mm
- Seal of the secondary shaft of the gearbox (shank) VAZ-2121, -21213, -21214, -2131, -2123:
Catalogue number: 2101-1701210
oil seal dimensions: 32x56x11mm
2. NIVA front axle oil seals:
-Oil seal for the front axle gearbox NIVA- 2121,-21213,-21214,- 2123,-2120
catalog number: 2121-2302052
Dimensions: 35.8 x 68 x 11mm
-Drive seal -2121,-21213,-21214,-2131,-2123, universal (without direction)
Catalog number: 2123-2303120 / 121 2 pcs.
seal dimensions: 57.15 x 40 x 9mm
But it is better to install seals with a notch (left, right):
Left drive oil seal -2121,-21213,-21214,- 2123
Catalog number: 21213-2301035 1 piece.
Oil seal dimensions: 57.15 x 40 x 9mm
Right drive oil seal -2121,-21213,-21214,-2123
Catalog number: 21213-2301034 1 piece.
Oil seal dimensions: 57.15 x 40 x 9mm
3. Transfer Case Seals 3pcs:
2 identical oil seals are installed on the valve:
catalog number: 2101-2402052-01 (this is the rear axle gearbox seal on the VAZ-2101 and NIVA-2121 of right rotation),
one is installed on the drive shaft of the RK:
(in the lower diagram), the second is on the front shaft of the RK differential (see the upper diagram - highlighted in red)
Dimensions of these seals in mm: 35.8 x 68 x 10(12) 2 pcs.
An oil seal is installed on the rear shaft of the RK differential - this is the 3rd oil seal (highlighted in blue in the top diagram)
with catalog number: 2121-2302052 left rotation 1 pc.
Dimensions in mm: 35.8 x 68 x 11(12)
4. Rear axle gear oil seal :
catalog number: 2101-2402052-01 (rear axle gearbox VAZ-2101) 1 pc.
dimensions: 35.8x68x10
5. Axle shaft seals for Chevy NIVA-2123:
catalog numbers of oil seals: 2110-2301034 right - 1 piece
2110-2301035 left - 1 piece.
gland dimensions in mm: 57 x 35 x 9
In the photo: VAZ-2123 axle seals (BRT) red-left, black-right.
The arrow on the oil seal indicates the direction of rotation of the shaft (when the vehicle is moving forward).
When to change the seal
Replacing the axle seal is not tied to a specific mileage, but is done in connection with the following defects:
- Transmission oil leakage from the rear axle of a Chevrolet Niva. It is characterized by the appearance of oil stains on the brake casing and the “stocking” on the side where the axle shaft seal has lost its seal.
- In case of accidental damage to the seal when replacing the axle bearing. Happens when a part is pulled out of its socket.
A distinction should be made between transmission oil leakage from the axle seal on either side of the rear beam and from the gearbox shank where the driveshaft is secured. In the second case, greasy stains and dirt cover the rear axle gear housing, located in the middle.
If for various reasons you need to replace the axle bearing, then you should also change the oil seal at the same time. This will save you from having to disassemble the unit again due to leakage of the old part. The part costs mere pennies, its catalog number for the Chevrolet Niva is 2110-2301034 (right) and 2110-2301035 (left), and the overall dimensions are as follows:
- outer diameter - 57 mm;
- width - 9 mm;
- The diameter of the hole along the protruding rubber (or silicone) edge is 35 mm.
The catalog number and dimensions of the O-ring of the Niva VAZ 21214 axle shaft are identical. In addition to the oil seal itself, transmission oil will be needed to replenish the lost amount in the gearbox. TAD17I brand oil is considered “native” for all types of VAZ gearboxes.
What to do with VAZ
Initially, we will discuss these types of repairs in relation to the “classic” Zhiguli. We will tell you how to replace the gearbox seal of the rear axle of a VAZ 2107.
- wrenches;
- screwdriver;
- mounting blade;
- Litol type lubricant;
- sandpaper;
- mandrel and hammer;
- a special key for holding the flange - a tube with two bolts inserted into the holes of the part.
Find out also how to remove the brake drum on a VAZ 2109 and about replacing the coolant on a VAZ 2110.
Begin.
- First of all, drain the oil from the assembly unit.
- We remove the axle shafts from the beam.
- We use a screwdriver to disconnect the cardan flange from the mating part of the tail gear, having previously unscrewed the bolts. We keep the cardan from turning with a mounting blade.
- We wrap a strong rope around the neck of the counter element of the drive gear and attach a hand scale to it. The force of uniform rotation of the part (kg s) multiplied by the radius of its neck gives the value of the required moment - we write down this value.
- Unscrew the tail gear flange nut, holding the part with a special wrench.
- We remove the detached element and the washer.
- Using a screwdriver, we remove the reinforced rubber product.
- Clean the seat with sandpaper and lubricate it with Litol.
- We press in the new spare part with a mandrel using hammer blows until there is a gap of 2 mm from the end of the crankcase to the part embedded inside. Now the reinstallation of the differential assembly cuff can be considered completed.
- We install and screw the flange element, holding it with a special key. If the initially measured moment of resistance to rotation was at least 6 kg s x m, then the new moment should be greater by 1 kg s x m. In any case, we tighten until the moment reaches 6 kg s x m, but not higher than up to the moment 12 – 26 kg per x m.
- Then we collect everything along the way in reverse.
- Add oil.
Preparation and disassembly
To independently remove a leaking rear axle oil seal on a Niva Chevrolet, you will need the following tools:
- standard set of wrenches;
- slotted screwdriver and wheel wrench;
- jack;
- hammer;
- wooden stand;
- cloth gloves.
Never neglect gloves when repairing a car: they will protect your hands from damage due to accidental impacts. The height of the wooden stand should be enough to support the rear axle with the wheel removed and the shock absorber unscrewed, otherwise oil will leak from it.
Before removing the old seal, you will have to disassemble the rear hub assembly and remove the axle shaft. Disassembly is carried out in the following sequence:
- Place the car on a level surface and secure it with wheel chocks. Make sure the handbrake is turned off.
- Loosen the wheel nuts, jack up the car and remove the wheel.
- Clean the rear axle flange that protrudes beyond the brake drum from rust. Additionally, you can treat this area with WD-40 lubricant.
- Unscrew the 2 bolts securing the drum with a 12 mm wrench, then gently tap with a hammer to move it out of place.
- The drum is removed in 2 ways: by squeezing it out with the same bolts, screwed into other holes, or by knocking it with a hammer through a piece of wood. The methods can be combined, just be careful not to damage the edge of the drum with the blows.
- After dismantling, clean the seat on the axle shaft again to make the drum easier to remove.
The next step is unscrewing and removing the axle shaft. In the VAZ 2131 Niva Chevrolet, 4 bolts securing it are held on the other side by a bracket holding the shock absorber.
After unscrewing the bolts, the shock absorber will no longer hold the rear axle, and the spring will push it down, causing oil to flow.
To avoid this, you need to first adjust the stand by jacking the car higher. The rear axle “stocking” must rest with a slope in the other direction so that the oil does not leak out.
Since in a regular Niva VAZ 21214 and 21213 the shock absorber is attached to the spring cup, and not to the rear hub, there is no need to unscrew it. A stand is also not needed here; a jack is enough to lift it.
The 4 bolts holding the rear axle shaft are unscrewed with a 17 mm wrench. Pay attention to the growers: they should not get lost in the brake mechanism. If you ignore the loss of the groover and install a new one, then the old one will subsequently get between the block and the drum while driving and the wheel will jam.
After unscrewing the bolts, with a sharp movement, remove the axle shaft with the bearing from the cage. If this fails, attach the wheel to the studs with 3 nuts and try to pull it. The last option is to use a special inertial puller for removal. There is also a popular method: tie the axle shaft with a rope to an iron garage door and hit it with a hammer to knock it out of the cage. But for this you need to carefully park the car closer to the gate.
Replacing the Chevrolet Niva front axle oil seal.
- First you need to remove one or two drives, depending on where replacement is needed.
- After this you need to remove the locking ring
- Using a hammer, knock out the bearing. If you have problems with removal, you can use WD-40 lubricant
- The cover is removed, the old oil seal is knocked out using a pipe.
- The installation site is lubricated and a new O-ring is installed.
- the unit is reassembled.
Hello! Most Chevy owners service the unpretentious units of this popular car themselves. During intensive use, you often have to change consumables, especially in the chassis. I will tell you about this type of service, such as replacing the front axle oil seal of a NIVA Chevrolet. The replacement operation is carried out when oil leaks from the axle housing. A clogged breather causes lubricant to squeeze out.
If grease drips immediately after stopping (while the gearbox is hot), and then the flow stops, the breather must be cleaned. When it is clogged with dirt, the heated air is not released outside during movement. Under pressure, the working fluid of the gearbox will be squeezed out even through serviceable gaskets and seals.
If the breather is in order, but oil still leaks, you will have to replace damaged cover gaskets or O-rings. There are three of them in the front axle, and they are different:
The oil seal that seals the drive gear axis is located at the rear of the axle, at the location where the front propeller shaft is attached. Oil seals for the right and left drive (inner axle joint).
ATTENTION! The left and right oil seals are not the same; they have a direction of rotation. This must be taken into account when purchasing
The direction of rotation of the wheel when moving forward is indicated by the arrow. If the oil is installed incorrectly, the removable notches will drive the lubricant out.
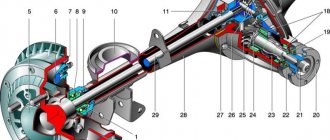
To understand the device, here is the layout of the front axle:
The oil seal is replaced without removing the front axle. If the work is carried out independently, and it is not possible to use a lift, the car is placed on an inspection hole or overpass. We tighten the hand brake and install supports under the rear wheels. Gearbox and transfer case levers in the “Neutral” position. The front part is lifted with a jack and fixed on stops.
We clean the bridge from dirt and leaks of technical fluids. Unscrew the crankcase drain plug and drain the oil from the gearbox. Screw the plug into place.
- Socket wrenches 13, 17 and 24 Hexagon 12 Mounting blade (mount) Wooden block; Hammer; Flat screwdriver; Universal puller, two or three legs; Retaining ring remover; A piece of pipe according to the diameter of the seals; Flushing fluid (kerosene, Carbcleaner, Vince, Laurel); Brush with stiff bristles; Lint-free rags.
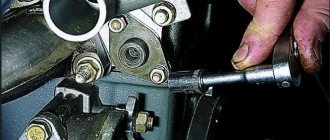
- We disconnect the driveshaft from the gearbox by unscrewing the bolts securing it to the flange.
- We separate the internal CV joint housings from the drive gears.
- Using a dynamometer, we determine the moment at which the drive gear begins to rotate freely. To do this, turn the flange mounting nut until the gear begins to rotate. We fix the magnitude of the moment.
- We tighten the bolts into two adjacent flange holes (for fixation).
- We insert a mounting spade between the bolts, hold the flange from turning and unscrew the fastening nut.
- Remove the washer and flange from the spline joint. If it is impossible to remove it by hand, use a universal puller.
7. Remove the oil seal using a flat-head screwdriver. 8. Rinse and thoroughly wipe the replacement area. 9. Replacement of the front axle drive gear oil seal is carried out only with original Chevrolet spare parts. To facilitate pressing, any grease (litol, grease) is applied to the sealing ring. 10. Press in the ring using a pipe of suitable diameter. 11. Place the flange on the spline connection and put on the washer. 12. Tighten the nut to the torque determined when unscrewing. 13. Fasten the cardan shaft.
- We remove both drives (or the one that requires replacement)
- Remove the retaining ring and spring washer;
- Using a hammer, carefully knock down the bearing. If removal is difficult, treat with a penetrating lubricant, such as WD-40.
- Remove the bearing cap with the old seal.
- Using a pipe, knock the oil seal out of the cover;
- Lubricate the new spare part with any grease and press the o-ring into the cover.
7. We assemble the unit. We fill the gearbox with oil in accordance with the maintenance instructions, do a test drive, and check for oil leaks.
Installing a New Seal
After removing the axle shaft, the metal shield where the brake pads are attached will remain hanging on the copper pipe with the fluid, so it should be fixed by inserting the 2 upper bolts back into the holes. Then follow the instructions:
- Remove the thick rubber gasket from the rear axle flange.
- Pull out the old oil seal by prying it with a screwdriver or pliers. Clean the seat and wipe with a rag.
- Lightly lubricate the new seal with transmission oil and insert it into the socket of the Niva rear axle as evenly as possible.
- Using a round pipe adapter, press the oil seal into the socket with light blows of a hammer. You can use an old seal as an additional attachment.
At the end of the procedure, you must thoroughly wipe all parts free of oil - the brake cylinder, pads, drum and metal shield. Before reassembling, it would be a good idea to check the axle bearing for wear and grease. Wear is indicated by difficulty turning, binding, or slight noise. If you discover a malfunction, take the axle shaft to the nearest car service center; you will not be able to replace the bearing without special equipment.
To check the grease inside the bearing, you need to pry the plastic covering the rollers with an awl and remove it. Then add thick Litol-type lubricant inside and put the plastic in place, and then begin assembly.
At the end, it is important to check the oil level in the rear axle gearbox of the Chevrolet Niva. The test is carried out on a fully assembled car, standing on a level area. The filler plug is unscrewed from the gearbox housing, after which the oil level is determined visually or using a thin wooden stick. If there is a shortage, you need to insert a hose of a suitable diameter into the filler neck with a watering can at the end, where the lubricant is poured. It is more convenient to top up with an assistant: you control the level, and the assistant gradually adds oil.
Disassembly
To get to the failed seal, you will need to remove from your Chevrolet Niva all the parts that make up the right or left rear hub assembly. Only then will it be possible to remove the axle shaft.
Disassembly is carried out in this order:
- park the car on a level place;
- secure the front wheels with stoppers;
- turn off the handbrake;
- slightly loosen the nuts securing the wheel;
- lift the car with a jack;
- remove the wheel;
- clean the end of the axle shaft, which protrudes slightly beyond the dimensions of the brake disc, from dirt and rust;
- spray it with WD-40;
- unscrew a couple of bolts holding the drum (you need a 12 mm wrench);
- Move the above brake element with light hammer blows.
Please note that there are two main methods used to remove the drum. In the first case, it is squeezed out of place by screwing the above-mentioned bolts into the free holes. In the second, they use the same hammer, but using a stump of a block as a protective pad. Without this preventative measure, it is easy to damage the edge of the brake disc.
What do you need to know to properly replace the rear axle gearbox seal of a Chevrolet Niva?
The rear axle gearbox seal seals the gap between the rotating shaft and the unit housing.
Its elastic cuff prevents transmission oil from leaking while the vehicle is moving. The part gradually wears out and loses elasticity under the influence of friction, high temperature and chemical reagents. As a result, the transmission begins to leak out of the gearbox.
Therefore, the oil seal must be changed at the first sign of an oil leak. Also, the part must be replaced during repair of the gearbox and removal of the shank.
Reasons for accelerated wear
The service life of the part is greatly reduced in the following cases:
- The gearbox breather is clogged. Under air pressure, oil is squeezed out through the cuff, breaking the internal stiffener.
- The universal joint flange nut is not tightened correctly. Backlash or increased friction leads to rapid wear of the oil seal.
- The transmission oil contains aggressive additives.
- The rubber of the cuff was exposed to chemicals from the road surface.
- The gearbox overheats due to poor quality or lack of lubrication.
The oil seal can also be damaged if a hard object gets between it and the shaft. It could be a splintered gear tooth, a piece of a retaining ring, or simply sand that accidentally got into the oil.
Tools and preparation for replacement
To change a part, you need to install the machine on a lift or inspection pit. To replace it yourself you will need:
- new oil seal;
- standard set of wrenches;
- hammer;
- pliers;
- a powerful wrench (without it it will not be possible to unscrew and tighten the shank nut);
- large flat screwdriver;
- puller;
- universal or key for fixing the shank flange;
- durable elastic cord;
- canter scale or dynamometer;
- torque wrench.
Instead of a wrench, you can use a homemade device in the form of two M8 bolts and a wrench to hold the shank flange. With their help, it will be possible to reliably keep the part from turning. To do this you need to: insert the bolts into the holes in the flange and place the knob between them.
It is important to use this improvised device correctly. The driver must be inserted in front of the flange, not behind it. Otherwise, you may accidentally knock down the mud deflector.
Replacement: step-by-step instructions
First, unscrew the bolts securing the cardan to the flange and hang the cardan shaft under the bottom. After this, you need to measure the torque of the shank using a dynamometer or canter. To do this, wind a cord around the flange, tie its end to the measuring device and pull. Memorize or write down the force at which the shank begins to rotate. This will come in handy when assembling the unit.
- Hold the flange with a wrench and unscrew the fastening nut.
- Remove the shank from the splines using a puller.
- Use pliers and a screwdriver to remove the cuff.
- Install a new oil seal and moisten its seal with transmission oil.
- Carefully slide the shank onto the slots and insert into place.
- Tighten the nut with a torque wrench with a force of 12-15 kgf.
- Check the rotation force of the shank with a cord and a canter (dynamometer).
- If necessary, tighten the fastening nut.
- Screw the cardan to the flange.
The work takes no more than two hours. After replacing the oil seal, especially if it had to be changed due to oil leakage, it is necessary to check the transmission level in the gearbox.
Replacing the oil seal on the drive gear drive, main steps
- it is necessary to unscrew the bolts holding the flange, remove the cardan shaft from the gearbox
- disconnect the CV joint housing from the drive.
- you need to connect a dynamometer and determine at what moment the rotation begins. To do this, rotate the flange mount until the gears begin to move.
- bolts are screwed into adjacent holes
- Between the bolts there is a pry bar, with the help of which the flange is kept from turning.
- After this, you can remove the flange along with the washer using a universal puller.
- The oil seal from the bridge gear is replaced with a new original spare part. The sealing ring must be lubricated with grease or lithol.
- After this, it is necessary to press the ring using a pipe of a suitable diameter.
- The flange fits onto the spline connection.
- The cardan shaft is installed in place.
Replacing the drive gear oil seal of the Chevrolet Niva rear axle gearbox
Tools:
- Straight box spanner 13 mm
- Driver for 3/4 socket bit
- Knob attachment 24 mm
- Large flat screwdriver
- Small hammer
- Torque wrench
- Mounting blade
Parts and consumables:
- Rear axle gearbox drive gear oil seal
- Sealant
- Litol-24 lubricant
- Self-locking nut for flange fastening
- Rags
Notes:
Replace the oil seal with a new one if an oil leak is detected. The need to replace the oil seal is determined by the amount of oil leakage. Before checking the leak volume, check the breather cap's freedom of movement in all directions to ensure that the breather is not causing the oil leak. Check the oil level in the axle housing and top it up if necessary. Don't forget to tighten the oil filler plug. If you are working in an inspection ditch, hang up the rear axle and place it on supports. Start the engine, engage direct (IV) gear and, with the speedometer reading steady at 90–100 km/h, let the axle run for at least 15 minutes to warm up the oil (oil temperature should be 80–90 °C). With direct transmission engaged and the speedometer reading 100 km/h, determine the amount of oil leaking. If more than 5 drops of oil leak out within 15 minutes, the oil seal must be replaced. Before replacing the oil seal, disengage the gear and stop the engine.
1. Lower the parking brake lever all the way down (if the car was braked with the parking brake).
2. Drain the oil from the rear axle housing as described here. Don't forget to tighten the oil drain plug.
3. Remove both axle shafts as described here.
4. Disconnect the rear driveshaft from the rear axle drive gear flange as described here.
5. We tie the cardan shaft to the hinge fork to the upper longitudinal rod.
6. Check the resistance to turning of the drive gear with a torque wrench. Remember its meaning.
7. Unscrew the nut securing the drive gear flange.
We insert the bolts into two nearby holes in the flange and screw the nuts onto them.
8. By inserting a powerful screwdriver between the bolts, we hold the flange from turning, and use a 24mm head to unscrew the flange securing nut.
9. The flange can also be secured with a mounting spatula.
Warning:
Self-locking nuts must not be reused; replace them with new ones!
10. Remove the flat washer installed under the nut.
11. Remove the drive gear flange.
12. Remove the drive gear oil seal from the gearbox housing neck using a screwdriver.
13. Lubricate the working surfaces of the new oil seal with Litol-24 grease, and the outer surface with a thin layer of sealant.
14. Place the oil seal in place and, with light blows of a hammer through a mandrel, press it into the gearbox housing to a depth of 1.7–2.0 mm from the end of the gearbox housing neck.
Helpful advice:
You can use an old oil seal as a mandrel.
15. Install the drive gear flange, then the washer.
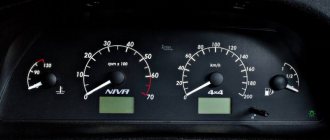
Video about the difference between RPM Shniva and VAZ 2121:
Knowing the reason for the gearbox wedge and knowing how to fix it, I went to a hardware store and bought 6 liters of kerosene. Kerosene turned out to be very expensive, 2 bottles of 3 liters cost me 700 rubles... I also went to Automaton in search of new bolts for the planetary gear, but found only ordinary ones, with a strength of 8.8... I bought a thread locker, sealant, a new spacer sleeve, oil seal and CV joint lube . Then I remembered that at my dacha I had the offal from a new factory gearbox, and from them I took the necessary bolts. I came home and started repairs. Using a Grover, I removed the roughness and burrs from the gearbox that arose from loose bolts. I took out the drive gear and washed its bearings in kerosene. I washed the pads on the self-block and the self-block itself, the main pair and also the gearbox housing itself. I put the spare parts under the battery to dry.
The stench from kerosene was all over the house, but there was nowhere to go... The next day, in order not to rush to the dacha, my friend and I moved the table with a vice to the house and we began assembling the gearbox. The old oil deflector washer was somehow all mangled, so I replaced it with a new one, and also installed a new oil seal, since the old one was torn.
Before screwing them into the GP driven gear, I lubricated all the bolts with blue thread locker.
Chevy Niva front axle structure:
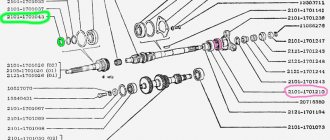
1 – mud deflector; 2 – lower cover of the gearbox housing; 3 – drive gear bearings; 4 – differential housing; 5 – drain plug; 6 – filler and control hole plug; 7 – bearing of the internal hinge housing; 8 – oil seal; 9 – housing of the internal wheel drive hinge; 10 – spring washer; 11 – retaining ring; 12 – bearing cover; 13 – adjusting nut; 14 – differential box bearing; 15 – bearing cover; 16 – cover fastening bolt; 17 – support washer; 18 – satellite; 19 – axle gear; 20 – gearbox housing; 21 – breather; 22 – bearing cover of the internal hinge; 23 – satellite axis; 24 – adjusting ring; 25 – drive gear; 26 – bearing spacer; 27 – drive gear oil seal; 28 – flange.
The front axle of the Niva Chevrolet consists of a main gear and a differential installed in one housing. The differential, final drive gears and gearbox bearings of the front and rear axles are the same. The front axle gear housing is cast, covered with covers at the front and bottom. The crankcase covers are sealed with gaskets.
Replacement of the Niva Chevrolet rear axle gearbox oil seal. Simple repair
Sooner or later, your car will need to replace the Niva Chevrolet rear axle gear oil seal.
The reason is the technical features of this vehicle unit. The rubber-metal cuff located in this part of the machine tends to wear out quickly, which is affected by aggressive environmental conditions, as well as the insufficiently high quality of the part. Therefore, any driver should be prepared to work to eliminate this problem. You should not delay the solution; a lubricant leak may lead to the need to completely repair the bridge, which is not only more difficult, but also more expensive. Replacing the Niva Chevrolet rear axle gear oil seal is a simple job. Even a beginner can handle it. But you should still carefully follow the technology. This will reduce the likelihood of problems in the future.
Technical features
The oil seal is located in front of the bridge. Its function is to prevent oil leaks at the junction of the cardan and the axle. Since this part of the car bears a large number of loads, it turns out that this element fails most often. The constant exposure of this part to reagents in winter also has a negative effect.
But, before starting replacement work, you should determine whether it is needed. The diagnosis here is quite simple. First, check the oil level in the gearbox; if it is not enough, add it to the maximum. Then drive the car into a pit or overpass and hang the rear wheels.
Next we proceed to diagnosis
:
- We start the engine and engage 4th gear;
- We keep the speed sufficient to maintain the speedometer speed around 100 km/h;
- We wait about 10-15 minutes;
What will you need?
Before starting work, be sure to prepare all the tools. This will minimize the time spent on repairs; also, using a specialized tool will simplify the process itself; you probably won’t break anything.
Some of the tools will be useful
:
- Head collar;
- A 13 box spanner is generally the most popular size;
- Long head 24;
It is also worth paying attention to purchasing replacement consumables. You will need the following list:
- Rear axle oil seal;
- Sealant;
- Litol-24;
- New self-locking nut for flange;
- Liquid key or WD-40;
- Rags.
It is most convenient to do this repair in a pit or overpass. In this case, there will be no problems with access to parts.