The axle shafts in the rear axle of the Niva Chevrolet experience very serious loads. The oil seals and, naturally, the bearings, which we will talk about today, get a fair amount of damage. If there is a conversation about replacing them, the manufacturer modestly advises changing them along with the axle shafts. It’s not cheap, so today we’ll try to replace the axle bearing on a Chevrolet Niva, look at the article numbers and manufacturers, and listen to the advice of experts.
When to change bearings on Chevrolet Niva axle shafts
Since our car is often operated in very difficult conditions, the loads on the bearings are very high. In addition to loads, the bearing may be subject to moisture attack when the axle shaft seal fails . At the same time, oil may begin to leak from the rear axle housing. As a result, the bearing is poorly lubricated and the grease is washed out over time.
A crunching sound from the rear wheel indicates a wheel bearing failure.
The most obvious symptom of bearing failure will be increased noise at any speed. In more severe cases, both radial and axial play may be observed.
The factory allows axial clearance of the axle shaft of no more than 0.7 mm , but most often the axle shaft will indicate the destruction of the bearing with strong noise and crackling.
At the first symptoms of a bearing failure, you need to start replacing it.
Numbers and articles
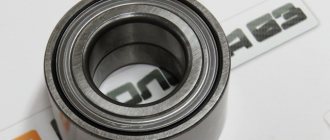
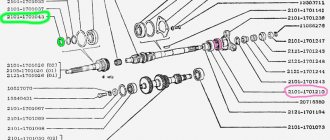
Fortunately, the axle bearing is not the most scarce part. It is one of the most popular of the 500 series of single-row bearings and is produced by a huge number of factories in the CIS, as well as in many European countries. Its industrial index is 180508 , the index of its foreign analogues is 62208-2RS . Automobile factory article number - 2121-2403080 .
Axle bearing - 180508.
The technical parameters of the bearing are:
- inner race diameter - 40 mm;
- outer ring diameter - 80 mm;
- Clip width - 23 mm;
- weight - 440g;
- the bearing has 9 balls with a diameter of 12.7 mm;
- rated speed - 5600 rpm.
The best imported manufacturers are NSK (62208DD), FAG, SKF, SNR. The average price of a domestically produced bearing is 200-250 rubles . It’s not worth buying cheaper, since it will be low-quality China or outright illiquid. Imported analogues can cost up to 800–1000 rubles . Actually, using these parameters it is easy to select a suitable bearing for the Shnivy axle shaft.
Symptoms of a problem
Bearing wear manifests itself as the following symptoms:
- Vibration of the front wheels, which can be reflected in the steering wheel or felt in the cabin.
- Knocking or crackling sounds in the front of the car when driving;
- Heating of the front wheels in the axle area.
If such manifestations occur, you need to check the condition of the wheel bearings. To do this, jack up the car and rock the wheel in different directions. Play and knocking in the bearing area indicates the need for replacement and adjustment. The malfunction may also manifest itself in the form of noise when the wheel rotates.
Separately, it is worth mentioning two problems that arise during the operation of the Chevrolet Niva:
1. The hubs get hot. It is important to understand that when braking, the kinetic energy of the car is converted into thermal energy. As a result, the brake discs and the hubs on which they are attached become very hot. Heating of the part during movement, and not during braking, indicates wear of the bearing or its incorrect adjustment.
The second option is typical for adjustable hubs. The adjusting nut must be tightened with a force of 2 kgf*m. If you tighten it further, the tapered bearings will be too tight.
Their rotation will be difficult. Prolonged operation of the machine in this condition leads to bearing failure and wheel jamming.
2. The adjusting nut is unscrewed while moving. Sometimes this happens literally after 20-50 kilometers. The phenomenon is observed in three cases: the master forgot to tighten the nut, there was a misalignment between the bearing races, or play appeared in the coupling of the CV joint with the hub.
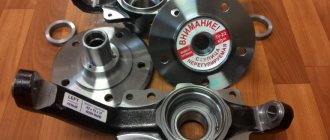
We remove the axle shaft, select tools, consumables and accessories
First of all, you should pay attention that when replacing a bearing, you need to install not only it, but also new axle shaft seals and new retaining rings. For cars with and without ABS, the locking rings are different - on cars without an anti-lock braking system, the axle locking ring has a smooth surface, and on cars with ABS, the locking ring is splined. It is impossible to confuse them. We assemble tools and accessories :
- Bulgarian.
- Standard set of tools and screwdrivers.
- Inertia axle puller.
Inertia axle puller.
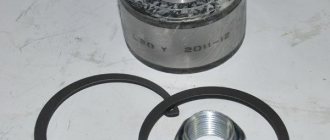
New set - oil seal, retaining ring and bearing.
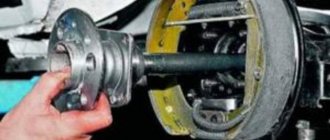
The tool has been selected and the axle shaft can now be removed. This is done in the following sequence :
- We place the car on a flat surface and install wheel chocks under the front wheels.
- We tear off the wheel mount, jack up the car, and install a stand under the rear axle.
- Remove the wheel and unscrew the brake drum mounting screws.
We unscrew the bolts securing the brake drum to the axle shaft.
We knock down the brake drum using a wooden block.
We unscrew the four nuts of the axle bearing mounting plate bolts.
We remove the axle shaft using an inertial puller.
When removing the axle shaft, you need to try not to damage the oil seal if there is no desire or need to change it. After this, the entire brake mechanism is suspended from the spring using a wire.
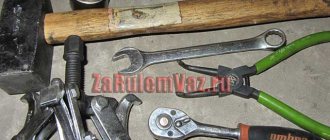
Essential tool for DIY repairs
Replacing a Niva Chevrolet axle bearing does not always go smoothly, so you should make sure you have a special tool in advance.
We will need:
- a set of keys and screwdrivers;
- Bulgarian;
- reverse hammer or inertial puller;
- metalworking tools – hammer, chisel, file;
- gas burner or blowtorch;
- pipe with a diameter of 40 mm and about a meter long, wall thickness 3-4 mm;
- lubricant like litol24 or analogues.
Changing the axle bearing of a Chevrolet Niva
The axle shaft has been dismantled, now it’s worth inspecting it carefully. If it requires editing or there are cracks and mechanical damage on its surface, it must be replaced. The splined part of the axle shaft is also carefully inspected. In case of any damage, the axle shaft will have to be replaced. If everything is in order with the axle shaft, change the bearing and retaining ring :
- The bearing and retaining ring are pressed onto the axle shaft with thermal tension, so to remove them you will have to use a grinder and a chisel. We clamp the axle shaft in a vice.
We clamp the axle shaft in a vice and saw off the old bearing with a grinder.
Unpretentiousness to road conditions is the main advantage of the modern Niva series SUV. But even the highest quality parts wear out from time to time and require repair or replacement. Replacing bearings on a Chevrolet Niva is often difficult, especially for novice car enthusiasts. Let's look at ways to replace Niva bearings, which most often fail.
MrPodshipnik
Bearing replacement, repair
Enter the marking or size (for example: 8*22*7) of the product and the country of sale
- Car brands
- Auto components
- Moto
- Velo
- Equipment
- Tool
- Technique
New instructions
- How to make your own repairs and replace the bearing on the steering column in a ZOOM bicycle 10/09/2019
- How to independently, at home, replace a bearing in an electric motor of a Philips food processor 10/05/2019
- We repair a DAB heating circulation pump and change the bearing ourselves 10/04/2019
- How to repair a Shimano fishing reel yourself and replace a faulty bearing 10/03/2019
- We replace the bearing and repair the SBR_ 132_A concrete mixer ourselves 10/02/2019
We independently change the bearing on the rear axle in a NIVA CHEVROLET car
In a Chevrolet Niva car, the rear axle shaft performs a rather important function. This is the transmission of torsional torque through the gearbox to the wheel. The rear axle axle bearing in a car is a support that can often break.
How to replace a broken bearing on the rear axle of a NIVA CHEVROLET yourself, without resorting to the services of professionals?
When torque is transmitted to the wheels, in this case the main part of the axial and radial load falls on the rear axle shaft. This is precisely the reason for the failure of this bearing.
In order not to change the entire rear axle assembly, which is quite expensive, it is easier to change the ball bearing separately.
The material in this article will tell you in detail how, step by step, on your own, at home, with a minimum of necessary tools, to replace a faulty bearing part.
Here you will learn:
— how diagnostics and testing are carried out;
— correct actions when dismantling old parts, in particular removing the bridge axle;
— how to reliably install a new part;
— how to choose a high-quality bearing, taking into account reliable manufacturers of these parts, markings, article numbers and sizes;
— you will also read our recommendations on how to easily and without problems carry out repairs in your NIVA CHEVROLET car, such as replacing the ball bearing in the rear axle shaft.
- How to find out if the bearing in the rear axle is faulty
- Introduction to the rear axle structure of the Niva Chevrolet
- How to dismantle the rear axle assembly and faulty bearing
- Replace the old ball axle bearing with a new one
- Video: We independently change the bearing on the rear axle in a NIVA CHEVROLET car
- Photos on the topic:
Procedure for replacing the front wheel bearing
The owner of a Chevy Niva will need to acquire several types of tools, including:
- Press;
- Suitable type of lubricant;
- Puller;
- Retaining ring remover;
- Mandrel for pressing;
- Hammer;
- Torque wrench;
- Hex head size 30;
- Screwdriver with a flat surface “minus”;
- Wrenches with standard sizes 17 and 19 .
Front wheel bearing replacement process
- In the first step, the car is placed on a level surface. It is best if it is a lift or a pit.
The wheel rim needs to loosen the nuts and bolts that secure it. Hanging is done first for the front part.
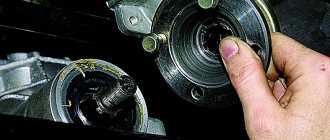
Replacing the wheel bearing of a Niva Chevrolet is very simple. The wheel rim along with the hub nut cover must be removed.
The next step is to install the opposite wheel in its place. The car is lowered using a jack until the second wheel is firmly hooked onto the support.
The main advice is to protect yourself from accidental rotations.
- Using an increased lever, you need to break off the hub nut. Next comes the re-removal of the wheel. Using a jack, we re-position the Niva in a suspended position, suitable for repairs.
- Removing the brake caliper is the next step. Using flat-head screwdrivers, spread the brake system pads, then unscrew the bolts securing the bar. The caliper and suspension element are connected to each other with wire. This will protect the brake hose and will not place increased stress on it. The non-adjustable bearing will also be protected.
- Next, the brake disc is removed. The main effect on it is gentle tapping with a hammer. It's good if the tool is a rubber hammer.
- Then the pin from the steering tip is pressed out of the eye near the steering knuckle. After disconnecting, it is recommended to retract the tip and secure it at a certain distance so that it does not interfere.
It is recommended to make a special mark on the surface of the two mating parts in advance. Then it will be easier to maintain the recommended position.
- Then, when replacing the bearings, they proceed to using a 17-mm wrench. The main thing is to correctly remove from their place the bolts that secure the shock absorber strut and the steering axle to each other. The two bolts that connect the knuckle and the ball joint are unscrewed using another 19mm wrench .
- The drive axle shaft is freed from the hub nut. Then the same is done with the thrust washer.
- The press will become an indispensable assistant when removing the hub from the steering knuckle. If a classic instrument is not nearby, you can use other available options. Then you need to compress the part with a puller. The emphasis is on the holes provided for this.
- Several operations are carried out using a lift: removing two locking rings from the knuckle and dismantling the bearing. The small washer of the puller rests against the outer race, and the larger part rests against the trunnion body.
- Before reassembling, clean the hub and rotary washer. The next step involves installing the retaining ring on the outside. A suitable type of lubricant is used before processing. The bearing is pressed into the fist. Then the inner wheel is installed, to which the hub is attached. Wheel bearings work the same way.
The main thing during screwing is to ensure that there are no excessive loads. Otherwise, the spare part will become deformed and become unusable ahead of time.
Below watch a video on how to replace the front wheel bearing on a Niva.
Removal and installation of wheel bearings Niva 2121, VAZ 2131, Lada 4x4
We carry out the work on an inspection ditch or a lift. We hang the front part of the VAZ 2121 car and remove the wheel. We disconnect the caliper from the pad guide (see Disassembling the front brake mechanism Niva 2131)…
...and tie them with wire to the upper arm.
We unscrew the adjusting nut of the hub bearings (see Checking and adjusting the clearance in the hub bearings).
We take out the conical bushing. Using a chisel, we unbend the edge of the locking plate of the nut for the front attachment of the lever to the steering knuckle.
Similarly, loosen the rear fastening nut.
Using a 19mm spanner, unscrew the nut that secures the rear lever to the steering knuckle.
Similarly, unscrew the front fastening nut.
We remove the locking plate. Having removed the lever from the bolts, we move it away from the steering knuckle.
Disconnect the brake hoses from the steering knuckle (see Removing the front brake hose). We disconnect the fastening of the upper and lower ball joints from the arms of the Niva 2121 (see Removing the upper ball joint, and Removing the lower ball joint of the VAZ 2121).
From the splines of the front wheel drive outer joint housing, remove the steering knuckle assembly with ball joints, hub assembly and brake disc. Disconnect the steering knuckle and hub with the brake disc.
If it is difficult to separate the parts, clamp the steering knuckle in a vice...
...and use a soft metal drift to knock out the hub. Now you can remove the bolts securing the Niva 2131 lever to the steering knuckle.
To separate the VAZ 2121 hub and the brake disc, screw the nut onto the stud...
...and knock out the pin. Unscrew the nut and remove the pin.
We dismantle the other studs in the same way.
We disconnect the hub and the brake disc. Use a chisel to knock down the mud ring. Using a “10” wrench, unscrew the bolt securing the protective casing...... and remove the casing.
To dismantle the seals and hub bearings, clamp the steering knuckle in a vice.
We pry up the oil seal with a screwdriver......and take it out. We take out the ring. We take out the inner ring of the outer bearing of the VAZ 2131 with a separator and rollers.
Similarly, we remove the oil seal, ring and inner ring of the other (inner) bearing with a cage and rollers.
We use a punch to knock out the outer ring of the outer bearing......and take it out.
Similarly, we knock out the outer ring of the inner bearing. We perform assembly in reverse order. Before installing the bearings, clean the inner cavity of the steering knuckle from old grease. We press in a suitable piece of pipe...
...outer rings of bearings.
We put 40 g of Litol-24 lubricant into the cavity of the steering knuckle and into the bearing separators.
Using a suitable piece of pipe, press in the seals.
After installing the mud ring,...
... using a chisel we press the metal of the ring in several places into the groove of the steering knuckle of the VAZ 2131.
By connecting the Niva 2131 brake disc to the hub,...
...press the studs with a soft metal drift. The heads of the studs with the milled surface should face the cylindrical surface of the brake disc.
To prevent the bolts securing the lever to the steering knuckle from falling out when installing it on the car...
...we screw the nuts on them.
By inserting the shank of the outer drive joint into the splines of the Niva 2121 hub.
...mount the steering knuckle.
Upon completion of assembly, we adjust the clearance in the bearings of the VAZ 2131 (see Checking and adjusting the clearance in the hub bearings).
Replacing the rear bearing
Replacing the rear wheel bearing of a Niva Chevrolet is impossible without the following tools:
- Pullers;
- Flat screwdriver;
- Pliers;
- Socket head with size 24 .
The work involves several preparatory stages:
- The wheel and brake drum are removed;
- The axle shaft is dismantled;
- The axle shaft is disconnected from the bearing and ring.
This sequence is used when removing a bearing with a ring with your own hands:
- The second jack is used to raise the second part of the bridge. This prevents oil leakage;
- The four fastening nuts are unscrewed;
- The ring and bearing are pressed off the axle shaft.
The condition of the oil seal deserves special attention. A screwdriver and hammer are used to remove the oil seal from the housing.
Then you can proceed to the procedure with the shank bearing itself:
- First you need to make sure that there is enough lubricant. If not, then add it if necessary.
- The appropriate mandrel size is the main element when pressing a bearing onto an axle shaft. You can use a pipe with a suitable diameter, at least half the length of the axle shaft itself.
- The retaining ring is installed next. It is recommended to preheat this part to at least 200 degrees. Then it is connected to the axle shaft. The operation does not cause problems if there are pipes or mandrels of the appropriate size.
- The installation of the axle shaft follows the reverse algorithm.
Removing the bearing, dismantling the bridge from the assembly
The procedure is largely similar to what was described in the previous paragraphs.
- First remove the wheel;
- To dismantle the brake drum mechanism, unscrew the bolts securing it;
- The bearing assembly is checked for play. The axle shaft moves;
- The four axle bolts are unscrewed using a 17mm wrench;
- Before unscrewing the axle itself, it is better to place a special stop under the bridge. This protects the gearbox from transmission oil leaks;
- Two plates or wide keys are installed under the flange. Two bolts M2 and M10 are evenly screwed into special holes;
- We observe the gradual detachment of the bearing from the seat;
- The axle is clamped in a vice to remove the lock washer. The locking element is being dismantled. A chisel and hammer are indispensable tools during this process. But such a simple option is not always feasible due to the fact that the parts stick;
- The element needs to be heated if it cannot be dismantled by other means;
- It is acceptable to use a grinder with small discs. It is also suitable for the steering shaft bearing.
We identify a malfunction on the VAZ 2123
As garage mechanics say, “The knock will always come out.” You should not wait for this, otherwise you will have to call a tow truck or repair the unit in the field. In fact, it is easy to diagnose the problem yourself. The first sign of bearing failure is increased noise, unpleasant metallic sounds from the hub, and increased heating of the metal at the place where it is installed.
Attention! In addition to bearings on the axle shafts in the rear axle of the VAZ2121 and Niva Chevrolet, there are also bearings in the differential and gearbox. The noise may come from them or from a worn main pair.
The following steps will help you accurately determine the source of the noise:
You should not delay repairs if at least one of these signs appears. The savings in this case are questionable, and a bearing that fails in motion can result in expensive repairs with the replacement of the entire axle shaft assembly.
Release bearing: replacement recommendations
Removing the gearbox is a mandatory step for those who are interested in replacing a Chevrolet Niva release bearing that has failed. The work is labor-intensive, because you have to remove the drive shaft. It's good to have an assistant.
The following procedure is relevant when replacing the clutch mechanism:
- Installing the car on the inspection hole and removing parts;
- Removing the gearbox;
- If it is necessary to replace the bearing, the part is pulled out. Its base must be disengaged from the fork. The plug is removed from the structure, then the part is easy to remove.
The main difficulties are associated with removing the gearbox. Replacing a bearing is an operation that takes no more than 10 minutes. Before installing a new part, it is recommended to lubricate it thoroughly. The quality of the material used determines how durable the structure will be in the future.
Comments (5)
In front-wheel drive vehicles, method 3 is not suitable, the bearings are double-row, it all depends on which row the wear is in. The disappearance of noise when turning left does not necessarily indicate that the left bearing is faulty; it may well be the right one. Method 1 is suitable for cars without or with a switchable traction control system. Backlash can appear when the condition of the bearing is already critical.
Extraneous noise (reminiscent of the sound of an electric motor) on the Skoda Octavia A7 began to appear at a speed of about 100 km per hour at about 91 thousand kilometers. When contacting the service center, no backlash or extraneous noise was detected when turning the wheels by hand. A test drive by the service center specialists did not reveal the cause of the noise (they suggested changing the tires). After two months, the noise began to appear starting at a speed of 65 km per hour. Before this, the right front hub was replaced (the noise seemed to be coming from the right) - the noise reminiscent of the operation of an electric motor remained, but the periodic shuffling sounds disappeared. For diagnostics, the car was hung on a lift. After starting the engine and spinning the wheels up to 40 km per hour, the sound was steadily heard in the gearbox. When the speed increased above 60 km per hour, the sound moved to the left hub. There was a moment when the wheel hit resonance and vibrated noticeably. After replacing the second (left) hub the noise disappeared.
Clumsily written. In the first method, “either lift each wheel with a jack.” All 4 at once?
Niva Chevrolet wheel bearings are subject to heavy loads during operation. Therefore, it is necessary to monitor their condition and change parts in a timely manner. Otherwise, the risk of a collision due to a seized bearing increases.
Input shaft bearings: how to replace?
Repairing and adjusting the bearings of the input shaft of the Chevrolet Niva gearbox will require a standard set of tools:
- Screwdrivers of different shapes;
- Hammers - small and large;
- Impact bearing puller equipped with a special hook;
- Mandrel. The main purpose of the tool is to center the driven disk.
The following actions are carried out after completion of preparation operations:
- Removing the gearbox;
- Bearing removal;
- Installation of a new part. For this, a special mixture is prepared from LITOL-24 mixed with metal dust. The substance should be quite dense;
- The resulting mixture is placed in the space behind the bearing;
- Even the reinforced gearbox input shaft bearing is pressed out using a special mandrel. The prepared mixture is added little by little and gradually. The main thing is to apply little force to the ring, otherwise the likelihood of damaging the part increases;
- The seat is thoroughly washed with kerosene after the input shaft bearing is removed. The structure is also thoroughly cleaned of dirt and sawdust as much as possible;
- The new element is pressed inside using a frame with suitable dimensions;
- In the reverse order, all other parts that were processed are installed independently.
Below watch a video on how to remove a manual transmission on a Niva.
How to install a new oil seal
When the axle shaft is removed from the car, the nearby metal shield used to mount the pads will be essentially loose. It will only be held in place by a thin copper tube filled with brake fluid. To prevent the latter from breaking, the shield must be temporarily secured with a pair of previously unscrewed bolts.
Removing and installing the oil seal is done as follows:
- remove the gasket from the bridge flange (do not tear it, although it is thick, it is still rubber);
- remove the damaged oil seal - pick it up with a flat screwdriver;
- thoroughly clean the area where it previously stood with a cotton, lint-free cloth;
- Before installation, the new seal must be wiped with oil (necessarily with transmission oil);
- place the element in the socket and make sure there is no distortion;
- Press it in with a piece of pipe so that the rubber is not damaged - place the old oil seal on top of it.
Now it is important to thoroughly clean all removed elements from dirt and oil. It is absolutely unacceptable to leave traces of grease on brake parts:
- drum;
- cylinder;
- pads;
- shield
If only the oil seal was changed on the Chevrolet, then it is advisable to inspect the axle bearing as well. The part is checked for wear, lack of play and presence of grease on the rollers. If an element breaks soon, then it:
- rotates tightly;
- makes noise;
- rattles when shaken.
Please note that you cannot replace the bearing yourself. This operation will be performed for you at a car service center.
You can only check if there is lubricant inside
To do this, carefully lift the plastic plug covering the rollers and look inside. In the absence or its obvious insufficiency, ordinary Litol is laid
The plastic ring is then placed in place.
Now you can assemble the knot. Follow all steps described in the instructions in reverse order.
Finally, be sure to check how much oil is left in the gearbox of your Chevrolet. To do this, lower the car onto its wheels and make sure it is level. Then:
- find the neck plug on the casing;
- turn it inside out;
- take a look inside.
If there is not enough lubricant, add it using a hose and funnel. It is better to do the work with a partner - one will add oil, and the other will monitor its level.
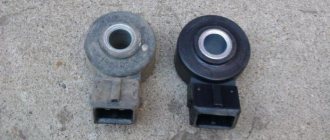
Generator bearing: replacement recommendations
The following recommendations are given for replacing the Niva Chevrolet generator bearing:
- The first step is to remove the generator itself. First, the generator mounts are loosened, then the adjustment bolt is released. The next steps are to remove the belt and disconnect the ground from the battery. We are talking about the negative terminal. It is also necessary to disconnect the wires from the generator itself. The structure is removed through the lower part. Why does the mount itself unscrew?
- After this, the master begins to disassemble the generator. The first step is to remove the pulley. The owner will need a screwdriver to lock the rotor. The main thing is a careful approach to work. The pulley is unscrewed with the appropriate key. You will need to pull back the latches to remove the cover. The part is pulled towards itself. All connections with bolts are additionally processed. Then it will be easier to unscrew them.
- The next steps are to unscrew the screws and remove the voltage regulator unit. You also need to get rid of brushes for a while. The generator cover is disconnected from the starter, otherwise it will not be possible to gain access to the bearings themselves. The main thing is not to damage the winding during such work.
- After complete disassembly of the generator, access to the bearings becomes available. It remains to check the parts for any defects that have appeared, including cracks and chips. Do the parts rotate easily? Is there any play between them? The seats may suffer from wear, so they also need to be inspected.
- Next, you need to knock the bearing out of its seat. To do this, tap the surface with a small hammer. The blows must be strong, but careful, otherwise the result will not be achieved. A piece of pipe of the appropriate size will make an excellent stand. Removing the rear bearings is impossible unless a special puller is used.
- The properties of old and new parts must remain similar. The same attachment is used when pressing into the body. The anchor is where the rear bearing is installed.
- When reassembling, proceed in reverse order.
Below watch a video on how to disassemble and repair a Niva generator.
Installing a New Seal
After removing the axle shaft, the metal shield where the brake pads are attached will remain hanging on the copper pipe with the fluid, so it should be fixed by inserting the 2 upper bolts back into the holes. Then follow the instructions:
- Remove the thick rubber gasket from the rear axle flange.
- Pull out the old oil seal by prying it with a screwdriver or pliers. Clean the seat and wipe with a rag.
- Lightly lubricate the new seal with transmission oil and insert it into the socket of the Niva rear axle as evenly as possible.
- Using a round pipe adapter, press the oil seal into the socket with light blows of a hammer. You can use an old seal as an additional attachment.
At the end of the procedure, you must thoroughly wipe all parts free of oil - the brake cylinder, pads, drum and metal shield. Before reassembling, it would be a good idea to check the axle bearing for wear and grease. Wear is indicated by difficulty turning, binding, or slight noise. If you discover a malfunction, take the axle shaft to the nearest car service center; you will not be able to replace the bearing without special equipment.
To check the grease inside the bearing, you need to pry the plastic covering the rollers with an awl and remove it. Then add thick Litol-type lubricant inside and put the plastic in place, and then begin assembly.
At the end, it is important to check the oil level in the rear axle gearbox of the Chevrolet Niva. The test is carried out on a fully assembled car, standing on a level surface.
The filler plug is unscrewed from the gearbox housing, after which the oil level is determined visually or using a thin wooden stick. If there is a shortage, you need to insert a hose of a suitable diameter into the filler neck with a watering can at the end, where the lubricant is poured. It is more convenient to top up with an assistant: you control the level, and the assistant gradually adds oil.
Bearing selection by manufacturer
Experienced car mechanics know that it is better to choose a bearing that is completely identical to what was before. It would be good if it was an item with the original box and logo. Such parts often correspond to their counterparts that were originally supplied to the assembly line. The price of the bearing is not always affordable, because they are produced in a limited batch for a batch of cars.
But there are other bearing models whose characteristics are in no way inferior to the original ones. And the cost of non-original bearings is lower only due to the use of a different brand. Here are just a few bearing suppliers that have become popular in today's automotive market.
- SNR – French company;
- SKF is one of the largest manufacturers in the world;
- FAG is a German manufacturer, one of the largest companies;
- NSK - from Japan;
- NTN is another representative of the Land of the Rising Sun.
Manufacturers from Japan often deliver their parts directly to the assembly line. Therefore, practically nothing is known about them on the regular spare parts market. You can ignore the country of origin in the case of the companies mentioned above. It often lists one of many offices and branches around the world.
Advantages of Iveco non-adjustable bearings
The new modification of 2123 hubs for the installation of non-adjustable bearings is gaining popularity - it is convenient and practical, and if you have certain skills, you can do all the work yourself.
The advantages of installing Iveco parts are obvious:
- long service life - about 100 thousand kilometers;
- the units can withstand high loads, which are three times higher than those of factory bearings;
- You can install wheels with a large offset on the car;
- the bearing does not need adjustment and does not require maintenance during the entire period of operation;
- you can do the alteration yourself.
Helpful advice: if you decide to remake, immediately check the brake disc, CV joints and side seals of the front gearbox - when replacing them, you will have to disassemble the hubs again and press in the bearings, which will become unusable.
Final recommendations for choosing bearings
It is recommended to select new Chevrolet Niva bearings based on future operating conditions. The original will be the best choice for those who spend most of their time in urban environments. If the conditions are extreme and involve the creation of additional loads, it is recommended to give preference to increased strength characteristics.
1600-2500 rubles – the cost of work to replace bearings, if the owner turns to service station specialists.
1200-2000 rubles will have to be paid for similar work carried out on the rear axle.
You can choose an option that suits your needs and current budget. The cost of materials can reach several thousand rubles, and a cheaper option is unlikely to be found.
Doing the work yourself is not so difficult - all you need is to have instructions and videos at hand. After replacing the Niva Chevrolet bearings, it is enough to drive a certain distance and see if there are any extraneous sounds.
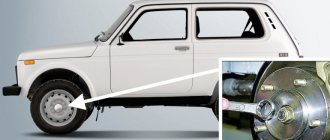
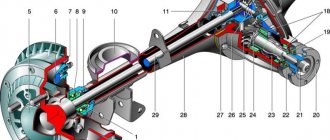
The Chevrolet Niva belongs to the class of SUVs with all-wheel drive. This is realized through the installation of a rear axle, through which torque is transmitted to the rear wheels. For this, a system of gears and axle shafts is used, which are located in the bridge. One of the elements that is subject to excessive load, and therefore the one that most quickly fails, is the rear axle bearing. Therefore, it is necessary to diagnose its condition in a timely manner and, if necessary, replace it. You can find out how to do this by reading this article.
Replace the old ball axle bearing with a new one
Before starting work on installing a new axle part, look carefully for defects, dirt and corrosion.
Pay attention to the condition of the axle itself, whether it is deformed or damaged
It's time to replace the new bearing part. What steps are being taken:
- When you start installing the new bearing, add some grease just in case. First of all, you need to put on the fasteners, and then install the bearing. A suitable mandrel is put on top to press it into place.
- Next, put on a pipe through which you hammer the bearing. From time to time it is necessary to check what position the part is in. Avoid distortions.
- Now we press in until the end of the bearing and the shoulder touch.
- The next step is heating the locking element. It is put on top of the shaft and hammered to the limit. Here you need to see if the bearing rotates easily enough.
- If there is a need to replace the oil seal, do so.
- The axle shaft is put into place in the bridge, all the bolts are screwed on.
Purpose of the bearing
This part is located in the rear axle of the Niva Chevrolet, closer to the outside of the car. Like any bearing, its main function is to smooth out the rotation coming from the rear axle. The axle shaft extends from the gearbox, where it is driven by gears, and ends at a flange on which the brake drums and wheel are located. In order for it to rotate smoothly inside the structure, a ball bearing is installed on it.
It is mounted in a special seat on the bridge, where an increased load on the axle shaft is provided. To prevent its movement inside the bridge, a special locking sleeve is used, which ensures double fixation of this element. An additionally installed oil seal ensures the tightness of the entire structure.
It is important to remember that if the seal is damaged, lubricant leaks, which leads to increased friction inside the bearing and rapid failure. Therefore, if damage is detected, the oil seal must be replaced.
These elements are among the most exposed to loads and therefore require periodic inspection and replacement.
Preparation and disassembly
To independently remove a leaking rear axle oil seal on a Niva Chevrolet, you will need the following tools:
- standard set of wrenches;
- slotted screwdriver and wheel wrench;
- jack;
- hammer;
- wooden stand;
- cloth gloves.
Never neglect gloves when repairing a car: they will protect your hands from damage due to accidental impacts. The height of the wooden stand should be enough to support the rear axle with the wheel removed and the shock absorber unscrewed, otherwise oil will leak from it.
DIY Chevrolet Niva axle bearing replacement
The SUV class car has all-wheel drive on all four wheels. This mechanism causes the presence of a rear axle, which is designed to transmit torque from the gearbox to the driving rear wheels. The rotation of the wheels is ensured by the presence of gears and axle shafts in the bridge.
The axle shaft is connected to the wheel and sets it in motion. But why is an axle bearing in the axle needed? Since the topic of the article is called the axle bearing, it is this that will be discussed further. Let's take a closer look at this mechanism in the design of the rear axle, its purpose, design (size, number, etc.
Replacement kit for cars with abs
Purpose of the axle bearing
The bearing is located in the rear axle structure of the Chevrolet Niva, closer to the outer edge. Like all bearings, it performs the function of supporting and smoothing the torque of the rear axle axis. One part of the axle (internal) engages with the gears (has splines), and the second comes out of the bridge, and a flange, brake drums and a Chevrolet Niva wheel are attached to it. To ensure that the axis rotates smoothly and does not move inside the structure, there is a ball bearing.
The bearing is located in a special socket in the bridge structure, where it performs its direct function. To prevent it from moving inside the bridge, there is a special rigid fixation on the axis, which is a locking sleeve. Thus, it has a double fixation. There is also an oil seal on the axle shaft, which provides a tight connection to the rear axle structure.
Important! If the seal is damaged or worn out, there is a direct negative impact on the bearing, causing the latter to fail. Therefore, it is necessary to replace the oil seal.
When using a Niva Chevrolet frequently, it is necessary to monitor the condition of the bearing and oil seal, and if they are damaged, replace them immediately.
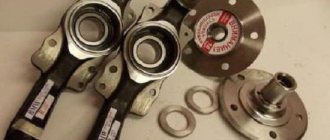
Design
1. number;2. internal and external size;3. height.
Also interesting: Replacing a wheel bearing for a Niva Chevrolet
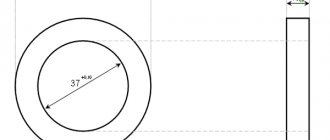
This data is necessary not only so that the bearing can be installed in the seat of the axle shaft and axle, but also so that it performs its intended functions. But it is worth noting that if one of these data is known, then the second need not be calculated. So, for example, the axle bearing has catalog number 2121-2403080.
D internal = 40 mm; D external = 80 mm; Height (thickness) = 23 mm.
Bearing faults
Failure of an axle bearing can result in a wheel seizing on the road, which is dangerous. It’s good if the speed of a moving car is low and somewhere outside the city, but the Chevrolet Niva is used not only at low speeds and off-road. Therefore, it is very important to monitor such an important part and replace it prematurely.
faulty bearing
Failure can be determined by the characteristic sound from under the wheels, as well as by the presence of increased radial and axial play.
Important! The axial clearance should not exceed 0.7 mm.
To determine it, you don’t need to pick up speed to hear a crackling or rumble, just turn on the rear wheel drive and drive a couple of meters. A hum or crackling noise occurs when there is a lack of lubricants, which leads to the product crumbling.
Important! If you notice an uncharacteristic noise in the rear area, you should immediately make sure that the bearings are in good condition.
Removing the axle shaft and replacing the bearing
In order to replace a failed bearing, it is first necessary to remove the wheel, brake drum, and axle shaft, and only after that it is replaced. The Chevrolet Niva is installed on a flat surface and the rear part is jacked up. The wheel and drum are removed; the procedure for removing them can be read in the relevant articles. Therefore, we will not dwell on this, but will immediately proceed to removing the axle shaft.
Removing the axle shaft
1. The second jack lifts part of the bridge to avoid oil leakage when removing the axle shaft.2. The axle shaft is secured with four nuts at “17”. Using a socket wrench, remove the nuts along with the groovers.3. The axle shaft is removed. If it is jammed and cannot be removed, then we try to knock it out using a hammer and a beam.
The Chevrolet Niva is equipped with drum brakes on the rear wheels, both with and without an ABS system. Even the first Sheviks were without an abs system. ABS is an anti-lock braking system that prevents loss of vehicle control. The difference between the axle shaft of a car with an ABS system and a simple one lies in the design of the retaining ring.
retaining rings with and without abs
So, let's look at how to replace a bearing on a Chevrolet Niva SUV with an abs system.
1. The suitability of the bearing is checked. After removing the axle shaft, do not forget about the oil seal. It is pressed into the brake shield.2. The oil seal is removed using a screwdriver and hammer. After replacing the bearing, a new oil seal must be installed.3. The axle shaft is clamped in a vice.4. The knurled retaining ring is removed, which secures the bearing. We knock it out with a chisel and a hammer.5. The bearing is removed in the same way as the ring.
Important! Check the axle shaft for cracks and chips. There should not be any, otherwise boring will be required.
6. Now you need to replace the old bearing with a new one. Before installing it, check the presence of lubricant inside. Add if necessary.7. The bearing is pressed onto the axle shaft. You can use a pipe of the appropriate diameter and length not less than the axle shaft.8. Installation of the retaining ring is best done by heating it. The ring is heated with a blowtorch for 5-10 minutes up to 200 degrees.9. The ring is installed on the axle shaft and pressed into place with a tube.
Now the axle can be reinstalled in the reverse order of removal. At this point, the replacement is complete, all that remains is to install the drum and wheel, and begin replacing the other side of the Niva Chevrolet car.
After installation, check the functionality of the replaced parts. After driving a few hundred meters, you need to listen to see if there are any extraneous noises coming from under the wheels. If no noise is detected, then everything is done correctly. Happy renovation work!
The axle shafts in the rear axle of the Niva Chevrolet experience very serious loads. The oil seals and, naturally, the bearings, which we will talk about today, get a fair amount of damage. If there is a conversation about replacing them, the manufacturer modestly advises changing them along with the axle shafts. It’s not cheap, so today we’ll try to replace the axle bearing on a Chevrolet Niva, look at the article numbers and manufacturers, and listen to the advice of experts.
Also interesting: Niva Chevrolet front hub repair
Bearing device.
Like most parts in a car, a bearing has several indicators based on which you can select the necessary part:
- number
- internal and external dimensions
- height
Knowing these parameters, you can select a replacement element that will be suitable for a given car and perform its functions correctly.
The number is the value in the catalog - 21212403080. In most cases, this data is enough to purchase a bearing model for a Chevrolet Niva in a store. If the required element is not available, you can find analogues, knowing the technical characteristics:
- internal diameter 40mm
- outer diameter 80mm
- height (meaning product thickness) 23mm
Adjusting the wheel bearing
To work, you will need an indicator and a torque wrench.
To prepare for adjusting the wheel bearing, you must perform the following operations:
- Secure the indicator by resting its leg on the hub near the adjusting nut.
- Place spanners on the studs and secure them with nuts.
- Rotate the hub and move it axially. (Screwed spanners are used as handles).
- Measure the amount of axial movement (clearance) of the hub, guided by the indicator readings.
- If the stroke exceeds 0.15 mm, adjust the play.
The adjustment is carried out as follows:
- Straighten the collar of the nut.
- Unscrew it with a spanner.
- Install a new nut and tighten with a force of 2 kgf*m.
Important: when tightening, it is necessary to rotate the hub in different directions.
- Loosen the nut and tighten again with a torque of 0.7 kgf*m.
- Loosen the tension by turning the key 20-25 degrees counterclockwise.
- Check hub play.
- Make sure that the indicator readings correspond to the norm (0.02-0.08 mm).
- Lock the nut by pressing its edge into the groove of the outer CV joint.
Unregulated
As a rule, the Niva has a standard adjustable hub, which requires periodic adjustment. But in order to get rid of this inconvenience, non-adjustable hubs for the Chevrolet Niva were developed, which have such positive qualities as:
- No maintenance required. They don't need to be adjusted
- The bearing in the device does not rotate
- It is filled with special lubricant from the factory, so there is no need to lubricate it.
- Due to the fact that the work occurs thanks to the ball bearing in the unit, friction is reduced
- There is no wear on the seat in the rotary cam
- Not adjustable as it is tightened from the factory
- No need to change the bearing
- Long service life which is equal to 100-120 thousand kilometers
Therefore, thanks to all the positive characteristics listed above, many car owners change the standard part to a non-adjustable one.
It is also worth noting that the non-adjustable part can be produced as a reinforced Niva Chevrolet hub, which solves the problem of wear of the oil seals on the steering knuckle. It is best to choose companies such as VolgaAvtoprom, IVECO, OmegaInterAuto.
The main disadvantage of this unit is its high price, but by installing this part you can forget about the problems that appear in the standard element. By installing a reinforced version of your SUV, the cross-country ability will increase and reliability will increase, and having a standard set of tools, you can make an independent replacement without any problems.
Step-by-step instructions for a quality replacement
If the unit has just begun to signal a problem, then repair work can extend its service life. If it is completely worn out (diagnosis is recommended at a service station), it makes no sense to carry out work to resuscitate the parts or put the mechanism in order - a complete replacement is required.
In most cases, if there is severe wear, the outer CV joint on a Chevrolet Niva is replaced.
It is important to remember that the upcoming process will require time and effort. The car needs to be driven to a special pit to facilitate access to the components and the CV joint itself
Tools:
- wrenches (set);
- hammer with extension;
- pullers
Experience in plumbing is required if the replacement is carried out in-house.
Replacing the outer CV joint
To change the outer part of the pair in the assembly, you will need to completely remove the axle shaft with the “grenades” installed on it from the car. The sequence of actions in this case is as follows:
- the body needs to be lifted (a car jack is used);
- install a stand to minimize the likelihood of an accident if the jack fails to cope with the task;
- Anti-recoil shoes are installed.
The safety measures taken will prevent damage and injury. The main point: before lifting the body, you should loosen the hub nut. For this job you will need a socket and a wrench extension. Further sequence of actions:
- remove the front wheels;
- unscrew the lower fastening that holds the front shock absorber;
- move it as far as possible to the side so that further work is not complicated;
- secure (use any available means).
After this stage, you need to unscrew the bolts directly on the ball joint. The next part of the work:
- completely remove the nut on the hub;
- Pull towards you and remove the outer CV joint.
The outer joint can be replaced without first removing the axle shaft. Sequencing:
- it is necessary to release the fastening clamp that belongs to the boot;
- move as far as possible on the axle axis;
- you will need to hit the CV joint body with a hammer (with an extension);
- Continue making blows until it is completely removed from the axle shaft.
Next stage:
- replace the retaining ring, which is located on the axle shaft;
- install a new part.
To install the hinge, all steps will need to be carried out in the reverse order of steps.
Maintenance frequency
It is worth carrying out repairs and maintenance of the Niva Chevrolet yourself, taking into account the following time periods:
Check the oil level in the engine block, washer water, as well as brake and coolant weekly. You should also pay attention to the optics, tires and battery. If the car is not used regularly, the frequency of such checks is 400 km. Change the oil filter and oil every 8 thousand km, which will extend the life of the power unit. Every 15 thousand km, check the remaining thickness of the front brake pads. The air filter of the ventilation system should also not be ignored. Check the condition of the gearbox, washers and electrical systems, suspension, brakes and steering annually. Also lubricate all moving parts of the door panels and trunk.
If the SUV is diesel, it is important to monitor the number of crankshaft revolutions at idle. The integrity of engine compartment elements, hoses and connections must also be monitored. Every 30 thousand
km the air filter must be replaced. Do not forget to check how well the drive belts are tensioned. Fuel filters or spark plugs must also be replaced, depending on the type of fuel used. Suspension repairs are not excluded at this time. Every 60 thousand km, change the lambda probes and gearbox oil. Repair of body parts is not excluded. Even the slightest scratches cannot be ignored, since corrosion affects this car extremely aggressively. At this stage, the stove can also become weak; you can fix the damage yourself. Even if you service and repair your car yourself, still periodically contact the services of a service station, where they will carry out the necessary measurements of the level of harmful emissions.