Chevrolet Niva — a compact crossover of Russian assembly. Produced in 2002, 2003, 2004, 2005, 2006, 2007, 2008. In 2009, the car received a restyling. The updated version was produced in 2010, 2011, 2012, 2013, 2014, 2015, 2016, 2022 and 2018. We will look at a block with Chevrolet Niva fuses and relays with a full description of the presented circuits. Let's show you where the cigarette lighter fuse is located.
p, blockquote 1,0,0,0,0 –>
p, blockquote 2,0,0,0,0 –>
Main block with fuses and relays
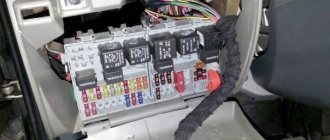
This block is located to the left of the steering column and is closed from below with a lid. To get to it, you need to tighten 2 screws, then press the top edge of the cover and gradually free it from all fasteners.
p, blockquote 3,0,0,0,0 –>
p, blockquote 4,0,0,0,0 –>
The block that appears will be held on a special bracket. The fuse diagram itself and the number of elements on it may vary depending on the configuration and year of manufacture.
For cars manufactured before 2009
Scheme - option 1
Scheme - option 2
p, blockquote 6,0,0,0,0 –>
p, blockquote 7,0,0,0,0 –>
Explanation of fuses
p, blockquote 8,0,0,0,0 –>
F1 (5 A) - license plate lamps, instrument panel lamps, indicator light on the dashboard, engine compartment lamp, additional brake light lamp, left side lamps.
p, blockquote 9,0,0,0,0 –>
If any of the listed lamps do not work, check this fuse and the lamps themselves, their connectors and wiring.
p, blockquote 10,0,0,0,0 –>
F3 (10 A) - high beam in the left headlight, indicator lamp for turning on the high beam headlights on the dashboard . Similar to relay K5.
p, blockquote 11,0,0,0,0 –>
F4 (10 A) - backup fuse.
p, blockquote 12,0,0,0,0 –>
F5 (30 A) - front door electric windows and their relays . If, when operating the power window, the window goes down but not up (or vice versa), check the button on the door. When lowering and raising, the polarity and direction of rotation of the motor are different. It could also be a problem with the window lift mechanism. To get to it, you need to remove the door trim. Check that the mechanism does not bite anywhere and that the gears are intact, without broken teeth. If there are problems, you can replace the entire power window drive with a new one.
p, blockquote 13,0,1,0,0 –>
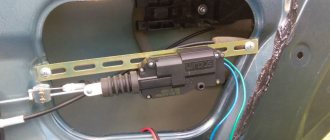
F6 (15 A) - door lock control unit . If one or more doors stop opening, check this fuse. The issue may be in the central locking, control unit, as well as the mechanisms themselves, rods and door locks. If you have no experience, it is better to contact a car service.
p, blockquote 14,0,0,0,0 –>
F7 (20 A) - sound signal and its relay, cigarette lighter . If the horn does not work, check this fuse, the steering column contacts and the wiring; the contacts may have oxidized and the wiring may have become frayed. Also check the horn itself, you can replace it with another one, for example, a two-tone one from Volga. If the cigarette lighter does not work, check the wiring and its contacts. The white wire is responsible for the backlight, the red and black wires go to the cigarette lighter contacts. Do not insert non-standard connectors into the cigarette lighter, they may cause a short circuit. If the connector in the cigarette lighter moves to the sides, it is better to use a splitter and insert this connector there.
p, blockquote 15,0,0,0,0 –>
F8 (20 A) - rear window heating element and relay (contacts) . Similar to relay K7.
p, blockquote 16,0,0,0,0 –>
F9 (20 A) - rear window heating relay coil, additional relay, rear window wiper motor, wiper and washer switch.
p, blockquote 17,0,0,0,0 –>
F10 (20 A) - backup fuse.
p, blockquote 18,0,0,0,0 –>
Where to look for a fault
To detect faults in electrical circuits, you will need a car tester or other similar measuring device, as well as skill in working with electrical equipment of cars. First of all, you should check the serviceability of fuse F10, which is rated for a current of 20 Amps.
Indirect confirmation of his refusal will be the inability to close the doors using a key fob or car key. If the fuse is faulty, it should be replaced with a good one, but check why it failed.
In the event that there is a short circuit in the circuit, re-blowing of the fuse is guaranteed. What else can fail? The culprit of the failure may be a breakdown of the electric motor in the door lock drive.
Additional relay and fuse box
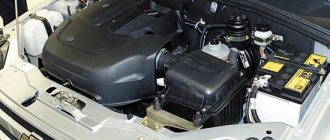
It is located behind the glove compartment at the feet of the front passenger. To access, unfortunately, you will have to remove the glove box. The fuses for the electric fans of the cooling system and the engine control relay (injection system) are located here.
p, blockquote 42,0,0,0,0 –>
Scheme
p, blockquote 43,0,0,0,0 –>
p, blockquote 44,0,0,0,0 –>
Purpose
p, blockquote 45,0,0,0,0 –>
- Additional relay (turns on the right electric fan through an additional resistor at low rotation speed);
- Fuse (50A) protecting the power circuits of the additional relay and the right electric fan relay;
- Fuse for the fuel pump (fuel pump) (15A), protecting the power circuits of the electric fuel pump relay;
- Fuse (15A) protecting the constant power supply circuit of the controller;
- Right electric fan relay;
- Left electric fan relay;
- Electric fuel pump relay;
- Main relay;
- Fuse (50A) protecting the left electric fan circuits;
- Fuse (15A) protecting power circuits switched on by the main relay;
- Controller
Cigarette lighter fuse
If the cigarette lighter does not work, then the first thing you should check is the socket itself for the presence of foreign objects and the integrity of the fusible link, which opens the circuit if the reverse mechanism of the cigarette lighter spiral does not work.
p, blockquote 46,0,0,0,0 –>
p, blockquote 47,0,0,0,0 –>
Next, check the fuse on the unit itself. On the diagrams it is marked as number 6 (F6).
p, blockquote 49,0,0,0,0 –>
If this does not help, then the question remains with the electrical wiring itself.
p, blockquote 50,0,0,0,0 –>
In this video you can clearly see an example of how to get to the fuse box and replace them.
p, blockquote 51,0,0,0,0 –>
You should also check the supply voltage to the connectors with the electric motor wires, as breaks occur in these circuits. To determine the lack of contact, you need to ring each wire with a multimeter. The drive motor is checked with a measuring device; to do this, it is necessary to measure the resistance of its windings.
Niva Chevrolet repair manual. Diagram of the door lock system: 1 – mounting block; 2 –…
If clicks are not heard, check that there is power at the switches. Conclusions Determining the causes of a central locking malfunction is quite simple.
The rest of the peeps act on their own, each opening its own door. Sometimes installing an alarm yourself can lead to blocking failure, so you should entrust this work to specialists.
Depending on the method of switching on the relay, the polarity of the voltage changes, ensuring a corresponding change in the position of the lock latch.
Some models may be equipped with an anti-theft system built into the central locking system. If you are unable to independently determine the cause of the failure by performing a series of general checks, contact your Chrysler dealer for advice.
With the engine off, switch the door lock switches in both directions Open - Closed. The relay should make clearly audible clicks.
Door lock relay location. There are a lot of different things to do, it’s cold outside, the toad was choking me to change it at the service station, and somehow I drove like that, locking it with the key. And then last week the door completely stopped working, neither opening nor closing.
When using the original signaling, only the starboard turn signals blinked. I read on the Internet that the electrical package located behind the fuse box burns out.
It cost me quite a budget in rubles. I came across two types of “Norma” in the store and, I took the one I had without the “” at the end, does anyone know what the difference is between them?
I left the store, immediately picked up the block, closed the door with the key, all the locks worked as expected, first they all opened, then they all closed. That is, the block is working and my wiring, as I said, is also all working.
What to do if the central locking does not work in a Chevrolet Niva: location diagram
Malfunction of the central locking system in the Chevrolet Niva is considered a fairly common problem, even after the 2010 restyling, when more reliable components began to be used. On new Chevrolet Niva cars, as a rule, central locking with a key or alarm key fob does not work. The doors have to be opened manually. You can fix the malfunction on your own, the main thing is to determine the cause of the breakdown and know the location of the relays and mechanisms.
Causes of central locking malfunctions
Most often, the electrical part of the solenoids control fails , and the locks themselves are considered relatively reliable.
The central locking of a Chevy Niva car works on the following principle: the signal for opening or closing the doors is transmitted by pressing a button on the key or turning the cylinder in the driver's door, while the signal passes through the central locking control unit and the on-board computer.
This scheme has its weaknesses, and the main reasons for failure are the following factors::
- short circuit in the circuit and fuse failure;
- chafing of wiring in flexible corrugation, loss of contact at joints due to vibrations and moisture ingress;
- central locking relay malfunction;
- error in the central locking control unit;
- lock motor failure.
Advice! If the car has an alarm system, the central locking may not open due to a malfunction of the alarm system. Perhaps the reason lies in the dead battery of the alarm control panel.
Operating principle and central locking diagram
Central locking has been installed on the VAZ 2123 since 2004 . Since then, the Chevy Niva central locking scheme has not changed fundamentally and is installed on cars starting with the “Norma” configuration. To control the remote door opening, a remote control (remote control with a flip key) is used. It combines the functions of an immobilizer, ignition key, and door key. The signal from the remote control is received by the electrical package control unit (1118-6512010), which is responsible for opening the doors.
Pressing a button on the remote control opens or closes all car doors , including the trunk door. In the same way, the central locking is triggered when the key in the driver's door is turned half a turn to the right or left.
The operation of the electrical network is controlled by a standard relay type 90.3747 , a 20 A fuse, limit switches in each door, and gearmotors on the lock mechanisms.
A special feature of the Chevrolet Niva Central Locker is the ability to manually open and close the doors, even with the battery removed.
Important! The gearmotors are equipped with protection against overheating and turn off for a while after repeated activation of the central locking system.
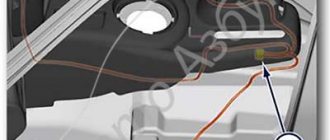
Location of the control unit
The electrical package control unit is located in an accessible location immediately behind the fuse box on the left side of the pedal assembly. It can be accessed from below or after partially dismantling the fuse box.
The mounting block with relay and fuse is located under the hinged cover to the left of the steering column . Fuse number F10, the relay position is marked in the diagram with an icon.
Ways to solve problems with central locking Niva Chevrolet
Before starting work, it is recommended to evaluate your repair skills and experience with electrical wiring in a car. Special equipment may be required, and at a minimum, a tester is required to diagnose electrical circuits. Troubleshooting always starts from simple to complex.
Fuse failure
The fuse is the first thing every car enthusiast should check if the central locking stops working . The symptom will be the failure of all doors to close with the button at the same time. It's easy to check - just open the mounting block and replace it with a serviceable one of the same rating.
Most often, the cause of its burnout is a short circuit or overload in the circuit . In the mounting block of cars manufactured before 2009, it is designated F6; on cars after 2010, it is located under the number F10.
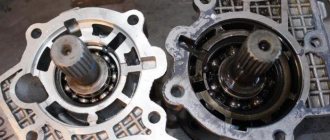
Gearmotors
Their breakdown does not occur often, but repairing or replacing motors in doors requires partial disassembly of the door and removal of the upholstery . A faulty motor can be detected by the silence on its part when the central locking system is activated or incorrect operation (does not open completely, fires every other time, extraneous sounds).
Functionality is checked with a multimeter or by connecting to the battery directly. Replace the gearmotors with a new assembly if the old one cannot be repaired.
Advice! It happens that the sounds of the motor operating are heard, but the door does not respond to signals from the key. In this case, it is necessary to check the rods coming from the locks to the gearmotors and door handles.
Wiring
This is probably the weakest point in the entire electrical circuit of the central locking system . The problem is that the door is a moving element, so the wiring harnesses are constantly being twisted in these places.
In addition to the central locking system, alarm wires, limit switches, audio systems, and power windows enter the door. Despite the rational S-shaped bend of the door wiring in the corrugation, damage to one or more wires occurs. The second weak point is the contacts inside the door.
The integrity of the wiring is checked by “ringing” suspicious sections of the circuit . The found break is cleaned and connected by soldering or crimping bushings. Replacing a broken wire entirely with a new one is not always advisable due to the complexity of the work.
Relay circuit
Power to the central locking can be supplied through the main relay used for low beam headlights and interior lighting. There are also schemes with a separate relay for the central locking, which is installed next to the control unit of the door opening system.
Typical 4-pin relays rarely fail, but if they do, the problem is easy to diagnose . To do this, replace the relay with any working one from the mounting block. If after this the central locking works, the cause of the breakdown has been found. An alternative option is to check the relay with a tester.
Central locking control unit
This block is present only on cars with the “Norma” configuration and higher . A common reason for its failure is a short circuit in the circuit or large voltage surges, leading to melting of the microcircuit contacts. Diagnosed visually (traces of melting on the body) or with an electrical tester.
The central locking unit, as a rule, is not repaired and is simply replaced with a new one.
On-board computer (ECU)
On Chevy Niva, the central locking scheme on later cars involves the participation of the on-board computer in the processes of opening and closing doors, as well as setting the alarm. Such a scheme allows you to expand the functionality of the central locking system, connect an alarm system with auto start and make the operation of the car more comfortable.
Information about errors and malfunctions of the central locking is obtained through a scanner or PC , which is connected to the car via a standard OBD2 connector. Errors in the computer are one of the reasons why remote opening does not work. In the application you can reset errors and find out the cause of the problem. In difficult cases, the control unit is reflashed.
Conclusion
A modern Chevrolet Niva car consists of various complex electronic systems. The central locking system consists of 6 components. The failure of one of the circuits leads to the failure of the entire system, while breakdowns of the hardware itself are extremely rare.
To quickly solve the problem, you need to imagine the central locking diagram and act consistently in troubleshooting. In difficult cases, when a unit replacement does not help, you should contact a professional auto electrician who is well versed in Chevrolet Niva.
Replacing the Chevrolet door lock fuse - Niva
All connection points must be isolated. But this will not be enough: Place an advertisement Feedback Team blog.
Unlocking locks in one click on Chevrolet Niva, Lada Priora, Lada Kalina...
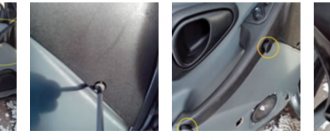
The central locking does not work, it does not work either from the leopard alarm key fob or by hand. Maybe he still knows how to switch off? You should contact an alarm installer. If you pull the button on the driver's door, but the lock does not work, then perhaps the limit switch in the door is faulty - you need to check, for this you will have to disassemble the lock, and this is a pain in the ass:
If the button on the driver's door goes down and goes up when locking or unlocking the door. In this case, the limit switch works.
signal to the field
It also responds to signals and dimensions. I won’t tell you where to dig because I don’t know the complete diagram. We need to look - maybe when they installed the signaling they did a reconnection.
Features of programming the new signaling
Let's say the scheme discussed above was implemented without errors. At the second step, as you might guess, you need to correctly program the alarm. Otherwise, there is a possibility of burning out the actuators installed in the passenger doors. The advice is simple: you cannot make a control pulse longer than one second. However, the default value is 0.7 or 0.8.
Map of modern alarm settings
The signal output used must also be programmed correctly (it must be activated at the moment of unlocking). An alternative method is to use the 2-step unlock output. The pulse duration on it must be set within 0.7-0.8 s. The default value is 30 s, and guess what this means in this case.
Car alarm connection points for Niva Chevrolet 2010
Driver's door – white/blue Passenger's door – yellow/black Rear doors – white/black trunk – white/red hood – green/black All limit switches are negative
Turns – blue and blue/black
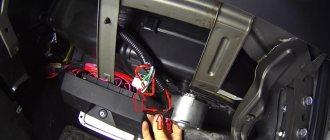
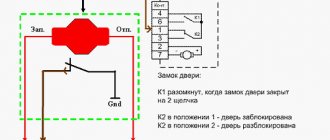
Central locking block behind the mounting block. Central lock (-) – closing – 7th leg, opening – 2nd leg. To control the central locking, you need to solder to the block.
On this car, the first press of the standard key fob opens the driver's door, the second press opens the passenger door. One of the well-known sites has connection points using an additional relay. But I don’t think this method is the best. That's why I offer mine. The central locking unit on the Chevy Niva is from Kalina.
Where to look for a fault
To detect faults in electrical circuits, you will need a car tester or other similar measuring device, as well as skill in working with electrical equipment of cars. First of all, you should check the serviceability of fuse F10, which is rated for a current of 20 Amps.
Indirect confirmation of his refusal will be the inability to close the doors using a key fob or car key. If the fuse is faulty, it should be replaced with a good one, but check why it failed.
In the event that there is a short circuit in the circuit, re-blowing of the fuse is guaranteed. What else can fail? The culprit of the failure may be a breakdown of the electric motor in the door lock drive.
Car alarm connection points for Chevrolet Niva 2022, immo number 1118-6512010
Bypass immo on the steering column: white wire into the gap to the lineman.
All limit switches are on the immobilizer block.
The central locking unit does not have to be disassembled and soldered in there. Everything works perfectly according to the Priora scheme: a thin blue wire to the gap (the gap is closed, it is to ground - open).
Turns – blue and blue/black. Can be found in the gray connector, under the mounting block.
Monitoring engine operation (+) – one wire comes out of the generator very conveniently. We take it from him.
The handbrake is torn off and connected via a diode, otherwise it won’t work.
Keep in mind that removing the dashboard requires 4 self-tapping screws, but in the center of the panel it is so tightly latched that it is only possible to break this fastening bracket. Or install the whitefish behind the mounting block.
Articles on the topic
Alarm installation cards for Chevrolet Niva
“>
Preparing to connect the alarm
Before directly connecting and connecting the signaling system, you should first find out how the lock itself works. After this, find the access points that are shown in the instructions on the transport. Alarms are mostly universal. They are installed on turbocharged, diesel or gasoline Niva Chevrolet engines.
Further actions:
- Before installation, you need to remove the protective structure from the steering wheel , remove five self-tapping screws with two screws. Then unscrew the panel screws that cover the mounting block and pull out the block.
- Remove the instrument panel trim and remove all screws. Unfasten the dashboard.
- a siren with a temperature sensor and a hood limit switch in the car engine compartment.
- Connect the antenna unit in the upper corner of the windshield. Place the LED type indicator on the left pillar.
- Attach the shock sensor to the steering wheel bracket , and place the service button in a hidden but easy to access place.