Lada Kalina - fuse and relay blocks
Lada Kalina 1st
generation was produced in 2004, 2005, 2006, 2007, 2008, 2009, 2010, 2011, 2012 and 2013 under internal serial numbers
VAZ-1117, VAZ-1118, VAZ-1119
with sedan bodies , hatchback, station wagon. In this article we will show a description of fuses and relays of the 1st generation Lada Kalina with block diagrams and photographs. Note the fuse responsible for the cigarette lighter.
The design of the blocks and the purpose of the elements in them may differ from those presented and depend on the year of manufacture and level of equipment of your Lada Kalina. Check the description with yours, printed on the back of the protective cover, or other technical documentation.
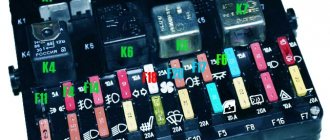
Main block
The main block with fuses and relays is located under the instrument panel on the driver's side, behind the protective cover.
Scheme Option 1
Scheme Option 2
Description of fuses
p, blockquote 10,0,0,0,0 —>
| F1 | 15A Electronic engine control unit, cooling fan relay, fuel injectors |
| F2 | 30A Electric windows |
| F3 | 15A Hazard alarm |
| F4 | 20A Windshield wiper, airbag |
| F5 | 25A Heater (viburnum heater fuse), Electric power steering control unit, Windshield washer |
| F6 | 20A Horn |
| F7 | 10A LCD instrument cluster indicator, Brake light switch and lamps, Interior lighting |
| F8 | 20A Heated rear window |
| F9 | 5A Side light bulbs on the right side, Glove box light bulb |
| F10 | 5A Side light bulbs on the left side, Outside lighting indicator in the instrument cluster, License plate light bulbs |
| F11 | 7.55A Rear fog light, Immobilizer control unit |
| F12 | 7.5A Low beam lamp right block - headlights |
| F13 | 7.5A Low beam lamp left block - headlights |
| F14 | 10A High beam lamp right block - headlights |
| F15 | 10A High beam lamp left block - headlights |
| F16 | 10A Right fog lamp |
| F17 | 10A Left fog lamp |
| F18 | 20A Heated front seats, cigarette lighter |
| F19 | 10A ABS |
| F20 | 15A Cigarette lighter , luggage compartment lock, diagnostic connector |
| F21 | 10A Transmission reverse lock circuit |
| F22 | 15A Security alarm control unit |
| F23 | 10A Electric power steering control unit |
| F24 | 7.5A Air conditioner |
| F25 | 10A Interior lighting, brake lights |
| F26 | 25A ABS |
| F27 | Spare |
| F28 | Spare |
| F29 | Spare |
| F30 | Spare |
| F31 | 50A Electric power steering |
| F32 | 30A ABS |
Fuse number 20 at 15A is responsible for the cigarette lighter.
Relay purpose
p, blockquote 12,1,0,0,0 —>
| K1 | Headlight washer relay |
| K2 | Power window relay |
| K3 | Additional starter relay |
| K4 | Ignition switch unloading relay |
| K5 | Alarm relay |
| K6 | Heated Seat Relay / Wiper Relay |
| K7 | High beam relay |
| K8 | Horn relay |
| K9 | Fog light relay |
| K10 | Relay for heated rear window and exterior mirrors |
| K11 | Seat heating relay |
| K12 | Fuel pump relay |
| K13 | Reverse light relay |
| K14 | Radiator cooling fan relay |
| K15 | Heated windshield relay |
| K16 | Heated windshield relay |
| K17 | A/C compressor clutch relay |
Engine control unit
This unit is located in the center console.
The fuses responsible for engine operation are located on top under the protective cover.
Photo - diagram
Designation
p, blockquote 17,0,0,0,0 —>
- Diagnostic connector
- 15A - Main relay circuits (winding of the cooling system electric fan relay, canister purge valve, air flow sensor, speed sensor, oxygen concentration sensor, ignition coil)
- 15A - Fuel pump, viburnum fuel pump fuse.
- 15A - Constant power supply circuits of the controller (ECU)
The relays are located in the lower right part of the console, where the fuses for the electric cooling fan are also attached.
The diagrams do not fit or you own a different generation of the model, study this description for the Lada Kalina 2.
We have also prepared video material on this material on our channel. Come in and subscribe.
p, blockquote 24,0,0,0,0 —> p, blockquote 25,0,0,0,1 —>
And if you have any questions, write them in the comments.
Source
Central locking control on Lada Kalina
Every car owner is concerned about the safety and security of their car. This is especially true for those who are forced to leave their “iron horse” for a long time in public places, as well as in the courtyards of residential buildings. The desire to protect your property is understandable, given the fairly high crime rate. Modern cars are produced with a security system straight from the assembly line. Most often we are talking about the central locking.
It is very convenient and practical, so it remains unrivaled when choosing a security system for little money. Using this device, you can close and open all doors, including the trunk lid, automatically. All this is done both directly by turning the key in the lock, and from the remote control.
Features of standard central locking
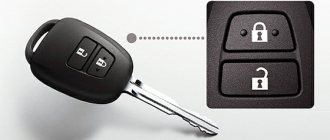
AvtoVAZ even installs a central locking system with a remote control from the factory even on the most budget versions of Kalina. However, such a system is clearly not enough to effectively protect a car from theft. The Lada Kalina central locking system is also controlled from the interior. On the driver's door next to the power window control unit there is a central locking button. The ignition key simultaneously functions as a remote control. On its plastic part there are three buttons, the purpose of which is as follows:
- Unlocking. One press – the actuator should click and the driver’s door will open, two presses – the rest.
- Closing. To close all doors at the same time, just press the button once.
- Opening the trunk. Not available on all trim levels, as a trunk lock actuator is required. You can also install the electric drive yourself.
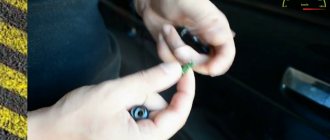
Kalina also provides another important function - rear door locking, as it is also called - child protection. To activate it, you need to use the key to turn the red chip to the right near the lock from the outside. After this, opening the rear doors from the passenger compartment is not possible, so that children cannot accidentally fall out while driving.
The central locking system does not have anti-theft functions; there are no shock sensors. All that the central lock can do is signal an unauthorized opening.
Replacement features
Briefly about the procedure for replacing the control module on Kalina 2:
- First, the instruments are dismantled from the center console; there is nothing difficult about it.
- Then the lower part of the center console trim is unscrewed, the trim is removed, and you gain access to the fuse and relay box.
- The mounting block with safety devices can be unscrewed, but it cannot be removed because it is connected by wires. You can rotate it a little so that it takes a horizontal position.
- You can stick your hand into the gap formed as a result of turning. Having done this, you will be able to feel the shelf on which the TsBKE is installed. A little to the left there is a bolt with which this module is fixed - you need to unscrew it.
- After this, through the top, through the instrument panel, you will need to disconnect the two connected connectors. After completing these steps, you can carefully dismantle the CBKE and remove it by slightly moving the fuse box. Please note that you should not pull the device too hard, since there are two more connectors on the other side that will need to be disconnected. When the wires are disconnected, the CBKE can be completely dismantled and repaired or replaced.
Photo gallery “Assistance in replacing CBKE”
Price issue
The cost of CBKE will vary depending on the modification. On average, such devices cost from 4,500 to 6,000 rubles.
Basic central locking malfunctions and methods for eliminating them
There are times when, after pressing the door unlock button, you may encounter a lack of response to the command. The lock cannot be removed and the central lock does not respond to button presses on the remote control. Conclusion - Kalina's central locking does not work.
You can gain access to the interior using a key, but in this case the sound alarm is not deactivated, and everyone will know when the car is opened. If the system does not respond to commands from the remote control, there may not be many problems: either the batteries in the remote control are low and need to be replaced, or synchronization is lost. In this case, it is not repair that is required, but restoration of the system's functionality.
Restoring synchronization
Synchronization may be lost if there is a short-term (from 6 seconds) lack of power to the microcircuit in the key fob. In this case, desynchronization may actually occur, i.e. the connection between the remote control and the control unit of the central locking Lada Kalina is lost. According to the operating manual, if such situations arise, it is necessary to register the key fob again, entering data about it into the memory of the central locking system. You should immediately take into account that the procedure is far from the simplest and most understandable, and you also need a special training key. You can try to restore synchronization as follows:
- Turn the ignition switch with the key that requires synchronization.
- Wait 6 seconds.
- After the immobilizer lamp stops flashing, the ignition can be turned off.
After 10 seconds, the same key is used to start the car again. If the immobilizer warning light does not blink, it means that synchronization has been restored.
At first glance, nothing complicated, but this method does not help in all cases. If there is a training key, but there is no previously registered key, then the ignition is first turned on, then turned off. After the immobilizer warning lamp stops flashing, within six seconds the key is moved to the second position of the ignition switch (starter).
Key programming for Kalina, Priora, Grants, UAZ and Niva
The remote control key for Lada Priora, Kalina, Granta, UAZ Patriot, Niva is programmed on the car without any devices. To do this, you need to have a so-called training key in your hands - which has a red pip on the head of the key. Used in cars with APS-6 unit.
The remote control key looks like this:
IMPORTANT ANNOUNCEMENT!!!
We work and consult ONLY in Nizhny Novgorod. If you are from another region, do not write or call us - we will not answer. We do not treat keys or cars from other cities: contact specialists in your region.
Purpose:
The remote control is designed for remote control of locking and unlocking of car doors, turning on and off super-locking doors, turning on and off the alarm system, raising the windows, controlling the locking of the tailgate (trunk lid), and also as a coded electronic key for the APS-6 immobilizer
The remote control is mounted on the blade of the ignition switch key type 1118-3704010 and is designed to operate:
1)via radio channel:
- with electrical package control unit 1118-6512010
- with driver's door module 1118-3763080, 2170-3763080-00/10
2) via transponder channel:
- with immobilizer control unit APS-6 2123-3840010-ХХ;
- with immobilizer control unit APS-6.1 1118-3840010-ХХ;
- with electrical package controller-2170-3763040.
Operating instructions:
For the remote control to work as part of a car, it must be activated (trained) using the training (red) code key from the immobilizer. After training, the remote control is also a working code key for the immobilizer and is used to remove the engine start ban. The system can be trained and operated simultaneously with two remote controls .
Training procedure:
Carrying out the training procedure leads to the following consequences:
- the engine control controller activates the anti-theft function if it has not been activated;
- the system changes its password to a new one chosen at random;
- a new system password is written into the training key;
- all remote controls that were previously trained are erased from memory;
- The codes of those remote control units that were trained in this training procedure are stored in memory.
The training procedure is applied in the following cases:
- activating the anti-theft function in the controller (for example, in a new car or replacing a faulty controller);
- erasing old and training new remote controls if lost;
- changing the system password if the owner admits that his system password may have been read (for example, when selling a car from one owner to another)
- remote control training when replacing a faulty immobilizer with a new one.
Only new remote control units or those that were previously trained using the training key used in this training procedure can be trained. It is impossible to learn a remote control key from another car into your car.
Please note: Due to the importance of the training key, it is not recommended to use it for everyday use and should be kept in a safe place.
Before starting the training procedure, fill the car with at least 10 liters of gasoline so as not to get confused by the squeaks.
Key programming instructions for Lada Kalina, Priora, Granta, etc.
- Close all doors. Turn on the ignition with the training key and wait in the on state for at least 6 seconds.
- Turn off the ignition.
The indicator light in the warning lamp unit should flash quickly (at a frequency of 5 times per second) while the learning procedure is being carried out correctly. If the lamp stops flashing quickly, it indicates an incorrect operation, an out-of-time interval, or a malfunction. Remove the training key from the ignition switch. - While the warning lamp is flashing (about 6 seconds), insert the remote control and turn on the ignition. The immobilizer buzzer should emit three beeps.
If the buzzer does not sound and the indicator has stopped flashing, this means: - the time interval of 6 seconds has been exceeded and it is necessary to repeat the learning procedure, starting from step 1;-immobilizer is faulty
- Wait 6 seconds for the buzzer to emit two more beeps and turn off the ignition.
- If it is necessary to train the second remote control, then you should perform steps 3...4 again, using the second learning remote control to turn on the ignition. If not, continue from step 6.
- After turning off the ignition for no more than 6 seconds, while the indicator is flashing, remove the remote control, insert the learning key and turn on the ignition. The buzzer should beep three times. Wait 6 seconds until the buzzer beeps two more times.
- Turn off the ignition without removing the training key, wait 6 seconds until the buzzer sounds a single sound signal. The indicator should flash twice as fast. If the sound signal does not sound and the flashing indicator stops, you should return to step 1 and repeat the learning procedure. If a repeated failure occurs when performing step 7, this means that the ECM was previously trained with a different key, in which case the controller should be replaced.
- After the buzzer gives a single sound signal, no later than 3 seconds, turn on the ignition for 2...3 seconds and then turn it off (after turning on the ignition, the buzzer will sound three times and the indicator will stop flashing). The hazard warning lights should flash and the car horn should beep.
- Remove the learning key.
Wait with the ignition off for at least 10 seconds. Insert the working key and turn on the ignition. Wait 6 seconds, if the indicator does not flash, test start the engine, the engine should start. If the indicator flashes, turn off the ignition and wait at least 10 seconds. Turn on the ignition. The warning light should not flash and the engine should start. If, after turning on the ignition, after 6 seconds the indicator lights up with a constant light, then the learning procedure must be repeated, starting from step 1.
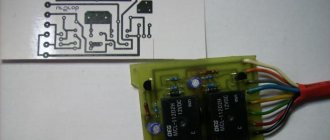
Replacing the remote control battery
The remote control is equipped with a CR2032 lithium battery, the initial supply voltage of which is 3 V. If the remote control supply voltage is within normal limits, then each time you press any button on the remote control, the indicator lights up with a short flash. If, when you press any button on the remote control, the indicator lights up with two short flashes or does not light up at all, then you should replace the battery with a new one.
To do this, you need to unscrew the screw from the side of the case opposite the control buttons, separate the halves of the case, remove the board from the case, replace the battery with a new one, observing the polarity; insert the board into the case; snap the housing halves together and tighten the screw.
Resynchronization of remote control codes
In cases where the remote control buttons are pressed outside the range of the radio channel, the “floating” code counter in the remote control goes out of synchronization with the counter in the system control unit. If the number of button presses outside the signal reception area of the system exceeds 1000, the system stops responding to remote control commands. In this case, the remote control training procedure should be repeated.
Updated August 01, 2013
Due to the increasing number of cases of lost training (master) keys for car owners of Kalina, Priora, Grant, Niva-Chevrolet, we are introducing a new type of service: registration of working keys in these cars, without a master key!
Usually in such cases, it is necessary to change a set of blocks: ECU (electronic engine control unit), APS unit, glass control unit, ignition switch complete with door cylinders and new keys, etc.
Now in our company you can register a working key with buttons without a training key, and for an additional fee you can receive a new training (red) key for your car. For this procedure, you need to come by car and leave it while the work is being carried out. The work includes dismantling the necessary units (ECU, APS, etc.) from the car, programmatically changing data, installing units on the car and registering keys. We emphasize that a key registered in this way will cost more than registering a remote control yourself if you have a training key, but naturally cheaper than buying and replacing a set of blocks with new ones.
Update January 05, 2014
Attention! It is now possible to make a duplicate chip for autostart using a working key with remote control buttons! A master or training key is not required. The chip obtained in this way can be used both for installation in the immobilizer bypass unit to implement autostart, and for everyday use, starting the engine of Lada Kalina, Priora, Niva-Chevrolet cars.
Such a duplicate is more expensive than a regular chip, which can be registered using a master key, but this is a real solution in cases where the master (training) key is lost. To create a duplicate, you need a car, a working key with remote control buttons (and it doesn’t even matter if it is partially faulty, for example, the buttons don’t work, etc., the main thing is that the ignition key starts the engine).
The entire copying procedure takes 10-15 minutes. Contact us by phone in contacts.
Source: https://dvernoydoktor.ru/blog/programmirovanie-klyucha-pdu-dlya-vaz-kalina-priora-granta-uaz-patriot-niva
Conversion into a single door unlocking impulse
The controller of the central locking control unit opens the doors in two stages: one press of the button unlocks the driver’s door, two presses – all others. But you can make it so that everything unlocks after one press. This is very easy to do:
- Turn on the ignition.
- Press the unlock and close buttons at the same time and hold for at least five seconds.
- After the beep, the key can be released.
When the buzzer sounds once, the system notifies you of the transition to a new mode. Returning everything to the way it was before is just as easy. To do this, repeat the above procedure and wait for the double buzzer to confirm the transition to the default settings.
Replacing the battery in the key fob
A sign of a low key fob battery will be the LED flashing quickly when you press any button. The central locking does not respond to commands. It is worth noting that a discharged battery will not affect the ability to start the engine. Since the immobilizer can easily read the code written on the chip, synchronization will not be lost.
Disassembling the key fob is very simple; just unscrew one screw on the body and, using any available tool, remove the cover on which the buttons are located. Next, the printed circuit board is removed, under which the battery is located. You need to determine its type by reading the letter and number combination. When replacing, be sure to take into account those same 6 seconds, i.e. have time to install a new battery during this time, otherwise it will be necessary to restore synchronization.
Replacing a dead battery
Let's say the LED located on the key fob body flashes quickly when you press any key. There will be no reactions from the central locker in this case. All of the above suggests that it is time to replace the battery. Details are discussed below.
If the LED flashes when you press the key, you can still start the car with that key. The immobilizer can easily read the code written into the key fob chip, and synchronization will not be lost either. But it is recommended to hurry up when replacing the battery.
So, to disassemble the key fob body, you will need a Phillips screwdriver. Having unscrewed one self-tapping screw, use a knife to separate the halves that make up the housing structure. The result looks like this:
Once the circuit board is removed, look at which battery is being used. The first characters of the designation are the letters “CR”. Then comes a set of numbers.
When making a replacement, try not to leave the contacts free for more than 6 seconds. Otherwise, there is a high probability of loss of synchronization.
It can be summarized that the replacement operation is performed in three steps:
- We disassemble the case, determine the type of battery;
- We purchase the same battery;
- We are making a replacement.
Care must be maintained at every step.
People's Councils
If you are confident that the key fob is working, but the central locking does not work or does not work correctly, then you can try the following:
- Replace the central locking fuse Kalina F22, which protects the controller's power circuit (located in the mounting block).
- The power supply circuit to the actuator of one of the doors may be broken. In this case, you need to open it 90° and find a broken contact or connector.
- It happens that the reason is that the key fob screw is too tight. You need to weaken it, and the functions will be restored.
In each specific case, atypical malfunctions may occur, so the above list is not exhaustive.
What difficulties may arise and how to overcome them
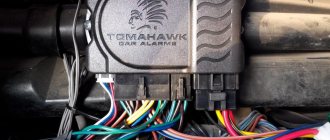
Connecting an alarm system manually by a motorist without special skills can lead to a number of difficulties during the implementation process:
- Selecting a security system connection. Here it is important to consider the type of signaling, the make of the car and the installation point of the head unit. It is not uncommon for Chinese car alarms to lack schematic connection instructions. In this case, you will have to determine it using a voltmeter, multimeter or probe. Alternatively, you can find a circuit diagram for the signaling from China on the Internet. Often our compatriots, after a fair amount of searching, lay out diagrams, one of which is suitable for your alarm system. When connecting the system without harming the on-board network, it is better to find the electrical diagram of your car, with the help of which you can easily find the connection points of the security system to the central locking wiring.
- In the process, obstacles may arise in the form of difficulty accessing central locking components and equipment.
- In the absence of even minimal skills, there is a possibility of incorrectly connecting the elements, which can cause a short circuit and malfunction of the contacts of the locking mechanism and signaling.
It is quite possible to install simple alarms without special knowledge, armed with connection diagrams and a set of tools. Complex security systems with a GSM module, engine start with a turbocharged supercharger, heating and the presence of other “goodies” are best connected with the help of specialists. Forcibly interfering with the central locking control modules during installation by making soldering is allowed only as a last resort and when necessary. It is possible to use special blocks that allow you to connect and configure an alarm system via CAN buses.
The process of installing a security system yourself is quite troublesome, but if connected correctly, your efforts will be generously rewarded in the form of significant savings, since often the cost of a specialist’s services reaches the price tag of the alarm system itself.
The best prices and conditions for the purchase of new cars
Installation and connection of central locking depending on the modification of Kalina
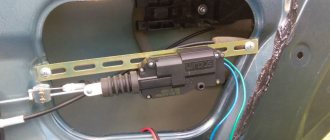
The central locking is controlled by an electronic unit, from which wires go to the door actuators. A wire also goes from the block to the driver's door microphone, which is located inside the actuator. When connecting, installing or repairing the central locking system after dismantling the left door trim, you need to find the cable from the drive to the 7-pin connector.
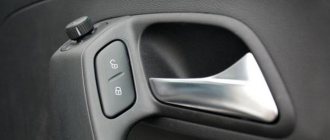
Depending on the configuration (“Norma”, “Standard”, “Lux”) under the casing you can see:
- Six wires suitable for the connector (drive and two microphones).
- Unconnected wires from the drive.
- Lack of wires that should be in the connector on pins 4/6.
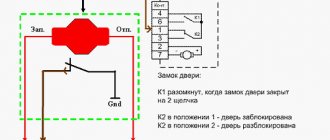
If there is an alarm, then wires 2/7 must be connected to the central locking unit. If the package does not include connecting all the actuators, then you need to do this yourself by connecting the missing ones to the control unit. To do this, you can use a two-wire cable that runs from the door to the central locking control unit. The electrical circuit of one or another modification of Kalina will help with the work.
Two configurations and two schemes
In the “Norma” version, if it has a central locking system, you can use two control wires. Ground is supplied to one of them if the locks need to be opened, and to the second one if the locks need to be closed. The period of connection to ground should take 0.7 seconds, and most alarms have such a setting.
Control cables, threshold harness
If we talk about the “Lux” configuration, the control wires will not help us here. The relay contacts built into the alarm will have to be connected to the breaks in the power cords. Despite all the complexity, there were no complaints about this scheme, and we will consider it right now.
The “luxury” option is the most complex
First you need to make sure that the central locking system in the car is really connected according to the “Lux” scheme. The control button located on the door must be trigger (non-latching). If you have exactly this type of car, you will have to tinker. It will be necessary to extend 4 power cables to the signaling unit. These cords, in turn, must go from the break point of the two standard wires (yellow-white and yellow-black). Find them in the bundle under the threshold.
Wiring harness, driver's threshold
Any alarm system is supplied with two relays, one of which is activated for closing, the second for unlocking the locks. Power cables drawn from the break points are connected to the relay contacts.
Connection diagram, “Lux” option
The part of the yellow-white wire that goes to the actuators is connected to the common contact. Another relay contact (normally closed) is connected to the second half of the cable. They connect to the yellow-black wire in a similar way, but here an opening relay is used, not a locking one. Each of the normally open contacts receives power.
In our case, the rating “15 Amperes” is used. Immediately before installation, you need to call the pair of wires that are directed to the actuators. The probe should show a value of 1.2 - 1.3 Ohms. And of course, when performing installation work, you first need to remove the negative terminal from the battery. Be careful!
Connection option for “Norma”
Let's say there is a switch in the driver's door, but it has two fixed positions. Then it will be easy to connect the alarm. You will need to make not 4, but 2 taps, and not from the power cords, but from two signal cords. There is no need to make breaks, just make a T-shaped connection. The diagram here looks standard:
Connection diagram, “Normal” option
You can complete the installation without breaking the wires at all.
Harness under the driver's threshold
We wish you success.
In the circuit discussed above, there is no fuse. We connected to the signal wiring, not the power wiring, and theoretically we can not be afraid of any short circuits. Still, it is better to insulate the free terminals on the signaling. The same applies to all connection points.
Connecting the central locking system for the “Lux” package
This method is also relevant for Lada Kalina Cross in the “Norma” configuration. “Lux” and configurations with additional options imply the presence of an armrest with installed central locking buttons and electric windows. From the button contacts you need to take the one that receives power after pressing, and stretch the wire to the alarm module. To connect, you can use the following diagram:
Connecting the central locking system for the “Lux” package
This connection option is suitable specifically for the “Lux” configuration, since it has a standard alarm system, and the central locking can be installed independently if for some reason it fails.
When connecting the central locking system, all work must be carried out with the vehicle's electrical equipment de-energized. Wires must be laid so that they do not touch metal. If this is not possible, then a tube is installed to protect the cable from breakage and other negative factors.
Module connection
Connecting the module will be successful and quick if you follow the correct algorithm.
The first thing you need to do is remove the airbag and unsolder the wires from the ignition switch, through which the engine starts. Next, the main wires of the automatic start system are connected to the ignition switch according to the special diagrams included with the specific device.
In the case of the Lada Kalina 2, you cannot do without a lineman, since this model is equipped with a standard immobilizer. The crawler is an additional module with a digital chip that allows you to avoid a “conflict” between the autostart and the anti-theft system.
It is a spare ignition key with a built-in immobilizer deactivation chip. As a result, at the moment the engine starts (automatic or remote), information will be read from this key and then transmitted to the ignition switch.
The next step is to connect the autostart control wire to the tachometer, oil sensor or car generator. Programming of the autorun unit is carried out according to the instructions. To provide the possibility of emergency shutdown of the installed system, another wire is connected to the hand or main brake. At this point, the operation of installing the module can be considered complete.
In order to install the autostart module, no special physical effort is required - the main attention should be paid to the electronics. Ignition key with built-in immobilizer deactivation chip
Ignition key with built-in immobilizer deactivation chip
Connecting the central locking system in the “Norma” configuration
In inexpensive trim levels, there is no button to close the doors from the interior at all. In this case, the connection is made according to the following scheme:
Connecting the central locking system in the “Norma” configuration
Unlike the connection diagrams for the central locking system in the Kalina “Lux” configuration, there are no resistors and the “+” voltage is not used. But in this case, when you press the close button, all doors will be locked, and when you press the unlock button, only the driver's door will open. The options considered are among the simplest; more complex schemes require special skills, so it is better to entrust their implementation to professionals at a service station.
Recommendations for both cases
First of all, we note that when connecting the relay to the power wiring, you cannot make the control pulse too long. Setting the value for more than a second can burn out the actuators. Here we were talking about programming, and now let's talk about the electrical part. As you know, before installation you need to open the hood and disconnect the negative terminal.
This advice should not be ignored in any case.
As for installation, it will be better if the power wire taps are carried out by an auto electrician. With signal wiring, everything is simpler, but the rules will be the same in each case:
- Do not let the cord touch the insulation to metal parts. If contact occurs, additional protection is used. For example, a heat-resistant tube placed over electrical tape is suitable;
- It is better to connect any power cables using twisting. Each twisting point is carefully isolated.
- The cross-section of wires carrying significant current must be sufficient so that the conductor does not heat up. This is how you can protect yourself from unforeseen consequences.
The last tip concerns power wiring. And the ability to twist is a whole art.
Pulse programming
When connecting a central lock, it is not enough to perform all the steps in the correct sequence; you also need to select the required pulse duration for the locks to operate. If it is too large, the actuators will overheat; if it is insufficient, it will not be enough to open and close. In the luxury configuration, all electronics usually “fall asleep” after 15 minutes of inactivity. To awaken it, an additional impulse is needed.
Central locking is a simple device, but it can secure your car from criminals much more effectively than a police cap on the passenger seat. The centralized door lock system is the most convenient way to quickly open and close them. If this security system is supplemented with a good car alarm, this will prevent you from ending up in a situation where your car is stolen or damaged.
Source