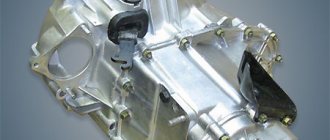
Characteristic
As we said earlier, a 4-speed transmission was also installed on the car. The assembly of the gearbox for the VAZ-2109 of this type did not last long. Therefore, it is now very difficult to meet “short-winged” cars with a 4-speed manual transmission. It's practically a rarity. 95 percent of the “nines” came with a more modern, 5-speed manual transmission. It was two-shaft, with synchronizers in all gears (except reverse). Structurally, this gearbox is combined with the main gear and differential. It differed from the 4-mortar in a different location of the crankcase ventilation pipe. It was located on the clutch housing (previously it was on the rear cover). A dipstick also appeared. But the gear ratios remained the same.
In Russia, these cars stopped being produced back in 2004. But you can still find spare parts for the VAZ-2109 gearbox in stores. Their price is quite reasonable. If necessary, you can buy a complete transmission for 5-6 thousand rubles.
The difference between the five-speed gearbox
The main difference between this type of box is that more elongated secondary shafts are installed at the exit from the crankcase, but otherwise the device is the same. Two gears are mounted on these extended shafts:
- presenter;
- driven, for fifth gear, combined with synchronizer.
Also different from this system is the absence of a transmission bushing on the switch. The number of gears in the main transmission element may vary and depend on the manufacturer. The numbers are marked on the driven gears of the transmitting elements; they are marked with special paint.
In addition, the ball bearings of the shafts of the secondary and primary shaft systems are located in the crankcase sockets, they are covered with a special plate. The plate part is attached to the crankcase cover with four screws. The cover of the rear part of the transmission type system is made of a deeper shape. A synchronizer is installed on the fifth transmission feed of the VAZ 2109, which is equipped with one locking ring, because it has only a single transmission element. A special fifth gear is installed on the primary shaft splines.
Device
This transmission consists of several elements:
- Primary and secondary shaft of the VAZ-2109 gearbox.
- Transmission box housing.
- Synchronizers.
- Axles with reverse intermediate gear.
- Differential, which changes the gear shift drive.
- Aluminum cover with breather. For better heat dissipation, its surface was ribbed.
So, we looked at the design of a typical VAZ-2109 gearbox. This transmission may need to be repaired for several reasons. Below we will look at the main faults and how to fix them.
design features of the gearbox of cars VAZ 2108, VAZ 2109, VAZ 21099
Gearbox design features
Depending on the vehicle configuration, a four- or five-speed gearbox can be installed, combined with a differential and final drive, the gear ratio of which can have several values (see “Technical characteristics of vehicles”). The input shaft 23 (Fig. 5.7) is made in the form of a block of drive gears, the drive gears are in constant engagement with the driven gears of all forward gears. The drive gears are located on needle bearings on the secondary shaft 33. In addition to them, two synchronizers are installed on the secondary shaft of the gearbox. The main gear drive gear is made together with the secondary shaft. The differential is two-satellite. The preload in the differential bearings is adjusted by selecting the thickness of the ring 4. The driven gear 34 of the main gear is attached to the differential box flange. The gearbox control drive consists of gear shift lever 38 (Fig. 5.8), ball joint 36, rod 34, gear shift lever 19 and gear selection and shift mechanisms. A lever 20 is attached to the inner end of the rod 19, which acts on the three-arm lever 11 of the gear shift mechanism. This mechanism is made as a separate unit and is attached to the plane of the clutch housing 23. Two axes are fixed in housing 1 (Fig. 5.9) of the gear shift mechanism. On axis 4 there is a three-arm gear shift lever, two locking brackets 8 and 13 and a bushing 12. Another axis 3 passes through the hole in the hub of the locking brackets, securing them from turning. The arm of the gearshift lever 2 is used to engage forward gears, the arm of the lever 11 is used to engage reverse gear, and the third arm is used by lever 20 (see Fig. 5.8) of gearshift lever 19. A lock 9 is mounted in the hub of the gear shift lever (see Fig. 5.9). A fork 10 for engaging reverse gear is installed on axle 7.
0:3486
1:504
Rice. 5.9. Gear shift mechanism:
1 — gear shift mechanism housing; 2 — gear shift lever (forward); 3 — guide axis of locking brackets; 4 — gear shift lever axis; 5 - spring; 6 — retaining ring; 7 — reverse fork axis; 8.13 — locking brackets; 9 — gear shift lever lock; 10 — reverse fork; 11 — gear shift lever (reverse); 12 - thrust bushing For a five-speed gearbox, the primary and secondary shafts at the exit from the crankcase are extended. On this part of the shafts there are drive 8 (Fig. 5.10) and driven 2 gears of the fifth gear and its synchronizer 3. For a five-speed gearbox, bushing 12 (see Fig. 5.9) is not installed in the gear shift mechanism. Gearboxes are available with different final drive ratios. To distinguish the secondary shafts, grooves are machined on their gear rims: two on the left (the shaft crown is located to the right of the observer) - for a seventeen-tooth rim, one on the left - for a sixteen-tooth rim, one on the right - for a fifteen-tooth rim. The driven gears of the final drive are marked with a gear ratio (for example, 65/15). To distinguish gearboxes by their final drive ratios, they are marked with paint. The marking is applied to the upper part of the gearbox housing: 01 - for gear ratio 3.9; 02 - for gear ratio 4.1; 03 - for gear ratio 3.7; 00 - for gear ratio 4.1 five-speed gearbox.
1:3211
2:504
Rice. 5.10. Five-speed gearbox rear:
1 — driven gear of the fourth gear of the secondary shaft;
2 — driven gear V of the secondary shaft transmission; 3 — 5th gear synchronizer; 4 - secondary shaft; 5 — rear cover of the gearbox housing; 6 — breather; 7 - input shaft; 8 — drive gear of the 5th gear; 9 — thrust plate for fastening bearings; 10 - gearbox housing USEFUL TIPS The manufacturer does not give clear recommendations on gearbox oils.
Either motor oil or various transmission oils are recommended. Therefore, decide which oil to use depending on the operating conditions of the car. If a VAZ 2108, VAZ 2109, VAZ 21099 car is operated mainly in a big city with frequent gear changes, then use motor oil, since in this case a relatively long service life of the synchronizers is ensured. If you mainly drive on highways at high speeds, but with relatively infrequent gear changes, it is better to use transmission oil, which provides an increase in the life of gears and bearings while slightly reducing the durability of the synchronizers. When filling the gearbox, try to fill it with a little more oil (about 100 ml) than recommended by the manufacturer. This will provide better operating conditions for the fifth gear bearing, which is located high in the crankcase and is lubricated only by splashing. four-speed gearbox
2:3251
3:504
Rice. 5.7. Four-speed gearbox:
1 — gearbox housing; 2 — filler and control hole plug; 3 - drain plug; 4 — adjusting ring; 5 — left front wheel drive; 6 — driven gear of the 1st gear of the secondary shaft; 7 — synchronizer clutch for 1st and 2nd gears with reverse gear; 8 — driven gear of the second gear of the secondary shaft; 9 — retaining ring; 10 — thrust half-ring 1 — driven gear of the third gear of the secondary shaft; 12 — synchronizer clutch hub for 3rd and 4th gears; 13-driven gear IV transmission of the secondary shaft; 14-needle bearing of secondary shaft gears; 15 — thrust washer of the 4th gear gear; 16 — ball bearing of the secondary shaft; 17 — rear cover of the gearbox; 18 — ball bearing of the input shaft; 19 — breather; 20 — synchronizer blocking ring; 21 — sliding clutch for synchronizer of 3rd and 4th gears; 22 — retainer block; 23 - input shaft; 24 — retainer ball; 25 — fork of the sliding clutch for the synchronizer of 3rd and 4th gears; 26 — roller bearing of the input shaft; 27 — clutch release fork lever; 28 — clutch release fork bushing; 29 — clutch housing; 30 — clutch release fork; 31 — clutch release bearing; 32 — roller bearing of the secondary shaft; 33 - secondary shaft; 34 — driven gear of the main gear; 35 — tapered roller bearing of the differential; 36 — differential box; 37 — satellite; 38 — retaining ring of the side gear; 39 — semi-axial gear; 40 — speedometer drive gear; 41 — right front wheel drive; 42 — speedometer drive; 43 — satellite axis; 44 — retaining ring of the satellite axis; 45 — protective cover of the gear shift drive hinge
gearbox control drive
3:3620
4:504
Rice. 5.8. Gearbox control drive:
1 - secondary shaft; 2 — fork for shifting 1st and 2nd gears; 3 — fork for shifting III and IV gears; 4 — 5th gear shift fork; 5 — rod of the 5th gear shift fork; 6 — retainer ball; 7 — clamp spring; 8 — clamp cover; 9 — guide axis of locking brackets; 10 — reverse light switch; 11 — three-arm gear shift lever; 12 — reverse fork lock plug; 13 — reverse fork; 14 — gearbox housing; 15 — blocking brackets; 16 — gear shift mechanism housing; 17 — gear shift lever axis; 18 — gear shift lever spring; 19 — gear shift rod; 20 — gear shift rod lever; 21 — fork rod for shifting III and IV gears; 22 — rod for shifting 1st and 2nd gears; 23 — clutch housing; 24 - bushing; 25 — rod seal; 26 — conical screw for fastening the hinge; 27 — protective cover of the hinge; 28 — housing of the gear shift drive rod hinge; 29 — hinge bushing; 30 — hinge axis; 31 — hinge tip; 32 — gear shift drive rod clamp; 33 — gear lever housing; 34 — gear shift drive rod; 35 — protective cover of traction; 36 — ball joint of the lever; 37 — spherical lever finger; 38 — gear shift lever; 39 — lever axis; 40 — lever axis bushing; 41 — locking bracket
possible gearbox malfunctions, causes and methods for eliminating gearbox malfunctions
| Cause of gearbox malfunction | Method for troubleshooting gearbox |
| Gearbox noise 4:3388 | |
| Wear of gear teeth Wear of bearings Insufficient oil level | Replace worn parts Replace worn bearings Add oil. If necessary, replace damaged or worn seals |
| Difficulty shifting gears 4:571 | |
| Incomplete release of the clutch Deformation of the gear shift control rod or torque rod Loosening of the screws securing the hinge or gear selector rod lever Incorrect adjustment of the gear shift drive Wear or breakage of plastic parts in the gear shift drive | See subsection. “Clutch” Straighten the rods or replace the rods Tighten the screws (see "Gearbox") Adjust the gear shift drive Replace damaged parts |
| Spontaneous gear shutdown 4:1743 | |
| Damage or wear of the ends of the synchronizer teeth on the gear and clutch Increased vibrations of the power unit on the supports due to cracks or delamination of rubber on the rear supports Lack of gears due to incorrect adjustment of the gear shift drive or incorrect installation (tension) of the protective traction cover | Replace worn and damaged parts Replace damaged parts Adjust the drive (see “Removing and installing the gearbox”). or adjust the traction cover |
| Noise (“crackling”) when shifting gears 4:2855 | |
| Incomplete release of the clutch Worn locking ring of the gear synchronizer | See subsection. "Clutch" Replace the locking ring |
| Oil leak 4:390 | |
| Wear of the input shaft oil seals, constant velocity joint housings, gear selector rod or speedometer drive shaft seal. The crankcase or box cover is loose or the sealant under the box cover or between the box housing and the clutch housing is damaged, the drain plug is loose. | Replace oil seals, seal Replace sealant, tighten bolts and nuts, tighten drain plug |
4:1299 next article:
repair of the secondary shaft of the gearbox on VAZ 2108, VAZ 2109, VAZ 21099 cars
1. With slight force, clamp the secondary shaft (Fig. 5.11) into a vice with soft metal pads on the jaws.
5:2197
Rating 0.00 [0 Vote(s)]
28315
The transmission goes out
If you lose speed while driving, the gear assembly is most likely worn out. The locks on the gear and clutch also fail. These elements are replaced entirely with new ones.
It is worth noting that the gear on the “nine” can also fall out due to too fast shifting. The manufacturer recommends a two-second pause when switching to increased speed. If you continue to ignore this problem, you may encounter failure of the synchronizers.
Noise
Each box has its own noise limit, which is not a symptom of a malfunction. The transmission has gears that constantly rub against each other. And no matter how technologically advanced the design is, it is impossible to completely eliminate sound. As for the 5th gearbox VAZ-2109, its noise regulation is 78 dB. Anything higher is equivalent to a malfunction. And the box may make noise due to insufficient oil level in the box. As you know, gear oil has a higher viscosity than motor oil. And it is not sprayed by the pump. This oil is located in the gearbox housing. When the gear rotates, it dips itself into the lubricant. If the liquid level is below the permissible level, the element will run dry. This entails increased gear wear and wear. As a result, even if the oil level is restored, the problem will not disappear.
Noisiness also occurs due to increased loads on the box itself. This happens after tuning the engine (for example, installing “evil” camshafts), which the owners of “nines” love so much. As a result, the engine never drops below three thousand rpm. Both the engine and gearbox suffer wear and tear.
The noise may disappear while driving and appear only when the clutch pedal is pressed. In this case, the box itself has nothing to do with it - the clutch is to blame. It is not the disc itself that is worn out, but the release bearing. Its resource is about 60 thousand kilometers. The element produces a characteristic hum and whistle, which intensifies over time.
Installation rules
Before you begin repair work, you need to figure out how to remove the gearbox. This device is disassembled to diagnose it. The gearbox is dismantled in a certain sequence. First, disconnect the battery terminals and drain the oil.
Then the crankcase protection is removed. The next step is to disconnect the ground wire. After loosening the nuts, the cable end is removed. Then the wire is disconnected from the relay and the starter is dismantled.
The finger is pulled out from the corresponding lever. The hinge is disconnected from the fist of the first element. The next step involves dismantling the CV joints. To do this, the first element is squeezed out and moved away from the gearbox. Then 2 CV joints are disconnected. The final stage is dismantling the gearbox.
Auto mechanics recommend moving the gearbox to a horizontal plane before performing this procedure. This procedure must be carried out without damaging the clutch spring petals.
It is difficult or crunching to engage the gear
The problem is a consequence of the failure of synchronizers. The first and second gear synchronizers often wear out. At first, the driver notices difficulties when turning on the desired speed. Then all this begins to be accompanied by a crunch, like on the 53rd LAWN. Do not forcefully press the lever - this will damage the gear block. If there is a problem with the synchronizers, use double squeezing with re-throttle. This is the only way to preserve the gearbox elements while moving to the repair site.
If the box begins to knock when moving, most likely a tooth on the shaft gear or main pair has broken. The element cannot be repaired and must be replaced entirely.
The lever is dangling
If the gearshift lever on a VAZ-2109 is loose, you should check the serviceability of the gearbox hinge (cardan). They have a tapered bolt that can unscrew. In most cases, the problem is solved by tightening it. Note that this bolt is tightly tightened from the factory. It is unscrewed to adjust the scenes.
Backlash also occurs due to a broken return spring, which is located in the gearbox mechanism. It usually changes every 4 years or 100 thousand kilometers.
The cone bolt also unscrews. It is smaller in size than the cardan and is located inside the box itself under the gear shift element.
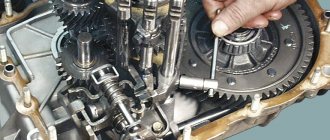
Reinstalling the gearbox
Gearbox assembly:
- we change all non-working elements;
- workers clean with a rag;
- assembly is carried out;
- degrease parts with threads;
- if necessary, lubricate the elements;
- change gaskets;
- insert the balls and bearings into place;
- we assemble the synchronizer;
- We put all the springs in place and tighten the bolts. When assembling, lubricate all connections with sealant;
- attach the box to the engine;
- add oil;
- connect the battery;
- we start the car and check it.
The VAZ 21099 gearbox is adjusted during assembly. Also, after installing the gearbox, you need to adjust the gearshift lever. It is important to adjust the gearbox and gearshift lever correctly.
It should be remembered that prevention can help avoid repairs and troubles along the way. Taking good care of the gearbox is the key to its long-term operation.
Backstage
If the gearbox on a VAZ-2109 is ringing, don’t be upset. All owners of "nines" have this problem. Moreover, the rocker rings both on “killed” and on relatively fresh cars. The AvtoVAZ representative office itself is aware of this defect. And vibration occurs due to the incorrect location of the support points of the internal combustion engine and the gearbox. As a result, the nodes vibrate, and the ringing is transmitted to all other parts, including the slide. Some solve this problem by installing an o-ring in the rocker area, others get used to it and drive like that, with a ringing sound.
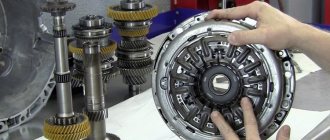
Disassembly
Having removed the gearbox, you can proceed directly to the main thing - disassembly. This will allow you to change damaged elements as you work, identify existing faults and solve problems on your own.
- Clean and thoroughly wash all external surfaces of the gearbox.
- Place the box in a vertical position and remove the back cover.
- Remove the clutch cable bracket, then use a rubber hammer to knock the rear cover off the gearbox.
- Remove the old gasket. She will be replaced.
- Engage any of the two gears - 3 or 4.
- Unscrew the bolt that holds 5th gear, then turn it on.
- Simultaneously turning on the indicated speeds will allow you to fix the shaft and prevent it from turning.
- Unscrew the nut on the secondary shaft, and then on the primary one.
- Remove the 5th speed synchronizer along with the fork.
- Remove the fork from the coupling. Remove the synchronizer as carefully as possible. If you allow the clutch to move away from the hub, the spring-loaded balls that secure the synchronizer will simply fall apart.
- Remove the 5th speed synchronizer locking ring.
- Remove the 5th speed driven gear from the output shaft.
- Remove the thrust ring located on the needle bearing.
- Remove the needle bearing itself from the 5th speed gear.
- Remove the drive gear from the drive shaft and remove the bearing plate.
- Now the needle bearing bushings should be removed from the secondary shaft, and the thrust washer should also be removed.
Jewelry work
- Take out the ring that secures the input shaft bearing, and then a similar ring for the secondary shaft.
- Unscrew the locking plug and remove the ball and locking spring. Next you can get a couple more clamps.
- Remove the rear engine mount.
- Unscrew the reverse gear lock plug, tilt the box and thus remove the lock ball and spring.
- Remove the clutch housing and gearbox housing mounting bolts.
- Acting as carefully as possible, separate the two units. To do this, there are grooves in the crankcases into which the ends of a screwdriver are inserted. By shaking, you can disconnect the elements without any problems.
- Remove the gearbox housing.
- Unscrew the bolt securing the 1st and 2nd speed shift fork.
- Remove the fork and stem.
- Unscrew the bolt securing the 3rd and 4th speed forks.
- Separate the rod head from engagement with the lever, remove it along with the fork from your gearbox.
When disassembling the box into parts, be sure to pay attention to the condition of the elements. If you detect faults in time and replace gearbox components, you can get by with inexpensive but very effective DIY repairs.
Disassembled gearbox
What to pay attention to
So, following the instructions, we disassemble the gearbox of your VAZ 2109. Along the way, pay attention to the following points:
- Bearings. When they wear out, a noise from the box occurs. Plus, worn bearings negatively affect the condition of other gearbox elements;
- Synchronizers and sealing washers. If their condition leaves much to be desired, then the gears shifted poorly precisely because of them. Replace them;
- Clutch system, cotters, coupling hub clamps. All this must be replaced separately if there are signs of wear or defects;
- Blocking rings, synchronizers. If there are chips or nicks, don’t even think about alternative solutions, replace them immediately;
- Bearing tracks. Over time they wear out. If signs of wear are found, perform a complete replacement. In this state, they were only a short time away from breaking;
- Gap between gears and locking rings. Normally it is no less than 0.6 mm. In case of deviations, there is only one solution - replacing the rings;
- Retaining rings. If elasticity is lost, these elements must be changed, since they will no longer be able to perform their functions.
When assembling the gearbox, do not forget to lubricate the new gaskets with a layer of lithol. And when pressing the oil seals, do it with the working edge inward. The metal clip should be located on the outside.
During the process of reassembling the gearbox, all rubbing components should be treated with oil, and do not forget about the sealant for connecting the clutch housings and gearbox. Doing everything yourself is quite possible.
Oil disappears
Unlike engine oil, rarely does anyone check the transmission oil level. But in vain, because sometimes you can simply get a dry dipstick. If measures are not taken in time, increased noise will appear (since the gears are running dry). For what reasons does oil leak from the box? There are several factors:
- The crankcase cover does not fit tightly.
- Worn shaft seals.
- Loose oil drain cap.
- Cracks in the transmission pan (solved by replacing the element).
It is worth noting that if there is no or insufficient oil level, the box does not operate at its temperature range. Because in addition to its lubricating properties, this liquid takes on part of the temperature loads. If there are oil leaks, the box may simply overheat.
The car jerks when starting, it is impossible to shift into gear
The cause of the malfunction is not always the VAZ-2109 gearbox itself. Repairing it may not save it if the clutch assembly is faulty. But it is this system that interacts with the gearbox and engine. It is through the clutch disc that torque is transmitted from the flywheel to the transmission shaft. Typically, this unit serves at least 120 thousand kilometers. But many “nines” have old-style odometers, which reset to zero at 100 thousand.
It is difficult for the driver to control when this or that part in the clutch has been replaced. If the car jerks at start-up and the transmission is difficult to turn on, most likely the disc has been worn out. The plates wear out on it and the damper springs fly out. The petals on the clutch basket are also bent. We have already said about bearings that they are noisy. All this together affects the behavior of the car on the road.