The VAZ 2109 5-speed manual transmission was produced at a plant in Tolyatti from 1987 to 2005 and was installed on all numerous AvtoVAZ front-wheel drive models on the 2108-09 platform. This transmission is designed for torque of power units up to 1.6 liters and 120 Nm. The ninth family also includes 5-speed manual transmissions: 2113, 2114 and 2115. The main thing you need is to constantly monitor its condition, control work processes and not subject it to strong stress. The VAZ 2109 gearbox is reliable, as well as low maintenance costs, since Russian parts are much more affordable than foreign ones.
VAZ 2108 – gearbox: arrangement of components, its repair and improvement
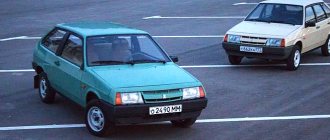
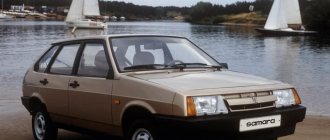
The domestic car is a car with front-wheel drive, and the engine is placed transversely and is used for driving along the highways. The metal body is made in accordance with the hatchback type, which has 3 doors. The rear door is designed for loading and unloading luggage. When transporting long and oversized luggage, the rear row folds down - this increases the luggage compartment.
4-cylinder carburetor engines with a volume of 1.1, 1.3 or 1.5 liters. At the moment, fuel injection systems are installed in some cars. The front-wheel drive car guarantees improved vehicle handling when cornering, even on wet roads. During long-term use of the car, wear of many elements occurs, the fasteners of the assembly components are weakened and the adjustable values are violated.
The gearbox is the most reliable element in the car. Failure of this mechanism is quite rare compared to other parts. And with all this, its complete or partial failure makes the car completely unsuitable for further use. It will simply be impossible to operate the car for its intended purpose. In addition, you will need a tow truck to deliver the car for gearbox repair.
Technical characteristics of the VAZ 2109 gearbox
| Type | Mechanics |
| Number of gears | 5 |
| For drive | front |
| Engine capacity | up to 1.6 liters |
| Torque | up to 120 Nm |
| What kind of oil to pour | TNK Trans KP 80W-85 |
| Lubricant volume | 3.4 liters |
| Change of oil | once every 75,000 km |
| Replacing the filter | every 75,000 km |
| Approximate resource | 150,000 km |
Predominant types of breakdowns
One of the types of gearbox failures on the VAZ 2108 is considered to be bearing wear or lack of oil in the gear shift unit. And with all this, this damage is very easy to fix by changing the oil or replacing the bearings. It is completely different if we are talking about more serious breakdowns associated with axial rearrangement of shafts, bending of the gearbox handle, jamming, unreasonable inclusion, disabling of gears, wear of fasteners, various nuts, as well as springs due to deterioration of the flexibility of balls - in such situations, without a full repair, it is not possible make do.
It is difficult or crunching to engage the gear
The problem is a consequence of the failure of synchronizers. The first and second gear synchronizers often wear out. At first, the driver notices difficulties when turning on the desired speed. Then all this begins to be accompanied by a crunch, like on the 53rd LAWN. Do not forcefully press the lever - this will damage the gear block. If there is a problem with the synchronizers, use double squeezing with re-throttle. This is the only way to preserve the gearbox elements while moving to the repair site.
If the box begins to knock when moving, most likely a tooth on the shaft gear or main pair has broken. The element cannot be repaired and must be replaced entirely.
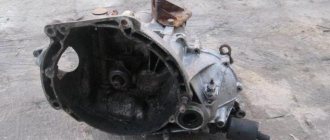
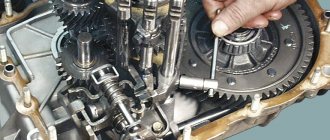
Construction design and further repair of the gearbox
Repairing a VAZ 2108 gearbox is a very complex and time-consuming process, especially if the car has sufficient mileage. Despite multiple service stations, not all specialists will be able to make repairs. There can be many reasons for this. For example, there is little experience, as well as a lack of spare parts in stock. The gearbox is considered a complex element of the car. It is capable of changing the traction force of the driving wheels of a car due to the engagement of gears with different numbers of teeth.
In addition, it provides reverse gear and long-term disconnection of the engine (together with the clutch) from other elements of the transmission, while the car is stationary or moving forward by inertia. The engagement of gears with different numbers of teeth is realized by their movement. The drive shaft is connected to the clutch disc, while the driven shaft is connected to other transmission elements.
The driven shaft, in relation to the main one, is capable of rotating with a different number of revolutions. The transition shaft with a fixed set of gears through them is in constant engagement with the main shaft.
Noise
Each box has its own noise limit, which is not a symptom of a malfunction. The transmission has gears that constantly rub against each other. And no matter how technologically advanced the design is, it is impossible to completely eliminate sound. As for the 5th gearbox VAZ-2109, its noise regulation is 78 dB. Anything higher is equivalent to a malfunction. And the box may make noise due to insufficient oil level in the box. As you know, gear oil has a higher viscosity than motor oil. And it is not sprayed by the pump. This oil is located in the gearbox housing. When the gear rotates, it dips itself into the lubricant. If the liquid level is below the permissible level, the element will run dry. This entails increased gear wear and wear. As a result, even if the oil level is restored, the problem will not disappear.
Noisiness also occurs due to increased loads on the box itself. This happens after tuning the engine (for example, installing “evil” camshafts), which the owners of “nines” love so much. As a result, the engine never drops below three thousand rpm. Both the engine and gearbox suffer wear and tear.
The noise may disappear while driving and appear only when the clutch pedal is pressed. In this case, the box itself has nothing to do with it - the clutch is to blame. It is not the disc itself that is worn out, but the release bearing. Its resource is about 60 thousand kilometers. The element produces a characteristic hum and whistle, which intensifies over time.
Disassembling the gearbox
In some cases, this happens - the box breaks, but the apparent reason is not immediately established. To identify it, the gearbox should be dismantled. Not everyone can immediately get to the service station, and you have to do the removal of the box yourself. For safety, disassembling it must be done by two people, since some parts with significant mass can injure a person if they fall.
First, remove the “+” terminal from the battery and drain the liquid from the box. After this procedure, remove the tray protection. There is a wire on the crankcase, called ground, attached with a bolt. This wire should be removed and moved slightly to the side so that it does not break during subsequent disassembly of the VAZ 2108 gearbox. First, remove the clutch cable. Then we separate the block from the starter relay. Unscrew the 3 bolts and disconnect the starter. Then we go under the car. Loosen the clamp and unhook the joint from the gear selector rod. Unscrew the speedometer drive cable and the wiring for the reverse speed light.
Then you need to unscrew the nuts located on the suspension arm. Unscrew the entire nut that connects the bracket and the brace. Next, turn the guy wires to the sides so that they don’t interfere with continuing disassembly. The cotter pin of the nut itself, which is responsible for securing the ball joint to the steering handle, should be unscrewed and pulled out. The tie rod assembly nuts should also be unscrewed.
The next thing is to knock out the ball pin from the rotation handle post. Then unscrew the 2 bolts and disconnect the ball joint with the steering knuckle. The shank should be knocked out from one of the CV joints of the drive wheels. This is where you need a mount. One CV joint has been freed, the second one should also be freed.
Then remove the crankcase cover. The tightening located between it and the cylinder block, which is attached to 3 bolts, should be loosened. Therefore, after removing the VAZ 2108 5 speed gearbox. the motor will remain without a lower support, and then you need to secure it. You need to do it like this:
- Take a powerful wooden beam, the length of which is approximately 1.5 m.
- Secure the front strut supports so that it is positioned above the engine.
- Secure the motor to the beam using a chain or strong ropes.
After the motor is secured, you can safely disconnect the rear and left support from the frame of the machine. Then, move the box in the opposite direction from the engine until the input shaft is freed from the clutch. Be careful not to break the petals located on the clutch diaphragm spring.
In principle, the entire procedure is completed, now the gearbox from the VAZ 2108 engine can be further disassembled to replace worn elements.
Types of malfunctions and their causes
In order to correctly determine the malfunction and its cause, it is necessary not only to know the principle of operation of the mechanism, but to notice all the symptoms of something wrong.
“Flying” gear – the gear block associated with this very gear has worn out. Aged locks on the clutch and gear also manifest themselves in a similar way.
Rapid wear of some elements occurs due to violations in the operation of the vehicle, which are clearly stated in the instructions of the car manufacturer. Changing gears at the wrong speed limit has a detrimental effect on many vehicle systems, including the gearbox. Experts recommend doing this around 3000-3500 rpm. Instant speed changes without observing the required time interval of 2 seconds, especially with a broken or incorrectly configured clutch, also cause very rapid wear of gearbox elements. This results in an excessive load on the synchronizers, which affects the gear block and leads to their failure.
During repairs, an incompetent specialist or a careless owner often makes the same mistake - the engagement clutch is not replaced.
It is quite easy to determine whether the clutch in the gearbox was replaced after repairs in the cabin or not. The element that has not been replaced begins to produce a fairly distinct “crunch” when shifting a gear that is not working before repair. If the state of the mechanism is very neglected, then a minimal overhaul will no longer save the situation.
Each gearbox has an acceptable noise limit. If the sounds produced by the mechanism exceed the usual limit, then something is wrong. Based on this, we can say with confidence that not a single gearbox in a car operates absolutely silently.
GOST level of external noise for a standard gearbox is a maximum of 96 dB, and internal noise is 78 dB.
Unstable engine speed can also cause noise in the transmission. Therefore, if you doubt the serviceability of the device, it is better to send the car for diagnostics.
Hard shifts, idle shifting, slipping gears - all this can be treated with a gearbox overhaul. The reason, like the malfunction itself, can be different, depending on many factors, because a car is a complex mechanism with a mass of interconnected components and systems.
Improving the gearbox by selecting gear ratios
Many techniques used in transmission tuning have been tested in motor sports. For any car, especially a sports one, the gearbox is an important element in realizing the dynamic qualities of the engine. Correctly selected gear ratios of the VAZ 2108 gearbox will make a car with a rather weak power unit fast.
Cars that require serious preparation use cam gearboxes. They are determined by many advantages - they can withstand quite large loads (using the shape of the tooth and the way the gear-cam clutch engages). They need less time to switch gears (due to incompletely squeezing the clutch or not squeezing it at all), especially since they do not destroy synchronizers (which simply do not exist).
But still, cam gearboxes are practically unsuitable for regular highway driving, since they produce a lot of noise (thanks to the use of spur gear pairs), they have “hard gear shifting” and have a fairly short resource. In addition, they are much more expensive than synchronized ones and must be constantly professionally maintained.
Synchronized gearboxes differ from conventional gearboxes only in gear ratios. Certain situations (VAZ eighth model) allow expansion to sixth gear. Good operation of the gearbox is achieved by effective selection of gear ratios of the main gearbox pair, the input shaft and the driven gears of the secondary shaft. The choice of gear ratios depends on the power and instantaneous capabilities of the engine, wheel diameter, and most importantly, on the desires of the motorist.
The gear ratio of the VAZ 2108 gearbox means the ratio of the number of teeth on the driven gear to the number of teeth on the drive gear. If it is increased, the transmission will become “more powerful”, also “shorter”, in a different way, the engine will turn the required number of revolutions. The car picks up speed quickly too, you just need to change gears often. This moment will only be reflected in a certain reduction in the maximum speed of the applied transmission.
Using an example, let’s take driving a VAZ eighth model with a 1.3 liter engine. with the main pair 4.5. It feels as if something very powerful was placed in the engine compartment, definitely not from a VAZ. Although the driver often needs to shift the gearshift knob of the VAZ 2108, the car is the first during any action, even at a traffic light. In sports cars, the gears used are the most “extreme” ones - 4.7, and on motocross cars - just 5.1.
The transmission goes out
If you lose speed while driving, the gear assembly is most likely worn out. The locks on the gear and clutch also fail. These elements are replaced entirely with new ones.
It is worth noting that the gear on the “nine” can also fall out due to too fast shifting. The manufacturer recommends a two-second pause when switching to increased speed. If you continue to ignore this problem, you may encounter failure of the synchronizers.
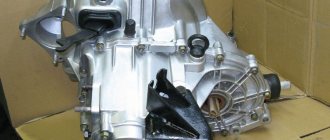
How to replace a gearbox on a VAZ 2108 car
Repairing a VAZ 2108 gearbox is not reasonable in all cases; exchange in most situations is more reasonable and simpler. You can buy a gearbox new or used. The choice of unit is determined by the advantages and financial capabilities of the car enthusiast. It is profitable to buy a used box for disassembly. There are serviceable spare parts on sale with less than half capacity. The advantages of used units are obvious.
The disassembled gearbox is exactly free of manufacturing defects (it has been tested on the highway), it has been diagnosed by professionals from the service center before sale, it is serviceable and efficient, and for all that, its cost is less than that of a new one. In reality, for a VAZ 2108 gearbox, the cost is determined by the node type (4 or 5 range) and the level of wear. By installing this gearbox, you can save money and time on repairs.
You can replace the VAZ 2108 gearbox from a 4-speed to a 5-speed. Then the car’s capabilities will become several times greater, this will also depend on the type of engine. After all, it happens that with a 4-range gearbox, the car seems to lack one more speed.
Oil disappears
Unlike engine oil, rarely does anyone check the transmission oil level. But in vain, because sometimes you can simply get a dry dipstick. If measures are not taken in time, increased noise will appear (since the gears are running dry). For what reasons does oil leak from the box? There are several factors:
- The crankcase cover does not fit tightly.
- Worn shaft seals.
- Loose oil drain cap.
- Cracks in the transmission pan (solved by replacing the element).
It is worth noting that if there is no or insufficient oil level, the box does not operate at its temperature range. Because in addition to its lubricating properties, this liquid takes on part of the temperature loads. If there are oil leaks, the box may simply overheat.
If the gearbox secondary shaft breaks, it should be corrected
- It is necessary to clamp the secondary shaft of the VAZ 2108 gearbox in a vice with metal soft pads on the lips.
- Using 2 pry bars, you need to compress the ball bearing located behind the secondary shaft.
- Remove the thrust ring.
- Remove the 4th speed driven gear.
- Then remove the needle bearing of the 4th speed driven gear and be sure to mark it.
- Then remove the spacer washer from the secondary shaft.
- Using 2 pry bars, move the 3rd and 4th speed synchronizers through the third speed gear from the splines of the secondary shaft.
- Remove the 4th speed needle bearing bushing.
- Then remove the 3rd and 4th speed synchronizer with the 4th speed locking washer. Mark the synchronizer locking washer in relation to the synchronizer clutch.
- Then remove the blocker from the secondary shaft. the 3rd speed gear synchronizer washer, then mark it in relation to the synchronizer clutch.
- Remove the 3rd speed gear from the output shaft.
- Remove the 3rd speed gear needle bearing from the output shaft, then mark the needle bearing.
- Remove the thrust washer of the thrust rings.
- Remove the 2 thrust half-rings from the secondary shaft.
- Remove the ball that secures it from the hole on the secondary shaft.
- Remove the 2nd speed gear from the output shaft.
- Remove the 2nd gear needle bearing, then mark it.
- Remove the lock washer (spring) from the secondary shaft.
- Place the secondary shaft of the 1st speed gear on the lips of the vice, then, hitting the end of the secondary shaft with a wooden mallet, press the 1st and 2nd speed synchronizer from the splines of the secondary shaft.
- Remove the 1st and 2nd speed synchronizer from the secondary shaft from the lock. 2nd speed synchronizer washer.
- Next, remove the ring that blocks 1st speed from the secondary shaft, then mark the synchronizer blocking washer in relation to the synchronizer clutch.
- Remove the first speed gear.
- Remove the locking ring.
- Slightly release the lock of the 1st speed needle bearing and remove it by moving the latter along the length of the secondary shaft. Then mark the needle bearing.
- Turn the secondary shaft over, using 2 large screwdrivers, press the inner bearing washer in front of the secondary shaft. Then remove the thrust washer.
- Clean, rinse and dry the secondary shaft elements thoroughly. It's good to inspect them.
- Check the condition of the shafts. If the bearings are worn, they need to be replaced. The shaft splines must be free of dents and all sorts of defects.
- Check the position of the VAZ 2108 gearbox gear. In case of chipped teeth or any other damage, the gears need to be replaced.
- Check the condition of the bearings and replace them if damaged.
- The radial clearance of existing ball bearings should not exceed 0.05 millimeters. Check this method with an indicator.
- Next, check the lock position. synchronizer rings. If there are nicks and all sorts of chips, they should be replaced.
- Next, check the gap between the gears and the blocking rings. The smallest gap should be 0.6 millimeters. In case of smaller gap, block. the ring should be changed.
- If there are burrs and dents on the thrust washers and retaining rings, be sure to replace them.
- Assemble the secondary shaft in the same way as you removed it. Place the blocking rings with the marks marked earlier. Install new rings in such a way that they align with the grooves of the hub.
- Press the ball bearing on the rear of the secondary shaft using the required mandrel, using extreme force, to the ring inside the bearing
- After assembly, you should check the operation of the synchronizers. By moving their clutches manually to the proper speed engagement position.
- In general, this is how the gearbox bearings of a VAZ car are removed.
Repair work
More often it happens when the owner repairs his car himself, and then, at best, takes it (or, at worst, tows it) to a service center to the technicians.
You can repair the gearbox of a VAZ-2109 car yourself, but only if you are confident in your abilities.
This work:
- First of all, remove the device to be rebuilt from the car.
- Get rid of dirt with simple diesel fuel and rags.
- Remove the dipstick indicating the oil level.
- Install the clutch housing in a vertical position by unscrewing the two nuts of the third bracket fastening on the clutch cable.
- Remove the second cable bracket.
- Unscrew the remaining fasteners from the back cover and remove it.
- Get rid of the fifth gear fork bolt.
- Secure the shafts so that they do not turn.
- Unscrew the fastening of the primary and secondary shaft.
- Remove the 5th gear and don't forget the synchronizer and fork from the output shaft, which also need to be removed.
- Remove the support plate from the synchronizer and remove the fork from the clutch groove.
- Then remove the gear with one ring.
- Remove the bushing from the secondary shaft.
- Remove the gear from the input shaft.
- Unscrew the screws with a screwdriver and remove the thrust washer from the secondary shaft.
- Remove the retaining rings from the shaft bearings.
- Remove the fixing elements and carefully remove their balls.
- Unscrew the rear inlet plug and remove the seal ring.
- Remove the spring and then the ball, slightly tilting the product.
- Remove the crankcase mounting nuts and bolts.
- Separate the crankcases using a flathead screwdriver.
- In the correct sequence, as shown in the photo, unscrew the bolts of the gear shift forks.
- Lift the first gear rod until it comes out of the support. Turn it clockwise until the head comes out of the locking bracket clutch.
- Remove the rod with the fork after turning the 3rd-4th gear rod.
- Turn the 5th rod and remove it.
- Remove the reverse gear shaft.
- Move the reverse gear all the way, turn it 30-40o and remove the intermediate element.
- Remove the input and output shaft.
- Remove the differential from the housing.
- Unscrew the bolts and remove the gear mechanism.
- Take out the magnet.
- Get rid of the fastening nut and remove the housing from the drive gear.
- Remove the reverse switch.
- Remove the secondary shaft bearing.
- Remove the oil collector.
- The input shaft bearing needs to be pressed out in order to be removed.
- Install new front bearings into the clutch housing.
- Slide the edge on the rod protective cover.
- Dismantle the gear lever and remove the rod.
- Replace the unsuitable hinge protection cover.
- To replace the clutch, press out the seals.
- Remove minor damage using sandpaper on both crankcases or replace them if necessary.
- Check the bearing seats in the crankcases to see if they are worn out and replace if necessary. Do the same with the remaining elements.
- Clean the magnet from wear particles; if it is not suitable for use, replace it.
- Clean the sealant from the crankcase planes and reassemble the gearbox in the reverse order.
Lubricate all rubbing elements generously with oil and do not forget about installing the magnet.
After overhauling and replacing all worn-out elements, the gearbox's performance cannot be compared to its previous condition. You will instantly feel all the improvements in the operation of the mechanism.
Existing checkpoint rows
Gearbox rows VAZ 2108: 1 – 3.42, 2 – 2.11, 3 – 1.35, 4 – 0.96, 5 – 0.78, 6 – 0.69
They are also called “commercial” because for many years they were considered quite famous, as well as being sold in series. In general, this is true at the moment. The first speed is extended, the second and fourth are shortened. Any changes are minimal (five percent each), and this is enough to correct the shortcomings of the standard series. In most cases it is installed with GP 4.1. The good news is that it is within the normal range. Gives improved overclocking.
What to choose
The design of the VAZ 2109 gearbox is imperfect, but this is not a good reason to change it completely. The design itself is reliable, it just requires some modifications. The best option is to replace the problematic part, which causes frequent unit breakdowns, or install new components.
- If you need to change the gear ratios of your original transmission, replacing a pair of gears from 17-tooth to 15-tooth parts will do. This modernization increases the efficiency of acceleration, the transition time from gear to gear is reduced, but the maximum speed of the car decreases. Perfect for traveling in urban areas.
- Installing sports gears makes the gears “longer”, that is, switching from one gear to another is required less often, while the dynamics of acceleration and maximum speed are practically not lost. This gearbox tuning is suitable for those who want to increase the speed characteristics of their nine. Mainly used after replacing the engine with a more powerful analogue.
- You can try replacing the original secondary shaft of the nine. The problem with this part is that it is hollow inside. Due to dynamic loads on the assembly, it often happened that this particular shaft shattered into pieces, which led to the final breakdown of the entire gearbox due to fragments stuck in the teeth. Replacement is made with a solid analog shaft for a pair of gears with a gear ratio of 4.13.
- Want to make your car more agile on the track? Buy additional sports hub bearings for tuning. They will slightly improve the performance of the chassis, but the main thing is that they are more reliable than factory parts.
- Start adjusting the differential, but do it only in reputable auto repair shops and service stations. Incorrect adjustment of the part will lead to frequent breakdowns or loss of vehicle controllability.
There are a lot of tips and fairly detailed instructions on how to independently replace a part of an assembly or the entire assembly, but you don’t need to do this if you don’t know the architecture of the car. When carrying out many works, practice and clear knowledge of the matter are required, so it is better to entrust the work to the masters at the service station.
If you need to improve the gear shift mechanism of a VAZ 2109, then before modifying it you need to purchase some additional parts and replace the factory ones with them. This option for solving problems is the cheapest and simplest. Installing an automatic transmission on a VAZ 2109 is not always justified. This modification will simplify driving the car, slightly increase the working life of the unit and allow it to smoothly transition from one speed mode to another. On the other hand, not every owner of a nine can handle repairs, maintenance and installation of automation, so taking into account the costs, this solution is not effective.
Gearbox for front-wheel drive VAZs
The first VAZs of the eighth model, which rolled off the assembly line back in 1984 of the last century. They were equipped with 2-shaft gearboxes, which were combined in 1 housing with a differential. Since those distant times, gearboxes have been updated in every possible way. But since some changes have occurred in the elements, they are not entirely interchangeable. The first VAZs of the eighth model were equipped with 4 VAZ 2108 gearboxes, as well as 5-range gearboxes without a dipstick.
At the moment there are practically none of these left. In 4-band, the main pairs were 4.1, also 3.9. In five-band 3.9, also 3.7. The concern decided not to indulge in a large selection and used only one main pair - 3.7. As for the gearbox ratios, they were, and still are, only one for all cars.
Timely transmission diagnostics
The reliability of the box is directly related to timely diagnosis of the device and replacement of worn parts. Current repairs are carried out either at a car service center or independently, if you have the necessary experience. To do this, the garage must be equipped with an inspection hole or a lift. Typically, box repair is done in the following cases:
- the device gets very hot;
- at high speed a buzzing sound appears;
- gears do not engage the first time;
- Some gear gets knocked out while driving.
Before you begin repairs, you need to remove the wires from the battery. Then the crankcase, crankshaft position sensor, and speedometer cable are disconnected. It is also necessary to release the clutch fork. After this, the VAZ 2108 engine is removed from its place and suspended on the hoist.
The disassembly diagram is as follows. The bottom cover covering the clutch housing is unscrewed and all the oil is drained. The rod is disconnected from the gear selection rod. After this, the box and engine are separated. Repairing the VAZ 2108 gearbox should begin with washing it. When the device dries well, remove the back cover and remove the sealing gasket. The retaining rings are removed from both shafts and the bearings are removed. Now it will be easy to get to the gear that needs to be replaced due to the large wear of the teeth.
Instead of a conventional transmission, a VAZ 2108 car is sometimes equipped with a sequential gearbox. Its lever moves either forward or backward. The gear forks are controlled by a shaft with wavy grooves. When the lever moves, the shaft rotates at a certain angle. The movement of the fork associated with this moment includes one or another gear.
The sequential box has a pneumatic or electric drive. The operating principle of such a device is somewhat different from the operation of a conventional transmission. Instead of helical gears, spur parts are used. Instead of the usual pedal, the transmission is controlled using an electronic unit. Thanks to the use of this type of transmission, gear shift times are significantly reduced.
Tips for replacing the gearbox
Many drivers are in favor of changing the 4-range gearbox on the VAZ 2108 to a 5-range gearbox. Thus, the speed probability of the car increases, the acceleration dynamics are improved. However, the 4-range gearbox is already a thing of the past. And to modernize your car, a 5-speed gearbox is just right, and in some cases they even install a 6-speed gearbox, for which the same VAZ 2108 gearbox bearings are suitable.
The car jerks when starting, it is impossible to shift into gear
The cause of the malfunction is not always the VAZ-2109 gearbox itself. Repairing it may not save it if the clutch assembly is faulty. But it is this system that interacts with the gearbox and engine. It is through the clutch disc that torque is transmitted from the flywheel to the transmission shaft. Typically, this unit serves at least 120 thousand kilometers. But many “nines” have old-style odometers, which reset to zero at 100 thousand.
It is difficult for the driver to control when this or that part in the clutch has been replaced. If the car jerks at start-up and the transmission is difficult to turn on, most likely the disc has been worn out. The plates wear out on it and the damper springs fly out. The petals on the clutch basket are also bent. We have already said about bearings that they are noisy. All this together affects the behavior of the car on the road.
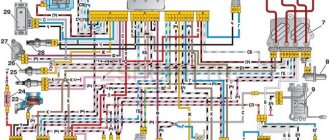
Gear shift drive diagram:
| 1 – gear selection rod lever; | 10 – hinge bushing; |
| 2 – gear selection lever; | 11 – hinge tip; |
| 3 – gearbox housing; | 12 – clamp; |
| 4 – clutch housing; | 13 – protective cover of traction; |
| 5 – gear selection rod; | 14 – gearbox control drive rod; |
| 6 – rod bushing; | 15 – gear shift lever; |
| 7 – rod seal; | 16 – ball joint cage; |
| 8 – protective cover; | 17 – ball joint of the gear shift lever; |
| 9 – hinge body; | 18 – jet thrust. |
The gearbox control drive consists of a gear shift lever (15), a ball joint (17), a rod (14), a gear selection rod (5) and gear selection and shift mechanisms (crumpled “P”).
To prevent spontaneous switching off of the P due to the axial movement of the power unit on its supports when the vehicle is moving, a reaction rod (18) is introduced into the gearbox control drive, one end of which is connected to the power unit, and a clip (16) of the ball joint of the lever (15) is attached to the other end ) switching P.
A lever (1) is attached to the inner end of the rod (5), which acts on the three-year lever (2) of the P selection mechanism. This mechanism is made as a separate unit and is attached to the plane of the clutch housing.