Engine assembly design
Replacing the camshaft on a VAZ 2109 is extremely rarely required due to the fact that it is one of the strongest parts in the design. The camshaft itself is a solid metal product with a set of cams, so it is not afraid of most loads.
However, under certain conditions the shaft may suffer mechanical damage or deformation. Most often these are collisions and accidents, less often - overloads. In such cases, it will simply need to be replaced with a new one along with other damaged parts.
Along with the camshaft, two more parts are often checked: the oil seal and the gear. The oil seal is a rubber-metal cuff that protects the shaft from foreign liquids, moisture and dirt. If it is damaged or deformed, this will lead to incorrect operation of the camshaft.
The gear is connected via a chain transmission to the crankshaft, which ensures the mutual operation of the 2 mechanisms. It may also become damaged, causing the engine to malfunction.
Sometimes the bed in which the part is placed becomes a problem. If liquid, dirt, dust, or oil gets there, this can affect the performance of the camshaft.
Causes and symptoms of malfunction
How long the oil seal will last depends on the conditions in which the car is operated, the tightening of the bolts, and the belt tension. If the driver has a sporty driving style, the engine often experiences stress, which leads to premature wear of the components.
Seals should be changed:
- when changing oil;
- when defects are detected;
- if traces of oil are found;
- if the engine knocks.
In addition, the cuff must be changed when replacing the standard camshaft with a sports one.
How to get to the camshaft?
To get to the VAZ 2109 camshaft, you will need to dismantle several parts. Arm yourself with the following tools:
- hexagon;
- wrench 13 or similar with a socket head;
- replaceable head for 10;
- ratchet handle.
To start work, turn off the power to your “nine” by disconnecting the battery. Then you need to set the piston of the first cylinder to the top dead center position.
Now we dismantle the devices that will interfere with the work in the following order:
- Air filter.
- Gasoline pump.
- Distributor.
- Let's take care of the gear. Remove the timing belt from it and assess its condition. Installation of a split gear will only be necessary if the old one has visual defects: chips, damage, deformation. If everything is in order, simply remove it by unscrewing the fastener. Don't forget to pick up the key so you don't lose it.
- Remove the drive housing on which the distributor is located.
- Now the path to the camshaft housing is clear.
- Remove all body fasteners, there are 10 of them in total.
- Next, pull out the fastening studs. Once all the pins have been removed, the housing can be removed.
- And here is the camshaft. Now he can be taken out of bed and examined.
The VAZ 2109 camshaft will need to be replaced if it is bent or the cams are damaged. A new one will cost about 1000 rubles. The camshaft is installed in the reverse order. Follow the order of tightening the bolts on the body so that part of the assembly is assembled normally and all parts take their position. More specific information on how to tighten can be found in your vehicle's owner's manual.
Design and malfunctions of valve stem seals
Modern valve seals are rubber caps with a powerful steel sleeve inside and expander springs. The task of the latter is to effectively fix the edge of the cap and the valve stem.
As a rule, rubber is used as a gasket material, which hardens over time, wears out and ceases to perform its functions normally. The result is engine oil entering the combustion chamber.
This problem can be recognized by one simple sign - thick bluish smoke begins to come out of the exhaust pipe, and oil consumption increases. In such a situation, it may be necessary to replace the valve stem seals on the VAZ 2109.
Where are the timing marks on a VAZ?
The 8-valve VAZ engine has one camshaft, and it is much easier to set marks on it than on a twin-shaft engine. Let's look at all the possible ways to find the extreme position of the camshaft and crankshaft.
Photo of VAZ 2108 timing marks
On the camshaft, as a rule, there is a mark on the pulley, such a small mark, and on the cylinder head there is an ebb with which this mark should coincide, or rather not even an ebb, but a protrusion on the shield, on the left side, when looking at the engine and camshaft from the front. Sometimes these marks are not observed; what to do in this case is described below.
The crankshaft is aligned according to the mark on the flywheel, on the gearbox, near the engine on top there is a hatch covered with a rubber plug. If you remove the plug, you will see marks on the flywheel and a protruding rod from the engine, which should coincide. But there may be a problem: the fact is that if the engine was disassembled and the flywheel was removed, then the flywheel can be placed on either side, that is, the mark will be God knows where, but not at TDC. There is no guide or eccentric on the flywheel; whichever side you put it on, that’s what it will become, even if you turn it 180 degrees.
In this case, you can look for the mark on the front of the engine - on the pulley and the return flow on the oil pump on the engine. But this is not the case on all engines; often this mark is missing. What to do in situations where no tags are found? Now the fun begins, in fact, marks are not needed on this engine, you can do without them.
How to set the VAZ 2109 timing belt correctly?
To work, you will need keys 17 and 19, a flashlight and a flat-head screwdriver. Remove the old belt and roller completely (just be careful not to lose the washers placed under and on it). Install a new tension roller VAZ 2109, and then begin adjustment.
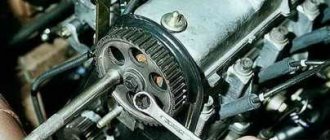
Using a wrench, turn the camshaft pulley until the mark on it aligns with the bar attached to the engine block. After this, try not to touch the camshaft so as not to knock it down (although this is quite difficult to do, but if desired, everything is possible).
A few photos that will give a clear idea of which marks need to be aligned when installing the timing belt on the nine:
1. Place a mark on the camshaft:
2. Checking the alignment of the marks on the crankshaft pulley
3. Check the marks on the flywheel for more accurate installation
Place a bolt on the crankshaft so that you can align the pulley to the marks. Rotate the crankshaft until the mark on the pulley is clearly vertical - this is the very first guideline. Afterwards, to ensure correctness, remove the rubber plug in the clutch housing.
A viewing window will open, through which you can see the flywheel. So, the latter should have a mark - a line that, under normal settings, coincides with the slot on the bar attached to the engine block. This is your second reference point, which directly speaks to the accuracy of the setting. Now all that remains is to put the belt on the crankshaft pulley first, then the camshaft.
To adjust the belt tension, you need to install a special key in the timing belt roller of the VAZ 2109 (if you don’t have one, you can adjust the tension using a screwdriver and a pair of screws or nails). Normal tension is when in the longest section you can turn it a maximum of 90 degrees. Yes, it should turn, but it should turn.
If you can’t turn it at all, then the tension is excessive and needs to be loosened. This is why the VAZ 2109 tension roller exists. Loosen the nut and perform the procedure again. After this, use a wrench to turn the crankshaft several turns and double-check that all marks match. If everything is fine, assemble the unit and start the engine.
Replacement photo gallery
The photos show some of the steps to replace a timing belt.
Removing the cover mounting bolts Removing the cover from the engine Plug on the gearbox housing Unscrewing the crankshaft pulley bolt Removing the pulley Aligning the mark on the camshaft gear Loosening the belt tension Removing the belt from the gears Marking the crankshaft Tensioning the belt with a roller
Instructions for replacing the belt on a car with an injection engine
The injector was installed on only one type of “nine” engine - with a cylinder displacement of 1.5 liters. The use of a fuel injection system did not cause any adjustments to the camshaft drive pattern. The procedure for replacing the timing belt on a VAZ 2109 with an injection engine is practically no different from the list of work on a carburetor car.
The difference is the removal of the old belt, which will require:
- Remove the crankshaft position sensor located next to the pulley from the engine. To dismantle, you need to unfasten the wiring plug and then unscrew the sensor mounting bolt. After this, the sensor is removed from the guide hole.
- To loosen the tension of the auxiliary drive belt, you need to unscrew the M13 nut installed on the generator.
The intricacies of replacing the timing belt on an injection machine are shown in the video from the Alex ZW channel.
There are also several differences when reassembling:
- The crankshaft pulley needs to be installed accordingly. To do this, you need to set the top dead center in the first cylinder - according to the mark on the flywheel and on the crankcase. In this case, the mark of the camshaft gear will coincide with the notch on the plate. The installed pulley should be located opposite the sensor with the beginning of the 20th tooth, counted from the two missing ones.
- The gap between the sensor and the pulley should be 0.4-1.0 mm.
- After completing the assembly, start and check the operation of the engine.
Check points on the pulley
Checking the timing belt tension
With the correct belt tension, the long leg should rotate 90º using the thumb and index finger. The test should not require much physical effort to complete. When retightening, additional loads occur on the bearings of the pump and tension roller, which damage them. Excessive tension is also harmful to the belt itself, which can break while the engine is running.
Preload check location
Installation of the camshaft.
1. Clean the mating surfaces of the bearing housings and cylinder heads from the remains of old sealant and oil.
2. Lubricate the camshaft with engine oil. We place the camshaft in the cylinder head supports so that the convexities of the cams of the first cylinder are directed upward.
3. At the camshaft exit points, on the surface of the cylinder head, apply a thin layer of silicone sealant.
4. Install the beds and tighten the nuts evenly in two steps.
5. First, tighten the nuts in the sequence indicated in the diagram until the bed surfaces touch the cylinder head. The installed bed bushings must fit freely into their sockets.
6. Then tighten the nuts to a torque of 21.6 N•m (2.2 kgf.m) in the same sequence.
7. After the final tightening of the beds, carefully remove the squeezed out sealant. We check the thermal clearances of the valves and, if necessary, adjust them. Then install a new camshaft oil seal.
8. We will assemble in the reverse order of disassembly.
Engine tuning is carried out to increase the parameters and characteristics of the power and dynamics of the power unit. In this case, one important factor should be taken into account: it is necessary to replace all elements with sports ones, and not just one. First, let's replace the camshaft from standard to sports.
To remove the camshaft, you must remove the plastic alternator belt cover. After removing the casing, open the cylinder head cover
In this case, you should pay attention to the position of the crankshaft - TDC for the first cylinder
When removing the camshaft, it is not recommended to touch the large crankshaft, as this may reset the factory settings, which will be impossible to restore yourself.
Next, remove the timing belt. At this time, the camshaft must be jammed using a mounting tool. In this case, the camshaft should be with a spike in front. When removing the timing belt, you should act carefully so as not to damage the cylinder head; it is recommended to place a wooden plate or something similar under the mount to prevent damage to the cylinder head.
After the timing belt has been removed, unscrew the camshaft mounting bolt and remove its toothed wheel and key.
It is best to mark the main bearing caps; this will help avoid confusion during installation. It is also necessary to mark the disc pushers if they are replaced. This completes the stage of removing the old camshaft. Installation of a new, sports camshaft is carried out in the reverse order. Thanks to the replacement of the standard camshaft with a sports one, the knocking of “fingers” will not be heard when the engine is running. This is achieved due to an increase in the detonation limit.
Sources
- https://blogautolive.ru/remont/zamena-raspredvala-vaz-2110-2109
- https://vazikov.ru/vaz-2108-2109-21099/zamena-raspredvala-vaz-2109-na-sportivnyj.html
Advantages of a sports camshaft over a standard camshaft
Valve timing plays a decisive role in the power of a car. Phases are the periods of time during which the intake or exhaust valves are opened and the duration of the intake or exhaust of exhaust gases. The supply of the mixture directly depends on the length of the phase, which means that the longer the phase length, the higher the thrust characteristic of a given engine.
A standard camshaft is not able to provide the required phase length, since it has insufficient cam sizes, however, these disadvantages are absent in the sports camshaft, which has the required cam length, and therefore the required phase duration.
As a result, the engine has higher thrust at low speeds, which means acceleration and movement will be more productive and save on consumables such as the clutch.
We make a washer.
For the material for the washer, I took a piece of galvanized sheet about 0.5mm thick and secured it to a piece of MDF panel with four self-tapping screws (so it wouldn’t fidget).
I drew 2 circles with a marker (inner diameter 25mm, outer 35mm) and hollowed out the inner diameter with a chisel.
I cut out the outer diameter with metal scissors, and I ended up with a curve like this, with the washer blank all covered in burrs:
I processed the inner diameter of the washer with a round file, and sharpened the sharp corners on the outer one:
Install the washer.
We put the washer on the camshaft (it should fit freely, if not, then adjust the dimensions).
I entered freely:
Put the cover back and tighten it.
Attention! Be sure to check if the camshaft is jammed. To do this, take a key set to 17 and try to rotate the camshaft
To do this, take a key set to 17 and try to rotate the camshaft.
It should turn with the same force as before installing the washer.
If the camshaft becomes very difficult to turn, or is completely jammed, then remove the cover again, take out the washer and grind it to thickness:
Shutdown.
After the washer is adjusted, the cap is tightened and the camshaft rotates freely - start the engine and enjoy the silence of its operation!
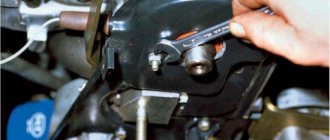
How to remove the timing belt of a VAZ 2109?
Before starting work, place chocks under the rear wheels and apply the handbrake. This will prevent the car from rolling away. Loosen the bolts on the right front wheel as it will have to be removed.
Raise the right side with a jack and finally remove the wheel (throw it under the engine crankcase so that if the car falls, it will not fall on the brake disc). Open the hood and use a 10 mm wrench to unscrew the three bolts that secure the protective casing of the gas distribution mechanism. That's it, now you have a general view of it, you can continue.
Now loosen the nut on the generator and remove its drive belt. It will interfere with the replacement, since the pulley will have to be removed from the crankshaft. Using a 19 mm wrench (you can even use a cylinder) unscrew the bolt that secures the pulley to the crankshaft.
On carburetor versions of cars, you can insert a screwdriver or a small key into the pulley slot to keep the crankshaft from turning. On injection cars, you will have to use the help of a partner, who will sit in the cabin and press the brake pedal (in this case, you need to turn on the fifth speed).
When you unscrew the bolt, you need to loosen the VAZ 2109 tension roller to make it easier to remove the belt. To do this, take a 17mm wrench and unscrew the nut. Moreover, you can remove the VAZ 2109 timing belt completely, since when installing a new belt, it should also be changed.
Remove the belt from the pulleys and pay attention to the condition of the pump - there should be no play in it, pull its pulley to the sides with your hand. A characteristic feature of the presence of play and strong production of a liquid pump can be the appearance of wear along the edge of the belt. If there is one, then you should immediately change the pump.
As for replacing the pump, this must be done every second belt change. If we take into account that cars of this family are all older than five years, then the recommended period for replacing the belt is about 50 thousand km. The liquid pump operates for about 90-100 thousand km. mileage
Therefore, you need to install a new one in a timely manner, and not wait until it is completely worn out and breaks the belt. But the tension roller of the VAZ 2109 needs to be changed at the same time as the belt, there are no other options.
Replacing the camshaft oil seal on a VAZ 2109.
The VAZ 2109 camshaft oil seal is a ring with a solid outer race and an elastic inner edge. Over time, this elasticity is lost, which means the oil seal ceases to cope with its task 100 percent, and the oil begins to leak, creating many problems for the motorist: constantly dirty protection, increased oil consumption, timing belt rupture, etc. So as not to waste money in the future To solve all these problem-consequences, do not allow them to happen - only after noticing oil leaks and making sure that it is the oil seal that is to blame for them, change it immediately.
1. Turn off the power to the car.
3. Using a 17 socket, loosen the tension roller and remove the timing belt.
5. Remove the key.
6. Remove the oil seal by slightly prying it with a flat-head screwdriver. Before installing a new one in its place, lubricate the working side with engine oil.
7. Install the sealing collar with the lubricated side inside the block head. Using a wooden stick, carefully so as not to damage anything, tuck the lip of the oil seal onto the camshaft.
8. Finally seat the oil seal in its seat using a mandrel of suitable diameter.
9. Reassemble in reverse order:
Removing the VAZ 2110 camshaft.
1. Remove the throttle cable from the bracket.
2. Using a 10mm wrench, unscrew the nuts securing the throttle cable bracket (injection motor) and remove it.
3. Use a screwdriver to loosen the clamps securing the two crankcase ventilation outlet hoses and remove the hoses from the valve cover fittings.
4. Use a screwdriver to loosen the breather clamp and remove the hose.
5. Using a 10mm wrench, unscrew the nuts securing the valve cover and remove the cover.
6. Remove the valve cover gasket.
7. On an injection engine, use a 10mm wrench to unscrew the nuts of the “mass” wires and remove them from the studs.
8. Using a wrench or a 10mm socket, unscrew the two nuts and bolt of the plug, remove it with the sealing ring.
9. And on a carburetor engine, remove the distributor housing.
10. Remove the camshaft gear. Unscrew the top nut securing the rear cover of the timing belt casing (described in replacing the pump ).
11. Using a 13mm wrench or socket, evenly, in several steps, so as not to break the camshaft cover, unscrew the ten camshaft bed nuts and remove the front and rear camshaft beds from the studs.
12. Slightly move the rear cover of the timing belt guard away from the cylinder head and remove the camshaft.
Step-by-step instruction
If your engine is knocking and you decide to replace the camshaft, then prepare everything you need in advance. It is difficult to carry out this work without relevant experience, so it is good if you are assisted by a more experienced partner.
Stages of work
- The first step is to remove the camshaft pulley VAZ 2114 8 cl.
- We take out the pulley key located in the camshaft groove.
- Unscrew the nut that secures the rear cover of the timing belt.
- Unscrew the nuts that secure the bracket to the cable.
- Having loosened the screws of the hose clamps responsible for ventilation of the crankcase gases, we remove them.
- Having loosened the clamp of the hose through which the crankcase gases are ventilated, remove it.
- After unscrewing the nuts, remove the valve cover.
- We remove the gasket.
- After unscrewing the nuts and bolts, remove the plug.
- In several circles (to reduce the spring pressure), unscrew the 10 nuts securing the camshaft bearing housing.
- We remove the camshaft housings VAZ 2114 8 cl.
- After the rear timing belt drive cover is removed from the cylinder head, remove the camshaft.
- Remove the camshaft oil seal.
- Before installing a new shaft, it is necessary to clean the contacting surfaces of the cylinder head and bearings if any sealant or grease remains on them.
- Lubricate the bearing journals and cams with fresh grease.
- We place the shaft in the cylinder head supports so that the cams of the 1st cylinder are oriented upward.
- We apply sealant to the cylinder head planes that come into contact with the bearings.
- We install the bearing housings and tighten the nuts in 2 circles.
- First, we do not completely tighten them as shown in the photo until the bearing housing and the cylinder head are in contact.
- Going in the same sequence around the second circle, we tighten the nuts to a torque of 2.2 kgf/m.
- Remove the leaked sealant.
- We insert the oil seal.
- We install the camshaft toothed pulley and belt drive.
- We turn the crankshaft clockwise to place the same alignment marks on the camshaft pulley and the rear cover of the timing belt drive.
- Rotate the crankshaft about fifty degrees (2-3 teeth on the camshaft pulley).
- Using a feeler gauge, check the gaps at the 1st and 3rd camshaft cams.
- The distance between the cams and washers should be 0.20 millimeters for the intake valves and 0.35 millimeters for the exhaust valves. The error should not exceed 0.05 mm.
- After adjusting the remaining valves, the work can be considered completed.
We remove the camshaft of the engine 2108, 21081, 21083 of VAZ 2108, 2109, 21099 cars
The camshaft will have to be removed from the engine (2108, 21081, 21083) when replacing oil seals, wear, removing the cylinder head, overhauling the engine, etc. On the listed engines, this procedure is almost the same.
Required Tools
— A socket wrench, or a socket with a 13mm wrench
— Additional tools for preparatory work (described in the linked articles)
Preparatory work
— Remove the timing cover
— Unscrew one nut and one bolt securing the rear timing cover
— Remove the ignition distributor (distributor)
The procedure for removing the camshaft of engines 2108, 21081, 21083
Reference: on engines of cars 2108, 21081, 21083 of cars VAZ 2108, 2109, 21099 and their modifications, the camshaft is installed in a bearing housing consisting of two parts; a camshaft oil seal is installed at the end of the front half of the housing. Both bearing housings are mounted on studs and secured with ten M10 nuts.
— Unscrew the ten nuts securing the camshaft bearing housing
We loosen the nuts according to the scheme in several passes so that the body does not crack. We use a socket wrench or a socket with a 13mm wrench. We first loosen the outer nuts, then move towards the middle. After loosening, unscrew the nuts completely and remove them.
The procedure for unscrewing the nuts securing the camshaft housing of engines 2108, 21081, 21083
— Remove the halves of the bearing housing
We move them up along the studs.
Remove the two halves of the camshaft bearing housing by sliding them up along the studs
— Remove the engine camshaft
We remove it from the pastels in the block head, having first slightly pulled the rear timing drive cover to the side.
We remove the camshaft from its pastels in the cylinder head
Notes and additions
— The installation of the camshaft of engines 2108, 21081, 21083 has some features. For more details, see “Installing the camshaft on engine 2108, 21081, 21083.”
Source
When is it time to change the camshaft
Emergency intervention in the operation of the VAZ 2114 8 cl camshaft is necessary in the event of any obvious malfunctions. Signs may be different, for example, a knocking sound is heard when the engine is running or problems with the seals. You need to check what’s wrong in such a situation immediately, either yourself or at a service station.
If you determine that the problem is in the seals, then 10 minutes will be enough for you to make a replacement. The oil seals are located in easily accessible places and installing a new one does not require dismantling large systems and components. If you don’t know which one you need to replace, you can check this simply by looking at which one is already installed.
A more complex malfunction may occur if you hear a knocking sound in the engine. This malfunction may not progress, that is, the knocking does not increase, while the readings of all sensors are normal
Some drivers take this calmly; they are not bothered by this state of affairs and continue to use the vehicle without paying attention to it. But the solution is simple, if your engine knocks, it means that the camshaft end play has increased
In this case, you can put a washer between the camshaft and the cover and there is a high probability that the knocking will stop. A fairly simple way out of this situation.
Some cars are equipped with camshaft position sensors, whose task is to signal in case of malfunction or malfunction of the system. But sometimes sensors fail and may need to be replaced. It is inexpensive and the price of such a sensor on the market does not exceed $10, and you can find out which one to buy from the car’s instructions. Installing such a sensor is simple, so there is no point in stopping there.
Replacement
If checking the oil pressure and ventilation system shows that the leak is caused by a violation of the integrity of the camshaft oil seal, the element must be replaced.
Replacement process
We have prepared instructions for such a case.
- Turn off the power to the car. To do this, simply remove the negative terminal from the battery and throw it to the side.
- Set the piston from the first cylinder to the TDC position - top dead center.
- Remove the drive gear from the camshaft.
- After removing the gear, make sure that the key is not left on the camshaft. Be sure to remove the key and set it aside in a visible place so as not to lose this element.
- Using an awl or flathead screwdriver, remove the old oil seal. It usually comes out quite easily with little effort.
- Do not forget to first make sure that the new camshaft oil seal you have chosen is not a fake, has no defects on the working edge, and there are no dents or sagging rubber on the product. Unfortunately, today there are more than enough fakes and products of questionable quality. By installing such an element instead of a damaged old one, the repair will not bring results, since the oil will still continue to leak.
- If the seal turns out to be good, install it. To make your task easier, make a small chamfer around the perimeter of the working edge using a needle file. This will make the edge of the new oil seal fit lighter and easier on the camshaft.
- Treat all rubbing elements with regular engine oil and place a new oil seal on the camshaft.
- Using a piece of wood or a wood stick, straighten the edge a little. It sometimes bends a little during installation.
- Arm yourself with a mandrel that matches the diameter of the oil seal and complete its installation in its seat.
- The process is completed by reassembling the unit, which involves installing the camshaft pulley and returning the negative terminal to the battery.
- Start the engine and check how effectively the new camshaft element does its job.
Reassembly
If the leak suddenly continues, be sure to re-check the condition of the crankcase ventilation system, make sure there are no pinches on the hoses and measure the oil pressure. Perhaps you have overlooked something. Or the seal was defective.
https://youtube.com/watch?v=HV36-sJcgz4
With the right approach, the procedure takes no more than 30-60 minutes. Even a beginner can do this task.
Replacing the cylinder head gasket on a VAZ 2109
At the end of the operational period or if the integrity of the cylinder head gasket is damaged, the element must be replaced. The main sign of malfunction and wear of the gasket is the formation of coolant and oil leaks at the junction of the engine block and the cylinder head.
Cylinder head seals
To change the gasket, you will need to dismantle the assembly, get rid of the worn cylinder head gasket and reassemble the structure in the reverse order, following the recommendations regarding the tightening torques of the cylinder head bolts. We will tell you about all this in more detail.
- Disconnect the wiring from the coolant temperature sensor and emergency oil pressure sensor.
- Remove the thermostat, just remember to drain the coolant first.
- Remove the air filter housing. There is no need to remove the carburetor, because it will not interfere with replacing the gasket.
- Disconnect the exhaust pipe from the exhaust manifold.
- Remove the camshaft drive gear after first setting the piston of the first cylinder to the TDC position. Now you can remove the protective casing of the camshaft drive belt, loosen the gear fixing bolts, securing the gear from turning.
- Remove the camshaft drive belt. Then you can completely unscrew the mounting bolts and remove the gear.
- Press the latch to disconnect the wiring block from the ignition distributor.
- Similarly, turn off the central high voltage.
- Loosen the clamps to remove the fuel supply hose from the fuel pump.
- Disconnect the throttle and air damper drive rods from the carburetor.
- Disconnect the power supply from the solenoid valve.
- Remove the vacuum booster hose from the intake pipe fitting.
- Disconnect the tube from the vacuum ignition corrector.
- Loosen the tension on the clamps to remove the interior heating hoses from the pipes.
- Remove the cylinder head. Using a socket with an extension, the mounting bolts are unscrewed.
- Rock the head a little jerkily, then remove the element.
- Remove the old gasket, clean it of any remaining rubber seal and other contaminants. Wipe dry thoroughly, after which you can reassemble.
- Before assembly, check whether the length of the cylinder head bolts is within the normal range. Ideally, their length is 135.5 millimeters. If the bolts have lengthened during use, then all bolts will have to be replaced.
Replacement procedure Reassembling the unit, if you strictly follow the instructions for dismantling work, will not pose any special problems.
An incredibly important aspect of replacing the cylinder head gasket and all other activities associated with removing the head is the correct adjustment and tightening of the bolts.
Tightening the bolts is done strictly with a torque wrench, which will allow you to control the tension torque.
Here are some guidelines for using this specialized wrench and checking the current tension condition:
- Place the holder in the zero position. This will indicate that now the key data is equal to the moment of the original position;
- Look at the torque tool readings as you begin to tighten the bolts;
- Rotate the holder, monitor the indicators;
- If the torque does not change, the fastener may be stretchable, which is normal. This is exactly what should happen;
- If the torque increases rapidly, bolt movement should be achieved. That is, the stretch of the holder is small, it needs to be stabilized.
Golden rules of tightening
To properly reassemble the cylinder head, you need to adhere to the golden rules:
- Strictly follow the tightening torque data corresponding to the VAZ 2109;
- Make adjustments only using a torque wrench. Other tools do not allow you to get the desired result;
- To install the cylinder head, use only serviceable bolts that meet the requirements of your engine installed on the VAZ 2109;
- Before work, make sure that the holders are in good condition.
Checking the bolts
Tightening diagram
In addition to observing the required tightening torques for the cylinder head mounting bolts, one more rule must be observed here.
Returning the bolts to their places is carried out strictly according to the diagram below.
Tightening sequence
Next, do the work according to the table, and you will do everything right.
Tightening is performed in four circles, following the sequence of work with the mounting bolts indicated in the diagram.
Eliminate camshaft knock (axial runout) with your own hands
Many already know that the VAZ 2111 injection engines have the following disease: “Axial camshaft runout”. This disease does not progress and does not cause damage to other timing components, but it manifests itself in the form of an unpleasant camshaft knock. It just so happened that the developers of the 2111 engine missed this point.
Where carburetor engines used to have a fuel pump and distributor, injection engines have a regular plug into which the camshaft rests. The camshaft axial play set by the manufacturer should not exceed 0.15-0.20mm. Over time, as the camshaft pastel wears out, the axial play increases, and a distinct knock begins to be heard from under the valve cover. Of course, you can continue to drive with this knock and not worry, but not every car enthusiast will be pleased.
I am sure that almost any auto repair shop will tell you: “Either ignore this knock, or change the entire head!” But there is one simple and absolutely free way to eliminate this annoying knocking noise by placing a washer between the camshaft and its side cover! Below is a detailed description and photo report of the work done.
Checking the camshaft axial play.
Remove the timing belt cover and start the engine. Then, with the engine running, press the handle of a screwdriver into the camshaft gear bolt. If the knock disappears when pressed, the reason is: Axial runout of the camshaft.
How to set timing marks on a VAZ 2108, 2109, 2199 if there are no marks?
If the timing belt has not yet been removed and you just need to make sure that the timing marks are installed correctly, first unscrew the spark plugs to make it easier to turn the crankshaft. Then put the car on a jack with the front wheel hanging, put it in gear and rotate the hanging wheel - this is the easiest way to turn the crankshaft. By looking into the spark plug hole, you can see what position the piston is in, and if you stick a screwdriver in there and slowly turn the crankshaft, you can easily catch TDC by looking at the screwdriver.
When TDC is determined in this way, remove the valve cover and look at how the camshaft is installed, how it should be - a little lower.
If the timing belt has already been removed and you need to set the position of the crankshaft and camshaft, then you should start by making sure that none of the pistons is at top dead center. This is necessary so that when the camshaft is turned, the valves do not rest against the piston and become bent.
Now we proceed to install the camshaft in the desired position. To do this, we need to remove the valve cover and look in which direction the cams are facing. In this case, we are not interested in all the cams, but only those that are responsible for the first cylinder, since we will set the TDC of the first cylinder.
Under the valve cover we will see the crankshaft, and there are many cams on it (8 in total, 2 cams per cylinder). The first two cams are our first cylinder. And we need to align the shaft in such a way that these two cams simultaneously press on the valves. This will be TDC, valve overlap. At the same time, the cams of the fourth cylinder (the two farthest cams) will not put pressure on the valves, but will look up in the letter V. This is TDC. The beauty is that the camshaft itself is correctly installed at the desired point under the action of the valve springs and does not go anywhere. Now you can install the crankshaft.
Now you need to set the piston of the first or fourth cylinder to TDC, no matter which one you look at, they move synchronously. It is better to shine a flashlight into the spark plug hole, the piston will be visible there. When the piston is expected to reach top dead center, you need to insert something long, such as a screwdriver, into the spark plug hole. By turning the crankshaft back and forth a few degrees, you can catch the TDC, the screwdriver will come out to the maximum amount. That's it, the marks are installed, you can put on the timing belt.
The timing belt is put first on the crankshaft, then on the camshaft, tensioned as much as possible on the right side of the sprockets, and on the left side it is tensioned with a tensioner pulley.
Replacing the timing belt VAZ 2109 1.5 liter 8 valves with photos and videos
Old VAZ 2109 with a 1.5 8 valve engine, timing belt replacement. In general, it could be a VAZ 2114 or 2110, there is no difference in operation, the eight-valve engine is the same everywhere. Together with the belt, we will change the pump, the tension roller and two pulleys, the camshaft and the crankshaft. If the timing belt breaks, the valves on this engine do not bend, but it is better not to let it get to that point. Changing the pump and roller is a prerequisite so that after a thousand kilometers you don’t have to disassemble everything again. But it’s up to you to decide for the pulley, the price is 150 rubles per pair. There were cars where a slightly bent pulley caused the belt to slip and gradually wear out, reducing its service life. On this car the belt was worn down in half.
We recommend that you periodically check the condition of the belt to avoid annoying consequences and not have to look for someone to take it to a repair shop. Replace every 40,000 kilometers.
And here is the patient himself.
To replace it, we need a key for the tension roller, the price is half a hundred rubles. You can buy it at any auto store. As well as a set of keys and sockets and two hours of free time.
Begin
Everything we need.
We unscrew the three ten bolts securing the protective timing cover and remove it.
Next, loosen the nut thirteen that secure the generator and unscrew the tension bolt ten.
We take the generator to the engine and remove the belt.
Remove the engine protection and drain the antifreeze. We set the camshaft mark by turning the crankshaft clockwise. The ebb on the pulley should be opposite the bend of the protective cover fastening.
Unscrew the crankshaft pulley mounting bolt. We put the assistant in the cabin and force him to engage fifth gear and press the brake. And at this time we easily and naturally unscrew the bolt using a 19 meter head and a pipe of one and a half meters. It must be screwed properly, and some craftsmen lubricate it with sealant and then wait for kind words addressed to them.
On the left side we see the crankshaft position sensor. We will need it to subsequently check the correct installation of the timing belt. We remove the crankshaft pulley and see that the marks match.
Unscrew the nut on the tension roller 17 and remove it along with the belt. Then unscrew the camshaft pulley bolt and remove the last one. Be careful not to lose the key. We unscrew everything that secures the protective metal shield, namely one ten-point nut and a bolt securing the cover, three bolts securing the pump.
Remove the protective cover and pump. Antifreeze remaining in the block may leak out if you have not drained it. Carefully, it's sweet.
We clean all the parts from oil and belt residues, as well as the pump seat from the old gasket and sealant.
Lubricate the gasket of the new pump with sealant and put it in place. We install the metal protection and tighten all the bolts and nuts securing it. We tighten the pump bolts evenly in a circle, then check whether the pump is spinning. Recently a client brought in an original pump, which turned out to have slightly larger petals and after installation it began to bite. I had to modify it with a grinder and take measurements several times. These are the spare parts we have.
We check if the key is lost on the camshaft and install the pulley. We tighten its bolt to seventeen.
Now comes the fun part - installing a new belt.
We check that all marks match. We first place the belt on the crankshaft and pump. Then we tighten the right descending branch of the belt and put it on the camshaft pulley and tension roller. We check all the marks again and tighten the belt with a roller. The tension is considered sufficient if, with the force of two fingers, you can twist the longest branch of the belt by a maximum of 90 degrees. It’s easier to take the right branch of the belt with two fingers and twist it, if more than 90 is not very bad, but less is very bad. An overtightened belt will wear out quickly and will also reduce the life of the pump.
We place the bottom protective plastic cover. And on the crankshaft pulley we mark the twentieth tooth after skipping two teeth. We count counterclockwise.
This mark corresponds to the top dead center of the first cylinder. We put the pulley in place and the mark should be against the crankshaft position sensor. More precisely, against the small iron core of the sensor. Sometimes it gets into the gap between the teeth, this is considered acceptable. We tighten the pulley in the same way as we unscrewed it, with the help of a partner.
We turn the crankshaft two turns and check the marks; this is where our mark on the pulley comes in handy.
If everything is in trouble, we collect everything that we took apart. As they say in smart books, install the parts in the reverse order of removal. Don't forget to add antifreeze.
We start the car, accept congratulations from family and friends and head off to adventure.
2.7. Removing and installing the camshaft
| GENERAL INFORMATION |
Camshaft and valve drive of a 4-cylinder petrol engine
| 1. Main bearing caps 2. Nut, 20 Nm 3. Key (operating without tightening) 4. Camshaft 5. Valve cotters 6. Outer and inner valve springs 7. Valve guide. Repair version with collar 8. Cylinder head 9. O-ring | 10. Valve guides 11. Valves 12. Plug 13. Plug 14. Lower valve spring retainer 15. Oil seal 16. Upper valve spring retainer. Designation: wide chamfer on the outside, chamfer on the inside 17. Hydraulic disc pusher |
4-CYLINDER PETROL ENGINE
Removal
| EXECUTION ORDER |
| 1. Remove the upper timing belt guard. |
| 2. Remove the cylinder head cover. |
| 3. Set the crankshaft to the TDC position for cylinder 1 (see subsection 2.5.2). |
| Warning Do not change the position of the engine crankshaft again. |
| 4. Loosen the toothed belt and remove it from the top of the camshaft gear (see subsection 2.5.1). |
| 5. Wedge the camshaft at the front with a spike. To do this, insert a suitable spike or a strong screwdriver into the hole of the camshaft gear and press it against the upper edge of the cylinder head. To avoid damage to the sealing surface of the cylinder head, use a wooden gasket. Hold the screwdriver firmly and loosen the camshaft bolt. Unscrew and remove the camshaft gear, if necessary, drive it in with light blows of a rubber hammer. Remove the key from the camshaft. |
| 6. Mark all main bearing caps. Four covers, from right to left, looking in the direction of travel, mark them with numbers from 1 to 4. |
| 7. Remove covers 1 and 3. Then unscrew covers 2 and 4 alternately crosswise. |
| 8. Remove the camshaft. |
| Warning If the disc pushers are removed, they must be marked so that they can be installed again in their original places. Place the disc tappets with the sliding surface (moving towards the camshaft) down. |
Installation
EXECUTION ORDER
1. Before installation, if necessary, you can check the camshaft runout at the factory. Wear limit: 0.01 mm. 2. If the old camshaft is installed again on an engine with high mileage or noise in the valve drive, it is recommended to check the axial clearance. Wear limit: 0.15 mm. The measurement is carried out with the poppet tappets removed and the first and last main bearing caps installed. 3. Install a new camshaft sealing ring. Pre-oil the lips and the outer edge of the O-ring.
4 Make a trial installation of the bearing caps, paying attention to the position of the centers. The covers must be installed so that the holes in the covers and the cylinder head match. When doing this, pay attention to the marks.
5. If the disc pushers were removed, install them in their original places. Lubricate the disc pushers with a thin layer of oil and do not distort them during installation.
Warning Disc pushers cannot be swapped!
6. Lubricate with oil and install the camshaft.
Warning In this case, the cams of cylinder 1 must be directed upwards. Install the bearing caps according to the marks. Pay attention to the position of the centers.
7. Tighten covers 2 and 4 crosswise to a torque of 20 Nm.
8. Install covers 1 and 3 and tighten to 20 Nm.
9. Install the camshaft key. Install the drive gear and tighten to a torque of 80 Nm, while holding the gear with a spike.
10. Place the toothed belt on the camshaft gear, paying attention to the correct position of the intermediate shaft and vibration damper (see subsection 2.5.2).
11. Tension the toothed belt (see subsection 2.5.1).
12
Install a new cylinder head cover gasket, carefully tightening the cover bolts to a torque of 10 Nm.
13. Install the toothed belt guard.
Warning If new disc tappets are installed, the engine must not be started for approximately 30 minutes, otherwise the valves will hit the pistons!
Replacement Guide
This video shows how to fix camshaft runout and replace the gasket.
Tools
For repairs you will need a minimum set of tools:
- spanner set to “17”;
- head with extension 10;
- slotted (flat) screwdriver;
- cuff mandrel;
- hammer.
Necessary tools for repair
Stages
The procedure for replacing the camshaft oil seal on a VAZ2109 consists of two stages: removal and installation. When removing parts, remember the order in order to follow it when reassembling.
Removal
- First of all, you should turn off the power to the car by removing the negative terminal from the battery.
- Next, you need to set the position of the piston in the first cylinder to TDC of the compression stroke. To do this, mark the crankshaft and camshaft.
- Now, by loosening the camshaft mounting bolt and the tension roller, you can remove the timing belt.
- Then unscrew the bolt and remove the camshaft pulley and key.
- Using a screwdriver or awl, remove the camshaft oil seal.
Installation
- Before installing a new consumable, you need to lubricate its edge with engine oil.
- The part is installed with the working edge facing the cylinder head. Then you need to use a screwdriver to tuck the edge of the rubber ring on the camshaft.
- After installation, the gasket must be driven in using a hammer and a mandrel of the appropriate diameter until it stops.
- After installing the cuff, all oil stains should be removed so that smudges can be seen later.
- Next, the previously removed parts are installed in reverse order.
After completing the repair, you should start the engine and check its operation: no knocks or extraneous sounds should be heard.
If the engine is knocking, then you need to look for the cause of the knocking and fix the problem, perhaps you need to tighten the bolts.
Replacing the oil seal
Replacing the VAZ 2109 camshaft oil seal is carried out after access to the gear is gained. Having removed the gear, you will see that a little further on the shaft there is a cuff, this is the oil seal. The oil seal can be pulled out by prying it with a slotted screwdriver.
Lubricate the new camshaft oil seal on the VAZ to make it easier to install it in its seat. We put the cuff on the installed camshaft and hammer it into place using a mandrel.
Take a test drive and look at the instruments. If the oil sensor shows that the fluid level is normal, then all the work has been done correctly.
The described tips can help guide owners of “nines” and their modifications (for example, VAZ 21093) in cases where knocking occurs from the engine. Some points are also described in the car manual. If you have no experience at all in disassembling car components, it is better to visit a car repair shop.
Source