14.09.2012
Acoustics for cars
In this article I will tell you how to connect and install component speakers.
After 3 thousand km of mileage on the VAZ 2114, I was ready to replace the front speakers and install tweeters on the instrument panel. I decided after I felt the difference in sound on my car and my father’s 14, which had mystery tweeters, and my front speakers for 400 rubles began to choke after 5 months of use.
Important!
- Throw away the factory wires and install silicone ones with a diameter of at least 1.5 mm.
- For better sound quality, it is recommended to solder the wire contacts rather than twist them by hand.
Installation of front speakers VAZ 2114, VAZ 2115, VAZ 2113, Lada Samara 2
We show the installation of speakers on a VAZ-2115 car, since in cars of the Samara family the speakers are installed under the instrument panel trims, and such work is simple. In Samara-2 cars, the front speakers are installed in the windows of the interior panels of the front doors. The diameter of the windows is 130 mm. Four holes are provided for attaching the speaker with self-tapping screws to the inner door panel.
When installing, an important point is the method of routing the wires from the head unit to the speakers. As doors open and close, the sections of wires between the door and the pillar will be constantly bent. Therefore, the wires in these places should be reliably protected.
The wire can be routed differently - take it out from under the instrument panel and pass it under the door trim. In this case, the wire in the cabin will be constantly visible, which is not very aesthetically pleasing. In addition, such a wire can easily be damaged, and in the place where it goes under the upholstery, the upholstery will not adhere to the door. This, in turn, will lead to loosening of the upholstery and, accordingly, rattling and squeaking when moving, which will certainly appear after a short time. In addition, the upholstery, constantly acting on the wire, will grind it. Thus, this method of laying wires can only be considered temporary.
In order to install the wires more thoroughly, special holes are provided in the A-pillars and the front side ends of the doors. However, simply passing the wires through the holes is only half the battle, since vibration will quickly rub the insulation of the wires against the edges of the holes. Therefore, to protect the wires, it is necessary to install a corrugated casing between the door and the stand. Such casings are commercially available and inexpensive.
If the wires do not have lugs to connect to the speaker terminals, you will need to install them yourself.
Remove the insulation from the end of the wire.
We insert the bare part of the wire into the tip to a sufficient depth.
In this case, it is necessary to ensure that no insulated part of the wire gets into the crimping area.
Since the installed tip is not insulated, we insulate it with a cambric.
This is what a corrugated casing for laying wires looks like. Please note: the ends of the casing are made in such a way that they can be securely fixed in the holes of the post and the end of the door.
The diameter of the casing also makes it possible to lay in it the wires of other electrical consumers that can be installed in the door (electric door lock, electric window and mirror drives).
We bring the wiring harnesses of the speaker, electric lock and electric window into the hole at the end of the door and fasten their ends with insulating tape,...
...which makes it easier to thread a single bundle of wires through the corrugated casing.
We bring the wiring harness into the passenger compartment through the hole in the front door pillar and secure the ends of the corrugated casing in the holes in the pillar and door.
The wiring harness is now securely protected.
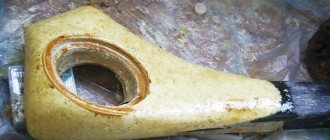
Place for installing the speaker on the inside panel of the front door with holes for mounting.
If the suspension of the magnetic speaker system (speaker with a nominal diameter of 130 mm) does not fit in the hole,...
Acoustic podiums: take sound with you on the road!
If you are a true music lover and connoisseur of good sound, then the standard car audio system is unlikely to fully meet your requirements. The quality of sound and the characteristics of its perception depend not only on the design and size of the speakers, but also on their orientation. Quite often one gets the impression that car industry designers are working hard to annoy those who want to enjoy their favorite tracks even on the road. But the problem can be completely corrected by replacing the acoustics. In this case, everything will look as if the speakers were installed at the factory. Acoustic podiums - special devices for tuning car audio - will allow for high-quality installation.
Purpose of automobile podiums and doors (for VAZ, etc.)
Podium is a raised platform designed to display something. In car audio, podiums are seats for speakers. Surely even not very experienced car enthusiasts have noticed that door cards in the same brands and models of cars may differ. Some have only standard speakers, while others have entire systems. All this can be done with the help of acoustic podiums for doors. Therefore, even if the creators of your, for example, VAZ, were initially against enjoying high-quality sound, then the problem can be corrected without much expense.
Door podiums are designed to solve the following problems:
- installing a speaker where there was initially no space for it. Using accessories, installation can be carried out so that visually the acoustics will look like factory ones;
- installation of larger speakers. A good road and your favorite music are pleasures that you should not deprive yourself of under any circumstances. And if, unfortunately, we don’t have much influence on the quality of the roads, then it is quite possible to achieve the desired sound. Select the speakers of the required size and install them in the doors using car podiums;
- sound direction: the sound features depend on the orientation of the speakers. And if yours have taken a wrong turn, then correct the problem with the help of acoustic podiums. They are offered in various modifications;
- imparting rigidity to the structure. The speaker itself is a reactive system. The diffuser, moving, compresses the air in front of it, thereby creating sound waves. This creates counteraction. And if the speaker is not properly secured in the door, it will wobble on its support. Because of this, the sound will become sluggish and extremely unpleasant.
Installing car acoustic podiums will allow you to achieve the desired sound effects while maintaining the aesthetics of the interior.
Assortment of sound podiums in the online car acoustics store Loudness
We are on the same wavelength as those who love speed, good roads and high-quality sound. Therefore, our assortment is represented by such products that allow music lovers to make even any VAZ sound new. In the Loudness online store you can buy the following types of car podiums:
- VAZ 2101-2107: acoustic podiums for 16, 20+16 speakers (horn at the top or bottom). Accessories for Lada are made of high-quality vinyl and are available in various designs. You can upgrade VAZ 2106, VAZ 2108, VAZ 2109 and other models. As a rule, such cars have space for 13 speakers, and their sound is a test for the ears of a music lover;
- VAZ 2110, 2111, 2112: if you are the owner of newer Lada models, this does not mean that when creating them, someone took care of introducing functional car audio. In order not to spoil your trip, we suggest you buy podiums for VAZ, with which you can install speakers 20, 20+16, 20+20. They will allow you to perfectly secure the acoustics, as well as adjust the sound due to the correct direction of the sound;
- VAZ 2113, 2114, 2115: for such Lada models you can buy podiums for speakers 20, 10+16, 16+16. If you have any questions when choosing a product, it is better to check with the seller. Installation of podiums for speakers should be carried out taking into account the features of the door map;
- Niva Chevrolet: podiums for the Niva are also available for sale in our online store. Initially, in this model, the mounting positions for the front and rear speakers are also designed only for 13 cm;
- “Lada Granta”, “Lada Kalina”: you do not have to change all the standard acoustics - you can only add individual elements, changing the sound. To buy podiums for classics, you first need to select suitable speakers so that the mounts will subsequently fit them;
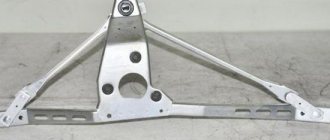
- “Lada Priora”: for owners of such cars, we offer triangles for HF made of fiberglass and black vinyl, as well as acoustic podiums for speakers of different sizes.
It is not difficult to install car podiums on a VAZ or other makes and models of cars yourself.
Component acoustics - reviews
I still didn’t dare to buy new speakers with tweeters, but a month later I went to the store, looked at the selection, and realized that my budget of 1000 rubles only fit into component acoustics.
Having heard about the quality of MYSTERY products, I turned around and went home. I decided to read the reviews out of curiosity, and as it turned out, many spoke very positively about such a system, and the next day I was already standing near the cash register and trying out new speakers. The price for MYSTERY MJ550 was 952 rubles.
Product delivery options
Note! Below are the shipping methods available specifically for this product. Payment options may vary depending on the shipping method. Detailed information can be found on the “Delivery and Payment” page.
Parcel by Russian Post
Available payment methods:
Parcel by Russian Post 1st class
Available payment methods:
Express Parcel EMS
Available payment methods:
Transport companies
Available payment methods:
Installing speakers in doors
Installing speakers in doors is a very easy process if you simply need to replace old speakers with new ones. But if this is your first time installing front speakers, then the level of difficulty depends on the presence of wiring in the doors and the availability of space for the speakers. Fortunately, our cars are supplied from the factory with side podiums for speakers with pockets, so this is already minus one problem.
The correct installation of speakers in the front doors is that the speakers must be mounted strictly in their places and the polarities of both the wires and the speakers themselves must be correctly connected. When it comes to installing front speakers, everyone has their own approach: some simply attach new speakers, while others also add noise and vibration isolation for better sound quality.
Manufacturing
Acoustic shelves for VAZ 2114
In principle, there is nothing difficult to make. It will be useful to arm yourself with a little patience (and Moscow was not built right away), follow the instructions correctly, and have the necessary tools and materials at hand.
What is necessary
Acoustic shelves for VAZ 2114
For a successful operation, you need to prepare the following:
- Plywood – a sheet 18 mm wide is suitable;
- A piece of material for reupholstering - the carpet fits perfectly, but if the interior is upholstered in leather or leatherette, then for a harmonious perception we replace the carpet with a piece of the corresponding material.
Note. Carpet is not bad because it is very comfortable to work with. This material is mind-blowingly obedient if you know how to handle it.
- Glue for carpet - the best option is aerosol or Nairit;
- Stain;
- Special staples for an 8 mm stapler (for wood) and the furniture stapler itself;
- Painting tape;
- Several screws.
As for tools, you should have a good jigsaw, a plane and a drill on hand, or, better yet, a screwdriver.
Car audio! Installation…
Hello everyone;) In today's blog we will install all the good car audio that was purchased earlier) During the installation I encountered many obstacles, since it all started from scratch and I did it for the first time. This is probably the last time I saw my salon clean)
So, in order: First of all, I laid the power wires on the left side under the thresholds, but I did not encounter any difficulties. I threw both “+” and “–” on the battery)
Later I also laid interconnecting wires on the right side.
I hoped that the doors were completely glued, since when buying the car the previous owner said that the front doors were glued with vibration, but after removing the trim I saw the following picture, the driver's door was glued with vibration in 2 layers, it was not even rolled out and came off, the passenger door was noisy in one layer, and the second layer was apparently removed, all the mistakes had to be corrected)
I cleaned up the driver's door and sealed the passenger door with a 2nd layer.
Next, it was time to throw the acoustic wires into the doors, and then I ran into a problem. I couldn’t find the holes where the wires go in the doors, I heard that you need to remove the dashboard to throw the wires, and someone managed to insert these same wires without removing the dashboard . Naturally, I didn’t want to remove the torpedo, and I was a little afraid of it)) But several days of torment and attempts to find these very holes turned out to be a failure for me. And having gathered my thoughts, strength and nerves, it was decided to remove the torpedo.
JOKING...
Vasily MISHUKOV, Orenburg
It all started when the group met and started a normal conversation about this and that. Sergey recently took a VAZ-2114 and, having driven it for about 2000 km, just passed its maintenance. This is not his first car, and he wanted something special in his car. We, of course, supported him and without blinking an eye we suggested, let’s make podiums for 20-centimeter speakers in your doors! There will be normal bass in the front, and for the middle and top we will use two-component acoustics. We'll install about four amplifiers, and two stealth subwoofers in the trunk won't hurt. They offered many options, all different, one more unusual than the other, but it all seemed to be a joke. Sergei listened to our chatter very seriously and in the end, in all seriousness, said that one of the options seemed interesting to him. We were joking, now we had to implement all this.
This is us (from left to right): Vladimir, Alexey, Vasily (this is me), Sergey (he is the owner of the car) and Dmitry
Leaving Sergei alone, especially since he is not very well versed in all the intricacies of car audio, was not comradely, and we offered him our help. I had to do a lot myself, as the most unoccupied student at Orenburg State University. Volodya and Alexey, who work at the car market in the tint box, and Dmitry, a sales consultant at the 12 Volt store, helped a lot not only in word, but also in deed, for which I thank them very much. Thanks to their efforts, in a couple of days we were able to rent a box on the territory of the Orenburg car market. Sergei was warned that he would have to part with his car for about two weeks (it turned out to be three). After that, with the help of Dmitry, we purchased all the components to create the system. Volodya and Alexey were closely involved in work and sported branded Pioneer overalls all the way, I have no idea where they got them for free, I tried for a long time to beg for at least one for themselves - they didn’t give it to me.
Sergey bought the Pioneer CD receiver himself, even before our “comic” system was assembled even in words. The most important thing about Pioneer is its technical capabilities for the money paid. Rich equalizer settings, time delays, switching of linear outputs to channel-by-channel amplification mode, and simply excellent playback quality. Therefore, having “finished” the system for Pioneer, we set the filters on the subwoofer to 40 Hz, twenty centimeters of bass in front play from 50 Hz to 2 kHz, and the mids with tweeters work from 1.6 kHz. All crossovers on amplifiers are disabled.
We decided to assemble the front using Pioneer TS series acoustics. The coaxial TS-E2096 were chosen for their amazing mid-bass size, and for the rest of the range, the component two-way set TS-E136 was suitable - the tweeters played very well during test listening. In the coaxial “plates” the tweeters and mids were left for the time being, although we thought for a long time whether to cut them off or not. We want to measure the frequency response of the system, the only bad thing is that for this we need to go to Samara. They decided to connect a passive crossover only for the component tweeter; its neighbor in the set is connected directly to the acoustic terminals.
The amplifiers for the front speakers were two two-channel Oris, I managed to listen to them, and they have good reviews in various Internet forums. For the subwoofers, we chose an Oris Armada monoblock, for that kind of money and that kind of power - just what is needed for two popular subs from the same company. Deciding not to waste time with the “tens”, we took the “twelfth” size of subs, although the boxes turned out to be quite large, 44 liters in size. The power supply of the installation was strengthened with a pair of 0.5 F buffers.
Work on the noise and podiums for acoustics began at the same time, while one dries, you can successfully glue the other. The interior of the car was completely disassembled - all door trims, seats, standard floor insulation, and all the “plastic” from the trunk was replaced with classic plywood.
Noise and vibration insulation of the interior took place during breaks between the production of podiums; for the work we used Standardplast materials. The doors were sealed very tightly; 1.5 sheets of Vibroplast were used for each one. All technological holes were reinforced with ties and then sealed on top with a Vibroplast + Splen sandwich, the wiring was specially weighted with Bitoplast. The trunk, wheel arches and floor also took a lot of damage; the same materials as on the doors lay almost seamlessly over the entire surface. I glued the floor for the first time and went a little overboard, then I had to work hard to put the seats in place. The edges of the door trims and all small “plastics” are glued with “Bitoplast” against squeaking and rattling.
The finished podiums were covered with vinyl identical to the original one. At first this task did not seem the most difficult, but when the turn came to pull the vinyl, only with the help of Volodya, Alexey, their industrial hair dryer and a rich vocabulary, they managed to overcome the vinyl.
Eloquence (but not correct diction) was added by the wasp, who, apparently, also decided to make fun of us in the only way she knew. I turned out to be the target of the joke: when I was finishing a can of Pepsi in the evening, an evil insect bit me right on the tongue. But I offered a drink to Dmitry, but for some reason he refused. In general, for the rest of the evening I could not speak, although I really wanted to.
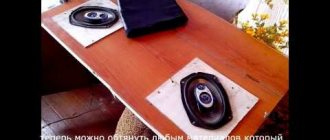
The standard holes in the metal of the doors had to be widened; the magnets of the “twenties” speakers would not fit otherwise. But when they put the casing in place, everything turned out impressive. The vinyl on the podiums looked very good; it created the feeling that the podium and the door trim were one whole.
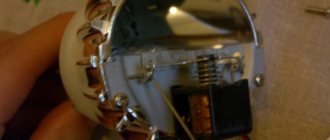
The installation of tweeters took place with intermediate listening. First, I installed the squeaker caps on the posts, oriented them and listened to see what would be best. Then he removed the whole thing and filled it with foam. The foam was washed off with water, and after drying, all that was left was to sand it down and smooth it out with fiberglass putty in several layers. After the interior was assembled, we began making subwoofer enclosures recessed into the wings. First, we decided to make a model from foam plastic and cover it with one layer of fabric impregnated with epoxy resin. For this undertaking, Sergey brought large sheets of foam plastic, from which we cut out the outer contour of the right and left drawer in layers. Each subsequent layer was glued to the previous one so that in the end we got life-size foam subs. To prevent the epoxy from being absorbed, the foam had to be covered with mounting tape.
Since I had little experience working with epoxy, I again called Volodya and Alexey for help. The fabric was glued as follows: first, a piece of fabric was placed on the body, then epoxy resin was diluted in a metal can and heated with a hairdryer to speed up the reaction. Then, with a brush dipped in heated epoxy, all pieces of fabric were impregnated one by one directly onto the foam body. When all five walls were covered with rags wet from epoxy, everything was dried with a hairdryer until hardened.
For some reason, the fabric with resin turned out to be quite soft, so the walls of the subs were reinforced with sheets of “Shumka”, and wooden plywood inserts were installed on the inside. The final treatment was done with compacted foam, using two and a half cans for each box. We cut out the front walls from chipboard. After assembly, the rigidity of the cases turned out to be so high that they could easily support my weight. The surface was finished with gray carpet.
The amplifiers are placed between the subwoofers in a custom-made spare wheel well cover. The cover is made of two sheets of plywood, between which all components and buffer capacitors are laid. The upper plywood, which became the new trunk floor, is equipped with windows covered with sheets of plexiglass, and the lower one is covered with a film resembling an aluminum sheet with ridges.
Before mounting it into the lid, one of the two-channel Oris was turned inside its own case so that the power terminals of both amplifiers were side by side and the inscription on the case was not upside down. The finished cover with installed backlights is attached to the subwoofer boxes on hinges, which makes it possible to use the spare tire without any problems.
The system was invented and made for Sergei, but we would all really like to know how professionals would evaluate this installation. This year we did not have time to get to any competitions and we really hope that next year we will definitely take part in at least one stage. It’s a pity, of course, that no one has held official competitions in Orenburg yet, because we are serious about competing for a prize…
Source
Types and properties of podiums
Depending on the installation location, there are two types of parts: external and internal. Internal ones are installed if you want to preserve the industrial appearance of the interior. For example, when replacing a standard speaker with a diffuser of similar diameter.
The internal parts are one hundred percent hidden under the door or ceiling trim. And it, in turn, must fit very tightly to the column. Otherwise you will get distorted sound. The internal structures are protected from damage and are simple to manufacture. Also, they do not affect the interior design of the cabin.
Speakers on the car door
The outer (external) podium makes it possible to install any speakers in size: 20 cm or 16 cm. The head can be positioned with inclinations in different directions - towards the listeners or parallel to the door. External installation helps reduce vibration due to its tight fit to the door trim.
Making your own podium
If you have decided on the type and location of installation, you can start working. It’s easy to make podiums for speakers with your own hands.
Homemade speakers
Arm yourself with the following materials:
- board (for ring parts);
- fiberglass (for complex parts);
- epoxy;
- nylon or other synthetic fabric (A collection of different and interacting tissues form organs)
; - leather or paint (for decorative work);
- putty;
- mounting tape;
- sandpaper;
- polyurethane foam.
Homemade speakers
In addition to the materials, the following tools will also be useful:
Regardless of the make of the car, be it a Priora or another VAZ model, before starting work you need to remove the inner trim. If an internal installation is being done. Then you need to prepare the space for installation. Cover the selected area with a vibration absorber. The installation template must be cut out of cardboard. Try it on in place and find the fixation points.
The template should be transferred to the material from which the part is being prepared. Cut the workpiece and drill the mounting holes. Place the blank in place and try it on. Also mark holes on the door and drill them. The parts are fastened with stainless steel bolts and washers.
Acoustic speaker for car
All that remains is to connect the speaker, install it and secure it. Place the trim on top and try on its position. If the cutout on the casing is incompatible with the size of the column, adjust the hole on the casing.
Install the paneling to your space. If necessary, add mesh to the speaker. First, covering it with acoustic material. That's all. All that remains is to assemble the door and check the sound properties.
Acoustic speakers for cars