The Volkswagen Polo sedan entered the Russian market in 2010, where it truly became the people's car. A distinctive feature of the car is its ease of repair, as well as the availability of inexpensive (both original and analog) spare parts.
One of the most important components of servicing any car is the timely replacement of brake pads. Repairing and servicing the brake system of the Polo sedan is not very difficult, but the owner still needs to know some nuances.
What pads were installed from the factory?
The Volkswagen Polo brake system has several variations. The front wheels on all cars are equipped with disc mechanisms. More advanced configurations have disc brakes on both the front and rear wheels.
In addition, there are differences in standard sizes. Depending on the engine power, larger and more wear-resistant parts were installed. Certain differences in the front brake units can be observed depending on whether the car is equipped with an ABS and ESP system.
But the main thing you have to pay attention to when changing pads is their markings. The presence of one or another marking, depending on the configuration and engine, is most conveniently presented in the following table.
| Engine | Marking |
| 1.4 TSI | 1 ZC |
| 1,6 | 1 ZE 1 ZG |
| 1.6 MPI (90hp) | 1 ZE |
| 1.6 MPI (110hp) | 1 ZC 1 ZE |
Each of the presented types has its own dimensions, in some cases they have almost identical parameters, and the main difference lies in the types of calipers.
For example, pads with the designation 1 ZE have the following dimensions:
- length - 131.2 mm;
- width - 52.5 mm;
- thickness - 17.8 mm.
For blocks with code 1 ZG the following parameters are inherent:
- length -146 mm;
- width - 54.7;
- thickness - 19.6 mm.
The sizes of the 1 ZC pads are represented by the following parameters:
- length -155.2 mm;
- width - 66 mm;
- thickness - 20.3 mm.
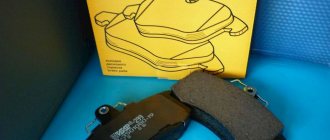
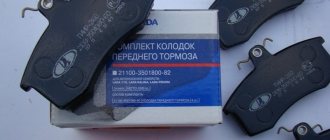
All pads manufactured and installed from the factory are designated VAG. This abbreviation classifies spare parts as original. The same replacement pads can be purchased both from an official dealer and from a regular retail chain of auto parts.
It should be noted that original pads are characterized by a somewhat inflated price compared to analogues. For example, 1 ZE pads with article number 6RU698151A can be purchased for an average of 2700-3000 rubles. Marking 1 ZG implies a slightly lower cost, in the range of 2400-2600 rubles (article number - 6R0698151A).
The most expensive original pads will be type 1 ZC pads. Their estimated cost starts from 2900 rubles per set (article number - 5K0698151).
In what cases is it necessary to replace brake pads?
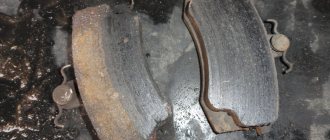
It is advisable to regularly, at each scheduled maintenance, remove the rear drums and evaluate the condition of the pads. The standard for replacement is to reduce the thickness of the linings to 2.5 mm. It is also possible that more obvious symptoms may appear associated with worsening braking, especially when using the handbrake. Additional signals for replacement can be considered:
- oiling of working surfaces;
- burning of linings;
- severe wear of brake drums;
- delamination or partial destruction of the lining material;
- overheating of the rear brakes after driving with the handbrake applied due to inattention.
In favor of regular monitoring, let us add that frequent removal of the drums simplifies this procedure; the parts do not have time to oxidize and become stuck, and in addition, work skills are developed.
What non-original pads can be installed?
The market for non-original spare parts is very inflated today. Manufacturers from all over the world are engaged in the production of so-called analogues. Therefore, it will not be at all surprising to find alternative pads on the Volkswagen Polo made in China or Indonesia.
The quality of many of these spare parts, of course, leaves much to be desired, and purchasing them would not be a rational waste of money.
However, there are a number of reliable manufacturers that made a name for themselves many years ago and produce spare parts for a wide range of cars. Spare parts from such a manufacturer in some cases may exceed the cost of the original due to increased performance characteristics.
When producing parts for budget brands, the price of new products may turn out to be much more interesting than that offered by the machine manufacturer.
According to reviews from car enthusiasts who previously installed analog pads on their Polo sedans, it follows that the following manufacturers of brake system elements, in particular pads, have the most optimal price-quality ratio:
- TRW;
- Ate;
- Brembo;
- Ferodo;
- Remsa;
For example, brake pads with code 1 ZE from TRW can be purchased for an average of 1350-1500 rubles (article number GDB2027). 1 ZG pads from Ate (article 13046071112) will cost a little less, around 1200-1300 rubles. Analog brembo coded 1 ZC article P85075 are offered at an average price of 1700-1800 rubles per set.
Features and characteristics of brake pads
There are front and rear pads. As a rule, replacing front models is much easier and cheaper for a car enthusiast than rotating rear units.
For the Volkswagen Polo sedan, the service life of the rear pads is limited to 45,000 km, which corresponds to the planned third maintenance. Wear of the mechanisms may occur earlier than this period - it all depends on your driving style.
Oiling of the pads, the appearance of deep cracks or chips are the main signals warning the driver about replacing the devices.
Despite the fact that replacing the rear pads of a Polo sedan is a difficult and lengthy process, all the work can be done independently without the help of service centers, where they will charge more than 10,000 rubles for the service. (including the cost of overlays).
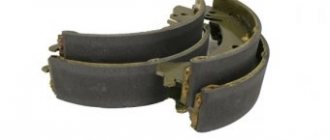
Depending on the configuration of the Volkswagen Polo sedan, there are two types of brake pads installed on two different drums.
The brake drum with collar has a size of 230 mm, the original code number is VAG 1J0 609 617 B. The dimensions of the pads with the code VAG 1J0 698 525 B are 230 × 32 mm. These are also original samples that can be purchased for an amount starting from 4,000 rubles.
The drum without a collar has dimensions of 228.5×40 mm. Its number is VAG 6RU 609 617 A. Other brake pads are used here - 200x40 mm - VAG 6RU 698 525 A. Copies can be ordered at a price of 4,000 rubles.
To understand what type of drum is used on the Polo sedan, just look at its shape. If there is a small protrusion on it, then it is a drum with a collar.
Important: the brake mechanisms of the Polo sedan should only be replaced as a set - all four devices must be installed on the drums. If you change only one side, then during braking the car will be pulled away from the trajectory.
Replacing front pads on a Volkswagen Polo
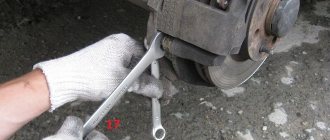
Replacing the front pads is not a complicated procedure, but it does require special tools and some knowledge.
If there is no urgent need to save the family budget, and if there are official services or regular auto repair shops not far from home, then parts can be replaced there.
If you want to save a few hundred rubles, or you don’t have any desire to go to a service center, then the replacement can be done in your own garage or even on the street.
Do-it-yourself replacement of front brake pads
The front brake pads on a VW Polo have a wear indicator. At a certain level of wear, a loud squeaking noise is created when the brake pedal is pressed. In this case, it is necessary to replace the brake pads.
It is recommended to change 4 pads on two wheels at once, so that the wear and load on the wheels during braking are the same. The best option would be to replace the brake discs and brake pads at the same time. In this case, the driver completely protects himself from sudden brake failure.
The service life of brake pads is 30-50 thousand km, however, it is recommended to inspect the pads and discs for wear levels at each technical inspection. You can replace brake pads yourself in a garage without having any specific experience. Before replacing the brake pads, it is necessary to drain the brake fluid in the reservoir by 3-4 cm (100-200 grams) so that when the piston is recessed into the brake working cylinder, excess fluid does not leak out.
What tool will you need?
To replace the pads you will need the following tools:
- jack (it is impossible to replace the pads without removing the wheels);
- supports supporting the car (after lifting it on a jack);
- a wheel wrench for unscrewing the nuts or bolts that secure the wheel to the hub;
- a set of socket wrenches for removing brake calipers;
- a screwdriver for pressing out the piston and making it easier to remove old pads;
- pliers may be needed if it is necessary to bend the ends of the fastening brackets;
In addition, instead of a screwdriver, it is advisable to use a special tool to adjust the brake piston. It is a device with which the piston will be pressed into the cylinder, freeing up space for installing new pads.
Necessary tools and tools
To replace the front pads yourself you will need:
- dry and clean cloth.
- a piece of aluminum, copper wire or rope;
- key “12” or hex key “7” (depending on the design of the collet);
- adjustable pliers or a small crowbar;
- wheel wrench;
- wheel stops;
- connector;
- thick;
- insurance for the jack in the form of hemp, several bars or bricks;
- syringe with a volume of 20 cm3 or a bulb made of medical rubber;
- flat screwdriver (medium size);
Before you start replacing the pads, check the brake fluid level in the reservoir. If the container is filled to about 0, the liquid must be partially pumped out using a syringe or rubber bulb.
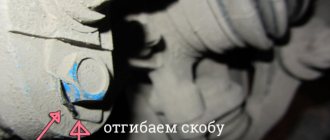
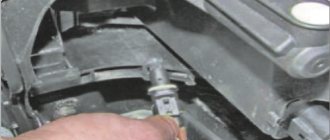
Then use a screwdriver to pry up the bushing covers covering the guide pins and carefully remove the covers.
First, pull out the lower caliper pin and pull it out.
We do the same with the second finger.
We carefully examine the condition of both the protective sleeves and the fingers themselves. If damaged, parts must be replaced. If the movement of the caliper relative to the guide is unsatisfactory, the threads of the mechanism must be lubricated with a special lubricant.
Remove the brake caliper and hang it on a piece of wire. There is no need to disconnect the hose. To avoid problems with the performance of the brake system in the future, make sure that the caliper does not dangle and that the hose does not twist or stretch.
We take out the external and internal blocks.
Then we remove the inner lining, overcoming the resistance of the spring clamp in the cavity of the mechanism. Never press the brake pedal. Otherwise, the piston will fly out of the caliper and you will have to call a service center to reinstall it.
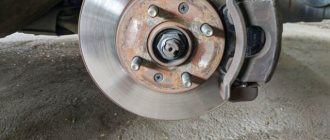
- We examine the condition of the brake discs. If there are dents on the surface, they can be smoothed out using the services of a technical service. The thickness of the rims of both front wheels should be the same. Clean discs only with an alcohol solution. Do not use mineral oils or sharp tools. There may also be traces of glue on the devices. They should also be thoroughly washed with a cloth moistened with alcohol.
- Let's analyze the condition of the brake cylinder piston liner. If there are deep cracks, the element must be replaced. To check the piston stroke, you can use a wooden strip - insert a piece into the caliper and ask an assistant to lightly press the brake pedal. The mechanism must operate smoothly in the cylinder. If movement is difficult, the device can be handed over to specialists for repair.
- Carefully, so as not to distort the piston and damage the cuff, press the piston into the brake cylinder.
- Install new pads into the caliper and release the piston.
- We put protective caps on the fingers.
- Connect the wear sensor connector.
- We install the wheels in place and tighten them with bolts.
- Press the brake pedal several times so that the pads take a central position and approach the discs.
- Check the brake fluid level. If necessary, add solution to the container.
To increase the efficiency of the braking system, the pads should be “warmed up”. To do this, we accelerate the car to 80 km/h and lightly press the pedal to slow down to 40 km/h. We carry out the procedure several times, taking short breaks between “warm-ups”. If you brake too hard, carbon may form on the surface of the discs, which will negatively affect the performance of the pads. For new devices to work properly, you need to drive about 200 km.
Finally, check the brake hose and bleeder valves for leaks. To do this, start the car and hold the brake pedal for 10 seconds with a force of about 25 kg.
Finally, it should be remembered that the reliable operation of all components of the braking system of the Polo sedan guarantees the safety of the driver, passengers and people around them.
Be sure to apply special grease to the brake pins on the guide pins. This is a high temperature lubricant that ensures smooth movement of the caliper and reliable operation of the front brake. Assembling the brake mechanism of the VW Polo sedan in reverse order. After replacing the pads on both front wheels, press the brake pedal several times to adjust the gaps between the pads and discs. Check the brake fluid level in the expansion tank and top up if necessary.
What else will you need to purchase to replace it?
To replace the pads, you may need some brake fluid, since after bleeding the brakes, its level may decrease slightly.
For faster lapping and running-in of new pads, you can use brake lubricant. But the main thing here is not to confuse it and not to apply it to the working surface of the pads. In this case, the effectiveness of the braking system will drop to a critical level, which is fraught with negative consequences.
For immediate replacement, a pair of cloth gloves will not hurt.
Catalog numbers (articles)
The question of which pads are best installed on the Volkswagen Polo V sedan can be answered unequivocally - only analogues, namely products from ATE or TRW. Their price per set is 2-3 times less than the original ones, but the resource is the same.
Article numbers of original pads
They are designated in the catalog of original spare parts by the following numbers:
- for 1KH (without collar) - 6RU698525A;
- for 1KC (with collar) - 1J0698525B;
- for 1KT (disc) - 1K0 698 451 J or 5K0 698 451 B.
When replacing the pads, you will need a repair kit for springs (6RU698545A) or rear caliper guide pins (8E0 698 470).
Articles of analogues
Analogues for 1KH (without collar)
| Manufacturer | Catalog number | Average price, rub. |
| VAG | 6RU698525A | 7297 |
| AMIWA | CS1275RI | 996 |
| AMD | AMDBF445 | 790 |
| AKYOTO | AKS23101 | 1566 |
| ABS | 8871 | 1072 |
| BORG BECK | BBS6213 | 945 |
| LYNX | BS8002 | 1856 |
| BOSCH | 986487270 | 1203 |
| FERODO | FSB408 | 1349 |
| MILES | E210088 | 758 |
| SAT | ST6RU698525A | 1515 |
| PATRON | PSP408 | 753 |
| PATRON | PSP015 | 1094 |
| CORTEX | KS025 | 2893 |
| EGT | 421396EGT | 771 |
| VIKA | 66981690401 | 1265 |
| MILES | E210539 | 1131 |
| ADR | ADR462721 | 1376 |
| AYWI | AW1820082 | 835 |
| IBERIS | IB154044 | 1169 |
| LEX | 34530 | 1650 |
| BOMBARDIER | BRS1625 | 1121 |
Analogues for 1KC (with collar)
| Manufacturer | Catalog number | Average price, rub. |
| ABE | C0S003ABE | 1355 |
| ABS | 9042 | 1637 |
| ADR | ADR460411 | 504 |
| AKOK | A0G00857 | 724 |
| AKYOTO | AKS23204 | 1055 |
| AMD | AMDBF444 | 969 |
| AP | 7300 | 1243 |
| ATE | 3013703572 | 3817 |
| AYWI | AW1820042 | 1084 |
| BEHR HELLA | 8DB355004461 | 3377 |
| BORSEHUNG | B17910 | 2133 |
| BOSCH | 986487555 | 1671 |
| BREMBO | S85516 | 1533 |
| CIFAM | 153379 | 2027 |
| DAFMI | SDSSMAZSUP | 308 |
| DELPHI | LS1784 | 1514 |
| DENCKERMANN | B120053 | 1478 |
| EGT | 421417EGT | 865 |
| FEBI | 34369 | 2998 |
| FENOX | BP53055 | 990 |
| FRANCECAR | FCR30B042 | 844 |
| FRI TECH | 1106219 | 1320 |
| GBRAKE | GS23002 | 1355 |
| GIRLING | 5186392 | 2008 |
| HELLA PAGID | 8DB355001691 | 1547 |
| IBERIS | IB154043 | 1012 |
| JURID | 362385J | 2274 |
| KAMOKA | JQ202020 | 1448 |
| KUJIWA | KUD0554 | 985 |
| LPR | 7300 | 1334 |
| LYNX | BS8001 | 1217 |
| MASTER SPORT | 3013703572SET4MS | 734 |
| METELLI | 530379 | 1360 |
| MEYLE | 1140420701 | 1286 |
| MILES | E210084 | 871 |
| MINTEX | MFR415 | 1650 |
| NIBK | FN0554 | 1713 |
| N.K. | 2743631 | 1284 |
| NTY | HSTSK003 | 1515 |
| PATRON | PSP549 | 800 |
| PROTECHNIC | PRS0431 | 1464 |
| REMSA | 408200 | 1606 |
| ROAD HOUSE | 408200 | 1403 |
| SBS | 18492743631 | 2419 |
| SAT | ST1J0698525B | 800 |
| SFEC | BS001784 | 1198 |
| SRLINE | S721007 | 1560 |
| SWAG | 30934369 | 2094 |
| TEXTAR | 91052400 | 1835 |
| TOPRAN | 112173016 | 1964 |
| TRISCAN | 810067631 | 1908 |
| TRUSTING | 106219 | 1346 |
| TRW | GS8639 | 2086 |
| VALEO | 562641 | 2453 |
| VEMO VAICO | V108352 | 2311 |
| VIKA | 66980004201 | 1254 |
| WEEN | 1522014 | 1223 |
| WOKING | Z408200 | 2101 |
| ZEKKERT | BK4380 | 986 |
| ZIMMERMANN | 109901018 | 1761 |
Analogs for 1KT (disc)
| Manufacturer | Catalog number | Average price, rub. |
| ABS | 366231 | 1228 |
| ADR | ADR451121 | 452 |
| AKYOTO | AKD1049 | 740 |
| AMD | AMDBF389 | 494 |
| AMIWA | CD01055 | 629 |
| ATE | 13046028802 | 2371 |
| BEHR HELLA | 8DB355018111 | 1265 |
| BLUE PRINT | ADV184206 | 902 |
| BORG BECK | BBP1512 | 1012 |
| BOSCH | 986461769 | 1295 |
| BREMBO | P85020 | 1375 |
| DAFMI | SDSSMAZSUP | 308 |
| DELPHI | LP565 | 928 |
| DOUBLE FORCE | DFP1330 | 637 |
| FEBI | 23240 | 1180 |
| FENOX | BP43014 | 714 |
| FERODO | FDB1636 | 2072 |
| FRANCECAR | FCR210501 | 458 |
| FRICTIONMASTER | CMX340A | 1613 |
| GALFER | B1G10207552 | 1218 |
| HANKOOK | S1S05R | 1883 |
| HELLA PAGID | 8DB355018111 | 1155 |
| H.S.B. | HP3010 | 747 |
| ICER | 180697703 | 1085 |
| JP GROUP | 1163706310 | 673 |
| CORTEX | KT1330T | 550 |
| KOTL | 1330KT | 642 |
| KUJIWA | KUR0019 | 515 |
| LPR | 5P634 | 809 |
| LYNX | BD1206 | 776 |
| MARKON | 5100150 | 388 |
| METELLI | 2201001 | 795 |
| MEYLE | 252096117 | 903 |
| MINTEX | MDB1377 | 1162 |
| NIBK | PN0019W | 1468 |
| N.K. | 204789 | 1059 |
| OPTIMAL | 9548 | 681 |
| PATRON | PBP1083 | 631 |
| POLCAR | S701001 | 1083 |
| POWER STOP | 16340A | 4583 |
| QUATTRO FRENI | QF55100 | 500 |
| REMSA | 26305 | 1030 |
| SANGSIN | SP1391 | 1284 |
| STELLOX | 274005BSX | 504 |
| TEXTAR | 2355402 | 1366 |
| TRW | GDB1330 | 1595 |
| TRW | GDB1622 | 2089 |
| VALEO | 598463 | 1491 |
| VITE | VBS1469PS | 579 |
| WEEN | 1511136 | 747 |
| ZEKKERT | BS1127 | 567 |
| ZIMMERMANN | 239141701 | 1854 |
Step-by-step process for replacing pads
So, if the brake system fault indicator light comes on on the dashboard, then most likely it’s time to change the pads.
Having purchased the pads themselves, as well as the necessary tools and accessories, you can begin the procedure, which looks like this:
- we lift the car on a jack, and then firmly install it on supports;
- in the engine compartment we find a reservoir with brake fluid, remove the lid from it;
- unscrew the fasteners (bolts) securing the wheel rim to the hub, remove the wheel to the side;
- by selecting a socket wrench, we find the required diameter and unscrew the mount on the caliper, remove the caliper from the brake disc;
- using a screwdriver, press out the brake piston and, if necessary, remove the mounting brackets;
- remove the old pads;
- we lubricate the new spare parts with brake lubricant and install them in technological places, while using a screwdriver or a special device we press the piston so that the pads fit correctly into the required places;
- fix the calipers;
- We fasten the wheel, close the reservoir with a lid, and bleed the brakes.
After replacing the pads, especially if it was your first time, you should check the performance of the brake system at low speed.
Work order
After determining the type of pads and purchasing a new set, you can begin replacement. For this you will need:
- Wheelbrace for removing wheels.
- Jack.
- Torx key T-30.
- Straight screwdriver.
The car is preparing to replace the rear pads in the following order:
- The machine is installed on a level surface and secured with wheel chocks.
- The handbrake lever is released all the way.
- The brake fluid in the expansion tank is drained to a depth of 3-4 cm.
- The rear of the car is jacked up, having previously removed the wheel nuts.
- The rear wheel is removed.
- To make it easier to dismantle the drum, the rear shoes are brought together in the following order:
- A plug is pulled out from behind the brake flap;
- A slotted screwdriver is inserted into the resulting hole;
- The auto-adjustment ratchet is turned so that it screws onto the threaded tip, and the size of the spacer bar becomes smaller.
1.Place the machine on a flat, horizontal surface.
2.Lift the hood, unscrew the brake fluid reservoir cap.
3.If its (liquid) level is at its maximum, use a syringe or bulb to remove it to half. This is necessary so that when the piston of the working brake cylinder is pressed in, the liquid does not overflow over the edges of the reservoir.
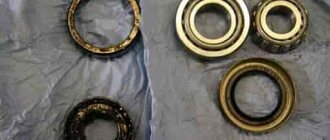
DETAILS: Front strut support bearing Types of faults replacement manufacturers
4.Using a wheel wrench, remove all wheel bolts.
5.Raise the car body with a jack from the appropriate side. Secure the jack with a stump, wooden blocks or bricks.
6.Unscrew the wheel bolts completely. Remove the wheel.
7. Turn the steering wheel all the way towards the removed wheel.
8. Place a screwdriver between the surface of the inner pad and the piston of the working cylinder and, using it as a lever, gently press the piston and spread the pads.
9.Using a “12” wrench, unscrew the bolt securing the caliper to the guide pin located below. Sometimes, instead of a bolt at “12”, there is a bolt with a hexagon head at “7”. If you have this particular design, use a screwdriver to pry up and remove the fastening cap. Then use a hexagon to unscrew the bolt of the lower guide pin. Remove the guide pin.
10. To replace the pads, you can not dismantle the upper pin, but simply lift the caliper up, remove the old pads, and install new ones in their place, however, it is better to remove it too to make sure that it is in normal technical condition and lubricate it.
11.In the same way, unscrew the bolt securing the caliper to the upper pin and remove it.
12. Carefully hang the caliper on any of the chassis elements, without twisting or bending the brake hose.
13.Remove the outer brake pad.
14.Remove the inner pad and its spring mechanism, which fits into the piston cavity of the working brake cylinder.
15.Wipe the guide pins with a dry, clean cloth.
16.Lubricate them with grease. Pay attention to the condition of their anthers. If they show signs of damage, they will have to be replaced too. Otherwise, the caliper will soon begin to jam, which will negatively affect braking performance.
17.Before installing new pads, remove dirt and dust from the caliper, wheel cylinder and brake disc.
18.Using adjustable pliers or a pry bar, carefully press the working cylinder piston inward. Do not damage the boot.
19.Install new pads without confusing the inner with the outer ones, and reassemble the braking mechanism in the reverse order.
20.Using the same algorithm, replace the brake pads on the other wheel.
21.Don’t forget to add the pumped out brake fluid to the reservoir.
Before driving, press the brake pedal several times. Avoid sudden braking at least during the first 300 km.
If you still have questions, or you want to more clearly familiarize yourself with the process of replacing the front brake pads on a Volkswagen Polo sedan, watch the video