Have you noticed that when braking, an exclamation light comes on on the instrument panel. Check to see if brake fluid is leaking.
If it still goes away, try the following:
- Add brake fluid;
- As soon as possible, locate and replace the faulty element.
Where can brake fluid go?
- Brake cylinder. To find a leak, remove the wheels and inspect the brake rotors for any leaks on the calipers. On the rear wheels you will also have to remove the drum. Most often, leaks can be found on the rear brake cylinders. As a rule, problems with brakes begin in frosty weather.
- The brake hose has broken or fallen off . To find a leak, just inspect it.
- The main brake cylinder is leaking Most often, a leak can be found on the rubber seal. Brake fluid may flow down the gearbox onto the left CV joint. But it may be that the brake fluid is draining into the vacuum reservoir. In this case, there may be no external leaks. This is only discovered after removing the master cylinder.
Don't skimp on safety. Replace the faulty element immediately. After replacement, be sure to bleed the brakes.
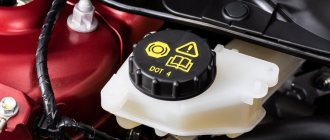
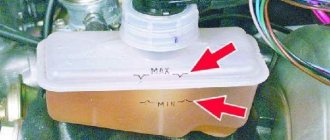
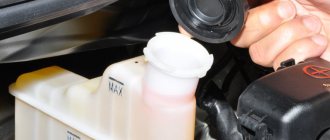
To control the brake fluid (BF), the expansion tank into which the “brake fluid” is filled has a gradation, it is by this that you can monitor the level of BF in the brake system. It is best for the brake fluid level to be between o and “MAX”; some motorists advise keeping the level at the upper mark.
If you once noticed a sharp drop in brake fluid
in the tank, you must find and eliminate the cause of this phenomenon, otherwise your safety, as well as the safety of your passengers, will be at risk. As a rule, a critical level of fuel fluid is indicated by a special indicator that lights up when you press the brake pedal, but you should not rely on electronics, since they often fail. It is better to control the brake fluid level yourself, making it a habitual procedure, especially since it only takes a few seconds.
In this article I will talk about where the brake fluid goes
and why this happens. You will learn about the most common reasons that can cause a brake fluid leak. So here we go!
How to tell if brake fluid is leaking
You can recognize a leak in the brake system by the fluid level in the reservoir. If its level approaches the minimum mark, then a leak occurs. Also, the “!” indicator should light up on the dashboard, indicating a critical lack of fluid for the brake system. But this does not always happen, so you need to control the level manually.
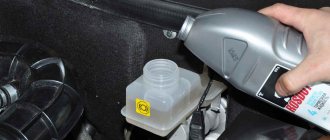
You can accurately understand that there is a fluid leak by making a test top-up in the expansion tank. If after this there is a sharp drop in its level, then the brake fluid leaves.
First of all, in such a situation, you need to check the expansion tank itself for cracks. If they are, the brake fluid tank must be replaced.
Vulnerabilities of the VAZ 2114
The most vulnerable points in the VAZ 2114 brake system include:
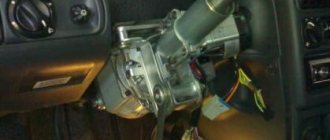
- Master brake cylinder - most often, leakage occurs due to wear of the sealing collar, which is subjected to stress during operation. There are also cases of installation of initially poor-quality seals. Detecting this leak is the most problematic, since liquid can go into the vacuum booster. In this case, no leaks are formed. If there are leaks on the left CV joint and gearbox, the GTZ is leaking.
- Brake cylinders of the rear wheels - in the VAZ 2114 their cuffs are susceptible to destruction, especially in frosty weather. A leak is determined by the presence of traces of leaking brake fluid on the calipers. If there is a strong leak, there may be marks under the wheels and on the road surface.
- Brake hoses - they are also subject to mechanical damage. If the rubber is dry, cracks will form on it. You should also inspect for leaks.
Vacuum booster - symptoms of malfunction
Almost all cars have a vacuum booster. It reduces the force applied by the driver to the pedal, while at the same time increasing the force transmitted by the fluid. It only works after the engine is started. Poor performance is often caused by wear or damage to the vacuum seal diaphragm. In this case, no vacuum is created in the chamber. We need to look at the fuel fluid level: if it is normal, we check the operation of the amplifier. If the vacuum tank is not topped up in a timely manner, it first malfunctions, then the diaphragm is damaged.
First, we check with the engine not running: depress the pedal and hold it pressed. If it begins to gradually fail, the reason is in the gas turbine engine: the cuffs are leaking or the working surface of the cylinder is worn out. Without releasing the pedal, we start the engine. It should fall smoothly and slightly and stop. If everything is exactly like this, then the vacuum seal is in order. If the pedal falls while the engine is running, the reason is in the amplifier, the GTZ is to blame. When driving with a damaged diaphragm, the speed during braking practically does not decrease. You need to immediately replace the diaphragm with a new one.
When the vacuum seal dies, when braking, the car, especially in cold weather, tends to stall, and the noise of escaping air is clearly audible.
How to find the cause of the leak
To find where the VAZ 2114 brake fluid goes, you should conduct a thorough visual inspection.
Brake hoses
The easiest way to detect a leak is on the brake hoses - here it is enough to check the rubber by touch. If it is rigid, inelastic and cracks form when bent, the hose must be replaced, even if there are no leaks.
Sometimes a brake hose of the wrong diameter falls off the fitting. In this case, it should be replaced with a similar one, but smaller in diameter. You can put on the same hose, but in this case you will have to secure it with special clamps.
Wheel brake cylinders
To detect fluid leaks on the brake cylinders, remove the wheels and inspect the brake system for signs of leakage on the calipers.
VAZ-2114 is equipped with a drum braking system. To detect leaks in the wheel cylinders, the brake drums must also be removed. This usually causes difficulty in removal due to the fact that their surface wears out.
In this case, they are removed in two ways:
- You can “squeeze” the drum out of the hub by selecting bolts of the required diameter and screwing them into the threaded holes on the drum. This is done until the drum is removed.
- Knock out the brake drum by hitting its internal parts with a hammer from opposite sides.
Important! With the second method, you should only use a hammer with a rubber striker. Metal cannot be used, because The drum may be damaged.
The best option for the VAZ-2114 is to replace the entire brake cylinder assembly at once. Otherwise, you should disassemble the cylinder and inspect its parts for damage.
You need to carefully examine:
- the surface of the cylinder itself;
- pistons - need to be changed if there are signs of corrosion or scratches on them;
- seals - if worn or in case of a loose fit, they should be replaced;
- Anthers - check for rips, scratches, cuts and other damage.
Attention! Before assembly, all cylinder parts should be cleaned and washed with brake fluid.
Master brake cylinder
If the cuffs of the main brake cylinder are clearly worn out, they should be replaced.
- pump out as much liquid as possible from the tank with a syringe;
- disconnect all tubes from the cylinder;
- remove and disassemble the cylinder itself.
It is necessary to carry out an inspection similar to the inspection of wheel cylinders. Brake circuit pistons must be free of corrosion and other damage.
If the surface of the cylinder itself has mechanical damage, the entire assembly must be replaced. The sealing collars should fit snugly and not be scratched or cracked.
After replacing components, you should:
- add brake fluid to the reservoir to the maximum;
- Bleeding the brake system is a mandatory requirement, since after repair work there is air in it.
Thus, a VAZ 2114 brake fluid leak is a problem that will not be difficult to solve for an experienced car enthusiast.
REPLACEMENT PROCESS
Before starting work, you need to stock up on the following tools:
- Hose 10-15 centimeters long and 6 mm in diameter;
- Wrenches for 8 and 10;
- Plastic bottle;
- Gloves (work clothes and safety glasses are also a good idea);
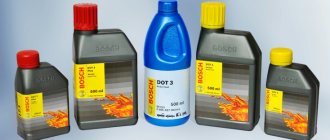
- Hydraulic fluid (there are a lot of manufacturers, each with its own characteristics).
Having collected all the tools, you can start working. The procedure is not complicated and does not require any professional skills. Most motorists do the replacement themselves.
It is extremely difficult to do this kind of work alone, so I recommend taking a friend with you who will undoubtedly help in the process. This will not only save time, but will also greatly simplify the procedure.
We are changing bunker - 4 in the VAZ 2114 in stages:
- We park the car on a pit or overpass;
- Remove the cap from the brake reservoir;
- We go into the pit. Here we need a fitting located on the rear right wheel;
- It is closed with a cap, which we remove;
- Take a bottle and pour some DOT-4 into it;
- We put the hose on the fitting and lower the other end into the bottle (do not forget to lower it to the bottom);
- Now you need someone to press the brake pedal. Smoothly 7-8 times in a row, and the last press all the way and hold;
- Unscrew the fitting a couple of turns;
- We observe how the waste product comes out;
- When 1-1.5 centimeters remain in the tank (it is important not to be late, otherwise air will enter the system), tighten the fitting and release the pedal;
- Add the missing DOT-4 to the tank (up to the Maximum mark);
- Then we repeat the procedures with the fitting and pressing the pedal until clean pillbox flows into the bottle;
- We tighten the fitting and move on to the next wheel.
There is a specific order in which the replacement must be performed. After the left rear wheel, we need the right front, then the left rear and finally the right front. If you started doing everything according to the instructions, then this is the sequence in which the bunker runs.
Where does the brake fluid go?
The presence of brake fluid (BF) can be determined by the level in the reservoir. It is advisable that the TJ is always at the max mark. If you notice that the fluid level is dropping, make sure that it does not drop below the minimum. To be on the safe side, a red exclamation mark will light up on the central panel inside the car (most often this happens when braking).
If the TJ level decreases, you need to do the following:
- top it up;
- At the first opportunity, find and replace the faulty element of the brake system.
Solution
If your car has such a breakdown, the main thing is to solve it comprehensively. It happens that malfunctions are associated with several reasons at once. If the problem is that the pedal is simply rusty, it needs to be replaced. It is easy to correct the situation by replacing the brake fluid with a higher quality one. By the way, you will have to update the fluid in any case - in order to “update” the entire system. Otherwise, over time, the pedal will definitely begin to fail when pressed.
If cracks appear in the pumps, the brake may also begin to fail. Moreover, even microdamages can be the cause of such a breakdown. So if you want the brake to function and not fail in the middle of the road, you will have to replace everything that has stopped working. It turned out to be enough for me to make one replacement. At this point, the question of why the brake pedal failed was closed. To be convinced, it was enough to just start the engine. No extraneous sounds. And if before the return after pressing was too slow, now everything works perfectly.
Vulnerable spots of the car
The brake cylinder (TC) is leaking. To find it, you need to remove the wheels and inspect the front discs for leaks from the caliper; on the rear wheels you also need to remove the drum. Most often, the rear TC fails due to poor-quality rubber seals. And such problems, as a rule, begin in cold weather (How to replace the rear brake cylinder?).
The main cylinder of the brake unit (GTC) has leaked. It is necessary to conduct an external inspection to look for smudges. Most often, the GTZ leaks precisely because of the rubber seal closest to the vacuum booster. The fuel fluid from the GTZ flows onto the gearbox, then flows onto the left CV joint. But it may also be that the GTZ flows into the vacuum chamber without external leaks. This can only be discovered by removing the GTZ.
The brake hose is leaking/falling off. Again, the malfunction is determined by visual inspection for the presence of smudges. The hose could fly off the caliper itself, leak at the joints, or burst.
Therefore, first, evaluate the condition of the pipes and cylinders on the calipers, and then proceed to the main one.
If you find a malfunction, carry out repair work and replace parts if necessary. Then be sure to bleed the brakes, as there will be air in the system. Also, do not forget that brake fluid is hygroscopic and requires regular replacement (How often do you change brake fluid?).
Source
Dismantling
To carry out dismantling work that entails replacing the master brake cylinder, it is necessary to prepare a certain set of tools and materials. It includes:
- Brake fluid;
- Tool for unscrewing fittings;
- Pliers;
- Dry rags;
- Metal brush for cleaning contacts;
- Key for 17, 13 and 10 millimeters;
- Spring tensioner;
- New brake cylinder.
Before starting work, prepare yourself a site where you can place all the elements to be removed. Write down or photograph, or otherwise record where this or that unit was removed from. This will greatly simplify the reassembly procedure.
After all the preparatory activities, you can start working.
- Be sure to remove the negative terminal from the battery of your VAZ 2114. Without this, almost no repair or maintenance work on the car can begin.
- Raise the hood and lock it securely.
- Use a syringe to remove any remaining brake fluid from the container.
- Unscrew the brake fluid supply pipes using an open-end wrench. Unscrew it carefully so that the brake fluid does not get on other units in the engine compartment.
- In some cases, the thread becomes stuck, making it very difficult to remove. In such a situation, we recommend treating the threads with brake fluid and letting it sit for a while. Then the hoses are removed using a 10 mm wrench.
- If these measures do not help, you will need a special wrench with a clamping bolt and a cap slot. It is attached to a nut, clamped with a bolt and rotates the part.
- After dismantling the brake fluid pipes, be sure to mark them with a marker or corrector so that you know which pipe is connected where during reassembly.
- Now you need to remove the brake master cylinder. To do this, first remove the two main nuts that hold the GTZ to the amplifier.
- That's it, the damaged element can be removed from its seat.
- Clean the installation sites so that there are no problems with the new cylinder in the very first months of operation.
- Follow the reverse assembly sequence so as not to confuse the location of certain elements.
- Do not clamp the brake fluid hoses too tightly, otherwise there is a risk of stripping the threads. Restoring connections is a hassle.
- It is recommended to replace the brake fluid used before repair, and then be sure to bleed the brakes.
- To level up, you will need help, so make an agreement with a friend in advance. One will gently press the brake from inside the car, and the other will wait for brake fluid to start coming out of the holes. At this very moment it will be necessary to return the front tubes to their places.
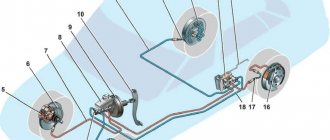
The structure of the car brake system
The hydraulic brake system consists of a brake master cylinder (MBC), wheel cylinders, brake booster, master cylinder reservoir, circuit lines, hoses and brake pads and discs.
Depressing the brake pedal transfers the load to the brake booster, which moves the master cylinder piston. Excess pressure is created in the system, the fluid moves along the lines, actuates the wheel cylinders, which press the pads against the discs or drums, and the car slows down.
FakeHeader
Comments 11
The piston under the front contour is correct, this is good. How does it work after repair?
I used to like the brakes better))) now they are as sharp as diarrhea
))))) They are as they should be. The same thing happened to me before replacing the front pads and brake discs. As soon as I replaced it, it started to slow down like a stone, you didn’t have time to press the pedal. Previously, we were a little thoughtful, you press the brake and the car slows down. Now you can fly your nose into the steering wheel.
My discs are almost worn out... Well, yes, the brakes are the same for me... It’s so bad... If you press harder, it slows down faster)) plus it squeaks on the UAZ, and it’s in the front... The pads are half worn out
Brake hydraulic system
The brakes on your car use a hydraulic system to operate. To transmit braking power, brake fluid passes through a series of metal lines and rubber hoses that connect the main components of the system. Generally speaking, brake lines connect the master cylinder - the hydraulic pump - to the hydraulic modulator - on vehicles equipped with ABS (anti-lock brake system) - and to the wheel brake assemblies.
These component assemblies, connectors, even lines and hoses are all potential points for leaks.
Typically, you become aware of a potential leak when you see a warning light on your dashboard telling you your brake fluid level is low, or notice a fluid spot on the floor of your parking space, or find that you keep adding fluid to the barrel and it gets low.
Now you need to confirm your suspicions. But modern cars are equipped with complex systems and, of course, they are difficult to diagnose when problems arise. However, you can do a preliminary brake inspection even if you don't know much about cars. Knowing what to check can lead you to the source of the problem.
Here's what you need to check.
Sources of brake fluid leaks
Brake fluid may leak from one (or several) elements of the brake system. May leak:
- brake hose;
- brake pipe;
- tank;
- cylinders;
- places of fastening and connection of the components of the assembly.
Crack in the tank
The fluid level may drop due to mechanical damage to the reservoir. This malfunction is easily identified by a simple inspection: oil leaks are visible. The tank will have to be replaced with a new one, do not be greedy and do not try to solder it.
Depressurization of the brake line
One of the most dangerous breakdowns. It manifests itself simply: when pressed, the pedal goes to the floor almost without resistance, and the car does not noticeably slow down. If this happens to your car, stop immediately. Use the handbrake or use the engine brake. You cannot drive with such a malfunction; you risk your life.
Examination
You should make sure that the master cylinder is the culprit for the malfunction of the brake system. This is easy to do; you don’t even have to go to a service center and spend money on it.
- Press the brake pedal with the power unit off.
- Start the engine without taking your foot off the gas pedal.
- During normal operation, the gas turbine engine fails under the influence of vacuum.
- If the pedal does not fail, you will need to conduct more thorough diagnostics and restore the device to functionality.
Most likely, you will need to restore the tightness of the return regulator connection. It is located on the intake manifold amplifier housing.
Repair kit or new GTZ?
Many car owners face a question when the brake master cylinder fails: how exactly to repair the brake master cylinder. After all, there are two main options:
- Purchase a new GTZ;
- Use repair kit.
First, let's take a look at the price tags.
New GTZ entry-level quality
New high quality GTZ
Purchasing a repair kit and using it to restore the functionality of the brake cylinder entails uneven wear of old and new elements, breakage of rings and a number of other problems. In this regard, we advise you to eliminate the breakdown by completely replacing the gas turbine engine, and not by using a repair kit.
Vulnerabilities of the VAZ 2114
The most vulnerable points in the VAZ 2114 brake system include:
- Master brake cylinder - most often, leakage occurs due to wear of the sealing collar, which is subjected to stress during operation. There are also cases of installation of initially poor-quality seals. Detecting this leak is the most problematic, since liquid can go into the vacuum booster. In this case, no leaks are formed. If there are leaks on the left CV joint and gearbox, the GTZ is leaking.
- Brake cylinders of the rear wheels - in the VAZ 2114 their cuffs are susceptible to destruction, especially in frosty weather. A leak is determined by the presence of traces of leaking brake fluid on the calipers. If there is a strong leak, there may be marks under the wheels and on the road surface.
- Brake hoses - they are also subject to mechanical damage. If the rubber is dry, cracks will form on it. You should also inspect for leaks.
Checking the brake fluid level
An experienced driver always checks the level of technical fluids in his car (motor oil, antifreeze and brake fluid) before leaving. We strongly advise all motorists to have such a useful habit. It is not difficult to check the condition of the fuel tank; the tank for it is located immediately under the hood, and there are control marks on the tank. It is believed that it is optimal to fill the liquid to the middle between MAX and MIN.
If this is your first time refilling the fuel tank yourself, be sure to read the instructions for your vehicle. Why is this needed: in some cars, the ABS (anti-lock) system requires bleeding the brakes.
If, when adding fuel oil, you notice a sharp and rapid decrease in the level, this is a reason to look for a leak. Traveling with such a malfunction is strictly prohibited.
In addition to checking the level, it is recommended to check the quality of the liquid. You need to buy a tester and measure the percentage of water in the fuel fluid every six months. An increased indicator indicates that the boiling point of the liquid has decreased (or even reached a critical point, after which the fuel fluid will “boil” and damage the brakes).
When checking the level daily, also monitor the condition of the fuel fluid: there should be no foreign matter, dirt, or deposits on the inner surface of the tank. There should also be no water drops.
Brake fluid can be added, but it is better to change it entirely. Remember that mixing different TJs is not recommended; do not skimp on your safety. The frequency of replacement is indicated in the operating instructions for the technical device. You can do this yourself or at a car service center. Use the fluid recommended by the manufacturer.
Secrets of bleeding brakes
To complete the repair process, the brake system needs to be bled. You can do the work yourself or contact the service.
- Fill the reservoir with brake fluid up to the max mark.
- The wheel brake fittings need cleaning.
- Take a separate container and a hose attached to the fitting.
The assistant sitting behind the wheel must press the gas pedal evenly and firmly three times. When pressing the fourth time, the pedal does not need to be released. At this time, you need to unscrew the fitting and look at the outlet of the fuel injection fluid. Bubbles in the stream will indicate air in the system. After the air is released, the fitting is wrapped, and the process is repeated on another set of wheels. Observing all pumping rules, it is impossible to be completely sure of the reliability of the result. Experienced car enthusiasts recommend not to neglect the services of service stations.
When making repairs yourself, experts advise tilting the car slightly towards the wheel in question. The air will rise upward and reach the threaded valve sooner. Lightly tapping the caliper optimizes the process. In addition to the above-mentioned bleeding technique, there is a technique for adding brake fluid to the supply reservoir. This is difficult to do and only experienced vehicle owners can do it. This procedure is not feasible for machines with return pressure control valves.
What should I put in the tank instead of brake fluid?
I’ll say right away that all fluids are filled just to get to the nearest service station. So, what can you replace the brake fluid with:
- Antifreeze or antifreeze. These fluids are best suited for the brake system. In addition, they are always in the car, and if necessary, they can be drained from the radiator.
- Power steering fluid. It is also a good replacement for brake fluid, but it is quite difficult to drain it from the car.
- Water. Ordinary water is poured only in extreme cases. It negatively affects the entire system. Iron parts become corroded, and the liquid itself can easily boil or freeze.
- Alcohol. As you know, alcohol does not freeze, but it boils very easily.
First aid when a crack is detected
The reasons why brake fluid leaves the reservoir can be different. This may occur as a result of the machine hitting an obstacle. The car service is far away - what should I do? Repairing a crack in the path is only possible to continue moving. Upon arrival at your destination, you will have to purchase a new tank. Glue doesn't help in most cases. Craftsmen recommend using a regular 40-watt soldering iron, slightly extending the rod and slightly loosening the top screw. A piece of plastic tape similar to the body of the tank is cut off. It is unsoldered and used as a patch. First you need to go over the crack with a soldering iron, then use a strip of prepared plastic.
How to get to a service station if brake fluid leaks on the road?
The correct answer is to call a tow truck. But force majeure can happen, no one is immune from this. Then there are two ways. You can drive at low speed (no higher than 20 km/h), hugging the side of the road as much as possible and turning on the emergency lights. You will have to brake with the handbrake and with the help of the engine.
The second way is to try to temporarily revive the braking system using improvised means. If you don’t have TJ at hand, you need to pour something else into the system (even water, but alcohol-containing solutions are preferable). Try to find the problem. Try to seal leaks at the junction points using improvised means (any plastic or rubber will do).
Let’s make a reservation that these methods are suitable if you are not far from a car repair shop.
How to find the cause of the leak
To find where the VAZ 2114 brake fluid goes, you should conduct a thorough visual inspection.
Brake hoses
The easiest way to detect a leak is on the brake hoses - here it is enough to check the rubber by touch. If it is rigid, inelastic and cracks form when bent, the hose must be replaced, even if there are no leaks.
Brake hoses VAZ 2114
Sometimes a brake hose of the wrong diameter falls off the fitting. In this case, it should be replaced with a similar one, but smaller in diameter. You can put on the same hose, but in this case you will have to secure it with special clamps.
Wheel brake cylinders
To detect fluid leaks on the brake cylinders, remove the wheels and inspect the brake system for signs of leakage on the calipers.
VAZ-2114 is equipped with a drum braking system. To detect leaks in the wheel cylinders, the brake drums must also be removed. This usually causes difficulty in removal due to the fact that their surface wears out.
In this case, they are removed in two ways:
- You can “squeeze” the drum out of the hub by selecting bolts of the required diameter and screwing them into the threaded holes on the drum. This is done until the drum is removed.
- Knock out the brake drum by hitting its internal parts with a hammer from opposite sides.
Important! With the second method, you should only use a hammer with a rubber striker. Metal cannot be used, because The drum may be damaged.
The best option for the VAZ-2114 is to replace the entire brake cylinder assembly at once. Otherwise, you should disassemble the cylinder and inspect its parts for damage.
Brake cylinder VAZ 2114
You need to carefully examine:
- the surface of the cylinder itself;
- pistons - need to be changed if there are signs of corrosion or scratches on them;
- seals - if worn or in case of a loose fit, they should be replaced;
- Anthers - check for rips, scratches, cuts and other damage.
Attention! Before assembly, all cylinder parts should be cleaned and washed with brake fluid.
Clutch hose repair method
Experts say one of the common reasons why clutch brake fluid has leaked is a damaged hose through which fluid circulates from the reservoir to the clutch.
Effective replacement tips:
- You need to remove the tank itself by removing the clamp from below.
- You should purchase a new hose, preferably red.
- You need to pull out the damaged hose carefully so as not to accidentally break off the plastic fitting.
It is important not to allow fluid to leak onto the fender or paint. After removing the tank, you should rinse it with water; it is also recommended to replace the clamps. We install the hose and tighten it without much effort. Don't forget to tighten the nuts as well.
Experts say that the hose often wears out. It must be checked periodically and, if damage is detected, replaced with a new one.
Problem: after replacing the brake fluid on the car, the pedal became soft and uninformative
By changing the brake fluid, the car enthusiast fulfills one of the requirements of routine maintenance on the car. Namely, replace the fluid after two to three years. The manufacturer confidently states that if this is not done, it will be bad. In fact, the emulsion is hygroscopic and can “grab” moisture from the air during this time.
Of course, this will negatively affect the functioning of the system as a whole. Safety comes first - we change it. We fueled everything up, tightened it up, started it up and drove off. And then we notice that after replacing the brake fluid, the pedal became soft and uninformative. What to do? There are several reasons for this problem floating around the web:
- The system is filled with low-quality components.
- The replaced elements of the assembly did not get used.
- The system is poorly pumped.
The first feature is more often a myth than a reality. The second one can appear when replacing the pads due to the fact that they have not gotten used to the disk and are pressed into the grooves of the groove. There are two ways out - wait 900-1,000 km until everything breaks in or sharpen the discs to get an instant effect. However, most often the problem of a soft pedal is associated with other problems:
- The main brake cylinder is not bled.
- The brake force distributor between the rear and the front is not pumped (sorcerer) - this does not apply to all cars.
- One of the components of the assembly is leaking (fuel fluid will leave the tank).
- One of the rubber hoses is inflated.
Source