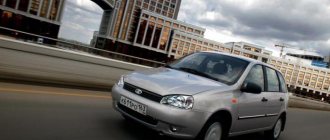
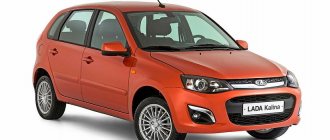
The domestic car LADA KALINA is quite common among car enthusiasts in the CIS countries due to its availability and sufficient build quality. At the same time, Lada Kalina light bulbs need to be replaced periodically. Even on the most modern cars, optical devices can wear out or become damaged during operation, which greatly interferes with driving.
The first generation Lada Kalina uses several types of light bulbs and indicator lights.
The location and names of the elements are as follows.
- Distant lights - H1;
- Low beams - H2;
- Front marker light and side direction indicators – W5W;
- Turn signals – PY21W;
- Front fog lights – H11;
- Fog lights at the rear of the vehicle - P21;
- Stop and reverse lamp – P21W;
- License plate backlight – W5W.
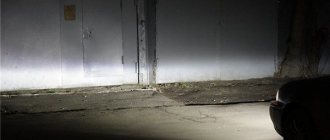
Standard illuminators often do not meet the requirements of motorists. They poorly illuminate the road and quickly fail. Therefore, some users replace the low beam bulbs on the Lada Kalina with diode models. To do this, you should select the appropriate elements on the market and modify the optical elements of the car.
Some drivers believe that simply replacing light bulbs is enough. However, it is not. The factory optics of the first viburnum are not adapted to work with such elements and will quickly fail. There is not enough space in the headlight to remove large amounts of heat from the diode, which leads to deformation of the lens and the plastic housing itself.
To tune the device, you must replace it completely. There are many offers and options for optics modifications on the 2022 market. Just select the appropriate option and install it instead of the standard one.
A similar replacement of a 2nd generation Lada Kalina light bulb is not required. The latest generation factory optics are already capable of working with diodes and have the necessary margin for full operation. The manufacturer insists that the most advanced versions of cars are launched on the market with diodes and replacement as such is not required.
What lamps are used on Kalina
The first generation Lada Kalina uses several types of light bulbs and indicator lights.
The location and names of the elements are as follows.
- Distant lights - H1;
- Low beams - H2;
- Front marker light and side direction indicators – W5W;
- Turn signals – PY21W;
- Front fog lights – H11;
- Fog lights at the rear of the vehicle - P21;
- Stop and reverse lamp – P21W;
- License plate backlight – W5W.
Standard illuminators often do not meet the requirements of motorists. They poorly illuminate the road and quickly fail. Therefore, some users replace the low beam bulbs on the Lada Kalina with diode models. To do this, you should select the appropriate elements on the market and modify the optical elements of the car.
Some drivers believe that simply replacing light bulbs is enough. However, it is not. The factory optics of the first viburnum are not adapted to work with such elements and will quickly fail. There is not enough space in the headlight to remove large amounts of heat from the diode, which leads to deformation of the lens and the plastic housing itself.
To tune the device, you must replace it completely. There are many offers and options for optics modifications on the 2022 market. Just select the appropriate option and install it instead of the standard one.
A similar replacement of a 2nd generation Lada Kalina light bulb is not required. The latest generation factory optics are already capable of working with diodes and have the necessary margin for full operation. The manufacturer insists that the most advanced versions of cars are launched on the market with diodes and replacement as such is not required.
How to replace the lamps yourself
Changing a light bulb in Kalina yourself is not difficult. The time spent on the work depends on the skill of the driver and the size of the hands. Some owners change light fixtures in 15-20 minutes without removing the headlight, while others suffer for more than an hour and ultimately dismantle the optics.
When replacing, cloth gloves are used. This helps protect the skin on your hands and also prevents contact with the bulb. When touched, fingerprints remain, which heat up when the light is turned on and after a while burn through the thin glass.
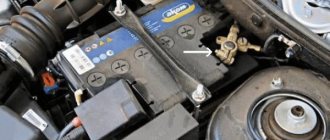
During work, the battery terminal is unscrewed to avoid a short circuit, which will lead to burnout of the fuse link in the fuse box.
Far module
Replacing the high beam lamp is easier than in the low beam module, since the cover is located closer to the radiator grille.
To perform the operation you will need:
- Turn off the Kalina engine.
- Open the hood lid.
- Remove the protective boot on the back of the flashlight.
- Carefully disconnect the plastic chip.
- Open the latch.
- Pull out the lamp.
Replacing lamps on Kalina with your own hands
The vehicle's optical devices are made according to a modular system. Therefore, replacing Lada Kalina light bulbs is possible without outside help. To complete the procedure you will need.
- Flashlight. Light bulbs are removed from the inside of the lighting fixtures and the fasteners are poorly illuminated. To make work easier, you need to illuminate the workspace. Under ideal conditions, assistance will be required. The second number will only highlight.
- Standard wrenches and flathead screwdriver. Keys free access to required parts. Use a screwdriver to remove the stoppers. You can also use an awl or a special puller. To work with the tidy, you will need a Phillips screwdriver.
- Paper napkins and alcohol, without this, replacing the low beam bulb of the Lada Kalina 1 and other elements will be impossible. If the user accidentally touches the working area of the emitter or headlight, fingerprints and accumulated dirt will need to be wiped clean. Otherwise, grease can greatly reduce the efficiency of the optics and shorten its service life.
- You may also need a fastening compound like VD 40. Some screws are prone to boiling and oxidation, which makes them very difficult to unscrew.
- Set of TORX keys. Some drivers complain that the car uses “stars” that cannot be unscrewed with ordinary keys. It is unknown where such elements come from.
It is also recommended to wash the car before performing the procedure - it is much more pleasant to work with clean surfaces.
Headlights
Replacing a headlight yourself will require preparation of the car and tools. To work you will need:
- set of wrenches;
- screwdrivers;
- rag;
- gloves to protect hands.
For ease of work, you need to wash Kalina in advance and clean the space in the garage. To replace the headlights, you need to remove the bumper and unscrew several mounting bolts.
Replacing low beam lamps
The standard replacement of the low beam bulb on a Lada Kalina is quite simple. The procedure does not require deep knowledge of auto electrics or the presence of specialized tools.
To perform the procedure correctly, you must prepare all the tools and follow the sequence of actions.
- Place the car on the handbrake and remove the terminals from the battery. It is recommended to drive the car into a well-lit garage or leave it outside, this will make it easier to see small parts and fasteners.
- Remove the plastic block cover. Here you can tighten the element by hand without using tools. In some configurations, the plug can be made of hard rubber (what it depends on is unknown). It is important to consider that the element often dries out and cracks. Therefore, you need to buy it in advance.
- The replacement of the low beam bulb on the 1st generation Lada Kalina continues, at the stage of disconnecting the wiring. The contact group often gets stuck, which forces the master to tense up a little. By rocking the block from side to side, you will need to pull it off its seat. In this case, you need to hold the device body so as not to damage the element. If a part is broken, it cannot be repaired - the entire unit is replaced.
- Next, remove the lamp retaining spring from the hook. Then you will need to move it to the side so that it does not interfere.
Important! You should not completely pull out the latch - it will be extremely difficult to install it in place. The bar simply slides out so that the light bulb can be removed.
- Next, the light bulb itself is pulled out of the socket. You only need to support the emitter by its metal elements; you should not even touch the glass part of the lamp.
- Installation of the new part is carried out in the reverse order. At the same time, it is important to check the reliability of the device. If there is increased vibration, the lamp may fall out of its socket, which may cause an accident.
Replacing a 2nd generation Lada Kalina light bulb is done in the same way. The headlights of the cars are almost identical in terms of design.
Headlight design features
In 2004, Lada-Kalina cars received new headlights, the design of which is called a block. Unlike the previous, standard ones, they combine lamps that provide low and high beam; lighting (side lights), turn signal lamps.
Another feature is that the new headlights have an electric remote light control. It allows the driver, while driving, to adjust the light output in height and direction. It should be emphasized that such a function was a relative rarity at the beginning of the 2000s.
Like any component, mechanism, part of a vehicle, headlights, including Lada-Kalinas, sometimes require preventive maintenance or repair. To do this, they need to be removed from the car. The purpose of such an operation may be the need for adjustment, improvement of decorative properties, or replacement of old equipment.
Those who often perform many works on the car themselves, before removing the headlights, are recommended to find out which company manufactured them. This is not difficult to do, you just need to look at the glass. The AL symbols indicate that the lighting unit is manufactured by Bosch.
During the production of Lada-1118 (Kalina), basic lights are mounted on the products: Kirzhach JSC Avtosvet and Bosch. It's hard to make a mistake. You can determine the manufacturer by the characteristics of some elements. So, if there is a cap on the low beam lamp, then it is made.
To begin the operation of “removing a headlight on a Kalina,” it is advisable to at least become familiar with how this unit works. It has three sections. As already mentioned - low and high beams, side lights, turn signal.
The road is illuminated with 55-watt incandescent lamps. To prevent dazzling of drivers of oncoming cars, special lenses are mounted on the front of the vehicle. The turn signal lamps, like the side lights, have a power of 20 watts. At the same time, the turn signals provide orange light.
There is a special corrector for adjusting the headlights. It has an electromechanical drive. Control is carried out from the cabin, where there is a special device on the dashboard. To adjust the corrector if it is not working correctly, you need to completely disassemble the headlight. But such disassembly may be required in other cases. This is, for example, tuning or installing new lighting elements.
Replacement of dimensions and DRLs
Dimensions are more likely to fail than main optics. Therefore, replacing light bulbs of Lada Kalina dimensions is a more popular procedure. Repairing a breakdown is as simple as repairing other parts of the optics.
- Open the plastic cover of the illuminator and remove the lamp base from its seat. All actions are carried out with extreme caution - despite the external quality factor, the light bulb is quite fragile.
- Next, the standard emitter is removed from its socket and replaced with a new one.
If the cause of the failure is moisture, you can protect the contacts with hot melt adhesive or a similar sealant that is resistant to elevated temperatures. Replacing the running light bulb of the 2nd generation Lada Kalina is carried out in the same way as the first modification.
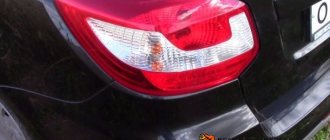
Replacing the brake light bulb on a Hatchback
The rear lights on the Lada Kalina Hatchback are designed in such a way that to replace the bulbs it is necessary to almost completely remove it. To do this you will need a minimum of tools, namely:
- 10 mm head
- extension
- ratchet or wrench
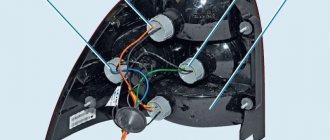
So, first of all, we open the tailgate (trunk lid), and from the inside you need to find those places where the nuts securing the rear light to the car body are located. One of them is shown in the photo below, made in the form of a special technological window in the casing:
And the second is located on top under a plastic plug, which must be removed by pressing two latches on the edges and pulling it towards you:
And now unscrew two nuts, one on top:
And the second one at the bottom through the same hole in the trunk upholstery:
Now you can move the rear light a little to the side by pulling it from the outside with a little force:
And from the back of it, you can without any problems remove the lamp that needs to be replaced, be it a hundred-signal, reverse, turn signal or marker. The cartridge itself is quite easy to remove; just turn it slightly counterclockwise.
To remove the light bulb itself, you need to press it lightly and also turn it counterclockwise.
Replacing light bulbs in the dashboard of Lada Kalina
Cleaning the viburnum is a separate matter. There are a large number of lights, indicators and alarms here.
The procedure is performed like this.
- As usual, set the car to the handbrake and remove the terminals from the battery.
- Next you will need a Phillips screwdriver. Using the tool, remove the two mounting screws. It is important to carry out the change very carefully - the panel is in a visible place and scratches can significantly spoil the appearance.
- After the decorative trim is released, you can carefully pull it out, overcoming the resistance of the latches. The lower part of the panel is equipped with special rollers. The guides must “survive” after repair,
- Under the decorations there is a mount for the tidy itself. The screws are also unscrewed with a Phillips screwdriver and the panel is removed.
- Next, the actual replacement of light bulbs in the Lada Kalina panel begins. To do this, you need to remove the device from the mounting socket and disconnect all contact groups and wires from the device.
- Once the panel is completely removed, you will need to move to a well-lit area to continue the repair procedure.
- Subsequent replacement of light bulbs in the Lada Kalina dashboard is carried out with a thin tool. After finding the required element, it should be disconnected from the socket and removed from the seat. This is done with pliers or special pliers. Grasping the cartridge, you need to turn it clockwise and pull it towards you.
- Next, you need to diagnose the cartridge; if the latter is working, only the illuminator is changed.
- Installation and assembly are performed in reverse order. At this point, the replacement of light bulbs in the Lada Kalina panel is completely completed.
Lada Kalina. Changing the brake light bulb.
The long-awaited moment (since the end of last year) came when I got behind the wheel of my own car. Vika withstood my torment when searching and choosing a car, and they were merciless. While studying at a driving school, I went through all the foreign economy class cars - Renault Logan, Duster, Chevrolet Cobalt, even the new Peugeot 301 caught my attention. Oh yes, I didn’t pass by the Chinese Lifan X60 SUV with leather interior and the Tiggo SUV. Of the Russians, I spent a long time considering the Lada Largus and Granta.
By the time I received my license, I was absolutely sure that I would buy a car with an automatic transmission (automatic), since I passed the city exam for a Nissan Almera with an automatic transmission. Moreover, immediately after receiving my license, I drove cars with automatic transmission (automatic transmission) in the Czech Republic (Renault Megane Universal diesel and Fiat Punto). But, having returned to Russia, and having seen with my own eyes the lack of roads, I decided that I would not take a foreign car, it’s a pity. I started looking... Lada Kalina station wagon. Why so suddenly? After reading reviews, talking with instructors and drivers, I decided that this is an impeccable car that I will need for driving to the country, and for transporting furniture and all sorts of rubbish (after repairs, almost everything needs to be translated), and for trips just to nature. I have nowhere to go around the town, everything is nearby within walking distance. And the biggest advantage is cheap spare parts and the ability to fix small breakdowns yourself, which I will write about on my own blog. Well, the engine is 84 hp. The tax won't really hit your pocket. Even if they steal or scratch (pah-pah), it’s not a pity.
Stern maintenance
On a Lada Kalina, replacing the brake light bulbs may be necessary if the headlight is damaged or the element itself burns out. Due to the design features of the car, repairs can only be performed by completely disassembling the rear panel and removing the entire headlight.
- On a Lada Kalina, replacing brake light bulbs begins with dismantling the headlight. To do this, you need to remove the plastic cover from where the seat belt comes out. The second part is attached a little lower - near the belt reel. The nuts are unscrewed with a No. 10 wrench. You should be extremely careful when doing this. If a part flies into the body panel, you will not be able to get it out.
- As soon as the device is freed from its mounts, all lamps will be accessible. You can remove them from the mount by turning the base 45 degrees clockwise.
- Next, the light bulb itself is removed and replaced with a new one.
- Reassembling the headlight is performed in reverse order.
Replacing rear lights – Lada Kalina Blog
To independently replace the rear light assembly, one 8-mm wrench will be enough, preferably a socket with a ratchet and a Phillips screwdriver. This procedure will not take more than half an hour and will not cause much trouble. Everything is described in order below.
Guide to removing and installing rear lights on Lada Kalina
The first step is to open the Velcro windows in the trunk trim, which give access to the headlight mounting bolts. Although, I would recommend bending the corner of the trim completely in the right place. To do this, you need to unscrew two screws. The first one is located on the threshold of the trunk, closest to the corner:
- The second bolt is on the plastic panel at the top, unscrew it completely, since the casing is located under this fastener, and below we take out the piston, which also secures the upholstery. In the photo below these elements are marked with arrows:
This is what it should look like after the work has been done, as shown in the picture below:
Now that we have free access to all fasteners and electrical wiring, we can begin removal. To do this, take a head with a ratchet size 8 and unscrew the three nuts securing the rear light, which are marked with yellow arrows, and immediately insert the rubber seal of the wiring harness inside, marked with an orange arrow in the picture:
Now disconnect the rear light wiring plug by pressing the latches on both sides:
After which you can safely begin to remove the rear light of our Kalina, simply by pulling it from the outside, since nothing else holds it.
We install the rear lights in the reverse order of removal. This manual is suitable for all owners of Kalina in a Station Wagon or Sedan, although for the Hatchback there are no fundamental differences in dismantling, all work is done by analogy - the only difference is in the mounting locations of the headlights themselves.
List of materials on the same topic
The procedure for dismantling the lights
You should know that the Lada Kalina 1118 flashlight system consists of:
- housings;
- glass (polycarbonate);
- lamps;
- reflector;
- wiring;
- lamp plugs;
- decorative inserts (masks).
As for the ease of removal and subsequent replacement of the lamp on the 1118 model, the process usually involves removing the front bumper. After this, the screws on the top and bottom of the lighting fasteners become accessible. After dismantling them, you can immediately remove the headlight unit, not forgetting to first remove the blocks with wires.
Removing the front opticsTo do this you will need to use:
- key for 8 and 10;
- a set of screwdrivers (flat and Phillips);
- new lighting system component.
Set of tools
In order to adjust the block lighting on the Lada. You will need to complete the following steps:
- Remove the air filter housing, as well as the coolant unit.
- Remove the PTF plug using a screwdriver.
- Unscrew the bolt on the lower fastener of the lighting component using a 10mm wrench. Insert your hand into the PTF hole.
- Remove the bolts located on the upper fastener of the light block component. They are located closer to the radiator. Use the key at 8.
- Unscrew the screw securing the product to the car fender using a large Phillips screwdriver.
- Expand the Lada Kalina headlamp so as to move the part closest to the radiator closer to the car engine. This measure will allow you to remove the lower fasteners from the seat.
- Remove the lower iron fasteners of the headlight. To do this, you will need to remove a couple of bolts with a short head.
Removing the headlight on Kalina
Remove the car light by moving towards you. At the same time, try not to damage the paint layer, since during dismantling the lamp will be located as close as possible to the bumper and fender.
After this, you can install a similar device in reverse order.