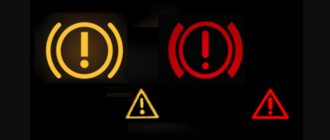
Automakers are trying their best to make passenger cars as comfortable to drive and maintain as possible, and saturating them with electronics contributes to this in the best possible way. The on-board computer, receiving information from many sensors, is able to inform the driver about many past or future breakdowns. These indicators also include a battery light, the lighting of which is considered normal only before the engine starts.
In other cases, it can be assumed that the battery does not receive a charge when the power unit is running, and sooner or later this will result in a complete loss of capacity. That is why experts advise not to stop along the way and look for the cause, but to follow to the final destination of the route in order to diagnose the malfunction on the spot.
How does the battery indicator work?
So, we all know that when you turn on the ignition, several warning lights come on at once, including the battery one. The oil pressure lamp goes out after the engine has started running and dispersing lubricating fluid through the system. But the battery light goes out as soon as the engine starts and the generator starts working.
The lighting of the lights is an integral part of the self-diagnosis procedure for important vehicle systems, which starts when the ignition is turned on. If the diagnostics do not reveal any malfunctions, the lights soon go out. So if the battery light comes on briefly when you turn the key, this is normal - at this time the battery supplies current, and when the engine starts running, the generator becomes the current source, which delegates part of its load to the battery, recharging it.
But this is a simplified schematic description of the process; in fact, everything is much more complicated and includes several intermediate elements. Let's describe how everything happens.
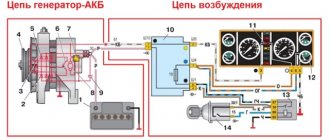
When the ignition is turned on, the battery begins to generate current, which goes to the fuse, and then through several circuits - diodes, relay-regulator, then reaches the slip ring and then goes to the winding.
As soon as the internal combustion engine starts working, the voltage at the lamp contacts equalizes, as a result of which the lamp goes out, and the current begins to flow in the opposite direction, from the generator to the battery.
If a problem occurs in any link of this chain, the light does not go out, but continues to burn. Or it lights up unexpectedly and goes out just as suddenly.
Thus, it can be argued that the operation of the battery lamp depends on the functioning of the generator, with one of its contacts connected to the generator terminal directly, and the second connected to the circuit described above coming from the battery.
Checking the generator and troubleshooting problems
A simple and proven method, long used by motorists, helps to find out whether the generator is working:
- Start the engine and apply load to the battery by turning on the headlights or heated glass.
- Remove the “–” terminal. To do this you will need a 10 key.
- If after removing the terminal nothing has changed, the engine runs without interruptions, the headlights do not go out, everything is in order with the generator.
- If the headlights go out and the engine stalls, the car's generator is faulty.
Brushes
To check the operation of the brushes, you need to remove and disassemble the generator, then remove the brushes and visually assess their condition. If they are worn, traces of sparking will be visible on the surface. In this case, you will have to replace the entire assembly.
Voltage regulator
This element breaks due to a short circuit in the circuit. It can also be damaged mechanically or connected incorrectly.
Examination:
- Set the limit on the multimeter to 20V.
- Measure the voltage at the terminals with the engine running at idle speed (1-1.5 thousand rpm). Normally, the tester will show 13.2-14 V.
- Increase speed to 2-2.5 thousand rpm. The indicator should increase to 13.6-14.2 V. When the speed increases to 3.5 thousand rpm, U should remain no higher than 14.5 V.
If the measurement values differ significantly from the norm, the most likely reason is a malfunction of the regulator.
Diode bridge
To check the diode bridge, a multimeter is enough. As an example, here is the procedure for testing the 37.3701 generator, which was installed on domestic “eights” and “nines”.
Check with a multimeter to see if there is a short circuit in the circuit:
- Turn on ohmmeter mode.
- Touch pin 30 with one probe of the device, and touch the generator housing with the other.
- A working bridge will produce a resistance value approaching infinity.
The next step is to check the serviceability of the diodes to see if they are broken. The procedure for checking “+” diodes:
- Place the first probe on pin 30, the second on any of the bolts that secure the diode bridge.
- With working diodes, the resistance approaches infinity.
To check the negative diodes, the probes are placed differently: the first - on the bolt, the second - to the generator housing. With healthy semiconductors, the voltage will also be close to infinity.
To complete the bridge test, additional diodes must be examined. To do this, the first probe is placed at pin 61, the second – at one of the bridge mounting bolts. If the diodes are working properly, the ohmmeter will show a tendency to infinity.
Having detected a malfunction of the diode elements, they are simply replaced with new ones. If the soldering is damaged, it is enough to re-solder the diode.
On a note! Diode bridges in generators of all brands are checked the same way, only the numbering of the contacts changes.
Bearings
A faulty bearing causes the pulley to become unbalanced. This is easy to guess by the abrasion of the belt, which leads to its accelerated wear. The second possible sign of bearing failure is jamming or stopping of the generator shaft. They solve the problem by replacing the bearing or the entire pulley. When the bearing plays, a knocking sound appears in the generator.
Contacts
Conduct a visual inspection of the positive terminal of the generator. If there is dirt, dust, oil stains, or traces of corrosion on it, clean the surface. Then do the same with the “mass”. Lubricate the contacts with a protective compound.
If the wire connecting the generator and the battery is damaged, replace it with a new one. Clean all terminals at the same time. If the generator brushes are oxidized, they are also cleaned. But so that graphite dust does not fall on the remaining elements of the generator.
Open circuit
If one of the phases of the generator is broken, you will have to first dismantle it to check. The further diagnostic procedure is as follows:
- Check the bolts connecting the phase terminals to the diode bridge. As a rule, traces of corrosion, poor bolt tightening or dirt are found on one of the contacts. Correct the damaged contact, and at the same time prevent all the others. If the wire is broken, replace it. If the winding wires are damaged, the generator may need to be replaced.
- Check the stator winding for any darkened turns. Inspect the wire insulation and measure its resistance with a multimeter. If you find dark spots on the insulation, it means that the generator is worn out and you need to rewind the winding. After repairing the generator, the problem should be resolved.
A lit battery indicator during normal charging can indicate various malfunctions in the car. To find and eliminate the cause, you need to conduct a comprehensive diagnosis yourself or contact a service station.
List of faults that cause the lamp to light up
So, if you notice that the battery icon on the instrument panel is on and does not go out, you can conclude that it is not charging. There may be several reasons for this:
- the charge is either completely absent or so small that its value is less than the potential difference at the battery terminals;
- the lamp control relay has failed;
- the contacts of the circuit elements are burnt, oxidized or weakened (on the battery itself, on the ground wire, on the generator).
Let's look at these cases in more detail.
Main causes of malfunction
If the battery icon on the instrument panel is lit when the engine is running or while driving, then various options are possible.
If it does not go out, then malfunctions are possible:
- in the generator: the pulley has stretched or a break has occurred;
- brushes or commutator are worn out;
- RR is faulty. Radio components have failed;
- rectifier malfunction;
- wedging, pulley play (extraneous sound);
- there is no contact on terminal +B or D (W);
- break, short circuit in the winding.
- discharged and does not take charge;
If the light is intermittent, dim or flashing. It lights up at low (idle) speeds, and goes out after revving up. The battery light is on and charging is in progress. The engine goes out after warming up, then malfunctions are possible:
- during generator operation: weak belt tension (slips);
- backlash of the generator pulley or tension roller;
- poor contact of graphite brushes with the rotor commutator;
- contact disappears on one of the phases;
- diode malfunction;
- cold soldering;
- the contact (oxidation) of the +B terminal or ground is interrupted (the pin is not tightened).
- contact disappears at the terminals of the wire going from the generator to the battery;
- if LED lamps are used instead of incandescent lamps.
The light does not initially light up for the following reasons:
- burnout of the light bulb itself;
- ignition switch wear;
- The fuse has blown. Poor contact in the socket;
- oxidation of contacts in the instrument panel connector.
To check the power supply circuit of the indicator, without disassembling, with the ignition on, remove the wire from terminal D of the generator and short it to ground. If the circuit is working properly, the indicator will light up, then you need to check the generator. If not, first check the fuse, then the light bulb itself and the wiring. In the dashboard, power from the battery is usually supplied to several icons at once.
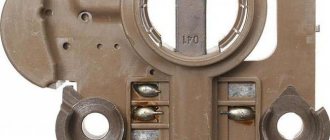
Figure 3 shows the components of the generator in section.
Rice. 3 Cutaway view of a car generator
Rice. 4 External view of the location of the PP (9402.3702) in the generator (without the back cover)
Figure 5 shows the generator components to be tested.
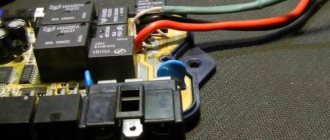
Problems with the relay regulator
The voltage in the on-board network or at the +B output must always be the same and not depend on changes in speed and load. To stabilize it, a relay regulator (RR) is used. It controls the field winding through graphite brushes. The relay regulator provides the input voltage within 13.5-14.5. B. The design of the RR varies depending on the type of generator, but their operating principle is the same.
Figure 6 shows RRs of different designs.
According to execution, RRs are divided into:
- Built-in – so-called “chocolate bars”. They are located in the generator.
- External (external) – mounted separately on the body.
PP also prevents the battery from overcharging. According to the element base, relays are divided into:
- Relays using evil. relays (remote).
- Transistor.
- Integral.
- With summer (13.1...14V)/winter (14...15.3V) switching.
- Thermo Optimized Voltage Regulator (TORN).
Main functions of TORN:
- U correction based on battery temperature;
- U correction based on engine temperature (sensor +12V);
- blocking and delay of generator switching on at start-up;
- three-mode control of the battery warning lamp;
- full dynamic correction of U according to TPS or DBP.
Before replacing the RR, you must ensure that the remaining equipment is in working order. It is not enough to just check the battery level and density. To check the voltage, you need to start the engine and disconnect the positive terminal on the battery. Connect the ends of the multimeter to the generator terminal or to the removed battery terminal. If it continues to work and the device shows 14.5 V, then everything is fine with the generator. If it stops, remove the generator. You need to check the RR, bridge diodes, windings and bearings.
A faulty PP can damage other equipment. For example, if the voltage is too high, the battery may boil. If the PP is faulty, the output voltage of the generator (during rotation) will be:
- Absent - emergency operation of the engine, only from the battery, without charging.
- Low (below 12 V) – dim indicator lights, reduced power.
- Overestimated (above 15 V) – the brightness of the light bulbs (headlights) varies with revolutions.
The regulator may not work due to:
- Electrical short circuits wiring, excitation winding.
- Diode breakdown.
- After polarity reversal (a battery was installed with the wrong polarity).
- Malfunctions of electronic elements of the RR.
- Mechanical damage.
- Worn brush. If the protrusion is less than 5 mm, replacement is required.
- Moisture inside the case. For example, it got hit while washing or while driving in the rain.
Let's look at how to check PP using the example of Y112A.
Figure 7 shows the appearance of the assembled PP Ya112A (with brushes).
To check it is necessary to disconnect the RR from the GN. If it is installed internally, first remove the rear cover of the generator.
To check the functionality of IRN 112A and 112B, a constant voltage power supply is used, with voltage regulation from 10 to 16 V and a light bulb (interior lighting) with a power of 1.5 ÷ 5 W. Assemble the circuit as in Figure 8.
Using this diagram, you can check all regulators with internal installation. If the unit is working properly, then when the voltage changes to 14.7 V, the brightness will change; if it becomes higher, it will go out. If it doesn’t work, you should change the tablet or try to repair it.
Figure 9 shows the electrical circuit of the PP Ya112A board (tablet). The electronic elements on the board are made in an SMD package.
To repair, you need to disassemble the unit and remove the board. Check the cleanliness of the contacts and the quality of soldering. If necessary, wipe and solder. Use a multimeter to check the power transistor (TIP42A) and the zener diode, then the rest of the parts. Defective parts, replace. After repair, assemble the generator and install it in place. Check its functionality.
Alternator belt tension
The drive belt is an integral part of the generator. Without him it’s like having no hands. The type of drive belt (V-belt or toothed) depends on the make, model of the machine and the alternator pulley. It is designed to transmit rotation from the crankshaft of the internal combustion engine to a generator, which generates energy during rotation. Figure 11 shows the interaction of the attachment through the drive belt.
The long-term operation of the bearings of the generator, water pump, crankshaft, tension roller and other equipment (attachments) depends on the belt tension. If the belt is over-tensioned, the belt itself stretches and wear of the bearings accelerates, and if the tension is weak, it slips. The belt is checked visually. If there is a break or damaged areas (delamination, cracks), then it must be replaced. Figure 12 shows an example of checking belt tension by hand.
With the engine off, check the tension with your finger. The displacement (deflection) should not exceed 1-2 mm with a force of 8 kgf in the middle between the pulleys. Depending on the brand of car, different tensioning devices are used. For example:
- With automatic adjustment of the required degree of tension based on torsion and compression springs.
- With dampers.
- Adjusting bolt.
- Adjustment bar (on older machines).
Figure 13 shows the appearance of the belt tension rollers.
Figure 14 shows the appearance of intact and cracked belts.
The belt is checked for signs of wear on the outside and inside. If the belt is worn, replace it.
Forms of wear on drive belts:
- Broken generator belt.
- Small cracks, delamination.
- Grease ingress.
- Attrition.
- Increased hardness due to aging or poor quality materials causes whistling.
Figure 15 shows an example of adjusting the drive belt tension.
Often there are options when the tension is produced by deflection of the generator itself. To remove and tighten the belt you must:
- Loosen the nut on the generator mounting stud and the nut on the adjusting bar.
- Tilt the generator towards the engine and remove the belt.
- After inspection or replacement, put the belt on the pulleys.
- Use a pry bar to tilt the hydraulic tensioner away from the engine to the desired tension.
- Tighten the nut on the bar and make sure the tension is correct.
- Tighten the nut on the stud.
The size (marking) of the belt is individual for each model. The belt is replaced in the same way as the standard one. You need to put it on without distortions and in the middle of the pulley. If a bar with an adjusting bolt is installed, then it is used to apply tension.
In machines with automatic belt tensioning, make sure that the tensioner is in good condition and is not in its extreme position. The extreme position of the roller indicates the maximum stretch of the belt and that it needs to be replaced. It is advisable to change it every 15-20 thousand kilometers. If the alternator belt breaks along the way, a 20 mm wide ring cut from a car inner tube can temporarily replace it.
Blown fuse or poor contact
A fuse with a fuse link provides protection of equipment and electrical circuits from overloads and wiring burnout in the event of a short circuit. It burns out for the following reasons:
- From vibration.
- Formation of oxides on contacts or weak contact.
- Insulation violations in electrical wiring (short circuit, presence of moisture).
- Defective.
- Lower denomination.
- Mechanical damage.
- Overvoltage (from the generator).
The presence of oxides or mechanical damage is determined visually. The ratings of the flag fuses are indicated next to the installation location or on the plastic cover of the unit. Figure 16 shows the appearance of intact and blown fuses.
Fuses are classified according to the material of the fusible insert into:
- Lead.
- Tin.
- Alloy (tin + lead).
- Aluminum.
You can find the location of a specific fuse in the car manual. There, the diagram shows where the fuse blocks are installed and which ones. You can also find a fuse by car make on the Internet.
In cars with a BSD bus (interface), control of the on-board network is more complex; there is no separate fuse. Data transfer is carried out via the bus between the engine control unit and:
- Generator and battery (sensor on the negative terminal of the battery).
- Oil level sensor
- Electric coolant pump.
- Electronic glow plug unit (diesel).
In the event of a malfunction of any of the above consumers, an error is recorded in the control unit and the control is switched off.
In most cases there is no separate fuse for the charging icon. So, for the VAZ2110, fuse F19 is 10 A common for powering the following elements:
- Excitation windings.
- Lock blocking unit.
- Monitoring the serviceability of lamps.
- Direction indicator with warning lamps.
- Reversing lamps.
- Display block.
- Clock (or trip computer).
If it burns out, then these nodes will be de-energized. This is a good clue that the fuse is working properly. Checking the fuse link can be checked in the following ways: visually, with a tester or with a multimeter. Figure 17 shows the VAZ 2110 fuse panel.
For a visual check, you need to pull out the fuse. On a round fuse (ceramic), the fuse link is located on the outside, and the break will be visible. In a blade-type fuse, the fuse-link is located inside a translucent (colored) body, but is visible in the light, and its rupture will be obvious.
Checking with a control (a low-power 5W light bulb with the ends connected) is carried out with the ignition on. One end is connected to the body, and the other end touches first one side of the fuse, then the other. If the light only lights up on one side, the fuse is blown.
Measuring with a multimeter can be carried out in two ways. The first is similar to checking with a light bulb (voltage measurement mode). Second: check in resistance mode with the ignition off. Set the multimeter to dialing mode. Connect the ends to the fuse terminals. If it is working, a signal will sound and the screen will show zero resistance. If the fuse is blown, the multimeter will be silent and show 1 in the most significant digit.
It is better to replace a blown fuse with “AVS” smart fuses with an LED indicator of the appropriate rating. These fuses do not need to be checked. If it is faulty, the LED on it will light up. If it burns out again after replacement, then the load sides are short-circuited. The damage will need to be found and repaired.
Battery icon is on
One of the main indicator devices located on the dashboard is the battery icon.
Its red glow indicates that the battery is not charging. In this case, the driver must proceed to the parking area or the proposed repair.
At night, the driver has no more than 30 minutes or 40 kilometers to drive. What are the reasons for the icon to light up? Is it possible to fix the problem yourself?
What to do if the charging light is on
It will be quite difficult to cope with the above malfunctions somewhere along the way, except that the alternator belt can be changed if you suddenly always carry a spare one with you.
But not everything is so scary, and even with the battery charge lamp on, you are quite capable of continuing to move. The role of the power source will simply fall entirely on the shoulders of the battery. Nevertheless, even without recharging the battery, you can travel a sufficient distance if you follow these simple, but necessary in this case, recommendations:
- You shouldn’t turn off your car’s engine without a compelling reason. The fact is that when starting, the starter consumes quite a lot of electricity. So, in case of a forced stop, you should then start using the traditional method - “from the pusher”.
- It is better to refuse to include additional elements that consume electricity. Yes, without music, a heater, heated mirrors and rear window, driving will be noticeably less comfortable. But it’s better than getting stuck somewhere in the cold in the middle of the highway.
- It is also better to refuse to turn on fog lights and high beams at night.
- To prevent the battery from being powered by a faulty generator, it is better to immediately disconnect the wires coming from it and wrap them with insulation.
By following these simple tips, you can easily get to the nearest car service center or your home garage.
The battery lack of charge indicator lights up on the panel
What does the battery indicator mean?
After you start your car's engine, the car will perform a test to ensure that the battery or alternator is generating the correct voltage.
Then after a few seconds the warning light will turn off if the dashboard computer determines that the battery or alternator is working properly. If it remains on, the computer will most likely detect a problem with the charging system. If this warning light comes on, you can only use the necessary accessories, including headlights and windshield wipers, to avoid draining your vehicle's battery.
Five problems that cause the battery indicator on the dashboard:
Generator belt
During load (optics light, radio on) with low belt tension, the battery quickly loses voltage. Signs of weakened tension are squealing and whistling, which is often observed when it is cold.
To clarify, check the degree of tension - measure the amount of deflection. First turn off the engine. According to the instructions, press on the part. Belt deflection of less than 5 mm is considered normal. If the deflection is greater, the part is tightened.
The manipulation does not cause any difficulties, especially in older cars and if there is an adjustment bar. Scroll the screw of the mechanism, which is usually located on top of the device. In this way, the generator is moved relative to the engine, creating the required tension.
In modern cars they are adjusted without a bar. For this:
- Loosen the generator fasteners;
- Turn the screws in a circle;
- Move the device away from the engine to the desired tension;
- Tighten the nuts.
At the end, check the degree of belt tension.
Voltage regulator
A part with a direct connection to the generator, due to which incorrect operation of the alternating current device affects the condition of the part.
A visually small detail, malfunctions of which lead to many troubles. For example, overcharging or undercharging the battery. The relay often breaks on cars manufactured in the last 5 years. Main reasons:
- Interturn breakdown of the generator;
- Destruction of generator brushes;
- Diode breakdown;
- Changing the battery poles.
The problem is diagnosed by the battery charge level. Overcharging or undercharging indicates a defective regulator. If there is a malfunction, the part must be replaced as it is not repairable.
How to determine the reasons
If the battery indicator lights up when the engine is running, the first thing to do is measure the voltage (U) at the terminals using a multimeter, the condition of the generator, electrical wiring, and various elements of the system.
For detailed diagnostics you will need:
- two screwdrivers;
- 12 V light bulb;
- multimeter;
- 10 mm wrench;
- pliers and knife;
- fine sandpaper.
- Inspect the alternator drive belt: it should be tensioned enough to turn 90 degrees, no more. The surface of the belt is ideally dry, without traces of moisture or oil.
- Measure U on the battery in a static state. When the engine is turned off, this value is 12-13 V. If it is lower, the problem is in the generator.
- Warm up the car and measure U at low idle speed. The norm lies in the range of 13.5-14.5 V. A lower result means the battery is undercharged, a higher result means the battery is overcharged.
- Increase engine speed to 2-3 thousand rpm. U is normal - up to 14.5 V. If it increases, you should inspect the voltage regulator.
- At idle, you need to turn on the headlights, turn on other energy consumers, then measure the voltage. The result should not be lower than 13.8 V.
Troubleshooting the battery charging system
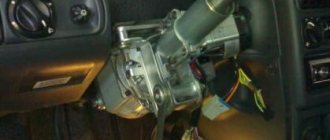
If previous measures to check the condition of the belt, fuses, terminals, contacts and connectors did not produce a positive effect, it is necessary to dismantle the generator and take it to a specialized workshop to test its performance.
In many cases, you can remove the generator yourself, if this does not require the use of special equipment and placing the car on a lift. Detailed descriptions of the process of dismantling the generator for a specific car model and engine are easy to find on the Internet.
Common reasons why the battery light is constantly on
These include the following cases:
- The alternator drive belt is loose, worn or torn;
- the fuse has blown in the section of the circuit from the ignition switch to the control light (in this case there is charging);
- contact is broken in the connector blocks of the mounting block;
- malfunction of the relay regulator;
- diode bridge malfunction;
- malfunction in the circuit of additional diodes;
- break in the current supply circuit to the rotor electromagnets;
- poor contact at the battery terminals;
- lack of supply current at the output of the generator;
- the generator brushes are worn out;
- there is no ground on the negative wire.
If the generator is not working on a strong battery, the car will be able to drive for about 2.5–3 hours during the daytime, if you do not turn on the headlights, air conditioning, wipers, or audio system.
The source of many faults in the battery charging system is the generator voltage regulator relay
The light may sometimes come on when the turn signal is turned on.
The most common reason is a malfunction of the diode bridge, poor contact in the rotation fuses, or poor contact in the ground wire of the instrument panel. It is necessary to check the contacts of all terminals on the wires coming from the generator. The problem must be fixed. Indeed, if the generator malfunctions (a break in one of the three diodes), the battery will no longer receive a full charge and after some time will be completely discharged every time the turn signals are turned on and/or off.
The light bulb goes out and burns at full intensity
A battery light that barely burns at half intensity while the engine is running indicates a generator malfunction: the diode bridge or insulation in one of the stator windings is broken. Less commonly, there is a problem with the ignition switch. The key cannot turn all the way due to accumulated dirt. A few drops of WD-40 “liquid key” into the ignition key hole will alleviate the situation. Sometimes it may be necessary to repair the car's electrical wiring and timely diagnose a decrease in the signal to the indicators.
Generator brushes
The brushes receive current and transfer it to the battery. Although the parts are small, they are very important because they ensure the car’s performance. I make them from graphite, sometimes impregnated with a special solution for long-term operation.
To identify malfunctions, remove the brush assembly and inspect it. Opal marks and other characteristic signs indicate worn parts. Brush failure is also caused by mechanical wear. To do this, measure the height of the graphite elements. Replace the part immediately if the height is less than 5 mm.
On old foreign cars and domestic cars, brush problems are checked using a different method. With the engine running, remove the minus from the battery. If the motor continues to run, everything is in order, the brushes supply voltage.
How to reset the “low battery” error
The best advice is to take the car to a service station. There, experienced specialists will do everything safely, quickly, without compromising the delicate electronics of the engine control systems and the safety of the machine. In some foreign car models, this problem disappears over time (if all elements of the charging system are functioning normally). You can solve the problem yourself. To do this, you need to disconnect the negative terminal for three minutes, and then put it back in its place and tighten it well.
You need to know that the battery charging indicator light, by its lighting, blinking and other abnormal glow, signals simple malfunctions. For example, failure of a separate diode, malfunction of the relay regulator, loosening of the drive belt. If a light bulb is detected, it is imperative to find and correct the reason for the lack of battery charge. Or you may soon need to buy a new generator or battery.
Video: the generator does not charge, how to find the fault and achieve proper operation
Unexpected malfunctions in the vehicle's on-board electrical network can lead to serious consequences. It is necessary to respond extremely quickly to the glowing signals of the control system self-diagnosis indicator lights, including the lit battery charging indicator. At the diagnostic station, using the error code, they will quickly identify and correct any malfunction in the charging system of the DC source.
Diode bridge
Placed on the back surface of the generator, it is responsible for converting alternating current. Common faults include breakdown and breakage.
To clarify, check the bridge with a multimeter, placing one probe on terminal 30 of the generator, and the second on the housing. The resistance of a working bridge tends to infinity. First make sure that there is no short circuit in the circuit.
Signal lamp
A signal block, emergency lamp or indicator that conveys the status of the system. If there is a malfunction, it does not light up. In the described case, it lights up constantly, which is often caused by problems with the LED device. When the engine is running at idle speed, the voltage in the system does not exceed 12V - the light is on. But when it increases to 2000 rpm, it goes out.
Other malfunction options:
| Glow | Procedure |
| Not for long | The error is temporary. The system automatically returns to normal. |
| Permanent | It is necessary to quickly eliminate the cause, which avoids expensive repairs. |
| Fast flashing | Reduce speed or stop the engine, since the error is fatal and requires an immediate solution. |
Generator malfunctions
It may turn out that even after installing a new battery, the charging indicator does not go off. This means that the reason lies in the malfunction of the generator device.
To determine that there is no potential difference, it is necessary to perform certain manipulations using rubber gloves as protective equipment:
- After turning off the engine, the wires from the battery device are disconnected;
- Using a multimeter, the potential difference across the terminals is measured. The optimal level is considered to be in the range from twelve and a half volts to twelve and seven tenths;
- The wires are connected. The ignition turns on. The procedure described above with measurements is repeated from the beginning. Now the indicator should correspond to a value in the range from thirteen and a half to fourteen volts. As the speed increases, it should also increase;
- If the opposite effect occurs and the voltage drops, this means that the brushes of the generator device are worn out, or the diodes in the diode bridge have failed. A break or loosening of the belt part may also be the reason why the charge stops flowing. When inspecting and pressing it, it should not bend by more than one and a half centimeters.
The driver can always determine the oxidation of the terminals independently. You just have to inspect the generator wires. The presence of the results of the oxidative process on them is characterized by both a characteristic burning smell and external signs.
However, in practice, serious malfunctions often arise that cannot be dealt with on your own.
You will need the help of a specialist with appropriate qualifications. Moreover, replacing brushes and faulty diodes will not be a problem, but wear and tear on rotor spare parts, for example, will require a complete replacement of the generator.