Removing seats Grants
| If you decide to tune the interior, install seat covers or install seats from a foreign car, then read the instructions on how to remove the front and rear seats of a Lada Granta with your own hands . |
Removing the front seats of Lada Granta
Required tool: 8 key. The front seats of Lada Granta are installed on skids that are attached to the floor.
- Move the seat all the way forward.
- Unscrew the two rear mounting bolts for the guide slides and remove the spring washers.
- We move the seat all the way back, and similarly unscrew the two front bolts with washers.
- If seat heating is installed, then disconnect the block with wires. Raise the seat and disconnect the seat belt sensor wiring harness connectors.
The second front seat is dismantled in a similar way. Installing the seats is done in the reverse order.
Removing the rear seat of Lada Granta
Required tools: 10mm wrench, flat screwdriver.
- Pull the front part of the rear seat cushion up.
- Remove the pillow loops from the holders on the body.
- Remove the rear sofa of Grants.
To remove the backrest:
- Bend the edge of the carpet and remove the 3 bolts securing the backrest to the body.
- Tilt the backrest forward and remove the 3 rear bolts securing the backrest to the body.
- Remove the seat back.
Installation of the rear sofa and backrest is carried out in the reverse order.
Video - Installing eco-leather covers on the rear seats.
Adjusting the front seats of the car
1. To adjust the front seats of the Lada Granta in the longitudinal direction (forward - backward), pull the locking lever up (see photo below). After placing the seat in a comfortable position, lower the lever and, moving the seat back and forth a little, lock it.
Note:
It is prohibited to adjust the position of the driver's seat while the vehicle is moving. The seat may move suddenly, causing you to lose control of the vehicle.
2. The tilt of the Lada Granta seat back is adjusted smoothly by rotating the handle.
In the optional version, the front seats are equipped with electric heaters, which turn on only when the car engine is running. 3. The height adjustment of the head restraint on Lada Granta seats is carried out by direct action on the head restraint. The headrest is adjusted downward by pressing the stopper lever (see photo below) of the headrest on the right side. To remove the head restraint from the seat back, move the head restraint up and press the head restraint release lever on the right side, and then pull out the head restraint.
Read more: Cylinder head cooling
Note:
The optimal position of the headrest is considered to be when its upper part is at the same level as the upper level of the driver’s head. If this is not possible, for very tall people the head restraint should be raised to its highest position, and for very short people it should be lowered to its lowest position.
Adjusting the rear seats of a car
Note:
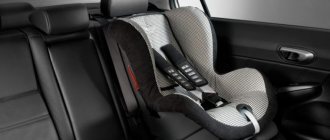
In the basic configuration, the Lada Granta does not have head restraints in the rear seats. In the luxury package, headrests on the rear seats are available and adjustable in the same way as on the front ones.
1. To increase the luggage compartment area, the rear seat can be folded down. This is necessary for transporting large cargo and lengths. Before folding the rear seat (or part of it), it is necessary to install the seat belt buckles in special holders on the lower part of the backrest. When returning the backrest to its working position, make sure that the shoulder branches of the side belts do not fall behind the backrest, that is, they remain in the passenger compartment and not in the trunk. After returning the seat to its working position, the seat belt buckles must be removed from the holders.
2. To fold the rear seat, pull the loop (see photo below) and place the cushion in the upright position.
Note:
If necessary, move the front seats forward.
3. Pull the lock drive handle (on both sides of the seat) and place the backrest in a horizontal position.
4. Installing the rear seats in their normal position is performed in the reverse order.
5. In a variant, each of both parts of the seat can be folded out separately if necessary.
Note:
When any part of the rear seat is folded for cargo transportation, the remaining part can seat no more than one passenger.
Removal and installation of front seats Lada Granta
Tools:
- Ratchet wrench
- Extension
- Torx head E11
Note:
The front seats are mounted on skids, the guides of which are attached to brackets on the floor of the body.
1. Move the front seat all the way forward, and remove the two rear mounting bolts for the front seat slide rails and the spring washers.
2. Move the front seat all the way back, remove the two front seat rail mounting bolts and remove the spring washers.
Note:
On a Lada Granta car equipped with front seat heaters, when removing the seats, disconnect the connectors of the heater wiring harness.
3. Raise the front seat and disconnect the seat belt sensor and heated seat harness connectors, and remove the front seat from inside the vehicle.
4. Remove the front seats from the Lada Granta.
5. Install the front seats on the car in the reverse order of removal.
How to fold out the seats in a Grant Liftback
The rear backrest folds in a 60/40 ratio, which is very convenient and practical when transporting non-standard loads. Press the side clamps of the upper backrest and lower the desired side.
If necessary, the back row folds completely onto the floor, forming a flat platform without steps or bends. Folding the seats is easy: just press the side hinges of the upper backrest. The lower sofa is fixed with metal hinges at the base.
Complete disassembly of Grant seats
How to remove upholstery from Granta seats?
The information will be useful to those who are planning to wash the seat upholstery, replace it with a new one, replace foam molding or install heated seats.
For work we will need: - Needle nose pliers - Side cutters - Plastic clamps
The front part of the casing is attached to the frame using metal elements marked in green:
Orange indicates the plastic removable seam of the back. And blue - elements that do not require dismantling when replacing or removing the upholstery.
But let's start with the headrest. We remove it and remove the rubber decorative washers.
Next, applying force, we disconnect the plastic seam (training before disassembling the backrest).
And we tighten the upholstery, squeezing the foam.
We turn the chair over and begin to disassemble the seat. From below, the upholstery is attached to the springs with metal rings.
Don't even try to remove them carefully. Even if you succeed, you’ll waste a lot of time, and you still won’t be able to put them back on. Therefore, we simply take the wire cutters and destroy them.
It is convenient to hold and remove these rings with thin-nose pliers. As a result, nothing holds the upholstery underneath.
We begin to pull off the upholstery from the front of the seat...
... and we rest against the fastening element that tensions and creates the relief of the front part of the upholstery.
A fastening element in the form of a wire rod is sewn into the casing (places highlighted in green) and tightened with the same rings to the foam casting reinforcement.
We take wire cutters and remove the rings...
... first releasing 2 longitudinal fastening elements, and then 1 transverse one.
The longitudinal elements are freed, the transverse elements are shown in the photo. It is placed where there is a transverse seam on the seat
When all 7 rings are removed, remove the upholstery.
And, if necessary, foam casting.
Having completely folded the backrest, we see a plastic seam like on the headrest. Let's disconnect it.
And we begin to roll up the upholstery until we come across the same fasteners...
We remove the same 7 rings as in the seat and tighten the upholstery.
The upholstery remains on the two headrest guides. You can either simply pull it off or remove the guides.
Well, the foam casting is not secured in any way...
The chair is disassembled. It took an hour to disassemble one seat, but if I had these instructions, it would have taken about 20 minutes. In the second part, I’ll tell you how to put the trim back in place.
So, the seat is disassembled...
If you did it like I did, you destroyed all the mounting rings. Well, after you have washed/replaced/repaired the upholstery, you need to somehow secure it to the seat. This is where plastic ties come to the rescue. By the way, I used polyamide ties from DKS - a reliable thing...
We find reinforcement in foam casting...
... and thread the ties through it.
Then we begin to tighten the upholstery until the fastening element coincides with the corresponding part of the foam casting. Next, we attach the fastening element with ties.
... and tighten them.
We remove the tails of the clamps with pliers.
We do the same with the rest of the fasteners on the back and seat.
We fasten the plastic seam of the back and fasten the seat straps.
Installing heated seats on Granta
Contents of the article: 1. Installation of standard heated seats from VAZ 2115 in Lada Granta 2. Installation of heated seats
Tuning Lada Kalina 2 - simple methods for transforming a modest small car
Tuning Lada Kalina 2, like the car itself, cannot be called expensive. And the owners of the domestic model take advantage of this, trying in every possible way to improve it, make it more powerful and more impressive. Fortunately, there is something to work on in Kalina, and this applies to both the station wagon and the hatchback. We suggest considering the most popular Lada tuning options, which will help change the car beyond recognition.
1 Refinement of the power unit of Kalina 2
The first thing to start modernizing with is the engine of the domestic model. Although the Lada's power unit does not have outstanding characteristics in terms of power and dynamics, it has nevertheless managed to prove itself exclusively from the best side.
Both hatchbacks and station wagons are equipped with a modest eight-valve engine with a volume of 1600 cm³, which without certain modifications will not be able to spin up at more than 5 thousand rpm.
The easiest and cheapest way to unlock the full potential of your car's engine is to install a zero-resistance filter and a straight-type exhaust pipe. As a result, more air will flow to the Lada engine, which will provide a better proportion of the fuel mixture.
And thanks to tuning the exhaust system, the car will get rid of processed gases faster.
To replace the standard filter under the hood of Kalina, you need to unscrew 3 fasteners holding the part. After this, carefully remove the filter and the gasket under it, and wipe the seat. Then we install the zero switch, connect it to the open pipe and fasten it with bolts. After this, you need to start the engine to check the operation of the new element.
Replacing the standard Kalina filter
We recommend that you read
In order not to spend money on a new direct-flow exhaust system, you can use a used part from Ford cars. After purchasing the exhaust, we begin dismantling the factory pipe on Kalina 2. To do this we will need:
- drill;
- a set of keys;
- crosshead screwdriver;
- pliers;
- rags and soap solution;
- degreaser.
It is worth starting to dismantle the standard exhaust system of the Lada from the front of the car. You need to act extremely carefully; if you have disconnected the bolts, but the pipe does not pull out, then you should not use force - it is better to check the structure again. After completely dismantling the exhaust, it is necessary to clean the channel.
First we wipe it with a wet rag, then degrease it and leave it to dry. The next step is to install a new exhaust system. Just like when removing, we start working from the front. We connect the exhaust to the engine, connect the pipes and securely screw the fasteners.
Finally, we attach the pipe in the middle at the back of the car.
2 We increase the comfort of the cabin
There are many ways to make using Kalina 2 more convenient and enjoyable. Many people start improving by redesigning the dashboard backlight. However, the panel lighting of this car model is already quite bright.
Therefore, we suggest turning your attention to another tuning option - a complete replacement of the car’s standard seats.
To do this, you can purchase parts from Lada Granta, which are not inferior in quality to the seats of most modern foreign cars.
Tuning the backlight of the Lada instrument panel
After purchasing a set of seats, you can immediately begin replacing them. Of course, both the hatchback and the second-generation station wagon Lada Kalina are narrower than the Granta, but you won’t have to adjust anything to fit, since the new seats will fit perfectly into the seats and will not rest against the body frame.
To remove the old chairs in the Kalina salon, we will need a flat-head screwdriver and wrenches. First you need to dismantle the rear seat, and then clean the mounting points. If necessary, you can change the standard bolts.
Then we remove the front seats, also cleaning the lower surface under them. Next, you need to act based on the type of new seats. If you bought electrically heated seats, you will first need to connect the wires.
This must be done in accordance with the electrical diagram indicated in the passport of your Lada Kalina. To ensure that the wires do not get in the way underfoot, they need to be wound into one bundle and secured to the bottom. After connecting, you need to screw the chairs themselves.
First we install the front parts, after which we change the seats behind. At the end, we check the reliability of the fastening and continue operating the car.
3 Popular methods of external tuning of Lada
The first step in changing the appearance of Kalina 2 can confidently be considered the installation of body kits. These details will completely change the body of a modest compact car that we are used to.
Among the highest quality parts, experts advise buying a set of body kits from WRC. Such elements are distinguished by their reliability and high quality of painting.
It’s very good if you complement the body kits by installing a spoiler from the same manufacturer.
The last stage of styling for Kalina 2 is the installation of chrome-plated alloy wheels with a diameter of 15 inches.
It is worth noting that some experts are categorically against installing parts of this size, because Kalina 2 has very small gaps between the tires and wheel arches.
The way out of this situation will be to completely flare the arches, after which it will be possible to install even wheels with 16-inch rims on the Lada.
Source: https://kareliyanews.ru/tyuning-lada-kalina-2-prostye-metody-preobrazheniya-skromnoj-malolitrazhki/
Seats
Seats Lada Granta (VAZ 11183, 21116)
The driver's seat and the front passenger seat of the car are equipped with headrests and equipped with mechanisms for moving the seat in the longitudinal direction and changing the tilt of the backrest.
Front seat
:
1 – backrest tilt adjustment handle;
2 – seat position adjustment lever. To adjust the position of the front seat in the longitudinal direction, pull up the locking lever located under the seat and, while holding the lever, move the seat forward or backward. After installing the seat in the required position, release the lever and make sure that the seat is securely fixed.
To adjust the tilt of the seat back, rotate the handle.
It is prohibited to adjust the position of the driver's seat while driving, as this may lead to loss of control of the vehicle. The front seat headrests are height adjustable. To remove the headrest or adjust its height...
...press the lock on the right side, then raise or lower the headrest. The rear seat cushion is one-piece. The back of the rear seat, depending on the configuration, can be either solid or consist of two parts. To increase the luggage compartment area, it is possible to fold the backrest completely or in parts.
Driver and passenger front seat overview. Adjustment mechanism
The ergonomics of the driver's seat are good, the range of settings for the steering column and seat allows a driver with a height of 180 cm to fit comfortably. However, the longer the distance, the faster fatigue sets in; the right leg increasingly becomes numb from the limited position.
For the first time in the Lada Granta Liftback model, the seat is equipped with lateral support. This was previously installed in the second generation Kalina, Kalina Sport. Scheme for manufacturing the structure:
- metal frame;
- foam pillow;
- back.
The frame is a supporting structure. The backrest and cushion are installed on the movable hinges of the frame. In the Liftback model, the backrest is solid, the height is proportional to the height of 170 cm. There are bolsters on the sides that provide a comfortable seat for the driver and passengers.
The seat elements have a spherical structure: springs covered with special foam and polyurethane are placed on a metal base. The top is covered with upholstery fabric.
Lada Granta seat with height adjustment
What I wanted to find
I decided to find something more convenient to put on this car. The main search criterion was that the width of the runners be the same as in the Lada Grant. The width distance between the fastening bolts is 45 cm. The length of the main skids that are attached to the car body is 41 cm.
If the runners are narrower than on the Grant, then the plates will have to be welded on. But I didn’t want this, since this is already re-equipping the car. If I screw the seats back to the standard places, there will be no conversion. The seats will hold securely and will definitely not come off. If there is welding, then it is unknown how it will all turn out.
I looked on the Internet, read, studied this topic. I decided on seats from Hyundai Solaris. They also have a width at the centers of the mounting holes of 45 cm. The length of the runners is also 41 cm. The only drawback is that the “ear” is riveted in front.
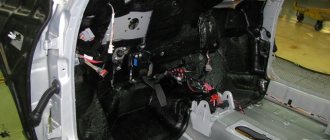
There is also a reinforcement at the back that will have to be removed.
After removing these elements, what remains are completely bare runners, which will be screwed into the Lada Granta. There is no need to drill anything, everything matches the standard fasteners - very convenient.
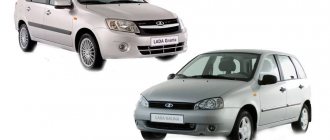
Seats on the fret grant from a foreign car
The standard seats of Lada cars may not be entirely comfortable. Some people lack more developed lateral support, others want height adjustment or adjustable lumbar support. All the shortcomings can be solved in one way - installing alternative seats, for example, from a foreign car.
The front seats themselves are different for Granta and Kalina (first or second generation), but the fastenings are similar. Distance between skid mounting bolts:
- width - 450 mm;
- length - 340 mm;
- diagonally 560 mm.
Luxury trim levels have similar seat mountings, which now have height adjustment. Seats from Lada Granta Sport, Kalina Sport or Kalina Cross are also perfect. The seats of sports versions of cars are more rigid (the seating position will be higher) and have little lateral support.
If you decide to choose seats from a foreign car, then pay attention to two things:
- Overall dimensions of the seats. They should not only fit in the cabin, but also be adjustable in all positions;
- The width of the slide (the distance between the fastening bolts). If the width of the seat slides of a foreign car is 45 cm, then it becomes possible to install them on a Grant or Kalina without alterations (with minimal modifications).
We analyzed reviews from owners on the Internet and compiled a list of “which seats are suitable for Granta or Kalina without modifications” (where the seat mounts for foreign cars have a similar width of the slide). The table is updated as new information becomes available:
| Automobile model | Note |
| Mazda 6 (2008 onwards) | Width 450 mm. Lumbar support, seat lift up/down, larger pillow under the knees ( source ). |
| Kia Rio | The slides are not symmetrical; the seats move inside the cabin by 1-2 cm. |
| Hyundai Solaris | The slides are not symmetrical; the seats move inside the cabin by 1-2 cm. |
| Skoda Fabia | Width 450 mm |
| Chevrolet Lacetti | Width 450 mm |
| Hyundai Tucson | Width 450 mm |
| Honda CRV | Width 450 mm |
| Opel Vectra C | Width 450 mm |
| Renault Megane | Width 450 mm |
| Nissan Qashqai | Width 450 mm |
| Mazda CX-5 | Width 450 mm |
| Volvo V40 | No fastening measurements were taken |
| Skoda Octavia | No fastening measurements were taken |
| Peugeot 308 | No fastening measurements were taken |
| Toyota Camry | No fastening measurements were taken |
| Opel Astra H | The width at the edges of the slide is 455 mm, in order to tighten the bolts you will have to cut off the edges of the slide |
Step-by-step installation instructions
I'll tell you in what order I worked:
- I unscrewed 2 bolts front and rear in the cabin.
- I pulled out the old seats.
- When installing a new seat from Solaris, I used the second internal hole. A standard bolt was screwed into it.
- The outer runners are a little tight, so I had to put a little pressure on them. But the tension is very small.
The inner runners fit well. The alignment with the original hole is one to one. But I had to put a washer in, since the hole is slightly larger than the required diameter.
The seats stood up like family. They are slightly worn, not new. As a result, the size of the seats takes up exactly the same amount of space as standard ones.
If you measure the distance between the seats, it is a little more than 12 cm. Standard armrests are 12 cm wide, so it turns out that they will be flush. But there is such an accessory from Granta Sport, which is 11 cm wide. I ordered such an armrest and want to install it.
Now the armrest will not interfere with the adjustment of the backrest - there are no twists. They are now on the outside, and not knobs, but levers. This is more convenient - you can quickly recline and fold the seat.
The driver's seat now has a lift that can be used to adjust the height. With minimal lowering, it turns out to be slightly higher than on Grant.
That's why I'm riding in the lowest position for now. The seat belts fit without any problems.
Purchase and installation of new seats
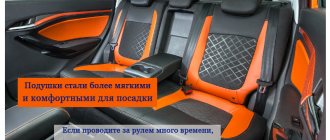
From the very first days of car operation, standard-type seats were not particularly satisfactory for vehicle owners. The seats were very soft, you could literally “sink” into them when you sat down, and the quality of the upholstery left much to be desired. The seats on the Kalina Sport were a completely different matter. At first, seats for the sports version of Kalina were produced by the famous German company RECARO GmbH & Co. KG.
The price for one seat was more than 10,000 rubles. Most recently, they were able to master production at AvtoVAZagregat OJSC in the city of Tolyatti. You won’t be able to find such seats in retail, but you can buy them directly at the factory. The estimated price is from 14,000 rubles for two front seats. The downside is that there is no delivery, and you can only pick them up directly at the enterprise, which is not entirely convenient.
As a result of the unification of the Kalina and Granta bodies, the attachment points for components and elements are in many ways similar. The same can be said about the seats. The process of removing the front seats is extremely simple.
- Sit in the front of the car and move the seat back as far as possible, lifting the lever to do this. As a result, access to the skid mounting bolts from the front will open. The bolts should be unscrewed.
- Next, you need to move the seat forward all the way, unscrew a couple of bolts securing the slide at the back. The seat can now be removed.
The seats on the right and left sides of the front detach in the same way. Removing the rear seat.
- To remove the rear seat cushion, you will need to pull the tab and fold it out. At the bottom, the pillow brackets are secured with stops. Pull them towards you and remove the pillow. If the rear seat is of a split type, then the principle of removing the cushions of the two halves is the same.
- Next, remove the seat back. First of all, press the backrest lock handle and tilt it forward.
- Several backrest fastening nuts will be visible from the luggage compartment of the car. Unscrew them and remove the proper backrest (with a split rear seat). If you need to remove the mounting brackets, you should unscrew the corresponding bolt with which they are secured.
This completes the steps to remove the backrest and rear seat cushion. Features of installing seats front and rear: each seat is installed in the opposite order of removal. When installing the slide at the front, the rubbing parts can be lubricated using Fiol-1. Thus, there are no significant features for dismantling the seats.
In the Lada Kalina, the updated seats have a more developed profile, and in the “luxury” configuration it is possible to adjust the height of the driver’s seat.
Refurbishment or not
Some may consider this a refurbishment, but I think not. I installed the seats on the Grant from a foreign car in the standard places. Skids without welding, also with 4 attachment points. Therefore, the reliability and installation method have not changed. And I doubt that it will be noticeable.
Owner reviews
| № | Positive |
| 1. | Kirill , 33 years old: I am completely satisfied with the original seats on the Granta Liftback, comfortable, ergonomic. Height is 175 cm, I don’t feel any discomfort. |
| 2. | Vitaly , 41 years old: I installed heating on the standard seats, nothing else is needed. It’s very nice that they installed lateral support, it was so lacking in Priora and Vesta. |
| 3. | Mikhail , 30 years old: my positive review of the back sofa. Comfortable, practical, good material, easy to clean. |
| 4. | Gennady , 29 years old: the quality of the seats is average, I’m satisfied, I put on the covers. I'm going to install heating. |
| Negative | |
| 1. | Victor , 24 years old: I don’t like standard seats, I bought a second generation Opel Astra at the market and installed heating. My advice to motorists. |
| 2. | Peter , 36 years old: everything is good in the Grant Liftback, except for the seats, they are not comfortable, too soft, the fabric is the cheapest. Replaced from third generation Ford. |
| 3. | Vitaly , 28 years old: my height is 185 cm, my original seats are not equipped with height adjustment, it’s so lacking. Replaced from Opel Astra. |
How to remove wheel caps on a Lada Granta
How to remove the radiator grille of a Lada Granta
Before tuning this element, let's figure out how it can be removed from the car.
The Lada Granta radiator grill can be removed in 2 ways. According to the classical method, you need to proceed as follows:
- remove the front bumper;
- on its inner side, unscrew the nuts securing the grille, there are 9 of them;
- Click to open 2 locks under the headlights.
Removing the radiator grille along with the bumper on the Lada Granta The second method makes it possible to do without dismantling the front bumper. The algorithm looks like this:
- Unscrew 6 bolts from the top of the grille;
- bend it, stick your hand in, find by touch 4 bolts at the top and 5 nuts at the bottom - for this you will need a figure eight wrench;
- Under the headlights, use a screwdriver to open the 2 clamps.
After dismantling, you can begin tuning. After this, installation is performed in reverse order.
Lada Granta: repair, operation, tuning and maintenance
Sometimes situations arise when it is necessary to remove and install Lada Granta seats. If you know the correct algorithm for these manipulations, such work will not take much time. It should be noted that the methods of attaching the front and rear seats are completely different. Therefore, the methods of installation and dismantling work are completely different.
Removal and installation of Lada Granta front seats
The front seat is attached to the slide using two pairs of nuts and bolts. In order to remove the seat, you will need to unscrew them. In the normal position of the chair, the nuts are inaccessible and their removal is difficult. Therefore, to remove the chair, you should perform a couple of manipulations.
First, the front pair of nuts is unscrewed. To do this, you need to move the seat to the maximum rear position. To do this, press down the lever attached to the slide. It is located under the front of the chair. And then move the seat back all the way. After this, you can freely unscrew the front nuts 1 that secure the seat to the slide.
At the next stage, you need to get to the rear pair of bolts 2. To do this, the chair moves all the way forward, it should take the most forward position. After this, the bolts become accessible for unscrewing. Now the seat is not attached to the slide; it can simply be lifted up and pulled out of the cabin.
Installation of seats is carried out in the reverse manner. Those. the chair is placed on top of the sled, pushed forward all the way, and secured to it with bolts 2. Then the seat is moved back and screwed with nuts 1.
Removal and installation of Lada Granta rear seats
Removing the rear seat is carried out in two steps. First, the lower part - the pillow - is removed, and then the back is dismantled.
The pillow is attached to the body using special hinges and nuts. To get to them, you need to remove the facings 3. After the nuts are unscrewed, you need to pull the pillow lock loop 4. Now the pillow can be easily removed.
To make it easier to dismantle the backrest, it is recommended to first remove the headrests. They are easy to remove if you simply pull them up. Now you need to press the backrest lock drive handle 5 and tilt the backrest forward. The final stage is unscrewing the nuts and bolts on the fastening hinges and directly removing the backrest.
Installation of seats begins with attaching the backrest and ends with installing the cushion. Actions are carried out in the opposite sequence to the withdrawal algorithm.
Removing and installing Lada Granta seats is an excellent way to carry out preventive treatment of metal fastening parts. Particular attention should be paid to the skids.
‹ Removing and installing roof trim Up Body glazing ›
Tuning using a utility net
Tuning the front part of a Lada Granta car using a Chain-link mesh is very common. Such a mesh can be bought at any hardware store - it can be metal or plastic.
We choose the option with medium-sized cells. This is important to avoid excess dust getting under the hood of the car.
Fine mesh netting for making radiator grilles
Next you need to follow a simple algorithm:
- using one of the methods described above to remove the radiator grille;
- cut off all horizontal and vertical jumpers, leaving only the outer frame;
- using cold welding, seal all the holes that were created after the jumpers were cut off;
- clean the surface from all irregularities and burrs;
- Cut the mesh to size and attach it to the frame. If the mesh is plastic, you can simply glue it. If it is made of metal, heat the frame so that it does not burst, and screw the mesh with self-tapping screws;
- paint and wait for it to dry. At this point the tuning can be considered complete.
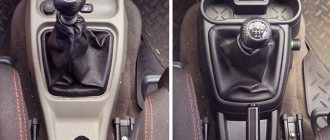
Relocating seat adjustments
Hi all. Because I want to install an armrest in this supercar, so I decided to move the seatback adjustment to the opposite side of the seats. The procedure is not complicated, you do not need to remove the seats. Now I will try to describe in detail for those who have not yet done this due to lack of knowledge.
The whole process took about 40-50 minutes, I’m happy with the result, now I’m looking for a suitable armrest, if anyone has an excellent armrest in mind, please voice it in a comment or write me a personal message, I would be very grateful. Thanks everyone for watching.
Lada Granta 2015, petrol engine 1.6 l., 106 l. p., front drive, manual transmission — styling
Cars for sale
Lada Granta, 2015
Lada Granta, 2021
Lada Granta, 2015
Lada Granta, 2013
Comments 17
Why didn’t you write about the lock washers on the rod? Tapping it is fine, but how can I move this puck back?) It sits dead.
I just placed a screwdriver at the base of the washer and hit it with a hammer
How did you remove the original knobs?
He used a screwdriver to pry it up and slowly pulled it off.
No, it doesn’t rattle or wander, the kit comes with a metal leg on which the whole thing stands. Oddly enough, it doesn’t even squeak
Now I have an idea why the spinners were placed between the seats. This was done for safety reasons in the following case: a car accident, severe deformation, the center pillar is pressed against the seat, the driver is pinned under the steering wheel and unconscious, to get him out, you first need to tilt the backrest with a twist. Now imagine if the spinner is on the left, it will be jammed and you won’t be able to tilt the backrest.
Those. all foreign cars are more dangerous than AvtoVAZ)))) You can just move the seat back)))
Now I have an idea why the spinners were placed between the seats. This was done for safety reasons in the following case: a car accident, severe deformation, the center pillar is pressed against the seat, the driver is pinned under the steering wheel and unconscious, to get him out, you first need to tilt the backrest with a twist. Now imagine if the spinner is on the left, it will be jammed and you won’t be able to tilt the backrest.
In such an accident, the body of the car will be opened like a tin can and the victims will be taken out. They certainly won’t look for where the backrest tilt adjustment is...
Not a bad option. Thank you.
Somehow the price is fabulous, there haven’t been such prices for a long time))) but he’s cool. I suspect that I won’t find it in the city, they don’t carry these and there are no catalogs for ordering. It would be better to order the option from the Internet.