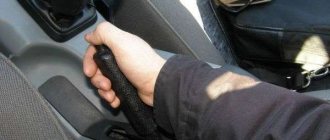
On the Lada Granta, the cable-driven clutch is a fairly reliable element. However, the drive itself wears out quite actively during the operation of the vehicle, resulting in:
- Grant's clutch cable stretches and breaks (the problem is solved by replacing the clutch cable);
- the Grant clutch is also adjusted (the required pedal travel and the moment of “grabbing” the clutch are set);
It is important to take into account a number of nuances both when removing the old cable and when installing and subsequently adjusting the new cable. Read more in our article.
Operations for removing the gearbox from a Lada Granta car
The gearbox is heavy and its shape does not have the correct contours, which is why it is best to carry out the work with at least two people.
1. Disconnect the wire from the negative terminal of the battery.
2. For ease of operation, remove the air filter.
4. Raise the car on a lift or hang its front part and place it on reliable supports (if you are working on an inspection ditch). For ease of operation, you can remove the front wheels.
6. If the gearbox is removed for repairs, drain the oil from it
7. Remove the four bolts securing the front clutch housing cover.
8. and remove the cover.
Read:
9. Disconnect the front suspension arms from the steering knuckles by unscrewing two bolts securing the ball joints to the knuckles on both sides of the car.
10. Leaning the mounting blade on the gearbox housing, press the left inner joints out of it.
11. and right-hand drive of the front wheels. Move the drives away from the transmission by moving the corresponding front suspension shock absorbers outward.
The movement of the shock absorber struts is prevented by the steering rods. To eliminate their influence, when disconnecting the right-hand drive from the gearbox, turn the steering wheel all the way to the left, and when disconnecting the left-hand drive, turn it to the right.
Disconnect the right drive only after removing the front cover of the clutch housing (see paragraphs 7 and 8), otherwise the mounting blade can bend the cover and the flywheel will touch it.
Do not disconnect both drives at the same time, as in this case the axle gears in the differential may move and it will be impossible to install the drives without disassembling the transmission . If it is necessary to disconnect both drives after disconnecting one of them, insert a technological plug or the old internal joint housing in its place and tie the plug or housing to the gearbox with wire so that they do not fall out when removing the box. After this, disconnect the second drive.
12. Disconnect the wiring harness connectors from the reverse light switch.
Grant gearbox cables
Removing the cable
at the cable gear selection
of the Grant gearbox
.
Removing manual transmission 2181 with cable drive
This video shows the process of removing the transmission
.
13. and from the speed sensor.
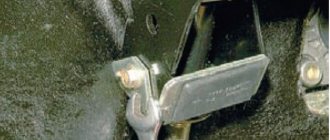
14. Unscrew the nuts of the two bolts securing the torque arm to the gearbox and remove the bolts.
15. and move the rod down along with the bracket,
16. Mark in any way the relative position of the transmission control rod and the shank of the gearshift rod hinge so that when reinstalling, maintain the drive adjustment.
17. Loosen the tightening of the nut of the clamp bolt securing the transmission control rod.
18. and disconnect the rod from the gear shift rod joint.
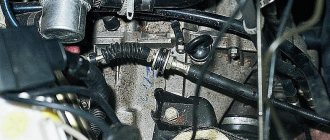
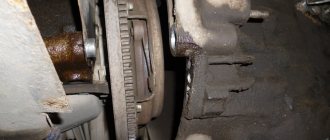
19. Disconnect the lower end of the clutch cable from the gearbox (see “Replacing and adjusting the Lada Granta clutch cable”).
20. Remove the rear bolt securing the ignition coil bracket.
21. Remove the two upper bolts securing the transmission to the engine, simultaneously securing the second support bracket. Bolt A (front in the direction of travel of the car) is short, bolt B is long. Move the throttle cable together with the bracket to the side.
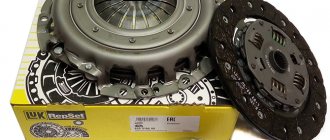
When is it necessary to change the clutch cable?
As a rule, replacing the cable is necessary when it breaks or is stretched too much (adjusting the cable does not allow normal operation of the clutch).
In this case:
- the clutch pedal becomes tight;
- the pedal stroke changes;
- squeezing the clutch is also difficult;
- the clutch pedal falls to the floor;
As a result, gears are difficult to engage, and a crunching noise may appear in the gearbox when shifting. Please note that ignoring the problem, as well as active attempts to “stick” the gear with a crunch while driving and other efforts that the driver makes when trying to change gears with a faulty clutch, can cause severe wear of the synchronizers and other elements of the gearbox. This means that there is no need to delay replacing the cable.
Moreover, this procedure is not complicated and can be done with your own hands in a regular garage. The only caveat is that you have to work in the area of the pedal assembly, which is not entirely convenient (the fuse box and power steering are in the way).
Procedure for removing/installing an automatic transmission on a Lada Grant
Required materials and tools:
- a set of car keys;
- heads, ratchet;
- rags;
- extension cord, additional lighting;
- screwdrivers with different tips;
- pliers, side cutters;
- hydraulic stop / telescopic stand;
- metal brush;
- new gear oil;
- hydraulic jack / any other lifting mechanism;
- graphite-based lubricant;
- rubber / silicone hose for draining waste;
- wooden stops;
- gloves.
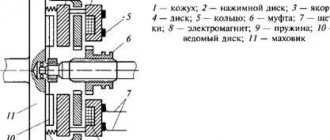
Description of transmission
Below we will consider the most important indicators that affect the operation of the car:
- the gear ratio for the VAZ 21807 shows figures of 3.94, for the French analogue this figure is slightly lower - 3.87;
- with this transmission, the Lada Vesta accelerates to one hundred in 10.2 seconds, which is a second faster than the JH3 - 11.2;
- the maximum speed for the VAZ 21807 is 188 km/h, for the JH3 the figure is 178;
- The fuel consumption of Lada Vesta with a domestic gearbox is 7.5 liters, the French gearbox consumes 7 liters.
Manual transmission
The most important thing the engineers worked on was modifying the transmission tooth profile. They took an example from European models, where the noise of the gearbox should merge during downshifts with the roar of the engine
Lada Vesta designers applied new developments, improving the entire system and adjusting its balance.
Catalog numbers and a list of all necessary parts
Catalog numbers of bearings, their cost
| Name | vendor code |
| F-846067-01 (dimensions 56 x 86 x 25) | From 1290.00 |
| F846067-00 | —/— |
| F846067-02 | —/— |
| NA4912NBS | 1706.88 |
| 61912ISB | 1272.96 |
*prices are current as of November 26, 2018.
Before replacing an automatic transmission, always confirm the catalog numbers with service station specialists.
Automatic transmission hums when accelerating
Sometimes the car makes unpleasant sounds when starting to move. Perhaps it's the automatic transmission whining. It starts making noise when shifting into third gear or at a speed of 60 km/h. With further acceleration, the unpleasant noise intensifies. After reaching a certain speed (80-90 km/h), the sound from under the hood subsides. If you stop pressing on the gas, the sound will no longer appear, but further acceleration will provoke its appearance again.
Replacing the rear gearbox can solve this problem. It is also worth inspecting the rear brake discs. You need to check the back side (where the brake cylinder is located). Rusty deposits may accumulate on the discs. If their width is more than 1 centimeter and they are over the entire surface, this may cause extraneous noise. The problem is solved by cleaning the inside of the disks.
Procedure for removing a manual transmission
Required materials and tools:
- set of car keys, sockets, ratchet;
- rags;
- additional lighting;
- jack;
- graphite lubricant;
- plastic container for draining waste;
- transmission oil.
Step-by-step instructions for replacing a manual transmission
- We install the machine within the perimeter of the repair area: on an inspection hole, on a road overpass.
- We remove the terminals from the battery, preventing a short circuit in the circuit.
- We dismantle the air filter and the plastic air filter housing.
- We unscrew the fastening nuts, remove the power terminals, and dismantle the starter.
- We unscrew the mudguards and the oil pan protection (if any).
- Remove the block with wires from the reverse activation sensor.
- Disconnect the contacts from the speed sensor.
- We twist the drain plug and drain the waste from the manual transmission.
- Disconnect the clutch cable, lever fork, and bracket from the gearbox housing.
New - well forgotten old
The modernized gearbox received the index 2181 and the same gearbox. The volume of oil poured has decreased by almost a third. “Mineral water” was exchanged for semi-synthetics, which retains its properties in cold temperatures down to -42 0 C, and does not require replacement for almost 200 thousand km. Suddenly.
Multi-cone synchronizers appeared on first and second speeds for good reason: their mission is to extend the life of the constantly loaded second gear and reduce the effort when changing gears.
The gear change mechanism has become a separate module. To dismantle it, it is not necessary to remove the Lada Granta box. A special lock prevents erroneous start of the reverse mode when turning off fifth gear. Innovation – selector grid: sets the lever stroke when selecting gears, repeating the shift pattern.
The main character in selecting the characteristics of the mechanism turned out to be... a simulation stand. The test driver engages the gears, and the robot simulates shifts. Taking into account the optimal settings, we created a mathematical model for the manufacture of another innovation - a 3D central plate, proposed instead of return locks and springs.
The rocker drive for gear changes was replaced by a cable.
As a result, we got a clear shift pattern, eliminated the interaction of the gearshift lever and seat cushions, and got rid of blocking when selecting reverse gear.
Differences between cable-shift and rocker-shift gearboxes
In gearboxes with rocker shifting, the desired speed is selected using a multi-lever assembly mechanism that connects the handle and the rod that fits the box. An example of such a gearbox is AvtoVAZ 2180.
With cable switching, the variable speed drive with rods gave way to cables.
Cable shift gearbox
By replacing rigid rods with flexible cables, vibrations of the body and gear lever decreased, backlash decreased, and shifts became clearer.
When to remove cables
The Lada Granta has a cable gear change mechanism that is more capricious than the rocker “brother”. During operation, carefully monitor the condition of the unit. Be sure to adhere to the “culture” of gear shifting. Jerks are detrimental to synchronizers and gears. The cables will also get it.
For some, removing the Grants gearbox cables will seem like an easy procedure, for others it will seem like a labor-intensive process, a la removing the gearbox on a Lada Granta. Such work is often carried out at a technical service station (STS). The cables are replaced in pairs.
Catalog numbers, bearing names
Replacing an automatic transmission with a manual transmission and vice versa: how justified is it?
The question is ambiguous, since each owner must start from his goals. When it comes to aggressive driving style, drifting, etc., you can’t find a better mechanic.
If you are a supporter of a smooth ride, medium speeds, and fuel economy, then an automatic is the best choice. Although, if you have the skills, you can drive it on the automatic type.
The final choice is up to the owner of the technical device.
How to eliminate the howling of a VAZ box
The first thing you can do is contact the service center and request that the noise be eliminated as part of the warranty repair. This process is long, painstaking, requires patience and does not always end in victory. In most cases, the manufacturer claims that the sound during transmission operation is normal and the vehicle is not subject to warranty repair. But if the sound is very loud or the buyer is very persistent, the manufacturer suggests replacing the box. But, judging by the reviews of drivers who managed to replace the manual transmission under warranty, this does not always solve the problem. The fact is that a howling box is a manufacturing feature, not a defect, so whether it’s worth replacing it with exactly the same one is up to you to decide.
Modification of the clutch cable
Sometimes the noise is due to vibration transfer between the fork and the clutch cable. This problem can be solved with a simple modification that does not require financial investment. You need to remove the clutch cable from the fork, replace the standard rubber insert with a washer made of softer rubber, which dampens vibration well. The element is glued to a plastic part, which serves as a stop for the cable.
This method does not help everyone and will not allow you to achieve ideal silence, but it makes the unpleasant sound much quieter. In any case, it won't hurt to try to implement this simple modification.
Interior noise insulation
Another option is good sound insulation of the cabin. Of course, the howl of the box in this case will not go away, but it will be less audible. This event is expensive, but it will make the car more comfortable. If the performance of the transmission is not in doubt, and only noise is annoying, you can use this option.
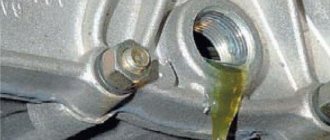
Do I need to add oil?
It is difficult to check the oil level in a cable-driven box; this model does not have a dipstick. The only way to do this is to unscrew the oil filler plug. If at the same time the oil begins to flow out slowly, then the level is normal; if not, it is better to top it up. In this case, it is imperative to use exactly the same technical fluid as already poured in the box.
To add oil to the maximum level, you need to jack up the car from the side where the oil filler neck is located and add oil until it begins to flow out. For convenience, it is better to use a syringe. As soon as the liquid flows out, the plug must be quickly tightened. If you do not raise the correct side of the car, the transmission fluid level will be low.
In some cases, this procedure helps get rid of the howling or makes the box a little quieter. Some motorists noted that they had to add about 0.5 liters of oil to the manual transmission. But in most cases, the procedure does not eliminate the howling problem.
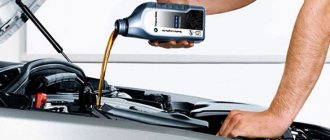
Does oil quality affect transmission noise?
At the factory, manual transmission 2181 is filled with budget oil of dubious quality. Many people prefer to replace it immediately. This not only makes the transmission quieter, but also extends its life. Does changing the oil eliminate the noise? In some cases, this procedure can improve the situation somewhat, but it is not a panacea. In most cases the box continues to howl.
Reviews
| № | Positive |
| 1. | Vladimir: after two years of active operation, there are no complaints about the operation of the manual transmission. I carry out technical inspections in a timely manner, fill in semi-synthetic oil, medium speed limits, non-aggressive driving style. |
| 2. | Sergey: after driving a car for a year and a half, I will say the following: there were no major breakdowns, nor any unscheduled repairs. However, twice I independently tightened the drive cable on the lever. |
| 3. | Kirill: I took a Granta with an automatic rifle from the showroom, the car is playful, good acceleration dynamics, average fuel consumption. The build quality is satisfactory, spare parts are always available in the market and stores. |
| 4. | Dmitry: I recently underwent scheduled maintenance, the master assured me that the transmission was in good working order. Replaced consumables, filter, oil. I have been actively using the car for two years now. The manufacturer indicates a resource of 180 - 200 thousand km before major repairs. Let's see how much mine comes out. |
| 5. | Vasily: at 65,000 km I replaced the rubber boot once, since the previous one was defective. There were no other breakdowns, consumables were replaced as usual. |
| 6. | Ivan: my positive review of the Lada Granta car. This is my second year of driving actively, and in a month I hit two months’ worth. I'm pleased with the build quality of the transmission, no complaints. |
| 7. | Vitaly: the manufacturer recommends changing the transmission oil every 60,000 km, in practice my interval is 50,000 km. I believe that the fresher the oil, the more useful substances are retained in it to protect and lubricate the gearbox gears. |
| Negative | |
| 1. | Ivan: I do not agree with the manufacturer’s statements about the service life of 180,000 km. Already at 80,000 km the cable drive was replaced. In the process, other minor breakdowns were eliminated. The model is crude, there are many shortcomings and defects that are not eliminated from year to year. |
| 2. | Vasily: after 75,000 km, my automatic transmission began to change gears with a certain delay (pause). After visiting a service station, the technician diagnosed a defect in the control unit and solenoid. |
| 3. | Gennady: in general, the transmission is good, but there are a number of shortcomings and defects that need to be eliminated. In order not to be fooled in the future, I plan to buy a Renault Logan. The model is proven, the weaknesses are known, there are not so many of them. |
Conclusion The design of a standard transmission is quite complex, regardless of whether it is manual or automatic. In case of repairs and preventive maintenance, prepare thoroughly and study the methodological recommendations.
When it comes to major transmission repairs, use the services of service station professionals. At a special diagnostic stand, technicians conduct tests and calibrate the operation of the box. Upon completion, they provide a quality guarantee for the block of work performed.
About the uniqueness of the cable unit for Granta
Replacing the rods and rockers with a cable system in the Lada Granta was intended to reduce the impact of vibration. At first, the developers were inclined to build a hydraulic circuit for the switching unit, similar to many foreign cars. Such a decision would have caused an additional increase in cost, affecting the price of the car, so the manufacturer chose a path that would take into account the financial capabilities of a wide range of buyers. The final increase in the cost of the car due to the use of a progressive cable unit reaches 5 thousand rubles. This is quite acceptable, since the price increase is insignificant, and the transmission unit is reliable.
Note that the cable gearbox has acquired more durable forks enclosed in the shift mechanism. Previously, the manufacturer used steel parts coated with bronze. Over time, abrasion of the protective layer was observed, leading to the penetration of dust into the unit with a subsequent harmful effect on the properties of the oil.
New analog forks are endowed with increased strength and have reduced weight. Aluminum is used as the material for their manufacture. An additional measure was the use of plastic linings to protect the forks from premature wear.
Also, the manufacturer of the Lada Granta mercilessly replaced the outdated lockers and springs present in the design of the switching unit. Now the main component here is the plate, which allows you to quickly “sort out” the steps. A latch moves along the surface of this element, which conveys the “intentions” of the owner to the unit (activation of the desired gear).
The cable gearbox allowed the LADA Granta gearbox to become an attribute of comfortable control of the vehicle's driving modes. Discomfort will be guaranteed to be absent due to the leveling of vibrations.
Perhaps the future promises LADA Granta the installation of a hydraulic shift mechanism, but in the present, such a solution as a cable gearbox allows you to get maximum comfort at minimal cost. The functionality of the updated box has made it possible to sufficiently get rid of annoying problems that bring frustration and discomfort to LADA Granta owners. The differential has undergone virtually no changes (with the exception of synchronizers, as already noted). This made it possible to minimize the increase in the cost of a car with such a transmission.
The cable gearbox is very simple not only to operate, but also if repairs are necessary. This is confirmed by a separately removable switching unit, a reduced volume of lubricant and its less frequent need for replacement (after 200 thousand km or a five-year interval).
Source
How to eliminate the howling of a VAZ box
The first thing you can do is contact the service center and request that the noise be eliminated as part of the warranty repair. This process is long, painstaking, requires patience and does not always end in victory. In most cases, the manufacturer claims that the sound during transmission operation is normal and the vehicle is not subject to warranty repair. But if the sound is very loud or the buyer is very persistent, the manufacturer suggests replacing the box. But, judging by the reviews of drivers who managed to replace the manual transmission under warranty, this does not always solve the problem. The fact is that a howling box is a manufacturing feature, not a defect, so whether it’s worth replacing it with exactly the same one is up to you to decide.
Modification of the clutch cable
Sometimes the noise is due to vibration transfer between the fork and the clutch cable. This problem can be solved with a simple modification that does not require financial investment. You need to remove the clutch cable from the fork, replace the standard rubber insert with a washer made of softer rubber, which dampens vibration well. The element is glued to a plastic part, which serves as a stop for the cable.
This method does not help everyone and will not allow you to achieve ideal silence, but it makes the unpleasant sound much quieter. In any case, it won't hurt to try to implement this simple modification.
Interior noise insulation
Another option is good sound insulation of the cabin. Of course, the howl of the box in this case will not go away, but it will be less audible. This event is expensive, but it will make the car more comfortable. If the performance of the transmission is not in doubt, and only noise is annoying, you can use this option.
Do I need to add oil?
It is difficult to check the oil level in a cable-driven box; this model does not have a dipstick. The only way to do this is to unscrew the oil filler plug. If at the same time the oil begins to flow out slowly, then the level is normal; if not, it is better to top it up. In this case, it is imperative to use exactly the same technical fluid as already poured in the box.
To add oil to the maximum level, you need to jack up the car from the side where the oil filler neck is located and add oil until it begins to flow out. For convenience, it is better to use a syringe. As soon as the liquid flows out, the plug must be quickly tightened. If you do not raise the correct side of the car, the transmission fluid level will be low.
In some cases, this procedure helps get rid of the howling or makes the box a little quieter. Some motorists noted that they had to add about 0.5 liters of oil to the manual transmission. But in most cases, the procedure does not eliminate the howling problem.
Does oil quality affect transmission noise?
At the factory, manual transmission 2181 is filled with budget oil of dubious quality. Many people prefer to replace it immediately. This not only makes the transmission quieter, but also extends its life. Does changing the oil eliminate the noise? In some cases, this procedure can improve the situation somewhat, but it is not a panacea. In most cases the box continues to howl.
Replacement
Despite the simplicity of this operation, replacing the cables of the Kalina 2 gearbox must proceed strictly according to plan. Any violation not only complicates the process, but also often leads to unpleasant consequences. If you don't put the car on the handbrake or don't support the wheels, it can run over your leg and injure your foot.
If you do not disconnect the battery, careless movement of any metal object may cause a short circuit and damage the wiring or some electrical components. Let's look at how to remove the Kalina transmission cables and then install new parts in their place
Preparation
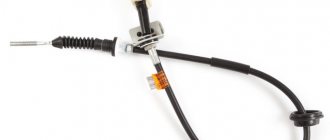
On the Lada Kalina, replacing gearbox cables begins with choosing a location for this operation. You need a flat, well-lit area without drafts (yard or garage). You will need cables (AvtoVAZ article number (OEM) 219011703113, price 2.5–5.5 thousand rubles per set) and the following tools:
- key to 10;
- Phillips and flat screwdrivers;
- puller (open-end wrench size 13, the arms of which are ground with a cone to a thickness of 0.5–1 mm).
Having chosen a site, put the car on the handbrake. If for some reason it does not work, support the rear wheels with wheel chocks or bricks. Otherwise, on Kalina 2, replacing the gearbox cables can lead to serious troubles.
Removal
Replacing Kalina gearbox cables begins with removing these parts. You will have to perform a number of works under the hood and inside the car in very inconvenient places. Therefore, you will need an assistant with dexterous hands who is not afraid of dirty work.
Replacing cables for the Lada Kalina gearbox
Actions under the hood
After placing the machine on the site and opening the hood, proceed as follows:
- Disconnect both terminals of the battery using a 10 mm wrench, then remove it and place it next to the car.
- Disconnect the air filter pipe from the engine by loosening the clamp using a Phillips screwdriver.
- Remove the air filter housing (there is no need to disassemble it as when replacing the filter element). To do this, use your fingers to release its fastenings from their seats on the body.
- Use a puller to pry up the cable tips so that they come off their pins. If you don’t have a puller, you can do this with a flat-head screwdriver or even your fingers.
- Pull the cable clamps out of their seats.
After disconnecting the drive elements from the pedals, pull them out through the engine compartment.
Activities in the salon
To ensure that the Lada Kalina 2 gearbox cables are removed normally, do the following in the cabin:
- Remove the handbrake pad, the cover covering the gear selector (plastic tunnel or console with cup holders) and the side ventilation panels next to the tunnel. All you need is a Phillips screwdriver.
- If you cannot remove the console, unscrew the bolts securing the handbrake lever, then move it to the side.
- Unclip the ends of both cables, then remove the clips holding them from their seats.
All that remains is to remove the plastic clip that secures both parts to the car body.
Installation
Replacing Lada Kalina gearbox cables is not only the removal of old ones, but also the installation of new parts, but in the reverse order. Consider a few important points:
- To ensure proper orientation of each cable, insert them with the arrow on the rubber seal facing up.
- If you can’t get them into the cabin, disconnect the oxygen sensor wire (lambda probe), and reconnect after installing new elements.
- If even the removed wire does not help, then hang up the left front side of the car, then support it with a safety stop and push the parts into the interior from under the car.
Having inserted the cables into the interior, perform the same steps as during dismantling, but in reverse order.
Finalization
Purpose: install a gasket between the clutch cable and the gearbox fork
Procedure:
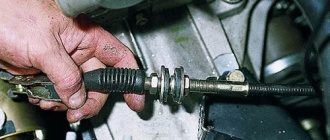
- Remove the clutch cable end from the fork.
- Unscrew the cable end, having previously measured the length of the free threads.
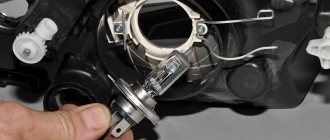
- Remove the clutch cable boot.
- Remove the rubber insert from the cable stop (photo No. 1).
- Instead, install a round washer made of porous rubber (diameter 32-35 mm, hole 12-13 mm) (photo 2).
- Cut a piece of rubber measuring 20x70 mm, 2.5-3 mm thick.
- Glue it (for example, with “Moment” glue) to the plastic cable stop (one turn), secure with electrical tape 1.5 turns.
- Insert the cable into the bracket on the gearbox and put on the boot.
- Screw on the tip, leaving a couple of millimeters less free threads on the stud (since the new gasket is thicker than the factory part).
- Place a 2 mm foam rubber spacer between the cable tip and the fork lever.
- Adjust the clutch pedal.
As a result: the effect was noticeable immediately. Now the rattling can only be heard with the windows open. After modifying the clutch cable fastening, the car drove more than 15 thousand km, the gearbox noise was within normal limits. Increased vibrations and noise are noticed only at a temperature of -20 o C, when the rubber gaskets become hard. The author has posted sound files (engine acceleration-braking mode at 1500-2000 rpm in 3rd gear), which shows what the noise was from the gearbox before and after modification. Site users can download the file:
To download files you need to log in to the site To download files you need to log in to the site
On foreign cars, increased clutch cable vibrations are dealt with using a special weight (Renault Logan cable). You can repeat the foreign experience in a garage, for example, wrap a bitumen ball around the cable sheath (taken from a vibration damper).
Let us remind you that owners of Lada Granta, Kalina and Priora cars also encounter clicks in the clutch pedal.
Do I need to add oil?
It is difficult to check the oil level in a cable-driven box; this model does not have a dipstick. The only way to do this is to unscrew the oil filler plug. If at the same time the oil begins to flow out slowly, then the level is normal; if not, it is better to top it up. In this case, it is imperative to use exactly the same technical fluid as already poured in the box.
To add oil to the maximum level, you need to jack up the car from the side where the oil filler neck is located and add oil until it begins to flow out. For convenience, it is better to use a syringe. As soon as the liquid flows out, the plug must be quickly tightened. If you do not raise the correct side of the car, the transmission fluid level will be low.
In some cases, this procedure helps get rid of the howling or makes the box a little quieter. Some motorists noted that they had to add about 0.5 liters of oil to the manual transmission. But in most cases, the procedure does not eliminate the howling problem.
Oil additives: is it possible to do without repairs?
If changing the oil does not help, the gearbox howls, then it is necessary to repair the unit. Many people can talk about adding additives, but this does not help in 80 percent of cases. According to reviews from many motorists, adding additives can only temporarily or not completely muffle the sound, but will not completely solve the problem.
Chemically active substances contained in revitalizant additives form a cermet layer on the surface of worn gears and bearings, which, according to the manufacturer, restores the geometry of the parts and compensates for wear. Of course, if the howl of the gearbox is barely noticeable, it has just begun, then adding, for example, Hado, may well delay the problem with repairing the gearbox. But it may not help if the problem is already old and the wear on the unit components is significant. Then repairs are definitely needed.