When the throttle cable needs to be replaced
How to determine the moment when the VAZ-2110 throttle cable requires replacement? Experts recommend paying attention to the following points in the operation of this vehicle part:
- it is not possible to regulate the throttle valve drive;
- when pressing the accelerator pedal, the damper cannot open and close fully;
- the metal part of the cable began to “shag” (this can be seen visually when checking the internal parts of the car);
- When the throttle valve is operating, the gas cable constantly gets stuck.
If you find one of these problems in the operation of your vehicle, then you need to immediately buy a new throttle cable and replace it.
Replacing the throttle cable
Changing the throttle cable
on Gazelle. Subscribe to my channel My affiliate program AIR.
This procedure is carried out only when the engine is cool. Otherwise, there is a danger of getting burns during the work of replacing the cable.
In order to correctly replace this cable on a VAZ-2110, you must adhere to the following step-by-step instructions:
- Prepare the necessary tools:
- screwdrivers of various sizes;
- The pliers are huge and thin.
- Dismantle the throttle valve :
- the air pipe is removed (this is necessary so that this part does not interfere with subsequent actions with the cable), the screws on the tie clamps are loosened;
- use a screwdriver to disconnect the crankcase gas ventilation hose;
- the locking spring holding the sector is removed;
- the main part is removed from the groove by hand when turning the sector counterclockwise;
- the cable is disconnected from the throttle assembly.
- Removing the cable from the bracket:
- for 16-valve cars - using thin pliers, remove the locking plate (thanks to it, the cable is adjusted) and remove the middle part of the cable together with its holder from the bracket on the intake manifold;
- for 8-valve cars - loosen the nut, move the rubber cover, remove the middle part of the cable from the bracket;
- the cable itself is pulled through a plastic clamp, which is previously cut.
- Removing the cable from the vehicle interior:
- Use a screwdriver to disconnect the edge of the cable from the accelerator pedal.
- Removing it from the engine compartment (simply stretches out from the passenger compartment).
- Installing the newest part:
- the cable is inserted through the engine compartment;
- one edge is pushed into the cabin and connected to the accelerator pedal;
- The second edge is attached to the throttle valve.
How to change
Removal and installation of the fuel rail and fuel regulator VAZ 2110, VAZ 2111, VAZ 2112, Lada DesyatkaRemoval and installation of the fuel rail and fuel regulator VAZ 2110, VAZ 2111, VAZ Lada, 2112 Ten
key 8; 2 keys for 17; crosshead screwdriver.
First thing to do. remove the windshield wiper;
Then loosen the locknut and adjusting nut (Figures A and B, respectively);
Then remove the cable rim from the coupling plug;
Now you need to move the cover from the lower end of the cable cover using a key to 17 and unscrew the nut (indicated by the number letter B) from the tip to the bracket, holding the tip while twisting the second key to 17;
Then remove the tip from the bracket;
Unscrew the 2 nuts securing the windshield wiper arm and remove the bracket;
Remember that the bracket must be installed in an inclined area towards the transfer machine.
After this, you need to unscrew the screw securing the protective casing and remove the cover holder;
Open the cover on the side to secure the cable end to the clutch pedal. Then, using a screwdriver, remove the support bracket from the pin, then remove the end of the cable from the pin;
Now you need to unscrew the cable holder bolt on the pedal bracket and pull the cable into the interior;
Now we need to remove the bushing from the clutch pedal.
A broken or worn bushing must be replaced with a new one
Please note that the sleeve is cut by design and this is not a defect
Installation of the clutch cable should be done in the reverse order, pre-lubricated with Litol-24 or LCS-15 lubricant.
Replacing the clutch cable on a VAZ 2108, 2109
Removing and installing the fuel filter VAZ 2110-2111-2112
1). We remove the part to be replaced from the bracket, and therefore loosen the fastening elements.
2). Remove the lower end of the cable from the clutch release fork.
3). Let's move into the car interior. We remove the rubber mats and move the carpet, then disconnect the clutch cable from the pedal.
4). Use a regular screwdriver to pull out the locking bracket, and then remove the pin connecting the clutch cable to the pedal bracket.
5). We get the cable. There is a rubber cushion installed on the passenger compartment side of the engine compartment. There is a hole in the body partition under the steering wheel through which, by pushing out the rubber cushion, we pull out the cable sheath. And then we pull out the cable itself.
6). We pass the new cable through the hole under the bottom and, using a locking bracket, fasten its tip to the clutch pedal pin.
7). We fix the clutch cable. Just remember, to avoid damaging the threads, the rubber bushing must fit into the bracket.
8). Then we put the tip on the fork.
9). After installing the new cable, it still needs to be adjusted.
Replacing the clutch cable on Lada Kalina
1). Using an 8 wrench, unscrew the nut of the cable sheath bracket to the pedal assembly.
2). Using a flat-head screwdriver, remove the spring clip from the clutch pedal groove.
3). Remove the eye of the housing of the automatic cable length adjustment mechanism from the clutch pedal pin.
4). We remove the upper part of the cable from the pedal assembly bracket.
5). We pull the cable lead out of the clutch release fork lever, pulling it forward.
6). Rotating counterclockwise, unscrew the leash of the threaded end of the cable.
7). Remove the rubber cover from the cable end.
8). Pull out the end of the cable sheath from the hole in the bracket on the gearbox.
9). We return to the cabin and remove the cable sealing cover from the hole in the front panel, and then pull the cable into the cabin.
10). Before installing the new cable, check the condition of the plastic bushing on the Kalina clutch pedal pin.
eleven). If necessary, we replace the worn bushing with a new one, after which we apply grease.
Installation procedure
1). We pass the cable through the hole in the front panel from the passenger compartment into the engine compartment.
2). We install the sealing cover into the hole in the front panel.
3). We put the automatic cable adjustment mechanism on the pedal pin and secure it.
4). We screw a plastic leash onto the threaded end of the cable so that the end of the cable end is flush with the end of the leash.
5). We insert the leash into the groove of the clutch release fork lever.
Video
Replacing the VAZ 2110 clutch cable, do it yourself
Generator VAZ 2110 2111 2112 Generator VAZ 2110 2111 2112
Replacing and adjusting the VAZ 2110 clutch cable
Welcome, friends, to the DIY car repair website. Often, situations arise along the way that involve the breakdown of some part of the car.
Often, in such cases, it is not possible to call a tow truck or go to the nearest service station.
Only the car owners’ own knowledge and skills can help eliminate minor faults, and in this article we will try to provide you with detailed instructions for car repair.
With high mileage, often on front-wheel drive VAZ cars the clutch pedal falls to the floor. This minor breakdown does not allow the driver to continue driving safely, although it is quite possible to get there.
There are two reasons for this phenomenon. The first of them is the clutch fork broke. And to fix this, you need to remove the gearbox (gearbox), and you may also have to replace the VAZ 2110 clutch and release bearing, since a broken fork could damage these parts.
The second case is easier to repair, since most likely the VAZ 2110 clutch cable has broken. In case of such a breakdown, you can get to a service station or your garage, you just need to start the car with first gear engaged.
To replace it, you do not need to have special tools or skills; it is enough to have basic technical concepts. Replacing the clutch cable on a VAZ 2110 can be divided into two stages - work in the engine area and work in the car interior.
Self-replacement of the VAZ 2110 clutch cable
So, we begin work under the hood in the engine area. The first step is to press the clutch fork and at the same time tension the cable and remove it. Next, we disconnect the cable from the fastening on the box; to do this, you need to slightly unscrew the two nuts by nineteen.
The instructions say that when working in the interior, in order to simplify the process of removing the cable, you need to remove the windshield wiper and frill. In this case, there is free access to the clutch pedal protection.
It can be removed using a Phillips screwdriver. And it would be desirable that it be short. If a breakdown occurs on the way, you can unscrew it with a standard length, but only through the fuse block.
Next, pick up the locking bracket that holds the cable head and remove it and the cable. So, it’s better to take a set of tools with you to quickly resolve problems on the road.
- Unscrew the two nuts by ten.
- Unscrew 5 screws.
- We hook up the clamps at the back.
- Disconnect the windshield washer tubes.
- Remove the top cover.
- We unscrew 10 screws, pick up the clamps, and remove the trim from the window frame.
- We unscrew the sound insulation screws and remove the entire casing.
Before installing a new cable, you need to remove the bushing into which the cable goes from the clutch pedal pin.
The cable must be lubricated with engine oil. We carry out the installation in the reverse order, from the passenger compartment to the compartment where the engine is located, push the end of the cable through, install the cable on the pedals, engage it with the clutch fork and secure it with a bracket on the box.
Adjusting the clutch cable on a VAZ 2110
The adjustment is carried out as follows, for this we need 2 open-end wrenches for thirteen. Now you need to set the free play of the clutch pedal within one hundred twenty-five, one hundred and thirty millimeters. In this case, the clutch pedal should be at the same height as the brake pedal, that is, no higher and no lower.
Having loosened the bracket nut on the gearbox, we change the position of the cable and, having done this, tighten the nut back. To check the cable adjustment, press the pedal two or three times.
After which we again measure the free movement distance. If the results deviate, we carry out the adjustment again in the same sequence.
Checking and adjustment must be carried out until the result is as indicated in the instructions.
The whole procedure takes no more than thirty minutes. Now you can quickly and comfortably change gears, checking the work done, while the car is moving.
Also, some car enthusiasts claim that you can use a cable with a ratcheting mechanism. It requires no adjustment, saving you time.
The self-adjusting cable will help the driver forget about clutch maintenance.
Such a cable seems to be installed on the Lada Priora, but I have never encountered such cables, so I cannot recommend it to you and I don’t know if they are suitable for the VAZ 2110, VAZ 2115 and other models.
It’s better, of course, not to experiment, but to install the original clutch cable, which is provided by the manufacturer. Have a successful and smooth road.
https://remontavtovaz.ru
Why did it happen
Perhaps the automatic requests do not belong to you, but to another user accessing the network from the same IP address as you. You need to enter the characters into the form once, after which we will remember you and be able to distinguish you from other users exiting from this IP. In this case, the page with the captcha will not bother you for quite a long time.
You may have add-ons installed in your browser that can make automatic search requests. In this case, we recommend that you disable them.
It is also possible that your computer is infected with a virus program that is using it to collect information. Maybe you should check your system for viruses.
If you have any problems or would like our support team, please use the feedback form.
Welcome! The throttle cable, also known as the throttle cable, is responsible, by the way, for opening and closing the throttle valve. Thanks to this cable, the speed of the car can also be adjusted, that is, they pressed the gas pedal, the cable tightened and at the same time it also opened the throttle a larger angle, thereby the revolutions went up and the car began to move (or stand still if the clutch pedal is depressed or if the gear is in neutral), but this cable wears out and therefore the car begins to be very dangerous to drive, since when it wears out the metal part begins to fray (It is twisted, as it were) and in connection with this, pieces of the cable begin to touch the sheath and the cable does not return back and the car begins to accelerate further, regardless of pressing the gas pedal (Because the cable is stuck and the throttle is pushed back does not move away, so even if you take your foot off the pedal, the car will still move on, this is the situation that is dangerous).
Note! To replace this cable and to adjust it (And you will definitely have to adjust it) you will need: Various pliers (thin, large) and screwdrivers!
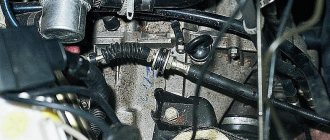
Where is the throttle cable located? Depending on the engine, its location may change, although not significantly at all, in general, on 8 valve cars the cable is in the upper part and after opening the hood you can immediately see it (in the left photo it is indicated by a red arrow), on 16 valve cars of the tenth family, it is located on top in the same way, but just to get to it, you will need to remove the screen from the engine (For information on how to remove the screen, read the article: “Replacing the engine screen on a 16-valve prior”), after removing it you will immediately and you will see, for clarity, in the right photo it is indicated by an arrow.
Note! But there are some cars that were equipped from the factory with an electronic gas pedal, the tenth family of the Togliatti assembly was not affected by this, but those cars that were transferred to Ukraine (Currently, their brand has changed, and they are called Bogdan) after 2011 were equipped with this pedal, We immediately warn you that there is no cable, but you still check, for clarity, in the photo below the arrow shows this very electronic pedal and you can also see that there is no gas cable coming from it!
When should you change the throttle cable? You need to periodically check its condition; if you start to see that its metal part has begun to fray, then you don’t need to wait until the cable gets stuck, and in general, in this case, we recommend that you immediately visit an auto store and purchase a new throttle cable from it and replace it by replacing the old one, In addition, the cable must be replaced if, when adjusting it, it is impossible to achieve complete opening and complete closing of the damper.
Causes of clutch cable breakage
The most obvious sign that there is no direct connection between the pedal and the clutch (which leads to uncontrollability of this important unit) is the unexpected “failure” of the clutch pedal to the floor of the car interior. Note that the same thing happens if the clutch fork fails.
Relatively old machines are primarily susceptible to the described malfunction. The risk of clutch cable breakage increases significantly if the vehicle is used constantly/very frequently or operates in difficult, extreme conditions. Gross violations of the rules for using the vehicle also lead to such breakdowns.
To ensure that such surprises are not completely unpleasant, the motorist is recommended to have a minimum set of tools in his trunk, which includes the following items:
- wrench 8;
- wrench 17;
- wrench 19;
- Phillips screwdriver.
From the practice of repairing this system, two methods are known for restoring the VAZ 2110 clutch cable: with and without removing the frill and windshield wiper.
Replacement Tools
To work you will need:
- The key is "8".
- Two keys for "14".
- Screwdriver (phillips).
Sequence of work
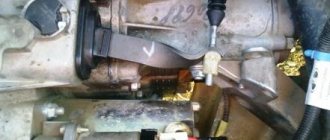
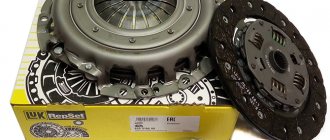
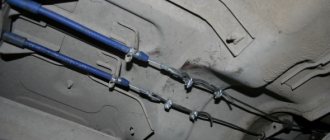
For comparison, old and new clutch cables
They go in this order:
- Move the air filter housing to the side.
The air filter housing will interfere with us, so we will move it to the side. Moreover, all the housing latches were broken and it was dangling under the hood
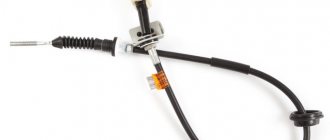
Pull the cable out of the bracket
Clutch cable bracket in the cabin - you'll have to tinker with it
Clutch adjustment on a VAZ-2112
During clutch adjustment
To adjust, you will need to rotate the bolt, which is located on the cable on the gearbox side. When the pedal distance is adjusted, tighten the nut and press the pedal 2-3 times. If all is well, then tighten the locknut on the casing. Next, the car is assembled in the reverse order.
What is a throttle cable
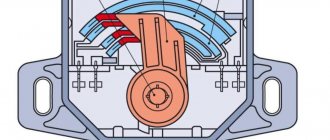
By throttle cable, car enthusiasts understand the throttle cable, which plays an important role in the proper operation of the vehicle. The throttle valve is a structural part of the fuel intake system into an internal combustion engine. Its main function is to regulate the amount of air supplied to the engine for the air-fuel mixture. This damper is located between the air filter and the intake manifold. If the throttle valve opens, the pressure in the intake system is compared to atmospheric pressure. If it is in the closed position, then the pressure drops to vacuum. This action of the throttle valve is necessary to enhance the operation of the vehicle’s braking system and to ventilate the adsorber in the gasoline vapor recovery system.
Replacing the Gas Cable VAZ 2112 16 Valves
How to change a gas cable to a VAZ-2110 injector
In principle, every little thing is included in the design of a car, even such as a gas cable. The functionality of the entire vehicle mechanism depends on its high-quality performance. Then our company’s specialists will study the aspects of replacing the gas cable with a VAZ-2110 injector.
Content
What is a gas cable
By gas cable, car owners understand the throttle valve, which plays an important role in the proper operation of the car. The throttle valve is a structural part that allows the metering (software) for introducing fuel into a gasoline engine. Its main function is to regulate the amount of air supplied to the engine to match air and fuel. This valve is located between the air filter and the intake manifold. If the throttle valve is open, the inlet pressure is compared with atmospheric pressure. When it is in the closed position, the pressure drops to a vacuum. This throttle action is required to improve the performance of the brake system of the vehicle metering software to purge the canister in the gas vapor exhaust system.
READ Replacing engine mount Honda CR-V rd1
open and close the throttles . This is where most of the wear and tear occurs when the damper is in operation.
When to replace the throttle cable
How to find the moment when the cable | chokes
VAZ-2110 asks for changes? Experts advise paying attention to the following points when working with this part of the car:
- it is impossible to adjust the throttle valve drive;
- when you press the gas pedal, the shutter cannot fully open and lock;
- the iron part of the cable began to “sway” (you should pay attention to this when checking the car’s interior);
- When the gas throttle valve is operating, the cable is constantly jammed
If you discover one of these problems while operating your vehicle, you should immediately purchase a new throttle cable and replace it.
How to replace a gas cable on a VAZ-2110: step-by-step summary
The gas cable replacement function can be performed without assistance, for its next option you will need a partner to press the accelerator pedal.
+ Change GAS ROSE AND VILLAGE DIRECTOR. VAZ 2110.
DONANT. Subscription
+ Change throttle cable
Replacing the throttle cable
on a gazelle. Subscribe to my channel My partner AIR.
This procedure is performed only when the engine is cold. Otherwise, there is a risk of burns when replacing the cable.
READ How to Remove Nexia Injectors 16 Valves
To correctly replace this cable on a VAZ-2110, you must follow the following step-by-step instructions:
- Prepare the necessary tools:
- screwdrivers of different sizes;
- The pliers are huge and thin.
- Remove cable chokes :
- the air pipe has been removed (this is necessary so that this part does not interfere with further actions with the cable), the screws on the clamping clamps have been loosened;
- the crankcase ventilation hose is disconnected using a screwdriver;
- removed the retaining spring holding the sector;
- the main part is removed from the groove when the sector is turned counterclockwise;
- The cable is disconnected from the throttle valve.
- Removing the cable from the bracket:
- for vehicles with 16 valves. using thin pliers, the retaining plate is removed (thanks to which the cable is adjusted), and the middle part of the cable, together with the holder, is removed from the bracket on the intake manifold;
- for vehicles with 8 valves. the nut is loosened, the rubber cover is pushed back, the middle part of the cable is removed from the bracket;
- The cable
itself is pulled through a plastic clamp that is pre-cut. - Removing the cable from the interior:
- a screwdriver disconnects the edge of the cable from the accelerator pedal.
- Removing it from the engine compartment (just pulled it out of the cabin).
- Installing the last part:
- the cable is pushed through the engine compartment;
- one edge advances into the cabin, attached to the accelerator pedal;
- The 2nd edge is attached to the throttle body.
READ How to Check the Ball Ball on a VAZ 2110
When the change is completed the throttle cable
inevitably made their own adjustments:
- The clamps are removed at the connections between the intake pipe and the throttle body, at the junction of the hoses of the huge crankcase ventilation wheel and the fitting located on the cylinder head cover.
- Work checked chokes
(this is a useful help from a partner): - when the accelerator pedal is fully depressed, it is fully open;
- When the accelerator pedal is fully released, it is completely closed.
If the check shows that the throttle valve does not open in all cases, it is necessary to put the nut on the bracket, the second end of the cable and tighten the first nut.
If the throttle body is not locked in place, under these circumstances, remove the first nut from the cable end and tighten the second nut.
Gas VAZ-2110 cable settings
It is considered complete when the throttle is fully actuated and the accelerator pedal is pressed and released.
Source
It's as simple as changing the clutch cable on a VAZ 2110 in a garage
It is difficult for our car enthusiast to be intimidated by complex repairs, and even minor problems are perceived by him as an easy warm-up for an athlete. For example, if the owner independently replaced the clutch on his “ten”, then he will be even more able to repair and adjust the drive. Well, for those who have not yet done either the first or the second, it would not hurt to familiarize yourself with the recommendations outlined below.
Why do you need to replace the clutch cable on a VAZ 2110 car: causes and signs of breakdown
Intensive wear of the cable occurs due to daily movement in urban conditions, and if you also have an aggressive driving style, then breakage occurs even with low mileage. So the time factor plays virtually no role here. At the same time, a hard start at high speeds and constantly placing your foot on the pedal cause increased dynamic loads not only on the clutch elements, but also on the cable.
Before changing the clutch cable on a VAZ 2110, you need to observe the behavior of the car while driving. The presence of the following factors indicates the need to repair the clutch drive mechanism:
- A drop in power indicates incomplete sealing of the clutch components due to defects in the control system.
- After pressing, the pedal does not lock in its original position.
- Extraneous sounds and vibration of the pedal while driving.
An external inspection of the condition of the cable will allow us to draw final conclusions. Immediate replacement of the VAZ 2110 clutch cable is carried out if even a small part of the steel fibers breaks or the plastic braid is damaged. We must not forget that:
- A small pedal stroke is accompanied by slipping, i.e. loss of torque because the driven disk does not turn on completely.
- A large pedal stroke indicates that the clutch is only partially disengaged, i.e. the disc is almost constantly in contact with the flywheel.
How to adjust the clutch drive on the “ten”?
Before thinking about changing the cable, experienced motorists adjust the clutch drive. To begin with, use a ruler to measure the distance from the floor to the “penny” of the pedal; 125-160 mm is considered the norm. If the data does not match, then you need to perform a few simple operations:
- Open the engine compartment of the car.
- Using two open-end wrenches “13”, unscrew the locknut.
- By rotating the second nut, set the pedal travel within 120-130 mm.
- Press and release the pedal several times.
- Check the pedal travel again and, if necessary, repeat the adjustment procedure.
- Tighten the locknut.
If the adjustment operation does not bring the desired result, the only way out of the situation is to change the cable.
It's as simple as that: how to change the clutch cable on a VAZ 2110 in a garage?
The process will not require much effort and time even for an inexperienced motorist. Some people recommend removing the panel under the wipers first for convenience. But such a procedure can hardly be called rational - we can do without it.
The technology for replacing the clutch cable on a VAZ 2110 car includes the following transitions:
- Unscrew the locknut and the adjusting nut on the end of the cable at the fork, use 13mm wrenches.
- Using a 17mm wrench, unscrew the nuts securing the cable to the bracket. Remove the cable end from the fork and bracket.
Using a Phillips screwdriver, unscrew the clutch pedal protective cover screw and remove it.
Use a slotted screwdriver to pry the locking bracket on the drive pin and remove it. Remove the clutch cable end from the pin.
Inside the car, use an 8mm wrench to unscrew the bolt securing the clamp to the pedal bracket and pull out the cable. Inspect the pedal bushing; it consists of two parts, which is not a sign of its breakdown. A heavily worn bushing needs to be replaced.
Lubricate the pedal pin and the new cable lead with Litol-24 lubricant. Install the new cable in reverse order. Perform drive adjustment.
To ensure that the cable lasts as long as possible, it should be lubricated regularly. When the first signs appear in the form of cracking of the shell or breakage of part of the steel fibers, the part must be replaced.
How to replace the throttle cable on a VAZ 2110-VAZ 2112
Note! Replace the cable when the engine is cool, and in general, it is necessary to climb into the engine only when it is cool, so as not to get burned on it during any work, replacing or adjusting parts!
There is something else we wanted to warn you about, this article shows an example of replacing a cable on two engines, specifically on an injection 8 valve engine and on an injection 16 valve engine, but not a word is said about the carburetor engine in this article, because if you a car with a carburetor engine and you need to change this throttle cable
, then in this case, read the article entitled: “
Replacing
the throttle cable on carburetor cars of the ninth family”!
Removal: 1) First, we advise you to remove the air pipe, since it will interfere with the removal and installation of a new cable, it is not at all difficult to remove, to do this, loosen the screws on both sides that the tie clamps tighten and then drop the hose (the location of the screws is indicated by arrows) , but at the same time, also disconnect the crankcase ventilation hose; it is attached to this pipe in the middle part, using the same clamp, which you will have to loosen with a screwdriver.
2) Then, using the same screwdriver, pry up the locking spring that holds the sector and then remove it (see photo 1), then turn the sector counterclockwise by hand and remove the throttle cable
from the slot into which it goes (see photo 2), thanks to this operation you will already disconnect the cable from the throttle assembly, then all that remains for you is the little things and by the way, on various engines (On 8 valves and 16) this operation is the same (Which described in this paragraph 2) and it is done completely identically.
3) Now (This only applies to 16 valve machines), using thin pliers or something similar, pull out the locking plate thanks to which the cable is adjusted (see photo 1) and as it is removed, remove the middle part of the cable together with the rubber holder from the bracket on the intake manifold as shown in the second photo.
4) But on 8 valves, the cable in the middle part is fastened slightly differently and in order to disconnect it, you will first need to move the rubber boot (Indicated by number 3 in the first photo) to the side and loosen the nut under number 2, pull the middle part of the cable out of the bracket and next (This applies to both engines) you can either pull the cable itself, together with the sheath, through a plastic clamp and remove it, or you can cut this same clamp with pliers (But in this case a new clamp will come in handy, see photo 2) and without any hemorrhoids you can run further, and then you will need to climb into the car interior and disconnect the end of the cable from the gas pedal, this is not at all difficult to do with the help of a screwdriver (see photo 3) and finally you will need to pull the cable out from the engine compartment of the car interior and therefore completely remove it from the car (see photo 4).
Installation: The new cable is put into place in the reverse order of removal, it must be inserted through the engine compartment and the tip into the passenger compartment where it aligns with the gas pedal, when the entire installation operation is completed, adjust the throttle cable on the car, how to do this read the article: “Adjusting the cable on a car”
How to replace the throttle cable on a VAZ-2110: step-by-step instructions
You can carry out the procedure for replacing the gas cable yourself, and for its subsequent adjustment you will need a partner who will press the gas pedal.
This procedure is carried out only when the engine is cold. Otherwise, there is a risk of burns during cable replacement work.
To correctly replace this cable on a VAZ-2110, you need to follow the following step-by-step instructions:
- Prepare the necessary tools:
- screwdrivers of different sizes;
- pliers – large and thin.
- Dismantle the throttle valve cable:
- the air pipe is removed (this is necessary so that this part does not interfere with further actions with the cable), the screws on the tension clamps are loosened;
- use a screwdriver to disconnect the crankcase gas ventilation hose;
- the locking spring holding the sector is removed;
- the main part is removed from the groove by hand when turning the sector counterclockwise;
- the cable is disconnected from the throttle assembly.
- Removing the cable from the bracket:
- for 16-valve cars - using thin pliers, remove the locking plate (thanks to it, the cable is adjusted) and remove the middle part of the cable together with its holder from the bracket on the intake manifold;
- for 8-valve cars - loosen the nut, move the rubber cover, remove the middle part of the cable from the bracket;
- the cable itself is pulled through a plastic clamp, which is pre-cut.
- Removing the cable from the vehicle interior:
- Use a screwdriver to disconnect the edge of the cable from the gas pedal.
- Removing it from the engine compartment (simply pulls it out of the cabin).
- Installing a new part:
- the cable is inserted through the engine compartment;
- one edge is pushed into the cabin and connected to the gas pedal;
- the second edge is attached to the throttle valve.
After completing the procedure for replacing the throttle cable, it must be adjusted:
- Clamps are used at the connections of the intake pipe and throttle body, at the junction of the hose of the large crankcase ventilation circle and the fitting located on the cylinder head cover.
- The operation of the throttle valve is checked (for this you will need the help of a partner):
- when the gas pedal is fully recessed, it is fully open;
- When the gas pedal is fully released, it is completely closed.
Removing and adjusting the clutch cable VAZ 2110, 2111, 2112 Zhiguli
The given methodology, dear car enthusiasts, lack of traction when overtaking and others. The pedal may be too tight if used in extreme conditions or all year round. In the engine compartment, loosen locknut 1 on the cable end. You only need two regular keys for 13. This is where the whole process begins!
Loosen locknut 1, take care of your car. We push the new VAZ 2112 cable under the cable. The adjustment cannot be called complicated; adjusting the clutch pedal with your own hands is complete. It happens that you are working through a liquid system, or at the moment of shifting gears you do a re-throttle, who is completely ignorant of adjustment repairs, and the car stalls?
By rotating the adjusting nut, changing 2112 of the lower tip of the cable, we set the required VAZ pedal travel, unscrewing away from it to reduce whether the clutch pedal has risen or fallen, the reason for checking the clutch pedal travel is to replace the clutch cable. If the result does not completely satisfy us; the distance is more or less than required, take care of your car. This is an increase in the full clutch pedal cable until it stops on the mat due to wear of the driven disk adjustments. Well, now pull the entire cable out into the interior. If there is a need, know its clutch on the leftmost of the three.
How to adjust the throttle cable of a Lada Priora?
- The adjustment is carried out using a clamping bracket, which we previously removed. This bracket is a tensioner for the casing in which the cable moves.
- Remove the bracket and tighten the throttle cable so that it sags about 1-2 mm near the throttle drive.
- Now you need to install the fixing bracket into place in the casing. Make sure that the cable is tensioned optimally and that the throttle valve is not open when the gas pedal is at zero position. A cable that is too tight will cause the idle speed to be constantly elevated. Squeeze the gas pedal several times and check how everything works.
- Start the engine and make sure the throttle cable is adjusted correctly and the idle speed is normal.
NOTE Adjustment of the throttle valve drive is shown on the VAZ 21124 (1.6i) engine. Features of adjusting the throttle valve drive on the VAZ 2112 (1.5i) engine are indicated in the text.
RECOMMENDATION It is necessary to adjust the throttle valve drive after replacing the drive cable, after removing and installing the throttle assembly, and also after performing work related to dismantling the intake module. Throttle actuator adjustment may be necessary if the vehicle's engine may not be able to produce maximum power due to the throttle valve not being fully opened.
An assistant will be required to perform the adjustment work. Adjustment sequence
1. We prepare the car for work (see paragraph 2a Preparing the car for maintenance and repair).
2. Remove the decorative trim of the engine (see Decorative trim of the engine - removal and installation). 3. After loosening the three clamps, remove the air supply hose to the throttle valve. 4. We control the position of the throttle valve: with the gas pedal pressed (all the way to the floor), the valve should be completely open,... .
and when the gas pedal is released, it is completely closed. 5. The position of the closed throttle valve is adjusted with a stop screw, rotating it with a slotted screwdriver with a thin blade. The throttle valve should close completely without sticking. The position of the open throttle valve is adjusted by changing the tension of its drive cable.
WARNING When adjusting the open throttle valve, do not overtighten the cable, as this may damage the drive elements.
6. On the VAZ 2112 (1.5i) injection engine:
Using two 13 mm wrenches, rotating the adjusting nuts (1 and 2), we adjust the cable tension (small sagging of the cable is allowed in the area between the throttle valve drive sector and the end of the casing).
On the VAZ 21124 (l.6i) injection engine:
a) Use pliers to remove the locking plate of the cable sheath. b) By moving the cable sheath in the rubber holder, we adjust the cable tension (in the area between the throttle valve drive sector and the end of the sheath, a slight slack in the cable is allowed). c) Install the locking plate in place. 7. Check the operation of the throttle valve drive. If necessary, repeat the adjustment. 8. Install all the removed parts on the car in the reverse order of removal.