Among the most common reasons:
- The service period has expired.
- Factory defect.
- Structural features of the car.
Many drivers assume that replacing one oil seal can eliminate the problem, which is not entirely correct. There are three cuffs that are installed in the car. Consequently, it is necessary to carry out three operations:
- Replacing the VAZ 2110 gearbox seals located on the front wheel drives.
- Replacing the VAZ 2110 gearbox seal located on the input shaft.
- Replacing the gear selector rod cuff.
It would seem that such a simple mechanism as a box, but it has three different oil seals that need to be replaced. After replacing the seals, the car starts to work much better. This affects the quality of gear shifting, and subsequently the handling of the car.
Replacing the gearbox drive oil seal on a VAZ 2110
Removing the VAZ 2110 gearbox takes a lot of time and effort. In addition, such a procedure is generally not recommended to be done without the necessary knowledge. Still, tasks of this level of complexity are best left to the service center specialists. But if you are in no hurry to take your car to a service station and want to replace the oil seal yourself, then our detailed repair instructions will be of great help to you.
How often do they need to be replaced and why do they break? This element is a very important part of the car. It needs to be changed every three years, because even the slightest displacement will cause an oil leak.
Replacement should be carried out only when the signs are clearly expressed, in our case it is oil leakage. This procedure and its consequences must be treated carefully, and not negligently. The sooner you notice a breakdown, the less damage will be caused, and the less costly this situation will be for you. So always monitor the condition of this element, as they say, listen and take a closer look.
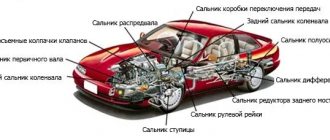
General view of the gearbox
Before proceeding directly to the process of replacing the oil seal, it is necessary to consider the structure of one of the main elements of the car - the gearbox. So, what parts does the unit consist of:
Transmission device diagram
Gearbox: 1 – clutch release bearing; 2 – guide sleeve; 3 – input shaft; 4 – roller bearing of the secondary shaft; 5 – secondary shaft; 6 – retaining ring; 7 – satellite axis; 8 – speedometer drive drive gear; 9 – transport plug; 10 – wheel drive oil seal; 11 – tapered roller bearing of the differential; 12 – axle gear; 13 – satellite; 14 – differential box; 15 – clutch housing; 16 – driven gear of the main gear; 17 – drain plug; 18 – adjusting ring; 19 – driven gear of the 1st gear of the secondary shaft; 20 – synchronizer for 1st and 2nd gears; 21 – driven gear of the second gear of the secondary shaft; 22 – retaining ring; 23 – persistent half ring; 24 – driven gear of the third gear of the secondary shaft; 25 – synchronizer for 3rd and 4th gears; 26 – driven gear of the fourth gear of the secondary shaft; 27 – needle bearing of the secondary shaft gears; 28 – ball bearing of the secondary shaft; 29 – thrust plate; 30 – driven gear V of the secondary shaft transmission; 31 – 5th gear synchronizer assembly; 32 – nut; 33 – thrust washer; 34 – drive gear V of the input shaft; 35 – rear cover of the gearbox housing; 36 – ball bearing of the input shaft; 37 – gearbox housing; 38 – roller bearing of the input shaft; 39 – breather; 40 – input shaft oil seal
Oil seal replacement process
When the design, as well as the principle of operation of the gearbox, has become clear, you can move on to the process of replacing the gearbox drive oil seal. So. Let's look at the step-by-step process:
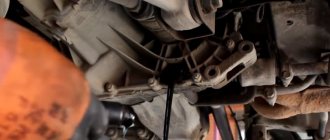
- We place the car in the pit.
View of the car from the viewing hole
Pull back the stem boot
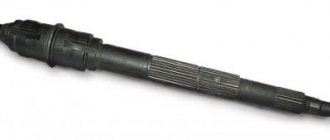
Remove the rod shaft
We remove the oil seal from its seat
Installing a new oil seal
Part selection
2108-1703042 – original catalog number of the gear selection oil seal manufactured by AvtoVAZ. The average cost of a spare part is up to 50 rubles.
Backstage oil seal of different prices
The cost of such a product will not differ significantly from the original. So the quality of such products is approximately the same.
Reasons for failure
Now that the issues of replacement and product selection have been considered, we can study the issue of the causes of failure.
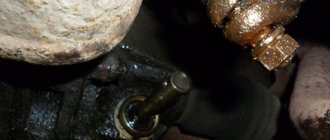
Box drive oil seal and the drive itself
So, let's look at what affects the condition of the oil seal:
- Wear or natural wear and tear. Since the spare part is subject to friction during operation, wear appears on the inner walls, which renders the part unusable.
Leakage due to a burst drive seal
The main reasons for device failure
The main factor indicating that crankshaft oil seals on VAZ 2110 models require increased attention is the numerous oil flows in the engine system, which arise under the influence of a number of reasons, including:
- Aging of the unit and its natural, physical wear;
- Problems with the installation of the device or its incorrect installation, which entails the occurrence of cracks on the working plane of the cuff;
- Various mechanical damages;
- Use of low-quality rubber.
The following set will be useful for work:
- Set of car keys;
- Screwdrivers with various attachments;
- Key for tensioning the timing belt;
- Graphite lubricant or antifreeze;
- Waste container;
- Canister with motor oil;
- Heat-resistant sealant.
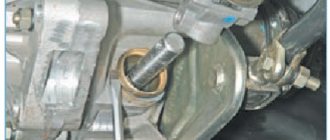
REPLACING THE INPUT SHAFT SEAL
To replace the gearbox seals, especially the input shaft, the gearbox must be removed from the engine. Having removed the gearbox, carefully inspect the installation locations of the cuffs. And first of all, you need to dismantle the release bearing and remove its guide. Under it you will find the input shaft oil seal.
To remove the seals we need a flat-head screwdriver. By prying it from the inside, you can remove the cuff from its seat. The input shaft oil seal has dimensions 25x45x9. Catalog number 2110-2301043Р. It is better to install it with sealant. The outer race of the oil seal must first be degreased, and then a thin layer of sealant must be applied.
When installing, you must ensure that the inner race of the oil seal does not turn outward and the cuff spring does not jump out of its place. We install it in its place and carefully, using a pipe, lightly tapping, hammer the cuff into place. In this case, it is necessary to ensure that the plane of the input shaft oil seal lies exactly in relation to its seat.
Then we install the release bearing guide in place. It is secured with three bolts, which should be tightened evenly so that it fits into place without distortion.
Next, we immediately install the release bearing. When installing it, you must immediately put on the wire springs, which are placed on the legs of the release bearing and fix it in place.
Now it's time for the drive seals. There are two of these seals, the left one is red and the right one is black. They also differ in the direction of rotation. This direction is shown by arrows on the seal housing. These arrows are located on the inside of the oil seals, on the right oil seal the arrow points to the left, and on the left oil seal the arrow points to the right. This can also be determined by the oil removal notches applied to the inside of the cuff.
They act to deflect oil away from the cuff. They are applied at opposite angles, in the direction of shaft rotation. Typically, the manufacturer labels it in three ways:
- Catalog numbers. The number of the right oil seal ends in an even number 2110-2301034Р, and the number of the left one ends in an odd number 2110-2301035Р.
- Arrows, left arrow on the right, right arrow on the left.
- Color. The left one is red. The right one is black.
REPLACING DRIVE SEALS
Video from YouTube channel: Engine repair and interesting!
The left and right drive seals are also removed using a screwdriver or a pry bar. There is no shaft on the right “black” oil seal (see video), so here you can insert a mounting bracket inside and remove it with a light blow. We also thoroughly clean the seat with a cloth.
Then, after degreasing the outer diameter, we apply sealant. After this, we install the cuff in place, and make sure that it sits evenly, without distortion, in its seat. Tapping with a flat object, we hammer it in until its outer plane is level with the body.
Then you need to insert a round block of suitable diameter into the hole; this is necessary to fix the satellites so that they do not move out of their places. You can also use a branch from a tree of a suitable diameter, sawing off a straight piece of the appropriate length, or a shaft from an old CV joint.
Next, place the gearbox vertically on the clutch housing.
We insert a flat mounting between the gearbox housing and the CV joint, or you can use a nail puller and, by hitting it, remove the CV joint from the gearbox. Next, using a powerful screwdriver or a flat mount, remove the “red” oil seal of the drive from the housing.
The new drive oil seal must also be checked for direction of rotation. The arrow on the inside should point to the right. Carefully install the new drive oil seal in its place, making sure that its plane is flush with the edge of the seat.
REPLACING THE GEAR SELECTION ROD SEAL
It's time to replace the gear selector rod oil seal, which is located under the boot. Catalog number 2108-1703042-01Р. Here you first need to remove the cross from the shaft. To do this, you need to move the rubber boot “glass” towards the gearbox housing, opening access to the crosspiece mounting bolt.
The bolt does not need to be completely unscrewed. Simply loosen it and the cross will be removed from the shaft. We remove the rubber boot and we will have access to the selector rod oil seal. We remove it, just like the others, by prying it off with a screwdriver.
The new oil seal, like the previous ones, covered with sealant, is driven into place using a pipe. Here you can use a spark plug wrench; it fits the diameter. We put the rubber boot in place, and then the cross, and that’s it!
The work on replacing the gearbox seals on a VAZ 2109 has been completed. With this, I finish the article and wish you, dear reader, success in operating the car!
Changing the front oil seal with your own hands
It is worth immediately noting that replacing the front crankshaft oil seal is not particularly difficult and is quite within the capabilities of even a novice car owner. It should be performed in this order:
- Remove the protective cover from the timing belt and dismantle the engine protection;
- We set the piston in the first cylinder to TDC on the compression stroke;
- Slightly loosen the timing belt, then remove it;
- We remove the front right wheel, after lifting the car with a jack;
- We dismantle the generator drive belt and pulley;
- Unscrew the fastening from the crankshaft pulley and remove it. Here you should first remove the key;
- Drain the engine oil from the system;
- We remove the oil pump, on which the device we need is located;
- We remove the old part using a screwdriver and put a new one in its place, using a nozzle or head on “27” for this;
- We reassemble the previously dismantled units in the reverse order.
When is it necessary to replace transmission seals?
There are oil seals in every gearbox. Their number depends on the type of drive; the functionality will be the same in all cases. The main task of oil seals is to prevent oil leakage from the main element of the transmission - the crankcase. In addition, they provide protection from dust and dirt to the internal parts of the gearbox.
The oil seal performs its functions only if it is fully operational. But, of course, he cannot work forever. As a result of regular intense loads, the element wears out and requires replacement. Oil seals are consumables. They are located in the clutch housing, near the inside of the gearbox. Replacing the seals in the box involves disconnecting the casing. The machine must be on an overpass or above an inspection hole.
There are no high loads or heating of elements in the gearbox; transmission oil is not supplied under high pressure (except for hydromechanical automatic transmissions). However, leakage can still occur. This is a serious problem as the oil level decreases, causing rapid wear of the gearbox and serious damage can occur.
- The main sign of a leak is transmission oil stains remaining after the car has been parked for a long time. You need to make sure that the problem is with the gearbox, as engine oil may leak due to improper installation of the filter.
- If you have established for sure that the leak is coming from the gearbox, you must stop using the car and carry out diagnostics and repairs. If the malfunction is not corrected in time, a decrease in the oil level will lead to wear and breakdown of the gearbox.
In addition, due to increased leakage, the gearbox may fail at the most inopportune moment. In this case, simply replacing the seals will no longer be enough. The box will have to be removed, troubleshooting and completely repaired.
Of course, the price to fix the breakdown will be much higher than if you had to buy only new oil seals.
It is important to note that periodic monitoring of the oil level in the gearbox allows you to promptly notice and eliminate the malfunction and avoid possible problems in the future. It should be checked regardless of the condition of the gearbox. You also need to monitor the occurrence of noise, crunching and grinding noises during gearbox operation.
If any of these signs appear, as well as difficulties with shifting gears, it is necessary to diagnose the gearbox.
You also need to monitor the occurrence of noise, crunching and grinding noises during gearbox operation. If any of these signs appear, as well as difficulties with shifting gears, it is necessary to diagnose the gearbox.
If you do not detect in time that there is a transmission oil leak, it will completely leak out of the gearbox. In this case, it will be necessary to carry out expensive repairs of the gearbox, while the cost of the oil seal is 50-100 rubles.
Oil seals are consumables. If they break, they cannot be restored. Therefore, if an element ceases to perform its functions due to damage or wear, it must be replaced with a new one.
Also, the replacement of the gearbox seals is carried out together with the change of the CV joint. If it is necessary to install this unit, the gearbox seals are also changed. This is done because if the oil seal is removed, it will no longer be fully operational.
In an automatic transmission and a manual transmission, replacing oil seals is almost the same
At the same time, it is important to understand that an automatic transmission has such an integral part as a torque converter. This is a device with blades that works on the principle of a windmill - it transmits torque from the engine to the gear shift mechanism, which allows the car to change the speed without driver intervention
The advantages of a torque converter are the absence of a clutch pedal, smooth acceleration of the car, and protection of the engine from overloads.
The weak point of the gas turbine engine is the rubber seal. If the automatic transmission seal needs to be replaced, then the sealing ring of the unit also needs to be changed.
The operation of the element is designed for approximately 200 thousand km. However, it may wear out earlier. Even small gearbox oil leaks must be eliminated and repaired, otherwise premature wear of the shaft, pump and the entire gearbox as a whole may occur.
How to properly drain oil from a box
There may be some inconvenience with the oil draining process. Indeed, it is necessary to have some experience here.
To drain the oil from the gearbox, you must do the following:
- To supply oil to the gearbox, you need to find the cap. It is made of rubber. It must be unscrewed and thoroughly wiped with a dry cloth to remove dust, dirt and oil residues. The same action should be done with the drain hole.
- The oil drain plug is unscrewed. Place a container under the car to allow any remaining oil to drain into it.
- The dipstick is removed, which indicates the amount of oil.
- We change the oil. New oil is poured to the mark indicated on the dipstick.
- The dipstick must be cleaned of any remaining oil with a dry cloth.
- After new oil enters the gearbox, you need to check its level again. To do this, the probe is placed in place. If the level readings do not correspond to the mark, you must add the required amount.
Note: in earlier car models, there is no oil indicator. The hole is located on the right side of the gearbox housing. Oil must be filled to the bottom edge of the hole.
Some materials are available in specialized literature. Videos and photos of the replacement process can be easily found on the Internet. Replacing oil seals is not expensive. If necessary, if you can’t do it yourself, this work must be entrusted to professionals. They can be found at your nearest service station. But if you do everything as required by the instructions, no problems should arise. And why overpay, especially since the price for services of this kind is not cheap.
VAZ 2109 gearbox seal: how to replace
VAZ 2109 is a common domestic car that has front-wheel drive. The VAZ 2109 is equipped with power units of different volumes (1.1, 1.3, 1.5 liters). The VAZ 2114 is a worthy competitor to the “nine”.
To ensure that the car does not lose its operating functions, it must be subjected to scheduled maintenance and undergo timely maintenance. At the station, mechanics must check the full functioning of the vehicle system. If necessary, replace worn components, for example those related to the transmission system. This procedure will help extend the working condition of the VAZ.
When is it necessary to replace gearbox seals?
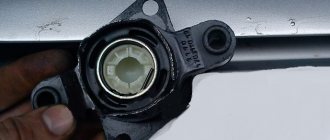
VAZ 2109 cars support the installation of a manual transmission. This type of transmission is a complex mechanism designed for a long service life. One of the consumables related to the gearbox is the oil seal. It is a type of sealing device installed in the area of movable joints. Gearbox seals are located on the input shaft, drive, and rod.
Appearance of oil seals
We list the main reasons why the gearbox seal should be replaced:
natural wear and tear of consumables; the component part does not fit well into the standard place; a defective part was installed.
Replacing the gearbox seal is relevant if the following symptoms occur:
- reduction of fluid in the gearbox;
- the appearance of extraneous noise from the box;
- the appearance of oil traces under the car.
If the transmission fluid decreases, a crunching sound appears when changing speed modes. Also, irregular maintenance may be the reason why the oil seal on the box leaked as a result of wear. Only timely replacement of consumables can avoid such situations.
Replacing gearbox seals
How to replace the oil seal on a gearbox? In order to carry out this procedure, you should arm yourself with special tools. Their set differs depending on which part of the car the oil seal will have to be replaced. For greater convenience, the car must be placed on a viewing hole.
Replacing the rod seal. If this procedure is necessary, access to the boot must be provided. Next, you should disconnect the existing cardan from the rod or lever. You should use a key specifically for this. The cardan and rubber boot must be removed. The awl must be removed from the VAZ gearbox seal. After this, you should clean the seat from dirt, then you can install a new rod seal.
You can replace the oil seal on a VAZ 2109 gearbox either with or without dismantling the gearbox. It is necessary to remove the gearbox if there is a need to replace the gearbox input shaft seals. In this case, you need to inspect the integrity of the place where the cuffs are installed. The release bearing must be dismantled. Below it is the input shaft oil seal. When installing a new oil seal, it is worth using a sealant and first degreasing the consumable itself.
If the crankshaft oil seal is leaking, it is necessary to determine which consumable has failed (front or rear). The owner of a Lada may encounter this problem after 100,000 km.
How to replace the drive seal? Replacing the gearbox drive seal can be done with your own hands. Among the tools, the car owner needs a wrench and socket wrench, a pry bar, a hammer, and a screwdriver. When performing this procedure, it is necessary to drain the fuel from the VAZ gearbox. Taking this into account, you need to drive the car onto the overpass and prepare a container into which the liquid will drain. A pry bar and a screwdriver are needed to pull out the drive and oil seal. Finally, the seal must be pressed in. Pressing is carried out using a hammer and a suitable sized piece of metal pipe.
Reasons for failure and number of gearbox seals
Among the most common reasons:
- The service period has expired.
- Factory defect.
- Structural features of the car.
Many drivers assume that replacing one oil seal can eliminate the problem, which is not entirely correct. There are three cuffs that are installed in the car. Consequently, it is necessary to carry out three operations:
- Replacing the VAZ 2110 gearbox seals located on the front wheel drives.
- Replacing the VAZ 2110 gearbox seal located on the input shaft.
- Replacing the gear selector rod cuff.
It would seem that such a simple mechanism as a box, but it has three different oil seals that need to be replaced. After replacing the seals, the car starts to work much better. This affects the quality of gear shifting, and subsequently the handling of the car.
Diagnosis of the problem
- Signs indicating the need to replace the gearbox seal are, first of all, oil traces left on the asphalt after the car has been parked.
- Before changing the oil seal, you should first make sure that this is the problem.
- Because oil leakage is often caused by a poorly screwed oil filter.
- Failure to identify an oil leak problem in a timely manner can have serious consequences.
- If you do not detect an oil leak from the gearbox in a timely manner, it will leak out completely, and then instead of the oil seal, the price of which is 50-100 rubles, you will have to repair the gearbox (see Repairing the VAZ 2109 gearbox - we do it right), and the price will increase significantly.
- To prevent this, it is necessary to periodically check the oil level in the engine and gearbox.
- Insufficient oil level in the gearbox can be manifested by a characteristic crunching sound that occurs when changing gears.
Replacing the gearbox rod seal of a VAZ 2109
- An awl like a crochet hook or something similar.
- Keys for 10 and 13.
- The awl is ordinary.
- Plastic cork from a mineral water bottle.
Replacement is carried out on an inspection pit or a lift. If there is nothing else, you can use a cheap alternative in the form of two spare tires laid flat. We take two stronger boards and drive onto this improvised elevation. Naturally, the work will have to be done lying down.
Attention: After driving onto a pit or overpass for repairs, secure the car for your own safety using the handbrake and additional wheel chocks. Replacing the oil seal in a VAZ 2109 gearbox is carried out in the following sequence:
Replacing the oil seal in a VAZ 2109 gearbox is carried out in the following sequence:
- We get to the rod that changes gears; it is covered on top with a rubber boot.
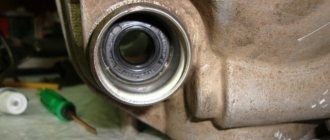
- If it leaks oil, then it is very easy to find it by looking at the oil stain (see photo below).
Gear shift rod
- We bend the wide part of this boot to get to the cardan located underneath it, which is attached to the rod.
- To gain access to the oil seal, it is necessary to disconnect the cardan from the shift lever and from the rod.
- For this we use the key 13.
- We unscrew the nut completely, this will help loosen the connection of the lever with the cardan.
- We take the lever out of the cardan, thus engaging 1st or 3rd gear.
- We use a 10mm wrench to disconnect the cardan from the rod; to do this, we move the lever to the side.
- We dismantle the cardan.
Disconnect the cardan from the rod
- Next, we remove the rubber boot, now we see the reason for the repair - it is the gearbox rod oil seal.
- It is located in a special recess - this is the place where the rod enters the box.
- Removing this oil seal without using a special tool is impossible, so we take a special awl and get to work.
- You can use a self-tapping screw as an option, the principle is very simple - you need to screw the self-tapping screw into the oil seal and “uncork” it like a corkscrew.
- When you have removed the old one, you can start replacing it.
- It is first necessary to thoroughly clean the seat from sand, oil, and other contaminants.
- Now you can press the new oil seal into the seat.
Replacing the VAZ 2109 gearbox seal is easier using a plastic bottle cap:
- This is done this way: cut out the inside of the plug and install a new oil seal through it.
- You can do without a traffic jam, this is a matter for the owner.
- We assemble the lever in the reverse order of disassembly.
- When the oil seal was replaced or any work was done related to fastening the gearshift lever and cardan, the rocker located in the car interior shifted greatly, which makes it impossible, in some cases, to change gears.
- Here the whole problem is hidden in the 13 screw, which connects the cardan itself and the lever that switches the speeds.
- Not everyone knows that it (screw 13) is not only fastening, but also adjusting.
- Therefore, upon completion of the work, be sure to check what position your lever is in and adjust its position, if necessary.
- Only now can you safely collect your tools and wash your hands.
- After assembly, be sure to check the oil level; if the level is low, you need to top it up, after which we can check the operation.
- Drive a couple of laps and make sure that the oil is not leaking anywhere else.
- That's all, I hope our instructions were useful to you. As you yourself have seen, replacing this oil seal is not difficult, and there is no point in overpaying for service stations.
Necessary tool
In order to change the seals, you need to prepare the following set of tools:
- A set of keys or sockets. Among them there must be keys for 10, 13 and 19.
- Several screwdrivers.
- Pliers.
- Prepare a special container for draining the oil. It can be made from a plastic canister, which is cut into two parts. Cut-up five-liter water bottles will also work.
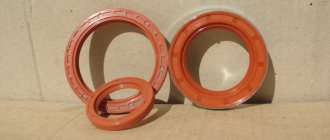
- New seals.
Front crankshaft oil seal.
Rear crankshaft oil seal.
Articles
As for new oil seals, it is better to change the front and rear at once. They are also called big and small.
- The most popular parts are from AvtoVAZ, with article numbers 21080100516000 and 21081005034.
- A better quality seal kit is from ESPRA, with catalog number E07418. A foreign manufacturer costs twice as much.
A set of branded ESPRA oil seals.
Replacement algorithm
In order to replace a part, you need to perform the following sequence of actions:
- First of all, you need to drain the oil from the engine. To do this, you will need an empty container of at least four liters.
- Next, remove the front timing belt cover.
Unscrew the two bolts on the sides of the cover.
Unscrew one bolt in the center of the cover.
Remove the timing cover.
- You need to raise the right front part of the car using a jack and remove the front wheel.
Jack up the front and remove the wheel.
- The camshaft must be turned clockwise by the bolt. You need to align the marks on the pulleys.
Align the mark on the pulley with the installation tab on the cover.
- The crankshaft must be fixed.
You can fix the crankshaft with a screwdriver...
...or lock the camshaft pulley.
- The generator drive pulley is removed.
First, under the hood, loosen the tension of the generator belt, then through the wheel arch, using a 17-mm spanner, unscrew the bolt and remove the pulley.
- Next you need to remove the timing belt. To do this, the tension roller must be turned so that the belt is in its loosest position.
Loosen the roller and remove the timing belt.
- The toothed pulley is removed. For this, two screwdrivers are used.
Usually the pulley can be easily removed.
But you may need a puller.
Only after this can the old oil seal be removed. For this you also need to use a screwdriver.
Under the pulley we see oil and an old oil seal.
We take out the worn oil seal and clean the surfaces.
Before installing a new oil seal, you need to lubricate its edge with machine oil. Only after this is it pressed in.
If the toothed pulley is completely rusted and there is no puller at hand, watch a video on how to remove the gear using the third method:
Rear oil seal
In addition, to replace it you will need to remove additional components and parts. If the VAZ-2110 car owner has already had to change various oil seals, then he will definitely cope with this task. An inexperienced car enthusiast can ask a friend who has had to do similar work for help.
The procedure goes as follows:
- You need to drain the oil from the gearbox.
Using a 17 key, unscrew the plug and drain the oil into a container; when finished, put the plug back in place.
- The wheel is removed. It is for this reason that it is recommended to change two oil seals at once in order to avoid unnecessary disassembly procedures.
- The CV joint is brought out.
To remove the drive, you need to unscrew the bolts securing the ball joint.
- The drive shaft is taken out along with the CV joint.
We push out the hinge using a mounting spatula.
- The gearbox is removed. Before doing this, you need to disconnect the drive rod.
We unscrew the jet rod.
Remove the clutch housing cover.
We unscrew the bolts securing the box.
Together we move the gearbox to the side.
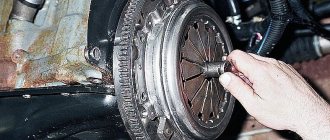
- Now you need to remove the flywheel.
Before removing the flywheel, put marks.
- Having removed the flywheel, we see the oil seal.
View of the seal.
- The old oil seal is removed using a screwdriver.
We clean the seat from dirt and install a new oil seal.
Next you need to lubricate with oil and install a new crankshaft oil seal. Assembly occurs in reverse order.
It happens that the old oil seal cannot be pulled out with a screwdriver, then self-tapping screws will come to the rescue. More details are shown in the video:
REPLACING THE INPUT SHAFT SEAL
To replace the gearbox seals, especially the input shaft, the gearbox must be removed from the engine. Having removed the gearbox, carefully inspect the installation locations of the cuffs. And first of all, you need to dismantle the release bearing and remove its guide. Under it you will find the input shaft oil seal.
To remove the seals we need a flat-head screwdriver. By prying it from the inside, you can remove the cuff from its seat. The input shaft oil seal has dimensions 25x45x9. Catalog number 2110-2301043Р. It is better to install it with sealant. The outer race of the oil seal must first be degreased, and then a thin layer of sealant must be applied.
When installing, you must ensure that the inner race of the oil seal does not turn outward and the cuff spring does not jump out of its place. We install it in its place and carefully, using a pipe, lightly tapping, hammer the cuff into place. In this case, it is necessary to ensure that the plane of the input shaft oil seal lies exactly in relation to its seat.
Then we install the release bearing guide in place. It is secured with three bolts, which should be tightened evenly so that it fits into place without distortion.
Next, we immediately install the release bearing. When installing it, you must immediately put on the wire springs, which are placed on the legs of the release bearing and fix it in place.
Now it's time for the drive seals. There are two of these seals, the left one is red and the right one is black. They also differ in the direction of rotation. This direction is shown by arrows on the seal housing. These arrows are located on the inside of the oil seals, on the right oil seal the arrow points to the left, and on the left oil seal the arrow points to the right. This can also be determined by the oil removal notches applied to the inside of the cuff.
They act to deflect oil away from the cuff. They are applied at opposite angles, in the direction of shaft rotation. Typically, the manufacturer labels it in three ways:
- Catalog numbers. The number of the right oil seal ends in an even number 2110-2301034Р, and the number of the left one ends in an odd number 2110-2301035Р.
- Arrows, left arrow on the right, right arrow on the left.
- Color. The left one is red. The right one is black.
REPLACING DRIVE SEALS
Video from YouTube channel: Engine repair and interesting!
The left and right drive seals are also removed using a screwdriver or a pry bar. There is no shaft on the right “black” oil seal (see video), so here you can insert a mounting bracket inside and remove it with a light blow. We also thoroughly clean the seat with a cloth.
Then, after degreasing the outer diameter, we apply sealant. After this, we install the cuff in place, and make sure that it sits evenly, without distortion, in its seat. Tapping with a flat object, we hammer it in until its outer plane is level with the body.
Then you need to insert a round block of suitable diameter into the hole; this is necessary to fix the satellites so that they do not move out of their places. You can also use a branch from a tree of a suitable diameter, sawing off a straight piece of the appropriate length, or a shaft from an old CV joint.
Next, place the gearbox vertically on the clutch housing.
We insert a flat mounting between the gearbox housing and the CV joint, or you can use a nail puller and, by hitting it, remove the CV joint from the gearbox. Next, using a powerful screwdriver or a flat mount, remove the “red” oil seal of the drive from the housing.
The new drive oil seal must also be checked for direction of rotation. The arrow on the inside should point to the right. Carefully install the new drive oil seal in its place, making sure that its plane is flush with the edge of the seat.
REPLACING THE GEAR SELECTION ROD SEAL
It's time to replace the gear selector rod oil seal, which is located under the boot. Catalog number 2108-1703042-01Р. Here you first need to remove the cross from the shaft. To do this, you need to move the rubber boot “glass” towards the gearbox housing, opening access to the crosspiece mounting bolt.
The bolt does not need to be completely unscrewed. Simply loosen it and the cross will be removed from the shaft. We remove the rubber boot and we will have access to the selector rod oil seal. We remove it, just like the others, by prying it off with a screwdriver.
The new oil seal, like the previous ones, covered with sealant, is driven into place using a pipe. Here you can use a spark plug wrench; it fits the diameter. We put the rubber boot in place, and then the cross, and that’s it!
The work on replacing the gearbox seals on a VAZ 2109 has been completed. With this, I finish the article and wish you, dear reader, success in operating the car!
DEVICE OF BRAKE MECHANISMS
Many people wonder what is the difference between the brake mechanisms of the front wheels and the rear ones. The fact is that when braking, they are subject to different loads, and they do not operate synchronously. But this is not the main reason for the differences.
The front mechanisms consist of:
- Brake disc of classic design;
- Direction pads;
- Calipers;
- Directly the pads themselves;
- Cylinder;
- Piston;
- Seal rings;
- Protection casing;
- Direction finger;
- And its cover, which performs a protective function.
The design of the front brakes is a little simpler than the rear, however, this does not mean that they play a lesser role in braking. After all, these are the mechanisms that work first.
- Nuts that secure the hub;
- Actually, the hub itself;
- Tension springs (lower and upper);
- Brake pads;
- Directional springs;
- Wheel cylinder;
- Expansion bar;
- Handbrake lever finger;
- Handbrake lever;
- Mechanism casing.
As we can see, this difference in design is caused by the presence of parking brake elements in the rear mechanism. Therefore, the part itself looks much more massive. The operating principle of the hydraulic part is the same as in the front. The only difference between the rear brakes is this.
A simple diagram of the VAZ 2114 brake system allows you to easily carry out any repairs yourself. Spare parts for domestic cars are inexpensive and quite common, which greatly simplifies operation and repair work. This is why VAZ cars are in such demand and provide good competition to foreign cars.
Replacing the outer CV joint
If you only plan to replace the boot of the outer CV joint of a VAZ 2109, then at the last stage you just need to tighten it and cut off the old one. But if you need to replace the entire hinge, then follow the same procedure as in the previous paragraph. Clamp the drive tightly in a vice and use a hammer to knock the CV joint off it. You shouldn’t feel sorry for it, because the new one will serve you for many years if your driving style is not very aggressive.
As in the previous point, first thoroughly wash the axle shaft, wipe it dry, and then install all the elements. First the boot, then the ring, drive the CV joint onto the splines. That's all, all that remains is to squeeze out all the grease under the boot and put it on, tightening it with clamps
Please note that worm-type clamps cannot be used, they will rest against the hub
Procedure
On Renault Logan cars, the weak point is the left inner boot. It often leaks and quickly loses its protective qualities. Replacing the left CV joint boot on a Logan is carried out in the following order:
- Unclench and remove the retaining ring from the rear end of the drive shaft;
- with the help of light progressive blows we knock down the tripoid;
- we bite off the clamp, remove the used cover;
- install a new dirt cover and tighten the clamp.
Replacing the right boot of Logan is carried out by analogy with the left one. The difference is that the three-stud cage is removed first.
Procedure:
- We cut the large clamp with a hacksaw and remove it; we will install a new one in its place;
- pull the part off the holder;
- remove the stopper, knock down the tripod and install a new dirt cover.
Assembly is carried out in reverse order. After washing all the parts, apply lubricant.
Important! The stopper has to be knocked down with a hammer. It is better to do this through a wooden block, which must be installed on the inside of the body, so as not to damage the grenade balls. Make sure the retaining ring is not damaged when knocked out
Otherwise, you will have to change both the stopper itself and the CV joint. The problem occurs quite rarely, but there is a risk
Make sure the retaining ring is not damaged when knocked out. Otherwise, you will have to change both the stopper itself and the CV joint. The problem occurs quite rarely, but there is a risk.