Clutch cable VAZ 2110 and its replacement
Usually the clutch cable breaks when the vehicle is operated in extreme conditions. Most often, a similar problem occurs with “old” cars that are in use all year round. If such a problem occurs, you can try to carry out a process called replacing the VAZ 2110 clutch cable yourself. To perform these actions, it is not necessary to use special knowledge and it is not necessary to have a professional tool. In order for the replacement of the clutch cable in a VAZ 2110 to be successful, basic information will be enough.
Replacing the cable
Replacing the clutch cable of a VAZ 2110
Replacing the clutch cable on a VAZ 2110 will take a minimum amount of time, this applies even to novice drivers. Based on the technical documents on the use and repair of the car, it is recommended to detach the windshield wiper with frill from the VAZ during the work process. Of course, if you need to save time, you can do the work without removing parts, but most specialists do this because the process of fixing the cable to the clutch pedal is relatively simplified. So:
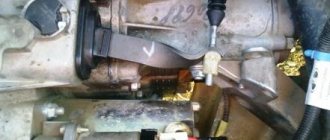
- At the first stage, you need to remove the old or damaged element; in this case, you need to get rid of the cable. It is pulled out from the fastening bracket, which is located on the gearbox.
- Using two 19-size wrenches, you need to unscrew the cable fastening nuts in the bracket itself, as a result its tension is weakened, and the cable is easily removed from the fasteners.
- At the next stage, the cable is removed from its fastening in the clutch activation fork. To perform such actions, you need to hold the fork and at the same time release the cable.
Replacing the clutch cable on a VAZ 2110
- It is detached from the clutch pedal.
- If the windshield wiper frill has already been removed, you can easily get to the protective cover on the clutch pedal; it is located not far from the brake vacuum booster.
- The fastening screw of the pedal housing is unscrewed with a short Phillips screwdriver, after which the housing is easily removed.
Replacing the clutch cable of a VAZ 2110 is easy
- Using a screwdriver, hook up the locking bracket that holds the cable head to the clutch pedal. This bracket is removed along with the cable.
- If the frill with the windshield wiper has not yet been removed, you will need to remove the locking bracket from the interior. To do this, you need to raise the clutch pedal all the way and remove the bracket, and then the clutch cable itself.
Installing a new cable
How to replace the clutch cable of a VAZ 2110
- Before installing a new cable, the bushing on which the cable is placed must be removed from the clutch pedal pin and inspected for integrity. If the bushing is severely worn, it needs to be replaced.
- The new cable is installed in the reverse order. Its end is pushed from the passenger compartment into the engine compartment, after which it is attached to the pedal. After this, the cable with the shift fork is engaged and secured in the mounting bracket on the gearbox.
Several ways to replace the cable
Replace the clutch cable on a VAZ 2110
You can change the tens clutch cable using different methods:
- remove the windshield wiper and frill, this is necessary for easy removal of the cable tip fastening to the pedal;
- do not remove the frill.
Based on the procedure for replacing the VAZ 2110 clutch drive, it means removing the windshield wiper and frill, but you can choose a slightly simpler path, in which disassembly is not necessary. In any case, after replacement, the clutch will need to be adjusted. Of course, many are interested in the instructions for a simple replacement method, so it is worth paying more attention to:
- Using a 19mm wrench, you need to unscrew the fastening elements of the clutch cable.
- After this, the cable tip is removed from the clutch release fork. If the cable breaks, you won't need to remove anything.
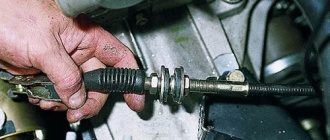
- Next, you will need to move into the cabin and unscrew the cable fastening nut, which is located not far from the clutch pedal. It is recommended to use a key of 8.
- The fastening bracket is detached from the end of the cable to the clutch pedal. To perform this action, you need to lift the clutch pedal and pick up the clip with a screwdriver.
- In this situation, the clutch cable will have to be pulled through the passenger compartment. As a rule, there may be other wires running with the clutch cable that are not listed in the vehicle manual and that interfere with the free passage of the cable due to large fastening washers. It is better to unscrew these washers for a while.
- The new clutch cable is pushed under the hood from the interior. Everything is attached back.
It is recommended to pay more attention to the most difficult process, which is attaching the cable end mounting bracket to the pedal. To carry out the work you will have to take a not very comfortable position. If you do everything according to the rules, you should always remove the windshield wiper frill. Of course, the staple can be replaced with your own clamp, which is made from a simple paper clip. The clip is carefully fastened into the recess of the pedal mount and is clamped with pliers for reliability.
As a rule, lubricating the cable inside the casing with a thick lubricant is not so easy.
Adjusting the newly installed cable
After the VAZ 2110 clutch cable has been replaced, all that remains is to make its final adjustment, spending about 30 minutes of your personal time. Thus, we ensure comfortable and reliable operation of the VAZ 2110 clutch mechanism.
Clutch pedal adjustment
The degree of tension is adjusted by changing the position of the lower end of the cable fixed in the gearbox bracket. You can navigate by the position of the adjacent pedal. When the adjustment is completed, we check it using a tape measure or ruler.
The pedal travel from its initial position to its stop on the floor should be within 125 mm with an error of 5 mm up or down. If the pedal position does not correspond to the specified recommendations, adjustment should be continued.
Source
Replacing the clutch cable on a VAZ 2110
In most cases, a breakdown of a manual transmission on a “ten” is not associated with any serious problems in the box itself. The most frequently broken component in a tens manual transmission is the clutch cable, which can be replaced on your own. Therefore, next we will talk about how to properly replace the clutch cable (see the video “How to remove and adjust the clutch cable on a VAZ 2110, 2111, 2112” below).
Why does the clutch pedal fail?
On a “ten” that has a solid mileage, the clutch pedal often begins to fail, and there may be two reasons for this:
- Broken clutch cable;
- Malfunction of the clutch fork.
Clutch cable rupture on a VAZ-2110 occurs when the vehicle is not used properly for a long time, for example, in extreme conditions. This part cannot be repaired, and therefore it is simply replaced. How to open the hood if the cable is broken? At the same time, even if the clutch cable breaks, you can get to the desired location without towing. To do this, you need to set the first gear, start the car and start driving. The transition from one gear to another, in this case, occurs when the gear is set to neutral. Having reached the desired location, it will be possible to replace the clutch cable without removing the gearbox.
If the clutch fork malfunctions, then dismantling the manual transmission will be required.
Clutch cable replacement process
Even an inexperienced car enthusiast can replace the clutch cable on a “ten”. However, if you carefully study the repair manual that came with the car, there is a clear indication that you should first dismantle the windshield wiper and remove the panel under the wipers (the so-called frill). Once these parts are removed, you can proceed to the clutch cable replacement procedure.
DISASSEMBLY OF A BROKEN ROPE
- Using two 19mm wrenches, the broken cable is removed from the bracket located on the gearbox by unscrewing the nut holding it;
- After the cable tension is loosened, it is pulled out of the fastening;
- Fix the clutch fork with one hand, and pull out the cable with the other.
UNLOCK THE CABLE FROM THE CLUTCH PEDAL
If the panel under the wipers and the windshield wiper were removed in advance, then further removal of the cable will occur only in the engine compartment. This is due to the fact that access to the casing protecting the clutch pedal is open. This casing is located next to the hydraulic brake booster.
- We unscrew, using a Phillips screwdriver, the fastening screws of the casing, and dismantle it;
- Using the same screwdriver, you need to hook and pull out the locking bracket that secures the cable head to the pedal bushing;
- We dismantle the cable.
If the panel under the wipers and the windshield wiper were not previously removed, the retaining bracket will have to be removed directly from the car interior, and not from the engine compartment. This work is very inconvenient, but, nevertheless, it is done like this:
- Raise the clutch pedal to the highest point of its trajectory, after which the bracket is dismantled, and then the cable itself;
- Using the “8” key, twist the support plate and pull the cable into the car interior.
INSTALLING A NEW CLUTCH CABLE
- Dismantle the bushing located on the clutch pedal pin - the old cable was put on it (if the bushing is very worn, it should be replaced);
- Using lithol, lubricate the cable guide and clutch pedal pin;
- The end of the clutch cable is threaded from the car interior into the engine compartment;
- Attach the cable to the pedal;
- Hook the cable and clutch fork;
- Secure the cable in the bracket on the gearbox.
How to adjust the clutch cable
After the clutch cable has been replaced on a VAZ 2110, it is necessary to adjust it. The point of this procedure is to set the correct pedal stroke. The free play of the pedal, which is measured by the distance from the floor of the car to its top point, should be in the range of 12.5 - 13 cm. If such measurements are not very convenient, then it is recommended to simply adjust the clutch pedal so that it is level with the other pedals.
- Slightly unscrew the nuts securing the cable (they are located on the gearbox bracket);
- Using adjusting nuts, adjust the location of the cable tip, fixing it and checking the trajectory and position of the clutch pedal;
- After the pedal is adjusted, tighten the fastening nuts.
At this point, all adjustment steps required after replacing the clutch cable are completed.
Video: How to remove and adjust the clutch cable on a VAZ 2110, 2111, 2112
Replacing the clutch cable of a VAZ 2110
The other day, while changing gear, my clutch pedal suddenly dropped. My first thoughts were that either the clutch cable broke or the clutch cable came off the fork. I opened the hood, saw the broken clutch cable and sighed with relief. The fact is that failure of the clutch pedal does not always mean replacing the cable. It happens that the clutch fork breaks, then you need to remove the box and change the fork, and that costs 1000-2000 rubles just for the work.
Stupidly, I towed my car home when it was possible to drive without a clutch. I just didn’t know that you could start in first gear and start driving right away. In addition, you can change gears without a clutch; to do this, you need to shift the throttle at the moment of shifting.
The price of a VAZ 2110 clutch cable is approximately 220-280 rubles. In the store I ask jokingly that I need a clutch cable for a dozen that will never break! They answer me: change the car. I bought a clutch cable for a VAZ 2110 in Balakovo. Of all, he was the most expensive.
You can replace dozens of clutch cables in various ways:
- Remove the frill and the windshield wiper (to make it easier to get to the attachment of the cable end to the clutch pedal)
- Without removing the frill (method for those who are able to take the lotus position)
The standard instructions for replacing the VAZ 2110 clutch cable involve removing the frill and windshield wiper, but I decided to take the shortcut and not disassemble anything.
Replacing the VAZ 2110 clutch cable without removing the frill
We unscrew the clutch cable fastening using a 19 key. Next, you need to remove the cable tip from the clutch release fork, but since The cable was torn, so we didn’t have to remove anything. We move into the cabin and unscrew the nut securing the cable near the clutch pedal using a 8 key. Unhook the bracket securing the cable tip to the clutch pedal. To do this, you will need to raise the clutch pedal as much as possible and use a screwdriver to pick up the clip (if you removed the frill and the windshield wiper, then you need to remove the bracket in a more convenient way from under the hood). We pull out the clutch cable through the interior. I have some wires running in the channel along with the clutch cable, about which nothing is said in the replacement manual. Because of this, the cable didn’t want to go through, the large cable fastening washers in the engine compartment were in the way, I unscrewed them. We push the new clutch cable from the passenger compartment under the hood. We fasten everything in the reverse order. The most difficult moment here is to put back the bracket securing the cable tip to clutch pedals. The fact is that it is very difficult to get there, which is why the standard instructions recommend removing the frill and the windshield wiper. But I decided to replace the staple with my own clip, which I made from a regular paper clip. I carefully fastened my clip into the recess of the pedal mount and clamped it with pliers for reliability. If you wish, you can lubricate the clutch cable with engine or transmission oil, but it is better to use grease (such as a CV joint) so that it does not freeze in winter. However, lubricating such a cable inside the casing with thick lubricant is problematic.
In fact, replacing the VAZ 2110 clutch cable with your own hands is quite simple. I did this procedure for the first time. The replacement was carried out in the winter outside in the evening with a flashlight in hand. I spent 2 hours replacing the clutch cable. I spent most of my time in the pedal area when removing and installing the cable.
Adjusting the clutch pedal VAZ 2110
The clutch pedal travel (all the way to the mat) should be 125mm (+-5mm). The maximum permissible pedal stroke is 160 mm. To adjust the clutch, you need to unscrew or tighten nut No. 2, after completing the adjustment, tighten lock nut No. 1. Tighten the rubber washer as much as possible to the fork.
You can adjust the clutch so that the pedal is lower than the brake pedal, then it will grab almost immediately after the pedal leaves the floor. If you make the clutch pedal high (higher than the brake pedal), then when you lower the clutch it will grab almost at the very end. A pedal that is too high can accelerate wear on the basket.
Replace the clutch cable on the “ten” yourself..
Why does the brake pedal fail when braking and what to do?
Is your car suddenly having problems with its brakes? There is no need to panic. There are special techniques that will help you gradually slow down and stop the car even in this case. The most useful tool in this case is the parking brake, or “handbrake”.
It can slow down and stop the car if it was traveling at a speed of 20–40 km/h. But if you have little driving experience, there is no need to suddenly raise the handbrake at medium and high speeds, especially when driving on a wet, icy or snowy road. Your car may skid, spin, be thrown off the road, into the oncoming lane, etc.
Clutch on VAZ-2112
This is what the VAZ-2112 clutch diagram looks like in disassembly.
The clutch on any car, including the VAZ-2112, plays a very important role. So, without his participation it would simply be impossible to transmit torque from the engine to the gearbox.
The following two tabs change content below.
About the expert:
Fan-auto
All my life I have been surrounded by cars! First, in the village, already in the first grade, I was rushing around on a tractor through the fields, then there was JAVA, then a penny. Now I am a third-year student at the Polytechnic Faculty of Automotive Engineering. I work part-time as a car mechanic and help repair cars for all my friends.
Due to the fact that this element bears a large load, it can absolutely be called a consumable material, because its main elements require immediate replacement if they are severely worn.
Video about replacing the clutch on a VAZ 2110-2112 family
It is impossible to influence the condition of the clutch in any way, and it is also impossible to control its condition visually, so its malfunctions will only appear when one of the elements begins to fail.
Tool for replacement work
To make the work easier, you need to prepare all the tools in advance.
- Inspection hole or lift.
- Jack.
- Wheel chocks.
- Set of socket wrenches.
- Mount or extension tube.
Step-by-step work order
Replacing the clutch without removing the gearbox
When the clutch is dismantled, we continue work:
- Using a spanner, unscrew the bolts securing the clutch housing.
- To make it easier to unscrew them from their place, you need to use the “8” key.
- These bolts must be unscrewed as evenly as possible so that the casing does not become deformed.
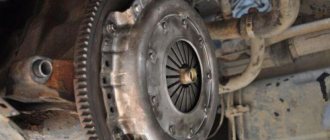
- Next, remove the basket and clutch disc.
- We inspect and, if necessary, dismantle the release bearing.
- Visually assess the general condition, as well as the drive and driven disks in particular.
- Depending on which of the elements a malfunction is detected, we replace them with new ones. It is also possible to replace the clutch immediately as an assembly.
- When installing the clutch in place, place the driven disk with its protruding side in the direction of the drive disk.
- Next, insert the centering mandrel into the fixation location. This is necessary so that it fits clearly in the very center of the flywheel, otherwise if it moves, the gearbox simply will not fall into place due to insufficient space for the input shaft.
- After this, we insert the mandrel into the crankshaft, then install the drive disk.
- We mount the clutch basket and tighten all the bolts evenly in a circle.
- When all the bolts are tightened, remove the mandrel.
- After this, we put the gearbox in place, having previously lubricated the splines of its input shaft.
Dismantling the VAZ-2114 clutch
After removing the gearbox, unscrew the basket mounting bolts with wrench 8. Fix the flywheel with a screwdriver and remove the discs. Use a screwdriver to pry up the springs and remove them from the protrusions. Then remove the bearing and spring along with the coupling. Replace the bushing with a fork, having first removed the protective cover from the fork. Pull out the bushing and remove the power fork by moving the lower end of the lever up.
https://youtube.com/watch?v=Rh382LjE_Xk
Sources
- https://mylada.net/remont/zamena-trosa-scepleniya-na-vaz-2110.html
- https://masteravaza.ru/transmisiya-sceplenie/disk-scepleniya-transmisiya-sceplenie/vaz-2112-zamena-diska-scepleniya-1115
- https://vipwash.ru/stseplenie/zamena-stsepleniya-vaz-2112-2114
Shifting gears without clutch
Not every driver of a VAZ 2110 imagines how to not only start, but also drive a car without using the clutch pedal. Of course, this skill is very specific, but it can be vitally important when the clutch cable breaks at the most inopportune moment.
The easiest way is to start the car in first gear, first pressing the gas pedal halfway. After turning the ignition, the car will immediately move off with a very noticeable jerk, so be extremely careful when trying to start it this way. Similarly, we turn on the reverse gear.
Driving for a long time in first gear can cause the engine to overheat. If there is a considerable distance to be covered, it is better to learn how to shift higher gears without using the clutch, for which:
- release the gas pedal and, at the moment of least resistance, switch off the gear, moving the transmission lever to the neutral position;
- then engage the next gear, continuing acceleration.
The proposed algorithm for downshifting in the event of a non-working clutch requiring replacement is somewhat different:
- Having switched to neutral gear, we revise the throttle, thereby increasing the speed of the input shaft;
- and only then switch to a lower gear.
Signs of breakdown
Maintenance of the VAZ 2110 clutch cable must be carried out as soon as the first signs of wear are detected. This is necessary so that the malfunction does not take the driver by surprise. If the clutch cable of a VAZ 2110 car breaks, then the following signs will indicate this.
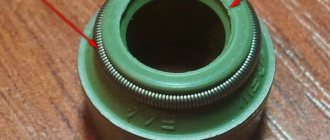
Mechanism for automatic adjustment of cable length: 1 - spacer sleeve; 2 - plastic body; 3 — clamps; 4 — toothed cable tip.
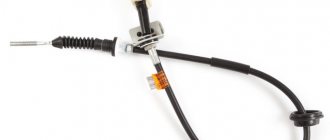
Clutch cable: 1 — leash; 2 — threaded cable end; 3 — cable protective cover; 4 - nut; 5 — rubber bushing; 6 — washer; 7 — front tip of the cable sheath; 8 - seal; 9 — rear tip of the cable sheath; 10 — cable sheath bracket; 11 — spacer sleeve; 12 — mechanism for automatically adjusting the length of the cable.
- Stiff pedal. If the driver feels that it has become more difficult to press the pedal, then you should contact a service station. Otherwise, the cable will burst, the pedal will fail and will not return to its original position. As a result, it is impossible to operate transport.
- Slipping. In other words, independent gear shifting. If the cable is faulty, this is quite likely. If the car is in neutral gear, it can move away.
- No switching. If the cable is broken, the clutch will not engage, which means the gears will not shift.
- Other symptoms. For example, there is a leak, then you need to inspect the cable, it is probably torn or disconnected. There may also be jerking, the car jerking forward.
Knowledge of such symptoms of a malfunction will protect the driver from possible emergency situations while driving and will allow you to quickly replace the VAZ 2110 clutch cable with your own hands.
Malfunctions
Any driver experiences an unpleasant feeling when the clutch pedal sinks to the floor. This can happen if the clutch cable breaks; it is also possible that the release fork breaks (this case is discussed in another article). The cable breaks more often on older cars that are used in extreme conditions or all year round.
The cable may become frayed, which affects the smoothness of the pedal and the operation of the clutch. This cable also requires replacement.
If the clutch cable is broken, you can drive your car to the repair site. You need to start the car in first gear and shift while driving. The following situation is possible: the cable broke while the gear was engaged, and the car stalled.
There is a possibility that it will be difficult to engage the neutral position. Then your car won’t even be able to roll off the roadway. The transmission is disengaged by rocking the car forward and backward and disengaging the transmission at the same time. You can jack up one of the wheels and spin it by hand, this will also help.
Even if the cable is not replaced, gear shifting is possible. It is possible to get to the service station, but such driving has a negative impact on the service life of the gearbox.
Malfunctions and reasons for their occurrence
But this type of drive is also not eternal and problems with it will only be a matter of time.
Over time, the cable threads corrode and break, which is why at one point when you press the clutch pedal, it remains in the depressed position and does not return to its original position.
For the same reason, it happens that pressing the pedal and returning it is difficult, and a grinding noise can be heard. This is a consequence of the “fluffing” of the cable - rotted metal threads rest against the braid, significantly complicating movement.
All these malfunctions occur for one simple reason - moisture gets inside the braid, which leads to corrosion.
And although manufacturers are trying to combat this problem by applying a polyethylene protective layer over the cable, such measures can only extend the service life.
And here, too, everything is simple - while moving, the cable rubs against the braid and over time the protective layer wears off. Lubricating the cable also provides only temporary protection.
Corrosion is not necessarily the cause of the burst. Very sharp squeezing of the pedal, for example, during a difficult traffic situation when the driver kicks it with all his might, can also lead to destruction of the cable.
In any case, if problems arise with the drive, the cable must be replaced, since it cannot be repaired.
Note that the cause of the failure of the clutch pedal can be not only the cable, therefore, if such a malfunction occurs, first of all you need to make sure that the drive has broken.
The fact is that there are cases when the clutch release bearing control mechanism breaks, which is a much worse problem than the destruction of the cable. After all, in case of such a malfunction, you will have to remove the gearbox from the car in order to repair the mechanism.
But a cable break is a malfunction that can be very easily eliminated if you have a spare element.
And since such a problem on a VAZ can appear at any time, it is recommended to always carry a new cable with you in the trunk.
Malfunctions
Any driver experiences an unpleasant feeling when the clutch pedal sinks to the floor. This can happen if the clutch cable breaks; it is also possible that the release fork breaks (this case is discussed in another article). The cable breaks more often on older cars that are used in extreme conditions or all year round.
The cable may become frayed, which affects the smoothness of the pedal and the operation of the clutch. This cable also requires replacement.
If the clutch cable is broken, you can drive your car to the repair site. You need to start the car in first gear and shift while driving. The following situation is possible: the cable broke while the gear was engaged, and the car stalled.
There is a possibility that it will be difficult to engage the neutral position. Then your car won’t even be able to roll off the roadway. The transmission is disengaged by rocking the car forward and backward and disengaging the transmission at the same time. You can jack up one of the wheels and spin it by hand, this will also help.
Even if the cable is not replaced, gear shifting is possible. It is possible to get to the service station, but such driving has a negative impact on the service life of the gearbox.
The cost of the spare part is low, about 300 rubles. The cost of replacing a cable in a car service is 400 rubles.
Contacting the service station
The vehicle can be driven by inexperienced drivers who do not know how to change the clutch cable on a VAZ 2110, in which case it is necessary to contact a technical service.
You will have to pay for the service, but this has its advantages:
- As for the cost, most service stations have reasonable pricing;
- all manipulations are carried out by highly qualified craftsmen with long experience;
- the process uses modern equipment and tools;
- Only new spare parts are installed;
- fast service times;
- quality assurance.
All these advantages indicate that you should not save money on car repairs if the driver does not know how to change the clutch cable on a VAZ 2110 car yourself.
Advice from professionals
A vehicle breakdown causes a lot of inconvenience and requires unexpected cash costs. To prevent such situations, it is recommended to take the advice of professionals.
- Carry out technical inspections of your vehicles regularly. This manipulation will allow us to identify future breakdowns and eliminate malfunctions at an early stage of development.
- Respond promptly to emerging signs. Do not operate a vehicle with worn parts.
- When making repairs, use only new and high-quality spare parts.
- Once again, spend a little and entrust the work to qualified mechanics if you don’t know how to remove the clutch cable of a VAZ 2110.
- To extend the life of the clutch cable, systematically lubricate it with a special substance using a syringe provided for this procedure. This feature will prevent chafing of the element.
Carefully monitor the condition of your car. Timely maintenance will extend the life of the vehicle.
Causes of wear
Content
The main reason for the breakdown of this element is long-term operation of the VAZ 2110 car in poor conditions. For example, a car is stuck in a snowdrift, the driver has to accelerate frequently, which affects the condition of the part.
Separately, it should be said about the correct operation of the machine. With a sharp start at high speeds or with regular movement, when your foot is on the clutch pedal, which causes slipping, this is also a wear factor.
Operational reasons are not the only ones. Cable wear may occur earlier than expected due to the following factors:
- low quality cable installation;
- Carrying out repair work with many mistakes;
- ignoring the first signs indicating a breakdown.
Every factor must be taken into account to avoid unexpected damage and expense.
Diagnosis of clutch faults
Traditionally, malfunctions of this unit have such characteristic manifestations as atypical sounds while the vehicle is moving when the device is turned on, difficulties with the gear shift function, lack of clutch when overtaking, and others. Under such circumstances, it is necessary to intervene in the operation of the device; accordingly, taking a number of measures to adjust the clutch on the VAZ 2110 becomes mandatory.
Despite the characteristic difficulties of diagnostics and repair work, for an initial assessment of the condition of the unit, it is advisable to apply your knowledge and skills without additional consultations at a car service center. Contacting a service station even if there are minor defects will require financial costs.
As experience shows, of the variety of car brands, the VAZ 2110 has the greatest ease of repair. How to adjust the clutch using a minimum of keys and instruments can be found on the websites of car enthusiasts, in thematic magazines, as well as on forums in personal conversations with leading auto mechanics or more experienced motorists.
First of all, the vehicle owner must have knowledge in the field of transmission structure, front suspension, as well as certain car care skills. Traditionally, repairs are best carried out in a garage with an inspection pit or lift.
The standard list of tools required to adjust the “ten” clutch includes the following elements:
- hydraulic jack (or mechanical version);
- auto supports;
- several universal sets of keys (open-end, ring-shaped);
- set of heads;
- a set of screwdrivers with flat and figured tips;
- hammer and chipping block;
- disk arbor.
In addition to garage tools, you will need a mechanic's workbench or any free table in order to conveniently position the clutch during the repair process. For quick work, you should first study the list of possible problems with the transmission of a VAZ 2110 car. How to adjust the clutch, and what technical techniques to use, will help by analyzing the problems identified during diagnosis.
So, problems that arise due to breakdowns or wear can be as follows:
- broken drive cable;
- broken fork;
- destroyed release bearing;
- worn friction components;
- broken disk springs;
- deformed disk due to overheating;
- broken basket.
You can control the supply of torque from inside the car using the far pedal on the left. In the process of pressing on it, muscle tension is transformed and directed along the fork. Measures for adjusting the VAZ 2110 clutch include adjusting the movement of this mechanism. The steel structure moves the release liner along the axis of the gearbox cylinder, acting on the diaphragm spring. It also deflects the pressure plate from the driven one, as a result of which the gearbox is disconnected from the electric motor.
Among the existing methods of transferring load from the pedal to the friction device, hydraulic and mechanical ones should be distinguished. A mechanism operating through a fluid system requires less expense to operate. A VAZ car has a mechanical unit installed, so the load is transferred to the fork through a cable. The disadvantage of wire-type parts is fatigue stretching under load after a certain period of time.
Replacing the clutch cable
We begin work on sweeping up the broken clutch cable on VAZ 2110, 2111 and 2112 in the engine compartment.
| With one hand we hold the clutch fork on the gearbox, with the other we tighten and remove the cable from the fork. |
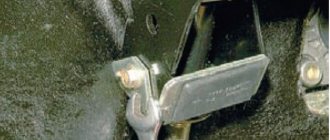
| We release the fastening of the clutch cable to the gearbox bracket; for this you will need two 17mm open-end wrenches. |
| Finally, remove the clutch cable from the bracket |
To carry out further work, it is necessary to move to the inside of the car.
| We unscrew the bolt securing the clutch cable bracket to the pedal (usually a 10 bolt, but sometimes there may be a mount with a 8 bolt). |
And here it’s time to remember another of the above exceptions. The fact is that on the VAZ 2110 from the pilot production batch, the bracket was fastened with a bolt with a head under. Phillips screwdriver. If you are the happy owner of just such a car and your clutch cable has broken, we can only sympathize with you because... It is simply impossible to get to this bolt with a regular screwdriver. It’s good if you have a special, short one at hand, but what happens is that the cable breaks along the way. But there is still a loophole in this situation: with patience and perseverance, you can unscrew this evil bolt. long screwdriver. through an open fuse box. When assembling, it is better to replace this bolt with another one, a wrench.
For greater clarity, let's consider further operations on the pedal removed from the car.
| Use a screwdriver to pry up the spring located on the right side of the pedal and disconnect it |
| Remove the bracket securing the cable to the pedal, disconnect the cable and take it out into the cabin. |
We install the new cable on the car in the reverse order.
| And finally, we adjust the free play of the clutch pedal with two keys to 13. |
What will you need?
Another positive quality of the cable drive is the ease of replacement. The whole operation takes about 20 minutes, even for a novice VAZ car owner. Moreover, everything can be done even in the field, with a small number of tools at hand.
For example, let's look at how to replace the clutch cable on a VAZ-2110, and in order to do everything you will need:
- 2 keys for 19;
- 2 keys for 8 and 10;
- Crosshead screwdriver;
- New cable.
All this is enough to carry out the work.
To make it clearer, look at the VAZ 2110 clutch drive diagram.
How to adjust the drive?
Replacing the clutch cable on a VAZ is not difficult, but this operation is not enough, since it still needs to be adjusted, and for this you will additionally need a regular ruler.
After replacement, the pedal may be higher or lower in level than the others, which is incorrect, they should be in one line.
The clutch is adjusted as you move the pedal. That is, we put a ruler next to it and mark the level of the position of the pedal pad.
After that, squeeze it all the way and make a mark on the ruler again.
Next, we subtract the distance - for a normally adjusted clutch the stroke is 12-13 cm, but 16 cm is allowed, although this value is considered the limit.
On the VAZ-2110, adjustment is made in two places - on the braid fastening nuts (allows you to change its length) and on the tip itself, which engages with the lever.
To do this, a thread is made on it and two 8 or 10 nuts are installed (they change the length of the cable itself). They are exactly what is needed for adjustment.
To perform adjustment work, it is necessary to unscrew the outer nut, since it is a locking nut, and by unscrewing or screwing the inner nut onto the tip, achieve the required pedal stroke, and then lock it.
On the VAZ-2109 there is only one adjustment - on the mounting bracket on the gearbox and the stroke is adjusted by changing the length of the braid.
You can do without a ruler on a VAZ-2110, it is only important to choose the right cable length. To do this, unscrew the locking nut and unscrew the adjusting
Then, moving the thrust sleeve along the tip, you need to find the moment when the release bearing begins to freely move. It will be easy to feel it, since the force on the lever will increase slightly.
All that remains is to fix the position of the sleeve on the tip with nuts and check. Is the pedal in line with the others.
This adjustment will ensure optimal cable tension, and the clutch will not “drive” or “slip”, since the drive is installed at the beginning of the free play of the release bearing.
Ten car. Either the cable broke or the clutch fork broke. How can I replace and adjust it myself? Thank you
If the clutch fork is out of order, you will have to remove the gearbox and replace it.
As far as I know, on 2110 brand cars, cable breakage is a very rare occurrence, and most often this occurs as a result of violations in the operation of the car or in some extreme situations. To replace the cable you only need a new cable
Is it possible to continue driving a car with a broken cable?
It’s quite possible to get to your house or garage without a clutch; if you’re within the city limits, towing is rarely required. The car must be started with first gear engaged, and movement must begin simultaneously with the engine starting. You need to change gears by accelerating in neutral.
Is it difficult to replace the clutch cable yourself and what is needed for this?
Replacing the cable is not difficult and does not take long. We remove the windshield wiper and the decorative panel under the wipers, you don’t have to remove it, but to make it easier for you to attach the cable to the pedals
In order to remove the old broken cable, you first need to remove it from the mounting bracket, which is located on the gearbox, to do this, unscrew the nuts that secure the cable in the bracket; to unscrew it you will need two 19mm wrenches. By loosening the tension, remove the damaged cable from the mounting, then we bring it to the fork, which engages the clutch, hold the fork with one hand, and remove the cable with the other
Checking status
Normal PT adjustment ensures that the vehicle is held on a slope. This corresponds to 3-8 clicks of the handle on newer nines or 5-7 clicks on a VAZ 2109 produced before 1995.
To carry out the test, follow a few simple steps:
- Find a slope that has about 25 degrees;
- Turn the handbrake to the required position;
- If the car starts to roll, the handbrake does not hold, adjustment is required;
- If there is no such slope nearby, the check is carried out in a garage;
- Place the car on a flat surface, raise the handbrake handle all the way;
- Approach from behind and try to push the car with maximum force;
- If the car begins to move, the RT requires adjustment;
- Check the operation of the handbrake at 2 clicks on newer versions of the VAZ 2109 and not reaching 5 clicks on versions before 1995. If the handbrake is working at full strength, the cable will be tightened. It will also need to be adjusted.
Operating a car with a tightened PT cable is also dangerous, as this leads to overheating and wear of the rear brake pads.
Adjustment
To adjust the PT cable you will need a pit, overpass or lift. Next we proceed according to the following algorithm.
- Raise the handbrake handle 2-3 clicks from the passenger compartment.
- Get under the car and loosen the locking nut of the parking brake cable equalizer. Before doing this, it is better to treat the nut with a wire brush to remove all dirt.
- Then act according to the circumstances. If the cable is overtightened, it must be loosened by appropriate manipulation of the nut. If the cable holds too weakly, the nut must be tightened more tightly.
- If tensioning the cable does not produce any result, then the element is already at the limit of its capabilities. Therefore, the only solution to this situation is replacement.
- When adjusting the degree of tension, be sure to evaluate the adjustment of the cable along the PT lever. As you remember, normally it is 3-8 clicks for more recent versions of the VAZ 2109, or 5-7 clicks for nines that were produced before 1995.
- Check the freedom of rotation of the rear wheels. If you overtighten the cable, the wheels will spin with difficulty and not as freely as they should.
- After making the adjustment, tighten the locking nut back and check the operation of the handbrake again by driving up a slope or pushing the machine with the PT on.
If the adjustment did not give a positive result, the cable turned out to be worn out, overtightened and does not allow adjusting the operation of the RT, you will have to change it, thereby repairing the handbrake.
Replacement
In some cases, heavy movement of the cable in the sheath is due to lack of lubrication. To eliminate this defect, fill the shell with transmission or engine oil. Pour until grease flows out of the opposite end of the cable casing. Remember to move the cable while adding lubricant.
But lubrication is more of a temporary measure. If signs of cable wear are detected, it is better to replace it with a new one. This is done as follows.
- Loosen the tension on the PT cable locking nut.
- Unscrew the equalizer adjusting nut, which will loosen the handbrake drive cables.
- Raise the rear of your VAZ 2109 using a jack, then remove the brake drum and brake pad.
- Unscrew the drive cable end from the drive arm.
- Disconnect the fastening nut, and then remove the PT cable holder on the rear suspension beam of the vehicle.
- Remove the shell bushing from the hole in the brake shield.
- Pass the end of the PT cable through the hole in the brake shield.
- Remove the PT cable from all holders on the body of your car.
- Disconnect the end of the PT cable from the equalizer.
- Push the cable end out of the bracket to remove the cable.
- Install a new, tested cable, proceeding in the reverse order.
- Do not forget to adjust the cable tension and the performance of the restored RT at the final stage of assembling the unit.
A few notes
Taking advantage of the fact that you have climbed quite deep into the inside of the car, you can carry out some additional actions so as not to return to this in the near future.
- It is advisable to change the release bearing along with the clutch;
- You also need to check the clutch paddles and the clutch basket itself. If there is significant wear, do not be lazy to replace them, otherwise in the near foreseeable future you will have to climb into the hole again;
- The driven disk must be centered
. It would be good to use a special mandrel for this purpose. If this is not available, you need to at least select a wooden round of the required size. When the basket fasteners are tightened, if the alignment is done correctly, the mandrel (or its substitute) should come out without any effort. But don’t fall out on your own.
Clutch adjustment
Replacing the cable is not the whole job. The clutch pedal will also need to be adjusted. This stage is not particularly complicated and can be easily done alone.
First, check whether the car is on the handbrake, then disconnect the negative cable from the battery. Now you need to find out how long the pedal travel is. The most convenient way to do this is with a regular ruler. Place it in close proximity to the adjustable unit (strictly horizontal) and see how much the lever lags behind. If the result is no more than 13 cm, then everything is in order, otherwise it will not be possible to do without adjustments.
Adjustment is made with the previously mentioned nuts located at the end of the cable on the hood side. The one located above is unscrewed as much as possible, and the second one is followed behind it until the gap between the pedal and the base is approximately 12-13 centimeters.
Then the clutch is pressed several times until it stops and the gap is measured again. When its value remains unchanged, return the lock nut to the adjusting nut and tighten.
Upon completion of the work, it remains to check how well the repaired unit functions. To do this, start the engine and drive away slowly. Drive around a bit, shifting gears and pressing the pedal. If everything is fine, then you can drive out onto the road.
Purpose of the cable and its place in the device
VAZ 2112 cars have a mechanical drive; it is installed on passenger cars of the VAZ family and not only, which are equipped with low-power power units. This type of drive compares favorably with others due to its very simple design and low cost of production. In addition, a mechanical drive is easy to repair and maintain because it contains a minimum number of necessary elements, see photo below:
Schematic design of a mechanical clutch
- As can be seen from the diagram, the main element of the mechanical drive is represented by a flexible cable enclosed in a shell
- The clutch pedal is located inside the car and is connected to the lever (clutch fork) through a flexible cable.
- At the junction of the fork and the cable there is an adjustment device, which is designed to regulate the free play of the pedal
- The operation of the drive is incredibly simple: the driver presses the pedal
- This sets the VAZ 2112 clutch cable in motion, which pulls the lever device
- This device (fork) moves the release bearing along the guide
- The release bearing presses on the legs (petals) of the basket
- Thus, the clutch is disengaged
Transplantation
The cable loop suitable for K7 engines contains several parts. The assembly itself is disassembled, and the boss attached to the cable is sawed off.
Don't be afraid to saw the tip
The center of the boss can be drilled out, although the hole is present from the factory. The main thing is to make a countersink, otherwise it will be difficult to solder the cable.
Tip installation
The solder should be recessed into the recess.
Now let's learn how to deal with the T-shaped tip. In principle, the same technology is used:
- Drill out the cable fastening;
- We carry out countersinking;
- We fasten and solder the new cable.
All actions are explained in the photo.
Preparing T-Tips
Steel solders well. You just need to use active flux. Soldering iron power – 100-120 watts.