Features of the work performed using the example of some cars
To prove the proposition that each power plant has its own characteristics of tightening the cylinder head, let’s consider the nuances of performing work on specific models.
VAZ-2112 16 valves
A number of modifications of the VAZ-2112 were equipped with two types of 16-valve power plants (factory indexes - 21120 and 21124). These two motors, despite some design features, have identical head tightening technology.
These units use 93mm long tension bolts. In this case, reuse of fasteners is allowed, but under one condition - if their length does not exceed 95 mm (if it is longer, they should be replaced). 10 bolts are used to secure the head.
Tightening is carried out in three approaches:
- The bolts are tightened according to the order with a force of 2 kg/m;
- Turning 90 degrees;
- Repeated tightening to 90 degrees.
The drawing diagram is shown below.
Between the 2nd and 3rd approaches you need to take a 20-minute break.
Since these engines use tensile bolts, additional tightening is not required during vehicle operation.
VAZ-2107
On the VAZ-2107, all installed modifications of power units are 8-valve.
The block head is attached to them with 11 bolts, 10 of which are main, and 1 is an auxiliary side bolt (installed in the side protrusion).
On this car, tightening fasteners is also performed in three approaches:
- 10 main bolts are tightened in order with a force of 3.5-4.0 kg/m;
- The same bolts reach with a torque of 11.5-12.0 kg/m;
- The auxiliary is tightened with a force of 3.5-4.0 kg/m.
Additional tightening of the cylinder head is not required when operating the VAZ-2107.
"Samara", 10th family, Priora
On models of the Samara family (2108-21099), as well as VAZ 2110-2112 with 8-valve units, tightening is already performed in 4 approaches:
- Tightening with a force of 2.0 kg/m;
- Reaching with a moment of 7.5-8.5 kg/m;
- Turn 90 degrees;
- Repeated rotation by 90 degrees.
The break between points 3 and 4 is 20 minutes.
As for the VAZ of the “tenth” family, which are equipped with 16-valve engines, their tightening technology is the same as that of the VAZ-2112 (described above).
The same applies to the Lada Priora; on 8-valve units, a method with 4 approaches is used (VAZ 2108-21099), and on 16-valve units, 3 approaches are used (VAZ 2112 with a 16-valve engine).
"Volga"
On ZMZ-406 engines installed on the Volga, according to the automaker’s technical documentation, tightening the engine block head bolts is carried out in two approaches:
- With a force of 4.0-6.0 kg/m;
- With a moment of 13.0-14.5 kg/m.
But many car owners of this car note that this technology does not allow the cylinder head to be properly tightened, so they use techniques with a large number of approaches.
A common method is the cross method, performed in 4 stages and with the following efforts:
- 4.0-4.3 kg/m;
- 7.5 kg/m;
- 11.0 kg/m;
- 14.3-14.5 kg/m.
Subsequent tightening of the bolts is not required when operating on this engine.
Sparco24 › Blog › Installing 16V camshafts
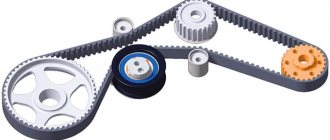
In this article we will look at the installation of sports and tuning camshafts on VAZ 2112, 21124, 21126 and 11194 engines. First, you need to remember that engines 2112 and 21124 have their own timing belt drive and are incompatible with the timing belt of engines 21126 and 11194 - this worth considering when purchasing split gears. Engine gears 21126 and 11194 have rounded teeth, so the belt, pump, lower crankshaft gear and camshaft gears have their own. To install the camshafts you need to do the following:
1. Disconnect the TPS, IAC and mass air flow sensor connectors, loosen the clamps holding the inlet pipe on the receiver, loosen the ventilation clamp for the crankcases of the cylinder head cover and dismantle the intake pipe assembly with the mass air flow sensor;
Common Mistakes
Despite the fact that automakers clearly indicate the procedure and nuances of tightening the cylinder head, many car enthusiasts make mistakes when assembling the engine. The most common of them are:
- Pouring oil into the mounting holes to lubricate the threads (the liquid is incompressible, so poured oil will not allow the head to be properly tightened);
- Over-tightening (exceeding tightening forces leads to damage to the cylinder head and the fasteners themselves);
- The use of damaged or inappropriate keys (the edges of the bolt heads may be torn off, after which it will be problematic to tighten or unscrew them normally);
- Use of unsuitable bolts as replacements (fasteners from different engines may differ in length, thread spacing, head height and diameter);
To avoid problems in the future, you should use only fasteners designed for a specific engine and fully comply with the work conditions.
We change camshafts on a VAZ 2112 16 valves
Replacing camshafts on a VAZ 2114 with your own hands
Socket wrench "8"
Stages of work
To correctly carry out the process of replacing exhaust elements, we suggest you use the instructions prepared specifically for our users. This manual is also suitable for those who want to replace exhaust camshaft seals, sensors or plugs.
- Open the hood of your 16 valve VAZ 2112. Remove the protective cover of the timing belt.
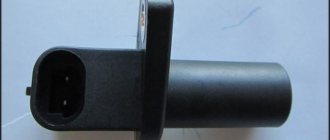
- After this, it is necessary to remove the cylinder head cover, as well as the engine fluid emergency pressure monitoring device (sensor). The sensor is removed so that it is not damaged during the work. You can also remove the sensor wire tip.
- Once the sensor is removed, you need to remove all the screws that secure the camshaft bearing housing. This is done using an “8” socket wrench. All bolts should be unscrewed evenly, not one at a time.
- After this, dismantle the bearing housing of the exhaust camshafts of the 16 valve VAZ 2112. It should be noted that the housing is dismantled with spark plug wells. They need to be pulled out of the case.
- Now regarding the plugs for technological holes. During the camshaft replacement procedure, motorists often lose the plugs. The plugs are small round shaped parts.
The plugs need to be removed from their installation locations in the cylinder head; there are two plugs in total, and they are located in the area of the rear ends of the camshafts.
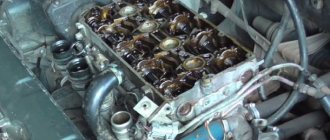
After this, you can dismantle the exhaust camshaft. It is advisable to remove the exhaust camshaft first. With the exhaust camshaft removed, proceed to remove the intake valve element. Now it's up to the seals. We begin to dismantle the oil seals and put them aside. By the way, when dismantling the oil seals, also be careful not to damage them. After removing the seals, inspect the dismantled devices. The oil seals must be free of mechanical damage, signs of wear, microcracks, etc. If you decide to install sports timing pulleys on your 16 valve VAZ 2112, then you need to purchase tuning parts in advance. Installation of sports elements is common among Russian motorists. Take your sports camshafts and lubricate their cams, as well as the supporting elements, with engine fluid. Please note: the exhaust and intake sports components are not interchangeable, they are marked. For example, the numbers 1006014 are marked on the components of the exhaust valves. After this, a small layer of sealant must be applied around the perimeter of the cylinder head of the 16 valve VAZ 2112, as well as along the surface of the pulley bearing housing. More precisely, the application sites are marked in the photo. It is better not to overdo it with sealant. Once the sealant is applied, the pulleys can be placed in place.
Then install the bearing housing on the cylinder head. Tighten all screws evenly until the body parts are flush with the cylinder head. By the way, it is also advisable to tighten the screws in a certain sequence; you can learn more about this in the photo. Then you should press in the oil seals, and also install the plugs in the cylinder head of the 16 valve VAZ 2112. After this, the assembly must be done in the reverse order, do not forget about the sensor.
1. Remove the sensor and unscrew all bolts
2. Remove the bearing housing
3. Remove plugs
4. Dismantle the shafts
5. Apply a layer of sealant
6. Tighten the bolts evenly
In what cases is it necessary to change?
The pulleys of the 16-valve VAZ 2112 must be replaced when they are worn out or have mechanical damage. In particular, we are talking about:
- failure or exhausted service life of the pulley bearing journals;
- mechanical bending of the camshaft;
- spent service life, as well as scuffing of element cams.
Lada 2112 with 16 cl internal combustion engine If some kind of extraneous knock appears in the valves while the engine is running, it is usually caused by one of these damages.
If you have recorded a reduced pressure of the engine fluid in the system, this may indicate an increase in the clearances in the bearings. To do this, in order to eliminate this malfunction, it is necessary to grind and restore the pulley bearing journals. You should also enlarge the grooves through which the engine fluid flows. This is done so that the lubricating fluid, after the next grinding, lubricates the internal combustion engine elements. As for the necks, after grinding they should be polished with green GOI paste.
What is a cylinder head?
In order to carry out any manipulations with this unit, it is necessary to understand the purpose and operating principle of the device. The cylinder head on the VAZ-2112 model we are considering is made of two options: cast iron, aluminum. Essentially, to put it bluntly, this is the engine cover.
One of the most important components of a vehicle, which is responsible for:
- combustion of gasoline in the engine;
- removal of exhaust gases during the combustion process.
Secondary functions performed by the cylinder head:
- the functional option is carried out thanks to the work of support washers, valve bushings and other parts located in the head;
- thanks to the hole in it, the chain tensioner and the drive of the pulley distributor are installed.
The abbreviation cylinder head is used more often in the terminology of automotive components, since there is not always time to pronounce long and complex names. But it is clear that you need to know all the decryptions. Especially if it is an internal combustion engine (internal combustion engine) and cylinder head (cylinder head).
First of all, this is necessary to avoid moisture accumulation at the junction of components in the block and their connections. Thanks to this protection, condensate collects on a special plane to allow liquid to leak out of the engine.
Torque and sequence of tightening the camshaft bed
Why is it necessary to properly tighten the beds of camshafts and other parts of the cylinder head? Correct tightening determines the normal functioning of all components and assemblies. In order to properly tighten threaded connections, a standard tightening pattern and a torque wrench are used.
Before installing the bolts in place, they must be thoroughly washed and lubricated with silicone grease. To properly tighten the bolts you need to know the sequence. The sequence starts from the middle part and gradually moves to the edges. It is best to familiarize yourself with the process via video.
Gasket replacement process
In order to make the replacement faster and more convenient, you will need a pit, overpass or lift. As practice shows, such conveniences are not always at hand and you have to suffer in the garage. Let's consider the step-by-step process of replacing the cylinder head gasket:
- We remove the “minus terminal” from the battery.
- To replace the gasket, it is necessary to clear the head channels of coolant, so we drain it into a previously prepared container.
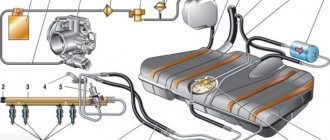
- Relieve pressure in the fuel system.
- Approaching the engine from below, it is necessary to dismantle the exhaust pipe.
- The next step is to dismantle the thermostat.
- Since it is necessary to replace the gasket itself, we will not disassemble the head and dismantle it together with the camshafts.
- The cylinder head is removed together with the fuel rail.
- Disconnect the camshaft and engine oil sensors.
- We are dismantling the timing belt.
- Now, you need to fix the camshafts, and then remove the pulleys so that they do not interfere.
- We dismantle the cooling sensor.
- Remove the valve cover. To do this, you need to unscrew the mounting bolts. During assembly, the bolts must be tightened in a certain order and with a certain torque.
- Now you can lift the cylinder head.
- We remove the remaining gasket material from the surface of the block and cylinder head.
- Install a new gasket on the head surface. If the gasket material has a red edge, then there is no need to use sealant, but if it is not there, then the gasket must be lubricated with graphite grease and sealant must be applied along the contour.
- We put the block head in place and tighten the screws in the sequence following the diagram.
- The rest of the assembly is carried out in reverse order.
Now the gasket has been replaced and you can continue to use the car.
Selecting a cylinder head gasket
Before you start choosing a head gasket based on the catalog number, you need to consider what types of gasket materials there are. Let's look at the main types of cylinder head gaskets:
- Asbestos. The main advantage: minimal shrinkage and excellent recoverability.
- Metal. These are some of the most reliable and high-quality consumables.
- Non-asbestos. Used as repair kits. Main advantages: elasticity, heat resistance, elasticity.
Metal cylinder head gasket
So, now you can consider the original gasket, as well as the substitutes that are used. Basically, all manufacturers label gaskets according to the original.
Reasons for failure
There are not many reasons why the cylinder head gasket failed, but every car owner must know them. So, let's look at the main ones:
- Wear. Each element of the car has its own service life, and therefore wear of the part is simply inevitable.
- Deflection or deformation of the cylinder head can lead to gasket breakdown or hot antifreeze getting onto its surface.
- Boiling your car can cause the gasket to fail.
Signs of replacement
To correctly diagnose and identify faults, it is necessary to diagnose correctly.
White steam from the exhaust is a reason to think!
Let's consider the main direct and indirect signs that the cylinder head gasket has worn out and requires replacement:
- White steam starts coming out of the exhaust;
- Traces of coolant or engine oil leakage appear at the cylinder head joints;
- Traces of oil appear in the coolant;
- An impressive amount of lubricant accumulates in the pan;
- Foam forms around the filler cap.
Now all the issues have been considered, the reasons, signs and method of replacing the cylinder head gasket have been established.
Approximate cost of replacement at a car service center
As you can see, replacing the camshaft is done with your own hands, in a home garage. You don't need any special equipment. On the other hand, this is an intervention in the engine design, which, if unsuccessful, can damage the power unit. One of the signs of malfunction is that after replacing the camshaft, the engine begins to trip. Therefore, in order to avoid major repairs and large expenses, many car owners trust the procedure to car services.
The price of replacing a camshaft starts at approximately 4,000 rubles. If you only need to replace the oil seal, the service station will charge the same amount. Replacing the shaft sensor costs 500 rubles. Replacing the timing chain of a passenger car equipped with a 4-cylinder engine is usually estimated at 6-7 thousand rubles. On SUVs and crossovers, this procedure costs more - 10-11 thousand rubles.
The camshaft is most often installed in the upper part of the cylinder head, but there are also systems with a lower location. The latter option is found mainly on old cars or cars with weak engines. The upper location of the element, on the contrary, is the calling card of powerful internal combustion engines with high operating speeds.
Performing the operation without a torque wrench
Carrying out work without special equipment. The tool is allowed only on “old” engines (Moskvich, VAZ of the first models).
A feature of tightening the cylinder head without a torque wrench is the need to “feel” the force applied. Otherwise, the general method of work is the same as using special equipment. tool:
- We tighten all the bolts by hand;
- We do the 1st approach, applying medium force (we try to pull all the bolts with the same force, smoothly and without jerking). Be sure to follow the tightening order;
- We carry out the second approach, increasing the force (in order to more accurately “feel” the force, the key with an increased shoulder should be pulled “toward” rather than pushed “away”);
- We do the third approach with high force (turn until the bolt stops).
When the throttle cable needs to be replaced
How to determine the moment when the VAZ-2110 throttle cable requires replacement? Experts recommend paying attention to the following points in the operation of this vehicle part:
- it is not possible to regulate the throttle valve drive;
- when pressing the accelerator pedal, the damper cannot open and close fully;
- the metal part of the cable began to “shag” (this can be seen visually when checking the internal parts of the car);
- When the throttle valve is operating, the gas cable constantly gets stuck.
If you find one of these problems in the operation of your vehicle, then you need to immediately buy a new throttle cable and replace it.
Step-by-step tightening instructions
When installing the head, follow the following sequence:
- Clean the contact surfaces on the block and head from dirt and dust, oil and coolant drips, as well as adhering remnants of the previous gasket or sealant.
- Inspect the holes in the block, inside of which threads are cut for screwing in the head fixing bolts. There should be no liquid or dirt in them, otherwise the bolts will not be able to be tightened completely. And if excessive force is used, the threads in the block may break or the bolt may break.
- Check and replace the centering guides in the block and place a new gasket on them.
- Prepare the head for installation, mount all the parts on it and pre-lubricate the necessary components (for example, valve stems).
- Place the cylinder head on the gasket and insert 10 fastening bolts into the holes and tighten them in several steps.
- Tighten all bolts according to the diagram (image above). The standard tightening torque for the VAZ 2112 cylinder head according to the regulations is 20 N/m.
- Tighten the bolts in the same sequence by turning 90 degrees.
- Repeat the broaching by analogy with the previous step.
When placing the block head on a simpler engine, the sequence is slightly different:
- Inspection and cleaning of surfaces and holes are carried out in the same way as for a 16-valve head.
- The first step is to tighten the bolts starting from the center of the head in accordance with the diagram (see photo gallery) with a torque of 20 N/m.
- Using the same scheme, the first tightening of the bolts is carried out with a torque in the range of 70-85 N/m.
- Turn the bolts 90 degrees in the same sequence.
- Repeated rotation another 90 degrees.
Torque and sequence of tightening the camshaft bed
Camshaft cover tightening sequence
Correct tightening of the camshaft bed, as well as other parts of the cylinder head, determines the normal functioning of all components and assemblies. So, in order to tighten threaded connections, a standard tightening pattern and a torque wrench are used.
Before installing the bolts in place, they must be washed thoroughly and lubricated with silicone grease.
In order to properly tighten the bolts, you need to know the sequence. It starts from the middle part and gradually moves directly to the edges. The detailed sequence can be seen in the photo below.
Tightening diagram for each camshaft bed bolt with numbering
As for the tightening force itself, it is 8.0-10.0 Nm . After the bed is installed on the block head, the connection bolts are tightened by hand or without much force using a ratchet with a head.
We tighten all the bolts by hand, but do not tighten them
When all the bolts are in place, you need to take a torque wrench and tighten them according to the standards in the order indicated above.
Torque wrench for tightening threaded connections
In what cases is it necessary to tighten the camshaft bed?
The bolts are tightened. Marked with arrows
Tightening the camshaft bed will be necessary if it was previously dismantled for restoration and repair work. So, in what cases will you need to remove the bed, let’s look at it in more detail:
- Replacing camshafts, lifters or valve seals.
- Overhaul of the block head.
- Engine repair operations.
- Replacement of individual elements of the cylinder head.
Consequences of improper bed tightening
The consequences of improperly tightening the camshaft bed include the following:
- Oil leakage due to a gap or loose connection.
- Passing air inside the cylinder head.
- Malfunction of the engine or cylinder head.
- Ingress of foreign objects (water, dirt, dust).
All these factors can negatively affect the performance of the cylinder head and main power unit.
Procedure for installation and dismantling
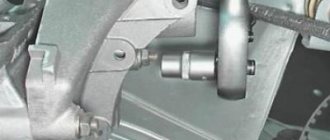
The cylinder block is the basis for mounting the head, which is held on by 10 screws. Unscrewing is carried out with a special socket wrench - “ten”.
The photo shows the correct folding order:
- Top right corner.
- Bottom right corner.
- Top left corner.
- Bottom left corner.
- Top second from left.
- Top second from the right.
- Second bottom from the right.
- Second bottom from the left.
- Top in the middle.
- Bottom in the middle.
By strictly observing this sequence, you can avoid deformation of bolts and threads, as well as other unpleasant moments.
The design of the unit is quite complex, although at first glance it seems primitive.
The head is attached with bolts or studs to the block and closes the cylinders on top. The seating area of the upper element is very large, therefore the correct sequence of tightening the threaded connections with a specific force is very important. Previously, older car models had cast iron elements of this unit, which were easier to work with. Nowadays, softer, lighter and more ductile aluminum is predominantly used, when working with which it is very easy to damage a cylinder. Cast iron is also much more resistant to heat shrinkage and deformation, which does not yet allow us to completely abandon it.
The standard screw size in the model we are considering is 93 mm. If even one stretches even a couple of millimeters, it must be replaced immediately.
The installation sequence differs from the above order and is shown in the photo:
- Middle bottom.
- Upper lower.
- Bottom second from left.
- Bottom second from right.
- Top second from the right.
- Top second from left.
- Bottom corner left.
- Top corner left.
- Bottom corner right.
- Top corner right.
Tension torque standards:
- The force at the first stage is 20 N*m.
- Each element should be turned to the right by 90 degrees.
- After 20 minutes of waiting, you need to turn it another 90°.
The initial effort is small. But from the third stage the work becomes more difficult, so a lever is used. If you have any difficulties with the stretching process, watch the video tutorial in which everything is shown and explained in detail.
Installing a cylinder head under a turbine on an internal combustion engine is not much different from the option discussed above, but in case of inconsistencies or other problems, it is better to seek advice or help from qualified specialists.
Source
Bolt tightening diagram for GBTSVAZ 2112 16 valves
When performing work, strict tightening rules must be observed. For the 16 valve engine model 2112, the permissible bolt length is 94 mm. If the indicator is 95 millimeters, the parts should be replaced. Some experts even recommend installing new pins for each procedure - this is guaranteed to ensure high-quality operation of the system.
Separately, it is required to adhere to the sequence of tightening the nodes - this guarantees an even fit of the surfaces and the absence of leaks in the future. The last point is the force applied during work. The indicator is critically important, as it ensures tightness and sealing of the block.
Installation and replacement of camshafts VAZ-2112 16 valves photo, video
Replacement of camshafts on the 16-valve VAZ-2112 engine occurs when they wear out and the support journals wear out. Most often this happens when the time for a major overhaul of the power unit or cylinder head passes. This is a rather complicated procedure, but you can really do it yourself.
The video below shows the installation of camshafts and split gears on a 16-valve engine of the VAZ family
The video material will tell you how to replace camshafts on a VAZ-2112 16 valves, and give some recommendations and advice.
Camshaft replacement process
Camshafts with gears and fasteners
In order to install camshafts on the VAZ-2112 16 valves, they must first be dismantled. Like any spare part, they are installed in the reverse order from disassembly.
So, let's look at the step-by-step process of removing and installing the intake and exhaust camshaft.
Removing camshafts
To begin with, as with any repair operations, it is necessary to remove the “minus terminal” from the battery. Remove the timing belt cover. Having unscrewed the mounting bolts indicated in the diagram, remove the timing cover. Now, you need to remove the valve cover
Please note that the bolt tightening order must be followed during assembly. After unscrewing the mounting nuts, remove the valve cover. Disconnect the wires of the emergency oil pressure sensor, and then unscrew it. Disconnect the emergency oil pressure sensor. Using a socket wrench or 8-mm socket, unscrew the 20 bolts securing the camshaft cover. Diagram for dismantling and tightening the camshaft bearing housing bolts. Dismantle the bearing housing. camshaft
Now, there is free access to two plugs that are located on the rear side of the cylinder head
We take them out. You need to be careful with the camshaft plugs; if you install them incorrectly, oil will leak out. If you don’t notice it in time, you’ll shorten the engine’s lifespan or end up in need of a major overhaul.
Remove the two rear cylinder head plugs. Remove the intake camshaft. We take out the exhaust camshaft. We take out the camshafts from their seats. We press out the oil seals from the camshafts. We remove the oil seals from the camshaft. If it does not come off, carefully cut it or pry it off with a screwdriver.
Installation of camshafts
Now that everything is removed, you can proceed to installing new camshafts on the car:
- Lubricate the cams and shaft support journals with engine oil.
Lubricate the camshaft journals and cams with engine oil.
We place each camshaft in its seat. It is worth considering that camshafts are not interchangeable, so they should not be confused.
The intake camshaft is shown on the left and the exhaust camshaft on the right.
Apply sealant to the surface of the cylinder head and camshaft bearing housing.
How to apply sealant to the camshaft bearing housing cover
We put the camshaft cover and cylinder head in place. Tighten the bolts evenly to a certain torque. We press new oil seals and install the rear plugs.
We press new oil seals onto the camshafts
We collect the remaining parts that were removed from the car.
Choice
Cylinder head camshafts for the VAZ-2112 are produced only by the manufacturer, so there is no need to look for analogues.
Original catalog numbers: inlet - 2112-1006015, outlet - 2112-1006014. Each camshaft costs an average of about 3,000 rubles.
Intake camshaft markings
Exhaust camshaft marking
Nuances
When installing the bearing housing and cylinder head, do not apply sealant that contains silicone. This is due to the fact that the motor heats up, and accordingly the sealant heats up, which releases vapors that can get into the cylinders and further through the system. You should use a sealant whose instructions or packaging indicate that it is safe for the oxygen sensor.
When applying sealant to cavities, you should not apply a lot of it, because when tightening the bolts, it can get inside and this will lead to clogging of the oil channels, and therefore there will be no lubrication. The lack of lubricant will lead to increased wear of parts that will quickly fail.
Replacing and installing camshafts on a 16-valve VAZ-2112 is not entirely easy, but it is quite possible
The main thing to ensure results is caution and following instructions. It is worth noting separately that the intake and exhaust camshafts are different and not interchangeable. On the intake there is an additional border for the phase sensor
On the intake there is an additional border for the phase sensor.
Replacing with a new or restoring the old camshaft
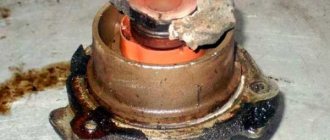
Damage is always analyzed. Based on scratches and burrs on the bearing journals, cracks and deformations, experts determine the degree of wear. The area where the node sits in bed must be examined. The dimensions of the necks and body supports are measured using a micrometer. If the damage is severe and the deviations in diameters are large, it is not advisable to carry out repairs. In this case, it will be difficult to restore the part, it will cost much more.
When the defects are minor - for example, the wear of the shaft is weakly expressed, scratches on the surface under the seals are small, repairs are carried out. In this case, grinding the surfaces and installing new oil seals with a small axial cross-section will help greatly.
One of the most common problems with camshafts is worn camshafts. This defect usually manifests itself with a characteristic knocking sound inside the engine when starting “cold”. If you ignore the initial symptoms, the problem will get worse. The noise will increase, a metallic clang will appear not only at the start-up stage, but also during the movement.
Camshaft cam
The causes of early cam wear are:
- oil filter clogged;
- refueling with low-quality auto scrap;
- frequent overheating of the power plant - the metal of the cams begins to “lead” from this;
- low lubrication level;
- incorrectly set valve clearance;
- Incorrectly set phases of the gas distribution system.
The second common malfunction is defects in the support journals. These include nicks, scratches, and various abrasions. Supporting elements also bend, crack, and change their original shape. Minor types of violations are caused by natural wear or poor-quality composition of the engine oil. They can be easily eliminated by grinding and simultaneously cleaning the internal parts of a car engine - cylinders, pistons, rings. At the same time, the oil pump and the internal combustion engine cooling system are thoroughly diagnosed, and their incorrect operation is corrected.
The curvature of the support journals is determined not visually, but using special equipment. There is an acceptable degree of curvature, which is determined by 0.05 mm (for passenger cars).
Significant defects cannot be ground, so the camshaft is replaced with a new one. However, it is extremely important to be able to identify the cause that led to the wear. Otherwise, the problem will repeat. As a rule, cams and bearings often break and wear out prematurely under extreme conditions. When a car is used more than normal, it gets into accidents and various collisions.
Bolt tightening conditions
When installing the cylinder head, it is important to comply with the tightening technology, which includes a number of criteria:
- Tightening order;
- An effort;
- Condition of fasteners (for example, studs with nuts);
Each engine has its own tightening order, which must be followed to ensure uniform tightening of the head to the block and to prevent the occurrence of stress on any surface areas. For example, on a VAZ 2105 it looks like this.
Force is another important factor for the correct fastening of this engine element. Attracting the plate is carried out in several approaches (their number differs on different motors), each of which is performed with its own force.
The cylinder head fasteners are tightened with quite a lot of force, which leads to them being pulled out. Therefore, on many engines, bolts cannot be reused; they must be replaced. But there are also motors for which replacement of fasteners is not necessary and their re-installation is possible.
All information regarding the cylinder head tightening technology is indicated in the technical specifications. documentation for the car, it is also often indicated on the packaging of head gaskets and fasteners.
Consequences of incorrect cylinder head installation
Correct tightening of the cylinder head is very important, since the performance of the motor directly depends on it. The cylinder head acts as a cylinder cover, and any violations in its fit affect the processes occurring inside the power unit.
Insufficient tightening of the head leads to a drop in compression due to loss of tightness at the junction of the cylinder head with the cylinder block, burnout of the gasket, breakthrough of working gases from the cylinders and their entry into the channels of the lubrication or cooling systems, penetration of technical fluids into the combustion chambers, which in turn is negative affects the functioning of the power unit and can cause very serious damage.
Excessive tightening also does not bring anything good; in this case, damage to the head often occurs - cracks appear, or fasteners are destroyed - bolts break, threads break, etc.
Uneven or incorrect tightening often causes warping of the head, due to which gaps appear at the junction of it with the block, which leads to the same consequences as insufficient tightening.
Torque and sequence of tightening the camshaft bed
Camshaft cover tightening sequence
Correct tightening of the camshaft bed, as well as other parts of the cylinder head, determines the normal functioning of all components and assemblies. So, in order to tighten threaded connections, a standard tightening pattern and a torque wrench are used.
Before installing the bolts in place, they must be washed thoroughly and lubricated with silicone grease.
In order to properly tighten the bolts, you need to know the sequence. It starts from the middle part and gradually moves directly to the edges. The detailed sequence can be seen in the photo below.
Tightening diagram for each camshaft bed bolt with numbering
As for the tightening force itself, it is 8.0-10.0 Nm . After the bed is installed on the block head, the connection bolts are tightened by hand or without much force using a ratchet with a head.
We tighten all the bolts by hand, but do not tighten them
When all the bolts are in place, you need to take a torque wrench and tighten them according to the standards in the order indicated above.
Torque wrench for tightening threaded connections
In what cases is it necessary to tighten the camshaft bed?
The bolts are tightened. Marked with arrows
Tightening the camshaft bed will be necessary if it was previously dismantled for restoration and repair work. So, in what cases will you need to remove the bed, let’s look at it in more detail:
- Replacing camshafts, lifters or valve seals.
- Overhaul of the block head.
- Engine repair operations.
- Replacement of individual elements of the cylinder head.
Consequences of improper bed tightening
The consequences of improperly tightening the camshaft bed include the following:
- Oil leakage due to a gap or loose connection.
- Passing air inside the cylinder head.
- Malfunction of the engine or cylinder head.
- Ingress of foreign objects (water, dirt, dust).
All these factors can negatively affect the performance of the cylinder head and main power unit.