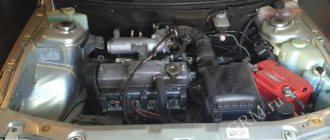
Former flagship of the Russian automobile industry VAZ 2110 with a 1.5 16 valve engine, replacement of the timing belt, rollers and pumps. The recommended replacement interval is from 40 to 60 thousand kilometers. The mileage on this strap is 80 thousand and, as the autopsy showed, if they hadn’t changed it today, then tomorrow it would have been more work for our mechanic. In general, we recommend that all customers check the condition of the belt at least once every 5 thousand kilometers, or once a year. But knowing the quality of our spare parts, more often is better.
Attention! On this engine, when the timing belt drive breaks, almost all the valves bend.
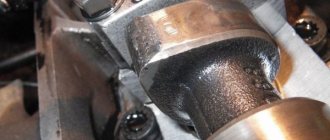
Consequence of exceeding the replacement interval. We look, remember and don’t let it get to that point. A little more and the meeting of the valves with the pistons would have been ensured.
The patient became five millimeters narrower and generally looked very bad. We send him to the honor board.
Setting timing marks on a 16-valve VAZ-2112 with your own hands
Car : VAZ-2112. Asks : Kostikov Vladimir Igorevich. The essence of the question : I can’t fix the timing marks, how can I set the marks on the timing belt?
I have a problem. When replacing the timing belt, the upper pulleys were not fixed, and now it is not clear how to align them. The marks on the pulleys do not “look” in exactly the same direction. Maybe it would be easier to tighten all the pulleys to the TDC position in cylinder 1? If we are talking about 16 valves, I am familiar with setting the marks on the VAZ-2112: I performed this operation on the timing belt 21124. Well, I have a 1.5 engine. Are there any differences?
How to set timing marks on a 124 engine
Should the tension be checked on a hot or cold engine?
In conclusion, let’s talk about two more secrets. The first one - as a reminder: on a 16-valve engine, the correct belt tension is obtained only when adjusted while hot. Second: depending on the position of the crankshaft and camshafts, the belt tension changes cyclically from minimum to maximum
Second: depending on the position of the crankshaft and camshafts, the belt tension changes cyclically from minimum to maximum
Second: depending on the position of the crankshaft and camshafts, the belt tension changes cyclically from minimum to maximum
A little different. Or rather, almost like that, but I don’t know how to explain. In general, under the action of valve springs, camshafts in certain positions tend to rotate in different directions, tensioning or relaxing the belt. But there are situations in which the springs of one cylinder themselves balance the springs of the other - and the RV pulley itself will not rotate anywhere. And this position is close to the TDC position
Or rather, it is 2 teeth away from it (in fact, it depends on the shafts used). 2 teeth is a small thing. One spring has not yet straightened out, and the other has just begun to compress. The force there is minimal, the RV pulley can be turned +/- 5 teeth easily by hand
Set the timing marks correctly - otherwise you will bend the valves!
The VAZ-21124 engine has a special feature: no matter how its pulleys are turned, it does not bend its valves. With the 21120 engine (16 v 1.5 l) such jokes will not work! If the pulley positions are not too far off, try putting on the belt and turning the mechanism to the “TDC 1 and 4” position. From now on, always use the following instructions:
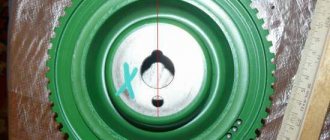
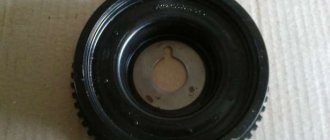
- The crankshaft is set to the required position by checking the mark on the generator drive pulley (photo 1) or on the crankshaft pulley (photo 2);
Alternator drive pulley and crankshaft pulley
Exhaust and intake shaft pulley
In theory, on the VAZ-2112, marking is carried out the same way, no matter what engine we are talking about. Here are photos for engine 21120.
What it looks like in reality and in the instructions
Take the time to find the inspection window on the gearbox housing. There is another mark under the plug.
The last step is optional. And they do it so as not to redo all the work “from scratch.”
- The number of belt teeth between the “upper pulley” marks is exactly 16;
- The mark on the crankshaft pulley sometimes breaks off - use the control method “1” (photo 1) or “3” (lower photo).
Updates for VAZ-21124
On a 1.6 engine, all actions are performed in the same way as described above. There is one exception - the generator drive pulley is aligned according to the mark on the casing (see photo).
Generator drive pulley, motor 21124
However, if this mark is not there, use the proven method: 20 teeth are counted from the DPKV body. Instead of the 21st there should be a “pass”.
The timing pulleys can be rotated as you like - the pistons will not touch the valves in any case. Compare what the pistons of two different engines look like and it will become clear what we are talking about.
For those who don't understand anything
The number of teeth on the crankshaft pulley is 21, on the camshaft pulleys – 42. When the crankshaft rotates 360 degrees, the camshafts rotate 180. In general, a complete engine cycle consists of two crankshaft revolutions (720 degrees).
In theory, you can use an alternative configuration method. Let the camshaft pulley marks point straight down. Then the mark on the crankshaft pulley should face up (TDC 1 and 4).
If there is no fixing device, you can make it yourself. Even a puller for suspension springs will do (see photo).
Source
Originals, analogues, articles and prices
Drive specifications: length 1295 x number of teeth 136 x width 9.5 mm.
| Name/article | Price in rubles |
| Original | |
| VAZ-2112 engine 16 valves, 2112-1006040-83 | From 1600 |
| VAZ 21120-1006040-00 | From 1600 |
| VAZ 2112-1006040 (16 valves) | From 1600 |
| GATES K015644XS | From 2000 |
| GATES K015536XS (16 valves) | From 2000 |
| GATES K055781XS, K015587, K015564 | From 2000 |
| Analogs | |
| BOSCH 2112-1006040 | From 1200 |
| INA 530055410 | From 1200 |
| CONTITECH CT996 | From 1200 |
| GATES 5539 | From 1200 |
| BOSCH 1987948286 (16 valves) | From 1300 |
| BOSCH 1987946329 | From 1300 |
| CONTITECH CT527K2 | From 1800 |
| CONTITECH CT1137K1 | From 1800 |
| LYNXauto 137FL22 (16 valves) | From 1500 |
| Hola TH1372 (16 valves) | From 1500 |
| BOSCH 198798527 (tension rollers) for VAZ 8 and 16 valves | From 450 |
Before purchasing spare parts, check the compatibility of the parts with the model of your technical device. Check the catalog numbers against the data specified in the instruction manual.
When we change the belt, do not forget to put marks on the crankshaft and camshaft. Many car enthusiasts neglect this rule, as a result of which the engine does not start, operates unstably, and the ignition angle is lost.
Which belt is better: domestic or foreign manufacturer. Russian analogues are not inferior in quality to imported ones, so it is not rational to overpay for a brand name. The final decision is made by the owner of the technical equipment, but it is necessary to listen to the opinions of experts.
Causes of drive belt wear
- Duration of vehicle operation without intermediate prevention and diagnostics;
- Installation of non-original parts, poor workmanship;
- Mismatch in length, width, number of teeth;
- Aggressive driving style, speed limits;
- Critically high (low) temperature conditions, climatic features.
Signs of belt wear
- Unstable engine starting: excessive wear or weak tension leads to malfunction of the ignition system;
- Copious amounts of smoke from the exhaust pipe due to melting of the catalytic filler;
- The appearance of third-party sounds when the engine is running;
- Presence of oily streaks around the perimeter of the drive mechanism;
- Cracks, fiber breaks on the belt, broken teeth, other signs of wear;
- The power unit does not start, the starter rotates.
Consequences of untimely replacement of the timing drive
- Wear of pistons, crankshaft liners, camshaft, valve mechanism;
- Increased engine oil consumption;
- Deformation of gears, cylinder head (cylinder head).
Timing marks - installation of timing marks using the example of a VAZ 2110, 2111 and 2112 engine
Dear friends, today we will tell you the basics of setting timing marks using the example of a VAZ 16 valve engine. It's no secret that correctly set timing marks are the key to proper engine operation. If the marks are set incorrectly, then normal engine operation is impossible. It is also important to tension the belt correctly, this greatly affects its durability. So, when do we have to deal with the procedure for setting timing marks? When, according to the regulations, we need to replace the timing belt at the next maintenance, by the way, the rollers are also necessarily changed along with the belt in this case. Also, if our pump is “covered,” the timing belt will have to be removed, since it is this that drives our “water pump.” Well, what if (the worst case scenario) is that our belt broke. Here, if the engine is “plug-in”, then this is a huge nuisance, the pistons meet the valves, and at a minimum, we are guaranteed to remove the cylinder head and replace the valves. So, what are timing marks and where are they applied? The first is the marks on the camshaft pulleys, both on the intake and exhaust:
They must coincide with the mark on the crankshaft, and there are already several methods for calculating this mark. It’s quite difficult to remove the generator belt pulley (it doesn’t allow you to see the mark) and see if the marks match.
With such a coincidence of the piston marks, they are at TDC (Top Dead Center)
The second method is to calculate the DPKV sprocket by the teeth
And finally, the third option for setting the crankshaft position is the marks on the flywheel, they can be seen if you remove the rubber plug on the gearbox:
These are the options for comparing timing marks that we offer you using the example of 1.5 16V engines installed on the VAZ-2110, VAZ-2112 and VAZ-2111. If you still have questions regarding timing marks on your specific engine, ask them on our forum, in the appropriate section.
Source
What is timing belt
The abbreviation GRM stands for Gas Distribution Mechanism. This mechanism distributes the air-fuel mixture among the cylinders through the valves.
The timing structure includes:
- Camshaft
- valves
- Valve adjustment washers or expansion joints
Timing belt side view
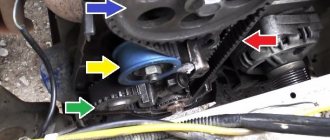
Gas distribution mechanism (GRM): 1 — timing marks on the rear cover; 2 — rear timing cover; 3 — intake camshaft gear; 4 — phase sensor ring; 5 — mark on the intake camshaft gear; 6 — exhaust camshaft gear; 7 — deflection roller; 8 — tension roller; 9 — timing belt; 10 — coolant pump; 11 — mark on the oil pump body; 12 — mark on the crankshaft gear; 13 — crankshaft gear;
A simple procedure for replacing the timing belt VAZ 2110, (2112) 16 valves
Former flagship of the Russian automobile industry VAZ 2110 with a 1.5 16 valve engine, replacement of the timing belt, rollers and pumps. The recommended replacement interval is from 40 to 60 thousand kilometers. The mileage on this strap is 80 thousand and, as the autopsy showed, if they hadn’t changed it today, then tomorrow it would have been more work for our mechanic. In general, we recommend that all customers check the condition of the belt at least once every 5 thousand kilometers, or once a year. But knowing the quality of our spare parts, more often is better.
Attention! On this engine, when the timing belt drive breaks, almost all the valves bend.
Consequence of exceeding the replacement interval. We look, remember and don’t let it get to that point. A little more and the meeting of the valves with the pistons would have been ensured.
The patient became five millimeters narrower and generally looked very bad. We send him to the honor board.
If the plate is not made
Everyone knows that on a VAZ-2112 engine, tensioning and replacing the timing belt is done using a key. Its appearance is shown in the photo.
Tension adjustment key
You can make a slot on the handle, and then, installing a dynamometer, adjust the force as shown above.
If the force is 4 kgf, then the distance from the slot to the midpoint between the pins should be 49.5 mm.
The difference between methods “1” and “2” is very simple: in the second case, the plate (key) is not fixed. This means that the key will have to be held at the same level while tightening the nut. Make a choice.
Preparatory operations
We remove the absorber and power steering reservoir so that they do not interfere in the future.
We loosen the bolt by seventeen, the tension roller of the drive belt of mounted units, also known as the generator belt, and remove the latter. It will not be possible to remove it completely because the engine mount is in the way. If the drive belt requires replacement, you will have to unscrew the engine mount. We don’t touch the generator, it doesn’t bother us.
Remove the tension roller. We unscrew the bolts securing the upper protective cover; they are hexagonal.
Remove the right wheel, plastic mudguard and drain the antifreeze.
Setting Top Dead Center
We see the crankshaft pulley. Using its bolt, clockwise, rotate the crankshaft until the marks on the camshaft pulleys and the timing belt protective cover match.
Markings on the left exhaust camshaft. The mark on the protective cover is highlighted in red.
Likewise for the intake camshaft. He's on the right. Its pulley has an inner ring for the phase sensor, so it is very difficult to mix up the pulleys.
Preparatory work
Before you start work, familiarize yourself with the timing system diagram and the location of the marks on the camshaft and crankshaft.
This is what a detailed timing belt diagram looks like.
Scheme: 1 . Crankshaft pulley. 2 . Timing belt. 3 . Water pump pulley. 4 . Tension roller. 5 . Intake camshaft pulley. 6 . Timing belt upper protective cover. 7 . Exhaust camshaft pulley. 8 . Phase sensor synchronization dial. 9 . Support roller.
A – TDC mark on the crankshaft pulley. B – Mark on the oil pump cover. C – Installation mark on the protective cover. D – Mark on the exhaust camshaft pulley. E - Mark on the intake camshaft pulley. F - Installation mark on the protective cover.
Tools for work
To carry out all the work you will need:
- New timing belt for the 16-valve VAZ-2112 engine.
- Socket head for “10” and “17”.
- The key is "17".
- Screwdriver.
- Tensioner pulley key.
Step-by-step replacement procedure
- First of all, after opening the hood, remove the negative terminal from the battery.
- Next, remove the timing belt protective cover by unscrewing 6 bolts using a “10” socket.
We clean the sensor from dirt and dismantle it.
Everything has been removed, everything needs to be replaced - that’s how it should be!
We set them up as marked with a marker.
If all work is carried out in such a strict order, the entire replacement can be done with your own hands within an hour.
Source
Installing a new timing belt
We check that the marks on the camshafts and crankshaft match. We install a new timing belt. If there are no directional arrows, put it so that the inscription is read from left to right.
The right, or descending, branch of the belt should be tight. You can turn the right camshaft clockwise a few degrees, put on the belt and turn it back. In this way we will stretch the descending branch. The tension roller has two holes for a special key. You can find it in any auto store. The issue price is 60 rubles. To tighten the timing belt, insert a special key and counterclockwise . Since there is a lot of controversy about tensioning the timing belt, let's write it this way: a tensioned belt should not have a sag between the camshafts of more than 5 mm when pressed and 7 mm on the longest branch (specially experimented).
Remember: an overtightened belt reduces the service life of the pump, and an undertightened belt can lead to cylinder head repair. (photo below)
We check all the marks. We turn the crankshaft two turns and check the marks again. If the pistons and valves do not meet and the marks coincide, then accept my congratulations. Then we put everything back in place in the reverse order of removal. Don't forget to tighten the bolts. We tighten the service belt roller with the same wrench as the timing belt tension roller. Fill with antifreeze and start the car. We wish the belt many years of service, but don’t forget to check it periodically; after all, it was made in Russia.
Consequences of a broken timing belt
Now you can easily change the timing belt on a VAZ 2110 with a sixteen-valve engine, even in an ordinary garage.
Step-by-step instruction
To replace the timing belt on a VAZ 2112, you can use the video or regular instructions. The following describes the procedure for servicing a car according to the standard plan.
Timing belt marks for VAZ 2112 16 valves
Before attaching the new unit, fix the camshaft and crankshaft taking into account the markings. The gears are fixed at zero. Points in the range from A to F must strictly match. When everything is ready, set the marks of the belt casing and shafts in a single specified position.
Find the plug installed under the thermostat on the box, remove it, then find the flywheel. When the marks on the camshaft and the casing match, you need to check the correspondence in the section of the flywheel, on the iron casing.
Installation
Installation procedure for the node:
Reassemble in reverse order. Finally, remove the screwdriver that was previously clamped in the crankcase.
Belt tension
The VAZ 2112 timing belt is tensioned by rotating the roller element clockwise using a special key until the optimal marks are reached. You can check the tension without special tools - simply by grabbing the unit in the area between the crankshaft and camshaft pulleys. The optimal values are those at which the mechanism can be rotated 90 degrees or more.
Replacing the timing belt for a VAZ with a 16 valve engine
We put the car on a flat surface, raise the handbrake and put it in first gear. Remove the decorative engine cover and the protective cover of the timing belt. Using a 19 mm spanner or a wrench, turn the generator pulley until the mark on the camshaft pulley aligns with the “tendril” of the protective casing mounting bracket on its left side. We move to the right and remove the rubber plug in the clutch housing to make sure that the marks on the flywheel match the triangular cutout on the scale, which is located there.
After all the marks match, loosen the tension on the generator drive belt and unscrew the bolt securing the pulley to the crankshaft gear.
We remove the gear and check the alignment of the marks on the oil pump cover and the crankshaft gear. The generator pulley mounting bolt must be installed back in order to subsequently rotate the crankshaft to check the correct valve timing. Next, you need to loosen the bolt securing the tensioner (tension roller) and use a special wrench to turn it clockwise until the timing belt tension is released. Now you can remove the old belt.
We put a new belt on the crankshaft gear, then on the camshaft gear, tension roller and pump. Once again we make sure that the marks match. Let's move on to belt tension.
Attention! Due to inexperience, you may encounter the following problem: when trying to tension, the mark may “run away” from the crankshaft pulley and flywheel. This happens due to the fact that you do not tension the drive belt branch (the one that “enters” the camshaft gear) loosely.
Tension it as much as possible and, while turning the tension roller, guide the belt teeth with your fingers into the teeth of the camshaft pulley so that torque is transmitted to the crankshaft. There is another option - make an allowance of half a tooth - a tooth on the camshaft pulley. After putting on the belt, turn it until the mark coincides with the “tendril” on the bracket, and carefully tighten the loose branch of the belt (from the side of the tension roller and pump) by turning the roller counterclockwise
This happens due to the fact that you do not tension the drive belt branch (the one that “enters” the camshaft gear) loosely. Tension it as much as possible and, while turning the tension roller, guide the belt teeth with your fingers into the teeth of the camshaft pulley so that torque is transmitted to the crankshaft. There is another option - make an allowance of half a tooth - a tooth on the camshaft pulley. After putting the belt on, turn it until the mark coincides with the “tendril” on the bracket, and carefully tighten the loose branch of the belt (from the side of the tension roller and pump) by turning the roller counterclockwise.
Belt tension on 8-valve VAZ engines
Before tightening the timing belt on the VAZ, the following preparatory work should be performed:
- Hang up and remove the right front wheel;
- Unscrew the 3 bolts securing the front timing cover;
- Remove the cover;
- Use a 17 key to loosen the tension roller.
After this, you should check the drive marks. One of them, located on the crankshaft pulley, must coincide with the installation tab of the rear cover. At the same time, check the mark on the flywheel. It should be flush with the alignment mark on the block boss.
If the marks match, the question of how to tighten the timing belt can be considered resolved. Without removing the belt, it is necessary to move the weakened tension roller to the right so that the necessary tension occurs. After this, the roller is tightened tightly. To adjust the roller, a special “horned” key is used. If it is not available, you can use two Phillips screwdrivers, which are inserted into special holes on the roller.
If the marks do not match, the timing belt on the VAZ-2109 must be removed from the pulleys. After this, the pulleys themselves are individually set according to the marks. It is better to start reinstalling the belt from the rear branch. After installing it, the roller is tightened.
It is necessary to finish tensioning and fixing the belt, and then manually turn the engine 2-3 turns by the crankshaft pulley. To do this, it is convenient to use a “19” head with an extension. The gearbox must be in neutral. If after turning the marks have not moved relative to each other, the procedure can be considered completed. Assembly is carried out in reverse order. » alt=»»> The question of how to check the consistency of the tension should be answered. To do this, hold the strap between your thumb and index finger and turn it 90°. The technician must be able to do this, otherwise the belt is considered over-tensioned.
Replacing the timing belt of a VAZ 2112 with a hanging wheel
If you are changing a belt with a wheel hanging out, then while tensioning the belt, install the wheel and lower the car to the ground. Engage first gear. This will also prevent the crankshaft mark from running away. Having ensured that the tension is correct, the car will still have to be raised so that it is possible to rotate the timing drive to check the marks. But there is a way out! Ask a neighbor or assistant to simply depress the clutch pedal.
Checking the timing belt tension
A well-tensioned belt should bend 90 degrees from the force of your fingers. If you overtighten, there will be problems with the tensioner and pump bearings. If you don’t tighten it enough, the belt will either jump (which will disrupt the valve timing) or fall off altogether.
So, the belt is tight. We turn the crankshaft twice to make sure that the marks match. If the marks match, then return the generator pulley to its place, tighten its drive belt and install the protective and decorative elements of the engine back. After 2 - 3 thousand kilometers of the car, check the belt tension and its condition again. The optimal service life of the timing belt before it is replaced again is 40 - 60 thousand kilometers. The frequency of checking its tension is 15 thousand kilometers.
Checking on 16-valve engines
1. Hook the steelyard hook onto the handle of the socket wrench extension. Use insulating tape or tape to secure the steelyard hook to the extension cord.
2. Check the belt tension in the middle part of the branch between the camshaft pulleys. We apply the edge of a ruler to the pulleys. Using the extension cord, pressing the belt with a force of 10 kgf, we measure its deflection, which should be 5.4 mm.
Replacing the timing belt Priora 16 valves
Replacing the timing belt on a 16-valve Priora is a little more difficult than on 8-valve engines, however, this procedure is accessible to almost every car enthusiast.
A belt in a car engine is one of the main parts for transmitting torque from one mechanism to another. But it is worth remembering that everything has an expiration date. We will outline the nuances of working and replacing the belt in the article below.
Tools and spare parts
Let's start with the fact that to replace the timing belt on a Priora 16 valves you will have to stock up on a very specific set of tools.
This is definitely a set of hexagons, a set of torx bits, and a set with a small 1/4-inch ratchet will not work, we’ll tell you why later.
In addition, you will need a device for tensioning the roller, but the usual one from 2114 will not work, you need a slightly wider one. If you have enough strength, you can tighten the roller simply by leaning against it with a mounting tool; many people do this.
The fact is that initially the 16-valve 21127 was designed without air conditioning. Everything was simple. The pump is driven by the timing belt, the alternator belt is no longer responsible for anything. In general, it couldn’t be simpler.
Crankshaft and generator with tensioner, without rollers.
The designers were faced with an almost unimaginable task - to install an air conditioning compressor, which they accomplished. Yes, not perfect, but we did it. And therefore, two additional pulleys appeared here - a compressor and a tension roller.
By the way, many car owners later began installing these same brackets with a tensioner in order to dismantle this circuit.
Replacing the timing belt on a Priora 16 valves
Let's get to work. First, unscrew the oil filler neck, then pull off the plastic casing. Then there are two development options. We will look at a more complex one, with air conditioning. Its difference is in the additional video, this has already been said. The whole point is that it also needs to be unscrewed, because it simply interferes with removing the protective cover.
Here you need a 15mm head. Unscrew the roller and remove the alternator belt. On the way, we listen to the video so that it doesn’t buzz, otherwise we need to replace it. Next, the timing belt casing opens before us. Remove the front upper and lower parts of the casing. To do this, unscrew the 8 Torx bolts.
There is also a surprise here if you use a ratchet. One of the bolts, the one closest to the passenger compartment, will have to be unscrewed using a simple Torx wrench, because the head with a tip and a ratchet will not fit between the engine and the spar.
So, we removed the casing, in front of us is the timing belt and all the rollers.
It is best to rotate by the camshaft - it is easier than by the crankshaft. It is not advisable to rotate the camshafts separately from the crankshaft. A maximum of 10 degrees to correct the marks if they misalign by a tooth or two.
Then we turn the wheel all the way to the right, someone removes it, which is not necessary. We unscrew the 4 bolts securing the mudguard using a Torx and one using a Phillips screwdriver to gain access to the crankshaft pulley.
Here we need a long extension and a wrench, as well as a 24mm socket. We put the assistant in the cabin, he engages fifth gear and presses the brake pedal all the way. After this, unscrew the crankshaft pulley bolt.
Now we take the key 15, unscrew the tension roller, while it is advisable to stop the camshafts from turning. We removed the video, looked at its condition, if it is buzzing, be sure to replace it, it may jam.
After the marks match, remove the roller, remove the old belt. It is advisable to remove the deflection roller to check its condition. Now we put the rollers in place and put on a new belt. First we put it on the crankshaft, then on the pump, then on the camshafts.
Now all that remains is to charge the roller. In order to hold it, you can use either a standard wrench, which is quite difficult to find on sale, or circlip pliers. We tighten the rollers, and then assemble them in the reverse order. Before assembly, turn the crankshaft two turns by hand. If it rotates, then everything is fine.
Video on how to replace the timing belt on a Priora 16 valves:
Replacing the belt drive
First, about the tools that we will need when carrying out repair work:
4. The marks on the flywheel crown should also converge. To trace their coincidence, you need to unscrew the plug on the crankcase. The mark is on the flywheel gear. If it matches the mark (cut) located on the crankcase, then everything is fine.
5. Loosen the tension on the belt drive and check the mark located on the crankshaft. We fix the flywheel by installing a screwdriver between the crankcase and the crown. 6. Unscrew the crankshaft pulley. We check the alignment of the marks on the crankshaft gear and the oil pump. 7. Now you can change the belt. To do this, you first need to remove the tension roller. Then the belt is removed. 8. We tighten the new gear. The tension roller rotates clockwise. This is easier to do with a special key, which should be prepared in advance. If there is no key, then you can use pliers for this, the ends of which are curved. The tension needs to be adjusted until it is optimal. 9. Now we collect everything from the opposite. Don't forget to remove the screwdriver from the crankcase.
Causes of belt breakage
One of the common problems with the model is the failure of the timing belt. The reasons for this may be different:
- Simple wear and tear caused by a long period of use of the vehicle;
- Regular increased loads under which the engine has to work intensively;
- Mechanical damage as a result of improper operation or received during the repair of other components;
- Manufacturing defect.
Regardless of the causes of the problem, it must be eliminated.
Over time, it stretches so much that the gear teeth jump by 1-2 links. This disrupts the valve timing and causes interruptions in engine operation. But this is the best-case scenario for such a situation. The worst is when the strap breaks and the valves bend.
Using shims when the belt slips
You can make washers yourself, for example, from the body of aluminum beer cans, coffee tins, or use ready-made ones from the factory. The main thing is that the washers are the same size as the spacer ring installed between the block and the tension roller eccentric. There are two options. The first uses factory washers. The thickness and quantity are selected experimentally. The use of this method is ambiguous, since the washers are flat and, accordingly, the contact plane of the roller will remain parallel to the same. However, this method has helped some car enthusiasts.
1 - if the belt is sliding towards the engine, 2 - if the belt is sliding away from the engine
Another method is to make your own crescent-shaped washers. The number and width of washers are also selected experimentally. The use of such washers is more expedient, since with their help it is possible to change the angle of inclination of the pin and roller so that it forms a normal to the plane of the cylinder block body.
The washer must be installed according to the diagram shown in the figure. In particular, if the timing belt is slipping towards the engine, then the washer/washers should be installed closer to the center of the block. If the belt moves from the engine, then vice versa, closer to the edge of the block. When installing washers, it is recommended to use a heat-resistant sealant that will keep them from sliding to the side with or without load.
Do not overdo it so that when the engine is running, the belt does not “go” in the other direction, opposite to the one where it was sliding before. The main thing is that the belt works evenly across the entire width and does not slip off the roller.
Installed washers
Finally, I would like to note that in rare cases, the cause of the belt shifting to one side or the other and its eating can be caused by not one, but several of the reasons described above. As a rule, the method of using shims is universal and can save the situation in even the most “neglected” cases. However, it makes sense to inspect the belt, roller and pump in order to identify shortcomings in their operation, and, if necessary, replace the listed components. This will save you from having other problems with these parts in the future.
What can cause a timing belt to break?
In a VAZ-2112 car with 16 valves, rupture of a belt part can occur due to:
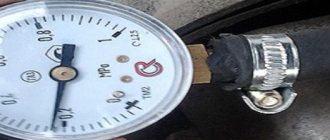
- Strong or, on the contrary, weak tension. To make sure it is tensioned correctly, it is recommended to use a special device called a frequency meter. Measurements should only be taken from a cold engine, the indicator should not exceed 155 Hz +/- 3 Hz.
- A rupture will be inevitable if the part has been in use for a long time and the replacement was not made in a timely manner. Since there is a constant temperature difference during the working position, the belt element gradually collapses, cracks appear on it, which leads to rupture.
- Due to improper placement of the bearing, which can jam and tear the timing belt.
- Due to leakage of the oil seal, which coats the part with oil.
- Due to a low-quality timing belt, which was installed in the 16-valve VAZ-2112 engine by the manufacturer.
These are the most basic reasons that lead to the rupture of the HMS belt. If you carefully monitor the technical condition of the machine and repair it yourself at the slightest sign of breakdown, you can avoid very unpleasant situations that can happen at any time.
Troubleshooting methods
Now we list methods for eliminating these causes. Let's go in the same order.
- Belt tension . First you need to check the tension level and compare it with the one recommended by the car manufacturer (usually indicated in the technical documentation for the car, also can be found on the Internet). If this value is higher than the recommended value, then the tension must be loosened. This is done using a torque wrench. If you don’t have one, then it’s better to contact a car service. As a last resort, you can perform this procedure “by eye,” but use the indicated devices as soon as possible. You can also use a regular dynamometer and a regular wrench for this.
- Poor quality belt . If the two edges of the belt have different stiffness, then a situation will arise where the timing roller eats the belt from the softer side. You can check this by replacing its right and left sides. If after replacement the second side does not wear out, then the belt is to blame. There is only one way out, and it consists in purchasing and installing a new, higher quality part.
- Wear of pump bearings . To diagnose this problem, it is necessary to dismantle the belt and check for play on the toothed pulley. If there is play, it means the part needs to be replaced. Bearings cannot be repaired.
- The pump is installed crookedly . This situation is possible if, during the previous replacement, the adjacent surface was poorly cleaned, and small particles of the old gasket and/or pieces of dirt remained on it, but if this happens, then most likely you will understand this by the leak that appears after filling the antifreeze and starting the engine. When installing a new pump (or even an old one, if it is in good condition), be sure to thoroughly clean both surfaces (including the bolt holes), both on the pump itself and on the motor housing, and install a new gasket. In some cases, instead of a gasket, sealant is placed under the pump.
- Problems with the video . The video needs to be reviewed. It should have minimal play and a flat working surface. To check, you can use a ruler or other similar object of the required width. It also makes sense to check the presence of grease in the bearing. If its quantity is small, it should be added. If the roller is of poor quality, it must be replaced. It is almost impossible to repair the bearing, much less the roller surface.
- Damage to stud threads. To correct this situation, there are two options. The simplest is to use a saw with the appropriate diameter for turning internal threads and/or a die for turning similar threads on a stud. Another option is more labor-intensive and involves completely dismantling the block in order to restore the specified thread. This method is used if for some reason it is impossible to use the sword.
Installing washers under the roller - Roller pin bend . Mechanically fixing a stud is almost impossible. Sometimes (but not in all cases, and it depends on the degree of curvature of the pin and the location of its bending) you can try to unscrew the pin and screw it back in, but with the other side. If the curvature is small, then such a solution may be successful. However, in most cases, shims are used. Let's consider this point separately, since most car enthusiasts consider this method a real panacea if the timing belt is eaten from the engine side or from the opposite side.
Belt replacement
Replacing the timing belt must be described separately, depending on how many valves your VAZ 2110 has - 8 or 16. Self-repair of the unit on an 8-valve engine is considered easier, although you should not have any serious problems with a 16-valve engine.
8 valve
The sequence of work will be as follows:
Disconnect the battery by removing the negative cable; Unscrew the bolts from the belt protective cover; Remove this protective cover; Remove the front wheel on the passenger side, while simultaneously removing the mudguards and engine compartment protection; Turn the generator pulley clockwise so that the marks on the cover and the pulley match; Remove the protective plug from the gearbox and check in the resulting hole to see how much the control marks match; Using a metal screwdriver or other object, you need to block the flywheel; After this, you can unscrew and remove the generator pulley; Make a few turns to loosen the nut that holds your belt tensioner pulley in place; Remove the old belt. You won’t need it anymore, so feel free to send it to the landfill; The space needs to be cleaned and degreased. White spirit is perfect for this; After rinsing, dry everything using a dry and clean cloth; Install a new roller, following the direction arrows
If they are missing, then take the inscription into account. It should be located from left to right, that is, you could read it without any problems; To tighten the belt, move the roller counterclockwise; Check that all marks and the degree of belt tension match correctly; The compression ratio should be checked on a cold engine and at an air temperature within 15-30 degrees Celsius; Turn on the motor and with the unit running, check whether you have installed everything correctly; If the sound is normal, then the installation was completed correctly; Reassemble the removed elements in reverse order.
16-valve
The VAZ 2110 is equipped with two types of engines - with 8 and 16 valves. At the same time, replacing a 16-valve valve is considered more difficult. Experienced craftsmen assure that for a high-quality timing belt change it is enough to put in a little more effort and attention.
Therefore, in this case, the work must be done as follows.
- Remove the six nuts that hold the protective cover in place. Remove the protection cover.
- Release the crankshaft sensor.
- Find an area on the pulley that is missing a tooth. It will act as a guide to find top dead center.
- Install the piston from the first cylinder so that it is at top dead center.
- Align the pulley and crankshaft sensor, lock the pulley, unscrew and remove it.
- Next, loosen the nut located on the tensioner pulley.
- Remove the old belt and also remove the tensioner pulley.
- Clean the freed space from dirt, oil, and clean it with a dry cloth.
- Install a new belt and secure the pulley with bolts. It is recommended to replace the roller itself at the same time.
- Make sure that the belt and drive marks match, as well as the timing gear marks.
- Tension the belt using the tensioner roller.
- Check the elasticity after stretching.
- Make two full revolutions of the crankshaft to check the quality of the assembly.
- Make sure that the marks match, after which the pulley can be installed in place.
- Turn on the engine, check for correct installation, and then reinstall the protection casing.
About engines
Depending on the configuration, one of four modifications of the power unit was installed on the car. Two of them had 8 valves in the cylinder head, two had 16 valves per engine. The cylinders are arranged in one row, the block is cast from cast iron. Three engines have a working volume equal to 1600 cm 3, one of them VAZ 11194 was made with an engine capacity of 1400 cm 3. This engine, just like the VAZ 21126 , has 4 valves per cylinder, that is, there will be 16 of them in the cylinder head Thanks to some modifications, the engines comply with Euro 3.4 standards.
Timing diagram
The engine with a displacement of 1400 cm3 was not produced for long, since the appearance of Kalina 2 was conceived only for power units with a displacement of 1600 cm3. Manufacturers guarantee a service life of engines of more than 200 thousand km. Both engines can be moderately boosted without significantly reducing their service life.
Are the valves bending?
This question worries many owners of Kalina and other VAZ cars with front-wheel drive. This is due to the fact that when there is a break in the valve drive or the teeth of the drive belt are cut, the pistons hit the valve heads. In the best case, the car gets bent valves, but bending connecting rods, damaged pistons, and burst valve guides are also possible. Such a malfunction will entail previously unforeseen costs for engine overhaul.
Don't let drivers be misled by the recesses in the piston heads; they do not save the engine from damage. In this case, only compliance with all recommendations of the engine manufacturers, the use of high-quality spare parts and other consumables, and timely replacement of worn parts can help.
How to check the condition of the VAZ 2110 timing belt
To check the condition of the timing belt you need to:
- remove the front timing belt protective cover plug,
- remove the alternator belt so that it does not interfere,
- unscrew 6 bolts and remove the front protective cover,
- Having gained access to the timing belt, we inspect it.
If during your next inspection you notice:
- cuts on the timing belt, bulges,
- delamination, appearance of broken threads,
- numerous cracks, folds, severe abrasions,
- oil leaks on the belt,
it must be replaced immediately.
As a rule, young drivers perform such repairs in specialized auto repair shops or car repair centers. But, if you decide to replace the old belt with a new one yourself, prepare the tools and materials: heads “10”, “17”, a special wrench used to tension the belt, a screwdriver, a new timing belt, detergent, clean rags.
Types of alternator belts
As for the types of belts, they are as follows:
- wedge;
- polycline;
- serrated.
The V-belt cut has the shape of a trapezoid. Such a part is capable of transmitting great forces and withstands significant loads. Transmits rotation from the crankshaft to no more than two devices, because cannot bend in the opposite direction. Serpentine belts are much wider, similar to rubber belts that are somewhat glued together. They have longitudinal grooves on the inside. There are transverse grooves on the inner surface of the timing belt that help transmit rotation most accurately.
Note. In modern engines, the belt can provide the functions of many components: generator, compressor, power steering, pump, etc. Connecting them can be quite difficult. Therefore, it is recommended to have a diagram on hand that will make the replacement easier.