VAZ cars of the 2112 family were produced with two 16-valve valves: 21120 and 21124. The cylinder head of these engines has different intake ports. In theory, there are no other differences. And therefore, the tightening torque of the bolts on the VAZ-2112 cylinder head will be the same if we talk about any 16-valve internal combustion engine. Tightening is performed in three steps, although repair books give another option (it is for 8-valve engines).
The following video shows how the cylinder head is installed in 5 minutes:
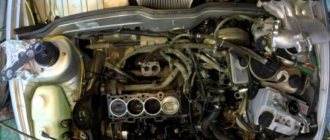
Removal
1. Drain the coolant from the engine (see “Coolant - replacement”).
If disassembling the cylinder head is not required
(for example, to replace the cylinder head gasket), it should be removed as an assembly with the camshafts, bearing housing, fuel rail, oil pressure and camshaft position sensors.
4. Disconnect the upper mounting rod of the power unit from the cylinder head bracket (see “Upper mounting rod of engines 2112 and 21124 (16v)”).
13 mm socket wrench
Unscrew the three nuts securing the rod bracket.
6. Remove the bracket from the studs.
8. 10 mm
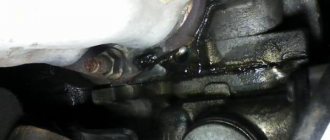
Unscrew the bolt securing the ground wire tip and disconnect it from the block head.
9. 13 mm
Unscrew the nut securing the tip of the negative terminal wire of the battery and remove the tip from the stud.
10. To avoid damaging the sensor connectors, disconnect the wires from the coolant temperature sensors of the engine management system (see “Coolant temperature sensor - check and replacement”) and from the temperature indicator (see “Coolant temperature sensor - check and replacement” ), as well as from the camshaft position sensor, if we remove the cylinder head assembly (see “Camshaft position sensor - check and replacement”).
13 mm socket wrench
Unscrew the two nuts securing the thermostat housing.
12. Remove the thermostat housing from the cylinder head studs and, without disconnecting the hoses, move it to the side.
13. Remove the sealing gasket.
10mm hex wrench
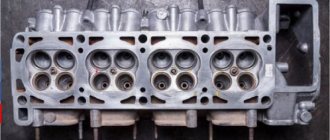
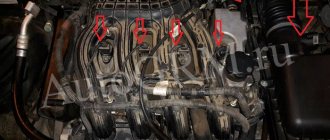
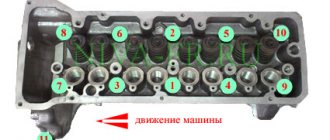
unscrew the ten bolts securing the head to the cylinder block in the specified sequence.
Sequence of loosening the head bolts
15. Remove the head from the cylinder block assembly.
. or with the camshafts removed.
16. Remove the cylinder head gasket.
17. In order not to lose it, we remove the two guide bushings from their seats in the cylinder block.
Hydraulic tappets
The valves are driven by cams on camshafts and hydraulic pushers. These elements are located inside the guide holes. With the help of hydraulic pushers, it is possible to automatically eliminate gaps in the valve mechanism. Therefore, when operating a vehicle, there is no need to adjust the thermal clearances of the valves.
In order for the hydraulic pushers to operate in normal mode, oil is supplied to them from the lubrication system. It is supplied through special channels in the engine block and cylinder head. Oil passes through these channels to lubricate the journals on the camshafts. There is a valve in the channel that prevents oil from draining from above after the engine is turned off. This allows you to maintain the system in normal mode until it stops completely.
Installation
1. Wash the cylinder head from dirt and deposits with kerosene or diesel fuel.
2. Remove any remaining oil and coolant from the threaded holes of the cylinder block (under the cylinder head bolts).
3. We clean the mating surfaces of the head and cylinder block from the remains of the old gasket, and degrease the surfaces with a solvent.
Warning! Always use a new gasket when installing the cylinder head. Oil contact with the gasket surface is unacceptable.
4. Install the head guide bushings into the seats of the cylinder block. We place the gasket on the cylinder block, and the guide bushings should fit into the corresponding holes in the gasket.
5. Install the head on the cylinder block. By slightly moving the head from side to side, we ensure that the guide bushings fit into the corresponding recesses of the head.
Warning! Reuse of cylinder head bolts is only permitted if their length does not exceed 100 mm
6. Using a caliper or a bench ruler, measure the length of the bolts. Bolts longer than 100 mm are replaced.
7. Before installation, dip the threaded part of the bolts into engine oil and let the oil drain, waiting for about half an hour.
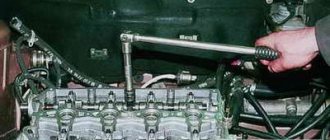
8. Install the head mounting bolts into the holes of the head. Using a torque wrench, tighten the head mounting bolts in three steps - first with a torque of 20 Nm (2 kgfm), then turn the bolts by 90° and then turn the bolts again by 90°. In this case, we follow the order indicated in the photo.
Common Mistakes
Despite the fact that automakers clearly indicate the procedure and nuances of tightening the cylinder head, many car enthusiasts make mistakes when assembling the engine. The most common of them are:
- Pouring oil into the mounting holes to lubricate the threads (the liquid is incompressible, so poured oil will not allow the head to be properly tightened);
- Over-tightening (exceeding tightening forces leads to damage to the cylinder head and the fasteners themselves);
- The use of damaged or inappropriate keys (the edges of the bolt heads may be torn off, after which it will be problematic to tighten or unscrew them normally);
- Use of unsuitable bolts as replacements (fasteners from different engines may differ in length, thread spacing, head height and diameter);
To avoid problems in the future, you should use only fasteners designed for a specific engine and fully comply with the work conditions.
What cylinder head bolts VAZ 2112 16 valves
- To the beginning of the forum
- Forum Rules
- Old design
- FAQ
- Search
- Users
vaskvi
, the length of the bolts for 16V must be measured with a washer, like this:
The magazine bolt (without washer) will naturally be longer:
serg_42
But in Murzilka they say differently
I'll give you a fight for the puck. I personally went to the store with a barbell and measured the bolt from the display case, and then compared it with my stock one.
I personally went to the store with a barbell and measured the bolt from the display case, and then compared it with my stock one.
The stock one was a little longer, I don’t remember exactly now, but it stretched a little less than 1 mm.
ps Yeah, I found my post about this on 2112.ru. The stock one was 0.3 mm longer than the store one
Information on icons and features
You can not
start topics You
cannot
reply to messages You
cannot
edit your messages You
cannot
delete your messages You
cannot
vote in polls You
can
attach files You
can
download files
Source
How to carry out repairs
In order to repair the block voice, you will need the following tools:
Perform the following manipulations:
All steps for assembling the unit are carried out in the reverse order, only you need to take into account one feature: adhere to the recommended tightening torque values for the VAZ-2112 cylinder head (16 valves). The photo shows the tightening sequence.
When is it time to change?
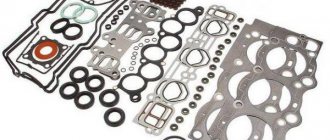
The gasket serves to seal the connection between the head and the cylinder block. There are several types of it:
- Asbestos. The main advantage: minimal shrinkage and excellent recoverability.
- Metal. These are some of the most reliable and high-quality consumables.
New metal cylinder head gasket
- Non-asbestos. Used as repair kits. Main advantages: elasticity, heat resistance, elasticity.
- leakage of engine oil or antifreeze in the connection area;
- white steam present in the exhaust gases indicates that antifreeze has entered the cylinders;
- when exhaust gases enter the cooling system, foam appears at the neck of the expansion tank;
- the presence of oil stains in the coolant indicates a leak in the connection;
- the presence of a white coating on the oil dipstick indicates that there is antifreeze in the engine oil; this may be due to a damaged gasket.
The procedure for replacing the cylinder head gasket on a VAZ 2112 16 valves is indicated in the manual, but this is not the main reason. There are a number of signs that determine the need for replacement:
Camshafts
When repairing the head, it is imperative to check the condition of the camshafts. When assembling, follow the instructions and maintain the tightening torque of the VAZ-2112 cylinder head (16 valves). The Priora is equipped with such a motor - it is quite powerful, has excellent characteristics and does not require frequent maintenance. Two camshafts drive the intake and exhaust valves.
The camshafts rotate in special sockets, which are located directly in the head. The difference between camshafts is that there is a small belt on the intake. It is located near the very first support. To prevent axial movement, there are thrust collars - they are located on both sides of the support in front. At the front of both camshafts there are self-clamping type oil seals.
Installation
1. Wash the cylinder head from dirt and deposits with kerosene or diesel fuel.
2. Remove any remaining oil and coolant from the threaded holes of the cylinder block (under the cylinder head bolts).
3. We clean the mating surfaces of the head and cylinder block from the remains of the old gasket, and degrease the surfaces with a solvent.
Warning! Always use a new gasket when installing the cylinder head. Oil contact with the gasket surface is unacceptable.
4. Install the head guide bushings into the seats of the cylinder block. We place the gasket on the cylinder block, and the guide bushings should fit into the corresponding holes in the gasket.
5. Install the head on the cylinder block. By slightly moving the head from side to side, we ensure that the guide bushings fit into the corresponding recesses of the head.
Warning! Reuse of cylinder head bolts is only permitted if their length does not exceed 100 mm
Installation and dismantling procedure
The part called the cylinder head is attached to the cylinder block with 10 screws. They are unscrewed with a 10mm socket wrench. The procedure for dismantling the cylinder head is shown in the first photo.
Reversal sequence (1-10)
The standard screw length is 9 3 mm. If the screw has been pulled out to at least 95 mm, it is replaced with a new one (AvtoVAZ requirement).
During installation, a different scheme is used (photo 2). Each screw is lubricated with machine oil, otherwise the efforts will be reduced to nothing.
The order of tightening the head is indicated in this photo
Tightening torque for cylinder head cover bolts
For VAZ-2112, the cylinder head tightening torque is standardized:
At first the effort is very small. But at “step 3” it will be difficult to cope with the work. Use the lever.
Why are guide bushings needed?
Before installing the cylinder head, perform the following steps: clean the threaded holes, as well as all holes for the bushings (photo 1). Each bushing is installed in place, and only then a gasket is placed on top.
Everything is ready to install the cylinder head
Metal parts adjacent to the gasket must be degreased. We looked at the cylinder head tightening diagram, but the cylinder head itself must be installed correctly:
After “step 2” the screws can be tightened.
Sealant
No sealing compounds are used when installing the gasket! Solidol, CIATIM and other lubricants are not even needed. The main thing is that the metal must be degreased. And the cylinder head gasket must be new.
Step-by-step replacement process
- Open the hood and unscrew the four bolts securing the engine trim. Eight head bolts.
- Press the latch and disconnect the power connector on the mass air flow sensor.
- Using a 8mm socket, loosen the two clamps and remove the suitable pipe from the filter housing to the throttle valve.
From the inside, use a slotted screwdriver to pry up and push up the two silent blocks that hold the filter housing. After dismantling the silent blocks, lift the filter housing and move it to the side.
Unscrew the 3 nuts securing the ignition module and disconnect the connector. Ten head nuts.
Unscrew the bracket securing the injector power connector and disconnect it. The bolt securing the bracket under the head is ten.
Unscrew the fourteen bolts securing the valve cover and remove it. Eight head bolts.
Unscrew the fuel supply and return fittings. Turnkey fittings for seventeen. Hold the tube with one wrench and unscrew the fitting with the other. It is advisable to mark the fittings before unscrewing them so as not to confuse them during assembly.
Unscrew the six bolts securing the side plastic timing cover and remove. Ten head bolts.
Unscrew the bolt securing the bracket to the upper engine mount. Fifteen spanner bolt.
Tightening process and diagram (on a 16 valve car)
But while you have not yet begun the procedure for tightening the cylinder head pins, you need to emphasize that each engine has its own torque and tightening pattern. As you might have guessed, this point will be different for each vehicle. In addition, several factors directly influence the torque indicator, and if you decide to engage in this process yourself, then it will be useful for you to learn about them:
- The tightening torque of the head is affected by the lubrication of the holes for the pins, as well as their condition, and, of course, the quality of the bolts themselves. In order for the torque to be set correctly, both the pins and the holes for them must be lubricated, and regular motor oil will do for this.
- If the thread of the hole or the pin itself is deformed, then it is better to refrain from the tensioning procedure. One way or another, over time this will lead to negative consequences.
If you are the owner of a VAZ 2112 with a 16-valve engine and are faced with the need to tighten bolts, our website will help you with this. This will be especially necessary in cases where the block head was dismantled and reinstalled. What is the tightening torque and how does the procedure take place? Next, we will consider this process step by step for a VAZ 2112 with a 16-valve engine.
Required Tools
And, although this procedure requires a certain approach, its preparation will not take much time. The bottom line is that a large set of tools is not required directly to tighten the head pins. The only thing you need is some motor fluid and a special torque wrench.
Torque wrench for work on a 16-valve engine
If you do not have such a key, then you need to buy it in advance or borrow it from a car service center. You need just such a tool, since it allows you to determine exactly the tension moment. Currently, a more budget version of this tool costs about 200-250 hryvnia (600-800 rubles).
Stages
If you removed the head of the 16-valve VAZ 2112 engine, then first of all you need to install it in place.
- Before the actual process of tightening the head pins of a 16-valve engine, their length should be measured. The standard screw length is 135.5 mm. Be sure to check it out. If the length of the pin differs from the above, that is, either more or less, then the pin must be replaced with a new one.
- Take engine fluid and apply it to the bolt threads. This can be done using a brush.
- After this, you can begin installing screws on the 16-valve engine. Tighten them by hand first, then use a torque wrench. The tension torque should be 20 Nm + (69.4 - 85.7 Nm) + 90°+ 90°. That is, tighten the pins, observing the indicators 20 Nm + (69.4 - 85.7 Nm) in accordance with the data on the torque wrench, then turn each screw twice by 90 degrees. As for the tightening order, it is as follows. First you need to tighten the two middle pins starting with the bottom one. Then tighten the two screws on either side of the bottom pin in order. After this, the screws located on the sides of the upper middle pin are tightened. And then, in order, you need to tighten the bolts located at the corners of the cylinder head. The tightening torque procedure is shown in more detail in the photo.
Fighting methods
If you are thinking about fighting saffron milk caps on your own vehicle, you need to know about the existing options.
Essentially, all available methods are divided into 2 main categories.
- Mechanical method. This is a set of special measures, the task of which is to clean damaged surfaces, perform priming, puttying and painting of the vehicle body;
- Chemical method. Here we are talking about a slightly different approach. The method is based on special converters and kits aimed at treating damaged areas with anti-corrosion agents.
There is a lot of debate and talk regarding these two methods.
Some adhere exclusively to the mechanical method of processing. Others are sure that there is nothing better than chemical control of saffron milk caps.
In fact, both methods are really good. Moreover, each of them is relevant for certain situations.
It is only important to understand which category your situation falls into.
- Mechanical restoration methods are relevant in situations where corrosion has managed to penetrate quite deeply into the metal elements of the machine. That is, you will have to completely remove all traces, clean the surface and get to clean, intact metal. Here you will need the appropriate tools and devices;
- Chemical options are best used when it is not possible to use the mechanical method. When the area is treated, the rust turns into foam. To remove it, just apply water pressure. Some products help the corrosion harden, after which the area can simply be covered with a layer of paint.
Before choosing one option or another, be sure to study the nature of the damage and its depth. Simple chemistry is not always enough to cope with the problem.
Practice clearly shows that in case of serious metal defects, the use of chemicals gives only a temporary effect, after which rust appears again. Therefore, the optimal solution would be to use a mechanical processing method.
Tool for the job
Before proceeding directly with the replacement, you need to collect all the necessary tools and materials:
- A set of keys of various diameters “10”, “13”, “17”, “21”.
- Screwdriver.
- Pliers.
- New coolant.
- Container for coolant.
- Clean rags.
- New consumables (depending on the purpose of the work being performed - approx.).
- Anti-recoil shoes.
For ease of work, it is best to use an inspection hole or a lift.
General assembly information
Tightening torque for cylinder head VAZ 2114 8 valves
Warnings before assembly
- When reassembling the engine, use only a new cylinder head gasket. It is not allowed to use a removed (even carefully) gasket.
- Also, do not forget that before installing it, you must thoroughly degrease the surfaces mating to it. The gasket itself must be clean and dry. Do not allow oil to come into contact with these surfaces.
- Before assembly, check the cylinder block bolts; they should not be stretched, i.e. their length should not exceed 95mm. If so, replace them with new ones. The use of such extended bolts is not permitted!
- Before assembling the engine, lubricate the threads and bolt heads. Regular motor oil is suitable for lubrication. It is necessary to lubricate the bolts 30 minutes before using them so that excess oil has time to drain.
- When installing the timing belt, do not allow sharp bends (with a radius of less than 20 mm) to avoid damage to its cord.
Camshaft drive diagram 2112
1 – crankshaft toothed pulley; 2 – toothed belt; 3 – coolant pump pulley; 4 – tension roller; 5 – exhaust camshaft pulley; 6 – rear protective cover of the toothed belt; 7 – intake camshaft pulley; 8 – ring for phase sensor; 9 – support roller; A – TDC mark on the crankshaft toothed pulley; B – installation mark on the oil pump cover; C and F – installation marks on the rear protective cover of the toothed belt; D – installation mark on the exhaust camshaft pulley; E – installation mark on the intake camshaft pulley.
Scheme for applying sealant to the upper surface of the cylinder head
First of all, place a clean cylinder block on the stand and screw the studs into it (if some are missing). Remove the main bearing caps and press the missing piston cooling nozzles into the cylinder block using mandrel 67.7853.9621.
Install the crankshaft and connecting rod-piston group into the cylinder block, attach the flywheel to the crankshaft, install the oil pump and its oil receiver, the oil sump with a gasket and the oil filter, proceeding as described in the 2110 engine section. Then assemble the engine in the following order.
Insert two centering sleeves into the cylinder block and install the cylinder head gasket over them.
What is a cylinder head?
In order to carry out any manipulations with this unit, it is necessary to understand the purpose and operating principle of the device. The cylinder head on the VAZ-2112 model we are considering is made of two options: cast iron, aluminum. Essentially, to put it bluntly, this is the engine cover.
One of the most important components of a vehicle, which is responsible for:
- combustion of gasoline in the engine;
- removal of exhaust gases during the combustion process.
Secondary functions performed by the cylinder head:
- the functional option is carried out thanks to the work of support washers, valve bushings and other parts located in the head;
- thanks to the hole in it, the chain tensioner and the drive of the pulley distributor are installed.
The abbreviation cylinder head is used more often in the terminology of automotive components, since there is not always time to pronounce long and complex names. But it is clear that you need to know all the decryptions. Especially if it is an internal combustion engine (internal combustion engine) and cylinder head (cylinder head).
First of all, this is necessary to avoid moisture accumulation at the junction of components in the block and their connections. Thanks to this protection, condensate collects on a special plane to allow liquid to leak out of the engine.
Finishing touches
When everything is assembled and docked, there is no need to rush and turn on the power. The first step is to check the reliability of all connections and the wires for damage. For greater reliability, the connectors can be wrapped with electrical tape.
After you are convinced of the reliability of the entire structure, connect the previously removed terminal and check the operation of the camera. Only after you have received a picture from it and are satisfied with the result, you can begin assembling the interior elements.
After completing all the manipulations, you will understand that installing a rear view camera on a car is quite simple. The result is worth the effort and time. Parking will become much easier and will no longer take so much effort and nerves from you.
The best prices and conditions for the purchase of new cars
Credit 4.5% / Installments / Trade-in / 95% approvals / Gifts in the salon
Mas Motors
Tuning
Bolt torque
Car owners who want to increase the power of the VAZ 21126 engine can use both reprogramming the control unit and engineering tuning, which involves replacing power elements and installing a turbocharger.
- Chip tuning will allow you to get about 5-8 additional horsepower without any loss of engine reliability. There are various chip tuning options, which involve replacing the control unit or flashing it with new software. It must be said that this method of increasing the power of a power unit is not popular, since its efficiency is minimal.
- Deep engineering tuning with replacement of the connecting rod group, fuel pump and injector allows you to increase engine power to a level of 120-130 horsepower. It must be said that such work with the VAZ 21126 engine is highly complex, so it should be performed by an experienced specialist who has experience working with engines of this type.
- It is also possible to install a turbine, but this can significantly reduce the life of the engine, which in turn forces a major overhaul of the engine every hundred thousand kilometers.
Author of the article: Pavel Kardash
| Extraneous knocking noises may appear at different engine speed ranges. | This may indicate problems with valves that lose their geometry and become distorted, which leads to knocking. |
| Significant increase in fuel consumption. | A similar problem is typical for a faulty injector. |
| The appearance of oil leaks. | The valve cover gasket is the weak point of this engine and can leak literally after 20 thousand kilometers. |
Head design
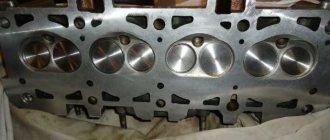
The 16-valve engine uses a cylinder head containing the following elements:
- Two camshafts. They have five supports, cast iron, each with 8 cams. It is impossible to install an exhaust camshaft instead of an intake camshaft (and vice versa).
- 16 valves. They are installed on guide bushings.
- Seats are installed directly on the block head, which come into contact with the valve plates.
- Hydraulic compensators in the amount of 16 pieces.
Camshafts are mounted on cylinder head supports. Compliance with the tightening torque of the VAZ-2112 cylinder head (16 valves, 1.5 liters) ensures normal engine operation. This will also allow you to avoid expensive surface milling after the next dismantling of the head.
General rules for performing work, methods used
There are a number of general rules that must be followed when installing the block head:
It is important to strictly observe the tightening torque. For these purposes, a special tool is used - a torque wrench.
It is not recommended to perform this operation with regular keys; The head bolts must be pulled smoothly, jerking is not allowed. Since the tightening force on the last approaches is significant, extending the wrench arm with a pipe can simplify the procedure and ensure smooth, uniform tightening; Before installing the bolts, you need to carefully inspect the condition of the threads on them. There should be no dirt or foreign particles on the coils. The threads of fasteners should be lubricated with engine oil before tightening. But you should not pour grease into the holes for the bolts (especially for “blind” holes), since in the future it will not allow the fasteners to be fully tightened.
Despite the fact that each engine has its own characteristics of tightening the cylinder head, the general technology of this operation is the same. In general, two methods are used to tighten fasteners:
- In several approaches, bringing the tightening force to the required value;
- Tightening the fasteners to a certain force (in one or more approaches), and then tightening the bolts twice to a certain angle.
The tightening method is selected based on the type of bolts.
The first method is used when using non-stretching bolts (these are not used now, but they can be found on old cars). But often this type of fasteners requires tightening after a certain period of engine operation in order to compensate for the shrinkage of the cylinder head gasket. But such fasteners are allowed for reuse, and more than once.
The second method of tightening the block is relevant for most modern cars. And all due to the use of tensile bolts (the so-called TTY type).
Such fasteners, due to elastic deformation, are able to compensate for thermal expansion of the head and shrinkage of the gasket, but for this they need to be put into deformation mode (in fact, just stretched a little).
To do this, it is necessary to tighten the bolts twice to a certain angle. On some cars this angle is 45 degrees, on others it is 90 degrees.
But after the elements are put into elastic deformation mode, they will no longer be able to return to their original state, and therefore their reuse is not allowed due to the high probability of destruction.