- Manual
- How to install and connect
- How to setup
- Functions
- How to turn off
- Specifications
After purchasing a car or a new audio system, you need to configure the head unit. The sound will depend on the quality of the actions performed. For the Pioneer Mosfet 50Wx4 radio, the instructions describe in detail the procedure for making the necessary adjustments. Thanks to the fact that the device is equipped with a touch screen, this is easy to do. A few taps on the screen are enough.
Manual
All settings of the Pioneer radio are made from the control panel, which consists of a multifunction joystick controller and several buttons. In addition to searching for and storing radio stations on the FM tuner, you can adjust the acoustic characteristics of your CD player. The procedure is described in detail in the “Adjusting audio parameters” section. In most cases, the available information is sufficient to make adjustments yourself.
How to install and connect
In many cars, the car radio is installed in the center console. Installation of the device does not cause any difficulties. The standard location corresponds to 1 or 2 DIN standard size of the receiver. If the previously used head unit was connected via an ISO connector, then you simply need to connect it to the block on the back of the radio. Otherwise, you need to buy a chip suitable for this model and resolder the wires.
To prevent the receiver from consuming energy when the ignition is turned off, a button is installed in the gap in the supply wire to break the circuit. Most often, power to the device is taken from the on-board consumer connected after the ignition switch.
Are you a car driver?! Then you can take this simple test and find out. Go to test »
How to setup
The Pioneer radio is configured using a joystick controller. All adjustments are made from the main menu, which is called up by pressing the Multi-Control knob. After this, you need to select the Audio window and press the joystick again. On the screen that opens, select the required function. On the new head unit, all adjustments have a value of “0”.
To return to the original screen, you need to press the Band/Esc button. Return to the main menu using the Disc/Back/Scrl key. To do this, you need to hold it until the picture appears, and simply pressing it will lead to the previous menu.
Functions
The instructions for use describe in detail how to configure all available functions on the device. The most difficult thing is to find and remember radio stations on the FM receiver and adjust the audio system parameters. Many Pioneer Mosfet 50Wx4 models have speakerphone capabilities. To set it up, you need to turn on the Bluetooth function on your phone and receiver. After a few seconds of searching, device connection information will be displayed on the screen.
Tuning radio stations can be done automatically or manually. To do this, go to the main menu and find the BSM (automatic search) function. After turning it on, it will begin searching for radio stations with broadcast frequencies from lower to higher. To record the program you like, you need to press buttons from 1 to 6.
How to turn off
There are 2 ways to turn off the Pioneer radio:
- OFF button. To do this, press and hold the key until the device turns off.
- Turn off the ignition. Most often, this method is used to turn off the device when placing the car in a garage or parking lot. After turning the key to position “0”, all consumers powered after the ignition switch are de-energized.
It must be remembered that if you turn off the radio with the key, when you start the engine, it will automatically turn on in the mode that was before it was turned off.
External ports
- In addition to the radio, the radio can play music from external devices or CDs (older versions).
- To be able to connect external devices, you will need the same “System” menu described earlier in setting the time.
- Go to the menu as described above.
- Scrolling through the menu, select the AUX, USB or Bluetooth option (if this feature is supported).
- Use the arrows on the sides (or tilt the handle itself) to switch the position. There are two options available - enabled (On) or disabled (Off).
- Choose to enable the desired port.
- Press the joystick once to confirm.
- In the same way as in setting the time, exit the menu.
- Further connection depends on the models of the radio and the connected device.
Bluetooth connection
It should be remembered that for the connection via Bluetooth to work correctly, like most other devices that support this function, pairing will be required. The PIN code is entered on the radio and repeated on the device (sometimes, especially if the device has already been connected via Bluetooth, you will only need to enter it on the radio).
To enter the pin code on the radio, take the following steps:
- They turn it off.
- Hold down the power key and go to the initial menu.
- Rotate the joystick to find the PIN CODE INPUT function (will appear if BT is enabled).
- Move the joystick up and down to enter the code. If you need to move between symbols, do it by swinging the handle left and right.
- Confirm by pressing the knob once.
- Exit the menu.
Now you can activate the mode on the device and try to find the radio. Those who like to assign clear names to devices can use the above method, but they must select EDIT DEVICE NAME rather than PIN CODE INPUT. The remaining steps are identical.
Important. Confirmation must be pressed once
Clicking on the same menu again will reset the code and require you to enter it again.
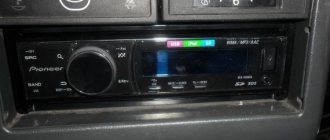
In the radio, the photo of which is presented below, the 3.5 AUX jack socket is located to the right of the radio control buttons, and the USB is behind a plug with the USB brand logo.
Radio "Pioneer" without CD, but with USB and AUX support
Specifications
The Pioneer head unit is equipped with a 4-channel amplifier 50 W x 4 “Mosfet”, which is matched with 2 Ohm acoustics. Low output noise level and Hi-Fi class signal-to-noise ratio provide high sound quality when playing CDs. The radio has technical characteristics:
- output power - 50 Wx4;
- rated power - 22 Wx4;
- FM tuner frequency range - 87.5-108.0 MHz;
- current consumption - 10 A;
- Dimensions (WxDxH) - 178x162x50 mm.
Tuner adjustment
To make adjustments to the FM path, it is necessary to connect measuring instruments according to Fig. 4.
Table 4
| Adjustable knot | Signal generator frequency, MHz | Signal level, µV | Displayed frequency, MHz | Adjustment element | The device and its indications |
| Tuning voltage (PLL circuit) | — | — | 108,0 (107,9) | L5 | DC Voltmeter - 6V |
| FM detector circuit | 91.8 M* | 1000 | 98,1 | T51 | Zero detector - 0 |
| Input circuit | 98.1 M* | 1,7 | 98,1 | L2 | Millivoltmeter - maximum readings |
| URCH circuit | 98.1 M* | 1,7 | 98,1 | L4 | Millivoltmeter - maximum readings |
| IF circuit | 98.1 M* | 1,7 | 98,1 | T31 | Millivoltmeter - maximum readings |
| Stereo decoder | 98.1 S* | 100 | 98,1 | VR154 | Millivoltmeter - 5 dB separation (stereo) |
| * Modulation: M - mono, modulation frequency - 400 Hz, deviation - 22.5 kHz; S - stereo, modulation frequency - 1 kHz, deviation - 20.25 (±7.5) kHz |
In table 4 shows the main tuner adjustments for models with the ES index.
Note. For radios with the UC index, the PLL is adjusted at a frequency of 107.9 MHz.
How to connect a Pioneer radio according to the diagram and wire colors
A car audio system has long ceased to be a luxury. Nowadays it is difficult to find a car without such a common option. Today, car radios are presented in the widest range. Thus, even the most demanding music lover will not be disappointed.
As soon as the treasured radio is purchased, a completely natural question arises: how to connect it to the car’s electrical system?
Of course, you can always use the services of auto electricians, and the problem will be solved. But not all car enthusiasts are happy with this outcome.
Some of them are interested in installing a car radio on their own without outside help. This approach allows you to master a number of technical skills and saves you money.
Wire marking
How to connect aux to pioneer radio
To correctly connect the wires in the Pioneer radio, first understand the marking features. The equipment kit includes connectors for connection, consisting of two contacts. Each has 8 wires. The power circuit is connected using one connector. The second one is needed for acoustics.
Pioneer connects in two ways. You need to purchase a special connecting adapter. Some do this: they disconnect the connectors from the wiring and connect them by twisting.
To connect the Pioneer car radio, a standard circuit is used. It is also suitable for other equipment models. The design has multi-colored wires
Connecting the Pioneer radio by color is very important. Since they are not just colored, but each color means something
And, it is important to exclude any mistake in this matter.
How to install a Pioneer radio
So, the choice fell in favor of the Pioneer car radio. It is worth noting that such audio systems have gained enviable popularity among our compatriots, largely due to their good technical performance and ease of installation.
The presented radio tape recorder meets all the requirements and standards for modern audio systems.
Let us consider in more detail all the features of self-installation of a radio in a car.
Wire marking
In order to simplify the installation of any electrical equipment, the insulation of the wires is painted in a certain color. Thus, each color corresponds to specific functional features of underwater pipelines.
When connecting the radio, you must first of all follow the connection diagram included in the kit.
In addition, the Pioneer radio usually includes 2 contact plugs, commonly referred to as “chips”. Each chip contains 4 pairs of contacts.
One of the chips is designed to supply power, the other is used to connect the speaker system. If the so-called “trick” is missing, do not despair. It can always be purchased at any auto store.
Before you begin directly connecting the radio to the car network, you need to understand the purpose of each wire.
For the most part, the color range of the underwater lines of the radio is limited to the following colors:
- red;
- blue;
- yellow;
- black;
- violet;
- white;
- green.
The red wire is usually referred to as the power line that supplies voltage to the radio when the ignition is on.
The blue insulation indicates the positive terminal going to the receiver antenna.
yellow terminal is the power terminal, supplying voltage directly from the battery through the fuse.
Black color indicates a mass hatch.
All other wires, depending on the type of radio, are responsible for powering the speakers. Purple, white, black and green are all feed lines.
A similar color of wires with a black stripe indicates that this wire is negative.
Connection diagram
Connecting the radio yourself should not cause serious difficulties. It is enough to be guided by the diagram presented below and adhere to a number of instructions and recommendations.
Despite the ease of installation, so-called emergency situations often arise when it is not possible to understand the location of the corresponding contacts on the radio plug.
In such cases, it would be most advisable to refer to the visual diagram of the Pioneer plug, where all contacts are sequentially indicated. Each digital pin designation on the diagram corresponds to the color shade of a specific wire.
It is important to remember that when fixing the wires, care must be taken to ensure they are properly insulated. Adjacent wires should not touch each other with conductive surfaces.
Audio
Front speakers
How to connect a subwoofer to a stereo amplifier: setting up live sound
Having configured the radio receiver, as well as connecting sound sources, you can focus on sound quality.
- After adjusting the volume, press the knob to get to the settings menu.
- Here they look for the “Audio” item.
- By pressing the handle, you enter this menu.
- After looking through it, they find the Fader instruction.
Rear speakers
The front speakers work cleanly, now it’s time to switch the rear speakers on the shelf into subwoofer mode - fortunately Pioneer can do this too.
- Turn off the radio.
- Press and hold the power button (as if you were going to set up the “demo” mode).
- Once in the menu, look for the inscription in the form of SW Kontrol.
- By pushing down the handle, you enter this menu.
- By rotating it, the parameter is set to SW.
- Confirm by pressing the handle again.
- Press the power button to save parameters and exit the menu.
- Then they return to the “Audio” menu (press the volume knob and rotate to select).
- By pressing the handle, you enter the menu.
- Here they look for the inscription SW SETTING1. Click on the handle to enter.
- Of the three options presented in the menu, you need to choose one of two - Normal or Rev.
Before moving on to the next settings, check at different volumes how the selected settings work. If you don’t like something, repeat the steps described, trying other values.
Loudness compensation
This option is hidden in the same “Audio” menu.
- Enter the menu, find the Loudness parameter.
- Select by pressing the knob.
- There are three values available here - High, Middle, Low (respectively high, medium, low).
- This parameter is responsible for adjusting frequencies at low volume levels. It is also impossible to give optimal settings here - they are set experimentally.
- Swing the knob to the left to go to “Audio” or from settings by pressing Band.
Equalizer settings
For advanced music lovers, here are a few more equalizer settings. They are hidden in the same “Audio” menu.
- Once in the menu, rotate the knob to select the EQ SETTING parameter.
- Enter this menu (depending on the model, you may need to enter another menu here). The three parameters offered in this menu are responsible separately for the settings of the low, mid, and high frequencies.
- Set according to your preferences. On some models, you can select several preset settings here. Depending on the speakers and your own preferences, adjust these parameters.
The settings here are no different from others - select by pressing, change by rotating, going to a higher level by swinging the knob to the left.
Installation of 1 din radio
Before highlighting the installation features of various car radios, let's take a short historical excursion. The fact is that in the mid-80s, leading companies producing car audio systems came to the conclusion that it was necessary to unify all radios.
In other words, standardize the sizes of the presented devices. Thus, after some time, the so-called DIN appeared, which received the status of an international standard.
The fundamental parameters of this standard are the width and height of the radio. Thus, the 1 din standard corresponds to dimensions of 178×50 mm. 2 din differs only in height, which is already 100 mm.
All of the above information must be taken into account when choosing a radio.
Let's look at a case where there was a need to install a 1 din standard car radio. It is worth noting that this standard is considered the most common. In this regard, difficulties should not arise when installing a new radio. As a rule, the installation of most standard radios is carried out in accordance with the 1 din standard.
However, a situation may arise when there is a 2 din standard socket in the car console. In this case, when installing a radio that meets the 1 din standard, you will only have to purchase a special adapter frame.
Video: an easy way to make AUX on any car radio with your own hands
Important: entering the function menu can be done by holding down another button, for example, SRC or SOURCE
Turn on Bluetooth
In order to activate Bluetooth, you need to go to the main settings menu and find the BT AUDIO sub-item there and select ON. After that, turn on Bluetooth on your smartphone/tablet and look for the radio.
After the radio is found, we connect to it, which may require entering the security key - by default “0000”.
Installation of 2 din radio
The situation is somewhat different in the case when a 2 din standard radio tape recorder claims to replace the old radio. The installation procedure for such a radio will be painless if the old analogue meets the same standard. Otherwise, a number of problems may arise.
Firstly, if you replace the standard 1 din standard configuration with 2 din, you will have to replace a number of elements: the center console, frame, etc.
In addition, during these events you will definitely encounter various undesirable phenomena that will not have the best effect on the aesthetic component of the interior of your car.
Based on all of the above, it is quite reasonable to draw one single conclusion: select an audio system that meets the standards provided by the manufacturer of your car.
Video instructions for connection and setup
To learn more about the intricacies of connecting a Pioneer car radio, follow the link below. The presented video review highlights the main stages, features and recommendations on the topic under consideration.
Removing an old car radio
So, the treasured radio is waiting in the wings. It's time to get rid of your old audio system. At first glance, it may seem that this procedure is not complicated. By and large, this is true. However, there are a number of nuances that it is advisable to take into account during dismantling.
At the initial stage, in order to avoid damage to the panel elements, it is necessary to find out how the radio is secured in the niche.
Depending on the type of car audio system, there are several mounting methods:
As a rule, if we are talking about a standard radio, there is a last method of fixation. Often, the manufacturer, pursuing an aesthetic goal, masks the heads of screws or screws with plastic caps. Dismantling such a radio should not cause serious difficulties. To do this, it will be enough to unscrew the screws and gently pull it out.
The situation is somewhat different when the radio is located inside a metal casing. In this case, special keys will be required to remove the radio. Hardly anyone remembers their existence when this kind of need arises. However, all radios of the presented type are equipped with them.
The principle of fixing such a radio is not very complicated. Flexible metal tongues with a protruding part are attached to its side walls. On the casing, in a strictly verified place, there are special recesses. The aforementioned tabs go into them, rigidly fixing the radio in the casing.
If you don’t have a key, you can use two thin metal plates to remove it. To do this, you need to insert each of them between the frame and the radio, thereby squeezing out the metal tabs.
After this, you should pull the radio towards you, turning it slightly in different planes. It should be noted that this kind of tricks of manufacturers is nothing more than measures of protection against lovers of easy money.
In addition, the radios can be installed in the panel using plastic clips
With this method of fastening, it is important to prevent distortion of the plastic frame. To avoid damage, the clips should be released gradually and evenly, avoiding distortions
With any method of fixing the radio, its dismantling must be done carefully so as not to damage the integrity of the connecting wires and contacts.
How to connect your phone to Pioneer
The presented type of car radio does not meet all the requirements of its owners. For example, it is not possible to connect a phone to it without carrying out a number of actions. Let us dwell on this in more detail, since the presented topic has not lost its relevance.
To carry out such a procedure, you will first need to make a so-called linear input. The presence of such an analog input will allow you to connect a number of devices to the radio, including a telephone. Let's look at the most common method of installing a linear input.
To achieve this task, you must perform the following sequence of actions:
- find the location of the built-in AUX input;
- disconnect the line input contacts;
- solder an RCA type connector, better known in common parlance as a “tulip”, to the underwater pins.
If you have any doubts about the correct choice of the appropriate connector, just touch each of the wires.
At this moment, as the volume increases, a characteristic rising background will be visible in the speakers. Its presence will indicate that you are on the right track.
Setting up the subwoofer mode
To configure the mode, we will have to work with the preliminary settings, which Pioneer, fortunately, has available. Finding yourself in the menu for these settings is easy. To do this, you need to turn off the radio and then press the power button (top left) and hold it in that position until the display lights up. Fired up? That's all, now you are in the preliminary settings menu. As a digression, let's say that almost all the options discussed below have always been on such radios, with the difference that these settings were entered differently. This is either holding the joystick in a recessed position, or holding the “function” button. But at the same time, the radio must be turned off - otherwise you cannot enter the preliminary menu. Let's move on. So, here is a list of preliminary settings. Turn the knob to find out what options are available. There you can see the language settings, search for radio stations, enable additional inputs, etc. But you need to find the name SW Control. To find this name, turn the knob. Found it? Very good. Next, press the joystick and look at the screen. The inscription REAR SP FUL should pop up on it, which will inform you that all the sound is going to the rear speakers, and we need the system to enter subwoofer mode. Turn the knob further until FUL changes to SW. Leave it like that. The preliminary settings are all done. Now turn on the radio by pressing the power button. As soon as the sound appears, you will immediately notice that the rear speakers cannot be heard at all. Don't be alarmed because this is completely normal. After all, using the preliminary settings, you just entered the rear speakers into the desired mode, and now you still have to configure them. Go to “Audio” again, since now you already know how to do this. In this menu, rotate the joystick to find SW SETTING1. After this, press the joystick briefly, and as a result you will see the SW item on the left side of the display, and as many as three items may appear on the right side: NORMAL, REV and OFF. Well, with OFF everything is clear - this is turning off the mode. You will not need this function for settings. But the NORMAL command means that the speakers operate in normal mode with the diffuser working upward. The inscription REV means that the speakers operate in reverse mode with the diffuser working downward. Rotate the handle to stop at any of these modes. By the way, experienced car enthusiasts know that the reverse mode is best suited for sedan-type cars. After you have launched the selected mode, turn the joystick to the left and exit the settings. Now turn the joystick to find the SW SETTING2 menu. You will find it by turning the handle to the right. This will be the next menu that you have to work with. Press down the joystick and thus light up SW 80 HZ 0 on the display. Let’s give the explanation: 80 – frequency filter. That is, this is the frequency that goes to the speakers. If you have an oval shape, then the frequency range can be limited to 50 hertz. With this cut, you get a nice rich bass in sub mode. But if something doesn’t suit you, then here you can experiment with different options. By turning the knob to the right, you will find the mode power level indicators from -6 to +6. Using the verification method, select the indicator at which there will be no distortion on the speakers. That's all. Setting up the subwoofer mode is complete. Exit the menu using the same BAND button. After this, monitor the rear at different volume levels and adjust the sound power if necessary.
Possible problems and their solutions
During the operation of the presented car radio, various types of problems may occur. Their appearance is often caused by incorrect connection of underwater leads or a malfunction of third-party devices. In addition, malfunctions of the radio may be associated with power outages.
It is worth noting that in most cases, almost every malfunction has certain symptoms, based on which it is possible to determine its cause. With all this, it is worth noting that in order to eliminate a certain number of malfunctions, the owner will need at least minimal knowledge of electrical engineering and the presence of some measuring instruments.
Let's try to highlight the most common cases of problems.
Doesn't turn on
If, after installing the radio, it refuses to show signs of life, the following diagnostic measures should be carried out:
- make sure that the underwater leads are tightly connected;
- check the availability of power;
- make sure there is mass.
If all of the above measures do not lead to the desired result, there is a need to conduct a comprehensive diagnosis, which involves:
- checking the throttle and fuse L951;
- checking the voltage value of the Q952 stabilizer (operating voltage is 5V);
- checking the presence of a key on transistor Q609;
- checking the serviceability of MK/KK quartz oscillators.
If all of the above steps fail to identify the problem, it is highly likely that the problem lies in the IC601/IC901 microcontroller.
Doesn't turn off
Often, owners of Pioneer radios are faced with the fact that they simply cannot turn off the radio. Solving this problem will not be difficult if you find out some of the features of the devices of the presented type.
Review
An overview of the Pioneer car radio is presented below. Let's start with the display, which is well-informed and high-resolution.
Display
The display has special buttons that perform various functions:
- Audio button. It must be pressed if you want to exit the radio. This will turn on music from the device.
Note: When an SMS arrives on the connected cell phone, a receipt notification will appear on the display.
- Func. The function menu is activated.
- A movable button that can be rotated left/right is necessary to adjust the volume.
- Repeat allows you to play the song repeatedly.
- Using buttons 1,2,3,4,5,6 you can select one or another frequency when the radio is on.
Note. By the way, the radio supports FM and AM frequencies. Each frequency can record 6 radio stations. These buttons are what switch radio stations.
- There are also connectors for a USB cable, headphones, and a flash card. There is a place to connect a disk.
Speakerphone
Pioneer car radio malfunctions
Before you can use the speakerphone feature, you must set up your device to work with your cell phone. For this:
- Use the Bluetooth connection menu on your phone.
- Configure functions in the application menu.
Note: If your mobile phone is set to private mode, the hands-free function may not work.
The display will show the duration of the call.
Tuner
You can select the range in the tuner yourself. In addition, you can use the “Search” function, which is carried out automatically. The tuner is configured to work in most countries of the world. However, it is not designed for American frequencies, so the signal quality here may not be at the best level. In addition, you can use the RDS function only where you can receive FM.
Other devices
Any portable devices that can be connected to the connector on the front of the device can be connected to the pioneer car radio. Usually they connect audio players, USB devices, MP3 players.
How to remove a pioneer car radio
In addition, it can control the operation of the iPod. That is, using a car radio you can easily control the player located in a portable device. In addition, you can easily play any songs that are on it. However, the car radio only supports iPods with certain cables.
Note: The USB device may lose some data after connecting it to the radio. Such failures occur if the car radio turns off due to low battery.
Characteristics and connection of the Pioneer Mosfet 50wx4 radio
The radio tape recorder meets all modern technological standards, both visually and in terms of technical equipment. It is equipped with a touchscreen, thanks to which all operations on it have become even faster and easier - with just a few taps on the touch screen. At the same time, the design of the radio is not devoid of classic “decoration” in the form of buttons responsible for accessing the main functions. It must be said that externally Mosfet 50wx4 is in no way inferior to factory devices even from the most famous automakers, and therefore is suitable as an alternative for any car, even for some representatives of the business class.
Connection diagram
Loudness compensation
I would like to end here, but we forgot about something - loudness compensation. This is such a regime. It is easy to find it in the audio settings menu by rotating the joystick. Find the inscription LOUDNESS. Press down the joystick, and the same LOUDNESS will light up on the left, and three levels will be displayed on the right: low, medium and high. This setting adjusts the high and low frequencies at low volume. That is, the quieter the sound, the more clearly the effect of this setting is felt. However, if you turn the sound up to full power, this mode will not be felt at all. Therefore, you can fix the high level, which is indicated by the inscription HIGH. Now go to the audio settings in the EQ SETTING1 menu. Press down the joystick until the display shows EQ SETTING1 and three options in columns, adjusting bass, mid and treble. You can move through the columns by tilting the joystick to the right, and the adjustment itself is done by rotating the joystick handle. Using these options, adjust the frequencies to your liking. However, we do not recommend exceeding the low frequency parameter by more than one. From 0 to 1 will be quite enough - take pity on your acoustics. Although, if your speakers are powerful enough, then you can experiment. Now, that’s probably all. This time your “Pioneer” will sound at a professional level. I must say that there are still a few settings left in this radio, but only real music lovers with an ear for music will need them - and that’s a completely different story. We wish you a fun and safe journey! Video about setting up radio stations on Pioneer radios:
TagsAdvice for motoristsAn article on how to properly configure a Pioneer car radio. Features of setup, step-by-step algorithm. At the end of the article there is an interesting video about setting up radio stations on Pioneer radios.3 -> Sources used:
- https://autotuning.expert/magnitola/pioner-mosfet-50wx4-instruktsiya.html
- https://1avtozvuk.ru/sovety/magnitola-pioneer-mosfet-50wx4
- https://fastmb.ru/soveti_auto/1621-nastraivaem-avtomobilnuyu-magnitolu-pioneer.html
general characteristics
In terms of functionality, the new Pioneer is also not inferior to its competitors. With its help, you can listen to all radio stations available in the region where the car is located, music from various external media, from classic CDs/DVDs to SD and flash cards, and watch videos. Thanks to the large diagonal size and fairly high resolution of the display, the user can enjoy the startup screen and colorful menu design instead of the small monochrome backlight typical of most car radios.
Video: “deep” settings menu + disabling DEMO mode + disabling time
Turn off the demo
To disable the demo mode, turn off the car radio, and then turn it on again by long pressing the SRC button (maybe the SOURCE button), after which we get to the start settings menu, where using the joystick or the right-left buttons we find the DEMO ON sub-item, and then change it parameter to OFF.
How to adjust the bass
To adjust the bass level, you need to switch the rear speakers to subwoofer mode, which is described in detail in subparagraph 1. Also, to obtain richer bass, correct adjustment of low frequencies through the equalizer, as well as activation of the BASS BOOST function, which is disabled by default, can help. To do this, turn off and then turn on the radio using the SRC (SOURCE) button, and go to the preset menu, where we look for the BASS BOOST sub-item, after which we activate it.
Depending on the Pioneer audio recorder used in the car, there may be other parameters, which you can familiarize yourself with by carefully reading the instructions for the device, which is included in the kit or can be downloaded via the Internet.
Technical features
Thanks to the combination of qualities such as compactness and technical equipment, the new Pioneer Mosfet 50wx4 boasts excellent information content. It’s not difficult to understand the functionality; it’s enough to understand the meaning of each key, with the help of which the adjustment is carried out. The inscriptions on the buttons and the device menu itself are not Russified, so they will have to be read in English. However, there should be no difficulties:
- The “Audio” button allows you to switch from the radio station drying mode to music recorded in the device’s memory or on external media;
- “Func” is responsible for accessing the function menu;
- The “Repeat” key, when pressed, replays the song that was played last in the queue;
- The volume button has the classic appearance of a rotating joystick; with its help, the playing track can be made quieter or louder by systematically rotating it down or up, respectively;
- The number keys “1”, “2”, “3”, “4”, “5”, “6” are responsible for switching radio frequencies - for each frequency, thanks to the large amount of internal memory of the device, there can be up to six radio stations, and among them Supported formats include both FM and AM. Using these buttons, switching occurs as quickly as possible, without the need to search and configure again;
Pioneer Mosfet 50wx4 is equipped with a built-in headset, so you can talk on your mobile phone even while driving, without holding it in your hands. In addition, all SMS/MMS notifications received on the phone when the “hand's free” mode is turned on are instantly duplicated on the radio screen, where they can also be opened and read.
Of course, there are connectors for all modern media. It is possible to connect headphones and enjoy the music alone - this will be useful when it is extremely important for the driver to concentrate on the road, and the front passenger prefers to ignore these worries.
The integrated tuner is responsible for searching for frequencies. The range can be selected by the user independently, through a manual search, or this process can be automated. In most countries of the world, the tuner works very well - it regularly picks up all existing radio stations that are available for listening. The exception is US frequencies.
Other nuances
Installation of the Pioneer Mosfet 50wx4 radio tape recorder occurs in accordance with all standards for connecting such devices; as a rule, it comes with instructions in which this process is described step by step. More details about the installation of this model can be found in the video:
All malfunctions, as a rule, can be resolved either by rebooting the radio, or by returning it to factory settings through several manipulations through the menu. It should be remembered that the settings must be partially or completely reset after disconnecting the entire electrical network of the car from the power source - i.e., after disconnecting the battery. To prevent breakdowns and malfunctions, you should prevent various liquids and mixtures from coming into contact with the surface of the radio, do not connect devices to it that have computer viruses that can disrupt normal operation, and use it as carefully and carefully as possible.
Setting the cutoff frequency
Now we begin to adjust the cutoff frequency. Tilt the joystick to the left and exit the fader to the main menu (Keep in mind that tilting the joystick to the left will always move you from the functional settings to the main settings). Start turning the joystick to find the front speaker filter adjustment. The menu for these settings looks like this: HIGH PASS FILTER. Then push down the joystick and HPF OFF will appear on the screen. This notification indicates that the filter is turned off, as a result of which all the sound power goes to the front speakers, which, of course, entails unnecessary distortion. Press the joystick again, and instead of HPF OFF, HPF 50 will appear (if this value was adjusted before, then the number may be different). The number 50 means that at the moment a signal with a frequency of at least 50 hertz will begin to arrive at the front speakers. This is the subwoofer frequency, and it is worth saying that only powerful speakers can cope with it. To exit the settings, use the BAND button, which is located in the lower left part of the panel. Now, by rotating the joystick and thus adjusting the volume, you can check the sound for distortion. If the setting was unsuccessful and you didn’t like the result, go back to the filter menu and, by rotating the joystick, change the number to the next indicator and check the sound again. Note that for speakers with a size of 13 cm, you can safely set the filter parameter to 100 – 125. And if you have 16 cm acoustics, then this value should correspond to 80. So, as a result of the adjustment, we got a magnificent, clear sound, but at the same time there was a feeling that something went wrong. And all because there are no low frequencies in this sound, which is completely natural at this stage of the setup. This problem is completely fixable - you just need to switch the rear speakers to subwoofer mode.
Speaker wheezing
Some drivers encountered a situation where the speakers began to wheeze. At the same time, this does not happen all the time, but only from time to time. Of course, the problem could be a faulty speaker. But, often the reason turns out to be unsuccessful configuration of the system itself. Therefore, troubleshooting should begin by viewing the settings. You are interested in the balance menu. Here you can evaluate how the sound is distributed between the speakers. Pay attention to the uniformity of its distribution. Most often, unbalanced low frequencies cause wheezing.
If everything is correct in the settings, then it makes sense to pay attention to the wire connections. There may be a bad connection somewhere. That is why the speaker wheezes. This may be indirectly indicated by the irregularity of wheezing. Especially if the speakers are in the doors. When you open the door, you move the wire, one time the contact may be normal, another time, not so much. The cause of wheezing may be a broken capacitor.
. In this case, you need to check it.
Subwoofer doesn't work
In standard installed stereo systems with a Pioneer head unit, the sound from the subwoofer sometimes disappears. The problem is an unsuccessful output to the low-frequency speaker. The problem is treated in 2 ways. If the radio is new and under warranty, you can try to exchange it. But this does not always happen; more often it is repaired and returned.
Another option is to re-solder the output yourself. Perhaps the second option is the most optimal. Self-made repairs are much more reliable than warranty repairs. Moreover, no difficulties should arise there.
Conclusion
. Acoustics in a car often require quite a lot of attention. It needs to be configured correctly, this will allow you to make the most of its technical characteristics. How to turn off a Pioneer radio is a question often asked by owners of such equipment. In fact, this is done so simply that the manufacturers didn’t even mention it in the instructions.
Some radio models have an inscription on the front panel - MOSFET 50Wx4. This means that the model’s amplifier is assembled using transistors using MOSFET technology, and this guarantees sound quality. This inscription is also used on Pioneer car radios. Let's look at the Pioneer MOSFET 50Wx4 radio and setup instructions.